Azure Automation: Scale-Down VM Size
Introduction
The Azure cloud offers a lot of services to make our daily work easier. In this post, we will read about an ordinary reflection for IT/DevOps departments, and to build our solution we use Logic Apps and Automation Account services.
Case
The main case is to automatically scale-down the VM size in a case an employee deployed a costly VM instance.
Prerequisites
- A valid Azure Subscription
- Register at the subscription the Resource Provider "Microsoft.EventGrid"
The Deployments
For the demo purposes, we will deploy Azure Logic Apps and an Azure Automation Account.
To begin with, from the left-hand sidebar, click All Services, type Automation in the search box and select Automation Accounts.
Select +Add or Create automation account, to begin
On the Add Automation Account form, type a unique Name for the automation account, select a valid subscription and a Resource group, the location should be the same where the resource group created and then click Create.
Create the Run book
The Automation account has been created, and the next step is to create the Runbook. To do this from the left-hand side bar we select Process Automation - Runbooks - + Create a runbook.
param
(
    [Parameter(Mandatory = $true)]
    [string]$ResourceGroupName
)
$connectionName = "AzureRunAsConnection"
try
{
    # Get the connection "AzureRunAsConnection "
    $servicePrincipalConnection=Get-AutomationConnection -Name $connectionName
    "Logging in to Azure..."
   Connect-AzAccount `
        -ServicePrincipal `
        -TenantId $servicePrincipalConnection.TenantId `
        -ApplicationId $servicePrincipalConnection.ApplicationId `
        -CertificateThumbprint $servicePrincipalConnection.CertificateThumbprint
}
catch {
    if (!$servicePrincipalConnection)
    {
        $ErrorMessage = "Connection $connectionName not found."
        throw $ErrorMessage
    } else{
        Write-Error -Message $_.Exception
        throw $_.Exception
    }
}
# Get Virtual Machine Name and Size To Proceed With The Checks
#$ResourceGroupName = "AzureAutomationRG"
$VMName = (Get-AzVM -ResourceGroupName $ResourceGroupName).Name
$VMSize = (Get-AzVM -ResourceGroupName $ResourceGroupName).HardwareProfile
# If the size of the VM is not Standard_F4s,then resize the size to Standard_F4s.
if ($VMSize -eq "Standard_F4s"){
write-host "VM is allready a Standard_F4s"}
else {
$vm = Get-AzVM -ResourceGroupName $ResourceGroupName -VMName $VMName
$vm.HardwareProfile.VmSize = "Standard_F4s"
Update-AzVM -VM $vm -ResourceGroupName $ResourceGroupName
write-host The Virtual Machine $vm has been resized to "Standard_F4s"
}
Create A Blank Logic App
From the left-hand main blade select **Create a resource, **search for Logic App and then click Create.
Next, type the useful information (Subscription, Resource Group, Logic App name, Location) about the Logic App and then type Review + Create
After the Logic App deployment finish, we start to build the flow on the Logic App designer.
Add the Event Grid Trigger
To begin with, select to create a Blank Logic App.
In the search box type "Event Grid" and select the trigger "When a resource event occurs" to start the logic app flow building.
First, we signed in the trigger with Azure credentials, and provide all the necessary fields as the image below shows.
At the next actions, we will initialize four different variables (Subject, Virtual Machine Name, Resource Group, Resource).
Repeat the step above also for the other three variables.
After we added actions to initialize the variables we add a Parse JSON action
{
    "items": {
        "properties": {
            "data": {
                "properties": {
                    "authorization": {
                        "properties": {
                            "action": {
                                "type": "string"
                            },
                            "evidence": {
                                "properties": {
                                    "role": {
                                        "type": "string"
                                    }
                                },
                                "type": "object"
                            },
                            "scope": {
                                "type": "string"
                            }
                        },
                        "type": "object"
                    },
                    "claims": {
                        "properties": {
                            "aio": {
                                "type": "string"
                            },
                            "appid": {
                                "type": "string"
                            },
                            "appidacr": {
                                "type": "string"
                            },
                            "aud": {
                                "type": "string"
                            },
                            "exp": {
                                "type": "string"
                            },
                            "groups": {
                                "type": "string"
                            },
                            "http://schemas.microsoft.com/claims/authnclassreference": {
                                "type": "string"
                            },
                            "http://schemas.microsoft.com/claims/authnmethodsreferences": {
                                "type": "string"
                            },
                            "http://schemas.microsoft.com/identity/claims/objectidentifier": {
                                "type": "string"
                            },
                            "http://schemas.microsoft.com/identity/claims/scope": {
                                "type": "string"
                            },
                            "http://schemas.microsoft.com/identity/claims/tenantid": {
                                "type": "string"
                            },
                            "http://schemas.xmlsoap.org/ws/2005/05/identity/claims/givenname": {
                                "type": "string"
                            },
                            "http://schemas.xmlsoap.org/ws/2005/05/identity/claims/name": {
                                "type": "string"
                            },
                            "http://schemas.xmlsoap.org/ws/2005/05/identity/claims/nameidentifier": {
                                "type": "string"
                            },
                            "http://schemas.xmlsoap.org/ws/2005/05/identity/claims/surname": {
                                "type": "string"
                            },
                            "http://schemas.xmlsoap.org/ws/2005/05/identity/claims/upn": {
                                "type": "string"
                            },
                            "iat": {
                                "type": "string"
                            },
                            "ipaddr": {
                                "type": "string"
                            },
                            "iss": {
                                "type": "string"
                            },
                            "name": {
                                "type": "string"
                            },
                            "nbf": {
                                "type": "string"
                            },
                            "puid": {
                                "type": "string"
                            },
                            "rh": {
                                "type": "string"
                            },
                            "uti": {
                                "type": "string"
                            },
                            "ver": {
                                "type": "string"
                            },
                            "wids": {
                                "type": "string"
                            }
                        },
                        "type": "object"
                    },
                    "correlationId": {
                        "type": "string"
                    },
                    "operationName": {
                        "type": "string"
                    },
                    "resourceProvider": {
                        "type": "string"
                    },
                    "resourceUri": {
                        "type": "string"
                    },
                    "status": {
                        "type": "string"
                    },
                    "subscriptionId": {
                        "type": "string"
                    },
                    "tenantId": {
                        "type": "string"
                    }
                },
                "type": "object"
            },
            "dataVersion": {
                "type": "string"
            },
            "eventTime": {
                "type": "string"
            },
            "eventType": {
                "type": "string"
            },
            "id": {
                "type": "string"
            },
            "metadataVersion": {
                "type": "string"
            },
            "subject": {
                "type": "string"
            },
            "topic": {
                "type": "string"
            }
        },
        "required": [
            "subject",
            "eventType",
            "id",
            "data",
            "dataVersion",
            "metadataVersion",
            "eventTime",
            "topic"
        ],
        "type": "object"
    },
    "type": "array"
}
Add a For each Action with variables
The next action in the flow is to add a "For each" action and within it to add the next actions. Specifically the first action we add into the "For each" is the "Set variable" action
Add a Compose Action
Add a compose action to separate the string to separate values.
Subject Variable Value: /subscriptions/#######-####-####-####-###########/resourceGroups/DemoScaleDownVmRG/providers/Microsoft.Compute/virtualMachines/demovm
To achieve this, we need to write a simple expression using the split function, as the image below shows.
split(variables('Subject'),'/')
The result after the Logic App run would be the below
[
  "",
  "subscriptions",
  "#######-####-####-####-###########",
  "resourceGroups",
  "DemoScaleDownVmRG",
  "providers",
  "Microsoft.Compute",
  "virtualMachines",
  "demovm"
]
Now that successful split into several parts can proceed with the rest variables.
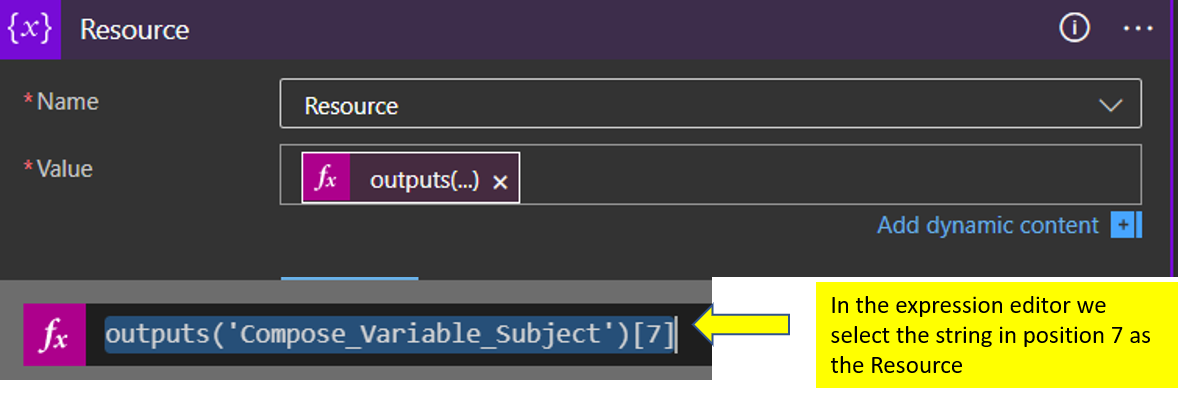
For the "Resource" variable we type the expression,
outputs('Compose_Variable_Subject')[7]
to get the "Virtual Machine Name" type the expression,
outputs('Compose_Variable_Subject')[8]

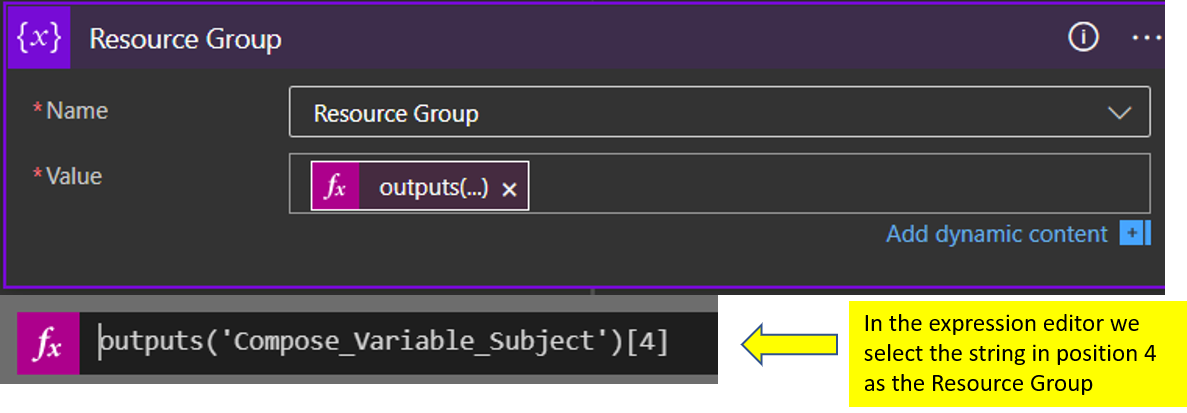
and final, the last variable "Resource Group" type,
outputs('Compose_Variable_Subject')[4]
Add A Switch Action
From the action list select to add a Switch
Add an Automation Account Create job action
Last but not least step we add the automation account "Create job" action, this would execute the job with the PowerShell script we created in the Automation Account step.
In the end, the deployment should be like the one in the image below.
Test the Logic App Workflow
The video file below shows how the workflow works. We have deployed a new Azure VM with "Standard_D16as_v4" size, and after the workflow successful run the size of the virtual machines changed to "Standard_F4s".
See Also
- Tutorial: Monitor virtual machine changes by using Azure Event Grid and Logic Apps
- Azure Logic Apps : Getting Started.
- Azure Logic Apps: How To Send Tweets In Your Email Address Using Service Bus
- Quickstart: Route custom events to web endpoint with Azure CLI and Event Grid
- Reference guide to using functions in expressions for Azure Logic Apps and Power Automate
- Perform data operations in Azure Logic Apps
- Create an Azure Automation account
- Automation account authentication overview
- Runbook execution in Azure Automation


