Database Portability feature in Exchange Server 2013 & 2016
Database Portability is a feature in Exchange Server 2013 and Exchange Server 2016 where a mailbox database can be moved or mounted on another Exchange Server. Apart from improving the reliability of the server, it reduces the recovery process in various failure scenarios with the normal recovery methods.
It is to be noted that when preparing the other Exchange Server, the operating system must be the same and of the same build or service pack. The Exchange Server must be of the same version and updates also be the same. For instance, if your main Exchange Server 2013 is running on a Windows Server 2012 R2, you cannot use database portability to an Exchange Server 2016 running Windows Server 2016.
Prerequisites
To perform the recovery, you must have the below prerequisites instated in the environment.
You need to be assigned with the right permissions. You need to have the Mailbox Recovery role. To assign this role, follow these steps:
• Open the Exchange Admin Center (EAC), click on Permissions, and click on Admin Roles.
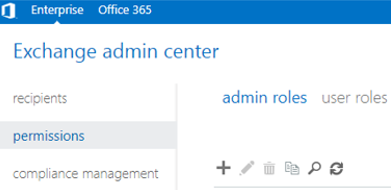
• Find the Organization Management Role and click on the edit button.

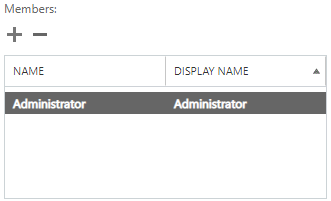
• Find the section members and add the user who will be performing this operation.
Note: During this operation, you will not be able to move the user’s mailboxes to a recovered or dial tone database by using the Exchange Admin Center (EAC) as all the operations must be performed using the Exchange Management Shell (EMS).
Move Mailboxes using Database Portability via PowerShell
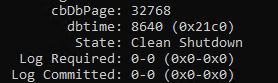
You need to first ensure that the database recovered is in good health and in Clean Shutdown state. This can be done by using the ESEUtil command with the /mh switch.
Eseutil /mh <location and file of edb>
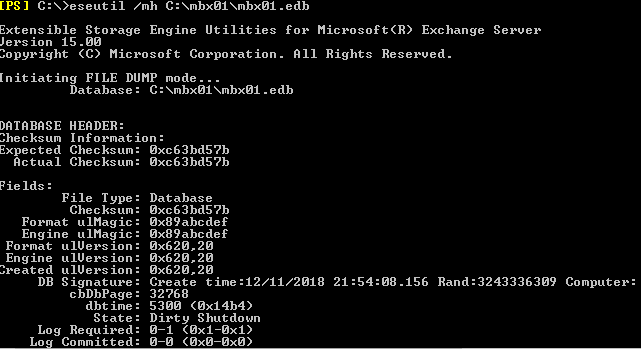
If the database state is in Clean Shutdown, you can move ahead to other steps. If the database is in Dirty Shutdown, you need to run a repair process. You can perform the process by using ESEUtil with the /R switch.
Eseutil /r e00 /l "<Path to logs>" /d "<Path to database>"
**
**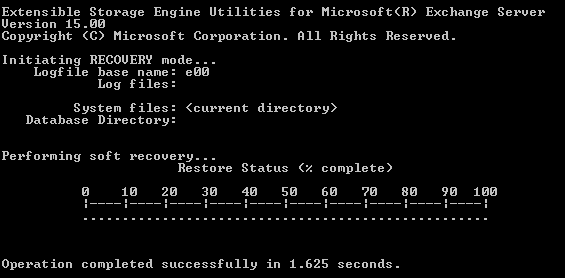
The process may take some time, depending on the size of the database. When this is complete, you can re-run the /mh command to check the status. It should be showing the database state as Clean Shutdown.
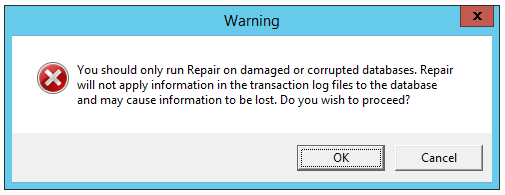
However, if this fails, you need to run the Hard Recovery process to try to get the database in Clean Shutdown state by using the /p switch.
Caution: This recovery process will purge any data that is deemed as corrupted. There is no guarantee that after the process is complete, your database will be in a clean state.
Eseutil /P "<full path to the EDB file>"
**
**
Once the database is in clean state, you can create the database on the server by using the PowerShell cmdlet - New-MailboxDatabase (as given below).
New-MailboxDatabase -Name <DatabaseName> -Server <ServerName> -EdbFilePath <DatabaseFileNameandPath> -LogFolderPath <LogFilesPath>

The next step is to set the database so that it can be overwritten by a restore. For this, use the AllowFileRestore switch as given below:
Set-MailboxDatabase <DatabaseName> -AllowFileRestore $true

Now, you need to move the original database files (.edb file, log files, and Exchange Search catalog) to the database folder you’ve specified when you created the new database.
After this is complete, you need to mount the database by using the Mount-Database cmdlet.
Mount-Database <DatabaseName>

After the database is mounted, you need to modify the user account settings so that the user accounts point to the new mailbox database on the new server. So, to move the users from the old database to the new database, use the Set-MailboxDatabase cmdlet.
Get-Mailbox -Database <SourceDatabase> |where {$_.ObjectClass -NotMatch '(SystemAttendantMailbox|ExOleDbSystemMailbox)'}| Set-Mailbox -Database <TargetDatabase>

This will point all the users to the new database. If there are any pending messages in the queues, run the following command.
Get-Queue | Retry-Queue -Resubmit $true

This command will go through all the queues and retries all the messages. If you want to run them by queue, you can use the Get-Queue with the queue name. To get the queues on the server, simply run the Get-Queue command.
Once this is done and the Active Directory replication is complete, the users will start using their mailboxes in the new databases under the new server with no manual intervention.
Conclusion
For the above process to work, the database must be healthy and both Exchange Servers are same and working. On the other hand, the process is time-consuming and requires a good amount of administrative efforts.