Migration from Exchange Server 2010 to 2016 | existing Office 365 Hybrid Environment
Overview - Co-existence of Exchange Server 2016 with 2010
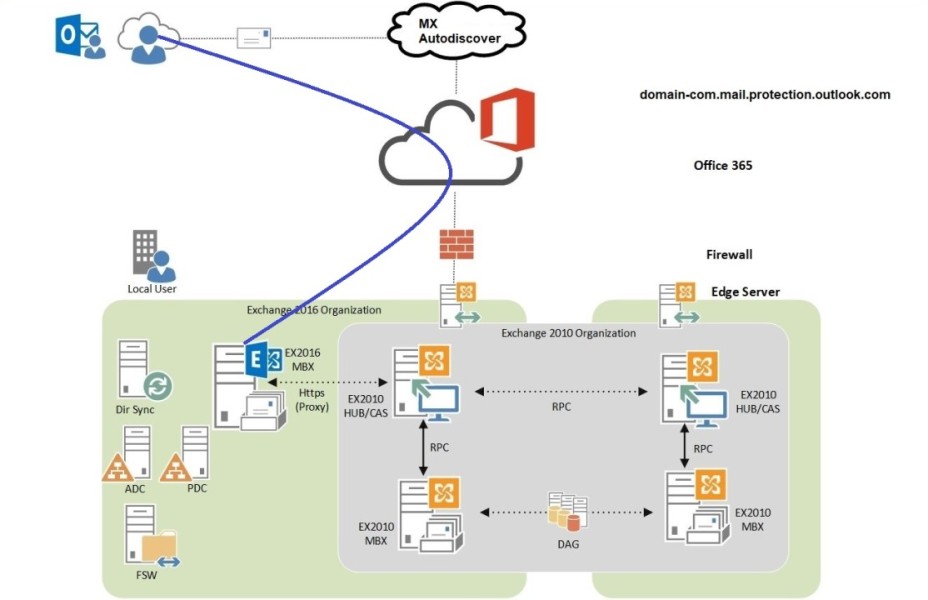
The following illustration shows the existing Exchange Organization where Exchange Server 2016 will co-exist with 2010 that's already configured with Office 365 as hybrid environment, the Exchange Server 2016 acts as proxy and redirect requests/queries to Exchange Server 2010, this behaviour is by design.
Important: When you introduce Exchange 2016 into a native Exchange 2010 environment, MAPI/HTTP will be enabled by default. Prior to moving any mailboxes to Exchange 2016, ensure you have configured your load balancer and/or firewall rules to allow traffic on /mapi/* via TCP 443
Step 1: Installation & Configuration of Exchange Server 2016
Installation of Prerequisites:
Run the following command in Windows PowerShell to install the required Windows components:
Install-WindowsFeature NET-Framework-45-Features, Server-Media-Foundation, RPC-over-HTTP-proxy, RSAT-Clustering, RSAT-Clustering-CmdInterface, RSAT-Clustering-Mgmt, RSAT-Clustering-PowerShell, WAS-Process-Model, Web-Asp-Net45, Web-Basic-Auth, Web-Client-Auth, Web-Digest-Auth, Web-Dir-Browsing, Web-Dyn-Compression, Web-Http-Errors, Web-Http-Logging, Web-Http-Redirect, Web-Http-Tracing, Web-ISAPI-Ext, Web-ISAPI-Filter, Web-Lgcy-Mgmt-Console, Web-Metabase, Web-Mgmt-Console, Web-Mgmt-Service, Web-Net-Ext45, Web-Request-Monitor, Web-Server, Web-Stat-Compression, Web-Static-Content, Web-Windows-Auth, Web-WMI, Windows-Identity-Foundation, RSAT-ADD
- Installation of .NET Framework 4.8
- Installation of Visual C++ 2012 and 2013
- Installation of UCMA Runtime 4.0
Unified Communications Managed API (UCMA) 4.0 is a managed-code platform that developers use to build applications that provide access to and control over Microsoft Enhanced Presence information, instant messaging, telephone and video calls, and audio/video conferencing
- Prepare Active Directory and domains for Exchange Server 2016
First you need to verify if your user account has appropriate permission, Schema Admin, Enterprise Admin
Here is the tricky part !
We all know whenever new version of Exchange Server is being upgraded or deployed the Active Directory Schema need to be updated. In the above mentioned Scenario the Exchange Server 2010 is already configured with Office 365.
How we can update or extend Active Directory Schema ?
Connecting Powershell to Exchange Online and getting TenantOrganizationConfig.xml file. See the following link.
Connect to Exchange Online PowerShell
Once you retrieved .XML configuration file then proceed to the following;
Get-OrganizationConfig | Export-Clixml -Path "C:\MyTenantOrganizationConfig.XML"
Setup.exe /PrepareAD /TenantOrganizationConfig C:\OrganizationConfig.XML /IAcceptExchangeServerLicenseTerms
Verify Active Directory Schema by rangeUpper value in schema configuration.

Refresh Directory Schema – AD Connect
This option is used if you have changed the schema in one of your on-premises AD DS forests. For example, you might have installed Exchange or upgraded to a Windows Server 2012 schema with device objects. In this case, you need to instruct Azure AD Connect to read the schema again from AD DS and update its cache. This action also regenerates the Sync Rules. If you add the Exchange schema, as an example, the Sync Rules for Exchange are added to the configuration.
When you select this option, all the directories in your configuration are listed. You can keep the default setting and refresh all forests or un-select some of them.
https://media-exp1.licdn.com/dms/image/C4E12AQGSD_VNhhxA-w/article-inline_image-shrink_1000_1488/0/1622915875677?e=1635379200&v=beta&t=cy3IKTtk2BH5C1uo3N5b2bjpPXzGhgdPiL__k-uMV7E
Open up Azure AD Connect Wizard and proceed to Refresh Directory Schema.
https://media-exp1.licdn.com/dms/image/C4E12AQGez2yHLnpVuA/article-inline_image-shrink_1000_1488/0/1622982029279?e=1635379200&v=beta&t=VeqK4-h6953OptgjjL9bMbXg0a-6RuEz0BrxCgI2YN0
Finally, It's time to introducing Exchange Server 2016 in existing Organization.
Run Setup.exe to start Installation of Exchange Server 2016. Follow the Wizard to Complete the Installation.
https://media-exp1.licdn.com/dms/image/C4E12AQGduV2pIE6K7A/article-inline_image-shrink_1000_1488/0/1622916214228?e=1635379200&v=beta&t=Be0MIFhCPP_SwqSJA9OZ_SOP-i7NZplbJszQrlk19Mk
After successful installation of Exchange Server 2016 you have to configure the followings;
Configuring Internal & External Virtual Directories, Autodiscover Internal URL using PowerShell, Exporting SSL Certificate to Exchange Server 2016, Configuring DNS for Exchange Server 2016, Configuring Outlook Anywhere, IMAP/POP, Application Relay Connector (Optional).
Finally ! Re-Configuring HCW (Hybrid Configuration Wizard)
This is the final step you have to do after installation & configuration of Exchange Server 2016.
Now you can decommission existing Exchange Server 2010 Organization.
Happy Email Messaging :)