Azure Cloud Services for Raspberry Pi 4: How to send telemetry to Azure Storage Table
Introduction
Microsoft Azure provides a variety of cloud computing services including artificial intelligence, machine learning, IoT, storage, security, networking, media, integration and so on. Among tens of thousands of IoT end devices, Raspberry Pi is one of the most popular and useful platforms that used in many areas because of its low cost, modularity, and open design. Raspberry Pi 4 is the latest powerful model with Quad core Cortex-A72 64-bit processor, 2 HDMI ports, 40 pin GPIO header and hardware video decode capability. Azure Table storage stores large amounts of structured data. Azure tables are ideal for storing structured, non-relational data, for example, data generated by the sensor telemetry system.
In this article, we will walk you through the steps required to send real time sensor data to Azure Storage Table on Raspberry Pi 4 model B with Azure Tables client library for Python.
Prerequisites
- Raspberry Pi 4 model B
- Azure Tables client library for Python
- DHT11 Temperature & Humidity sensor, PIR sensor
Hardware Connection
Here we use BCM Pin 17 as the communication channel between Raspberry Pi and DHT 11. And BCM Pin 4 is configured as the data input from PIR sensor to Raspberry Pi. The hardware scheme is the same as we presented here “Azure Cloud Services for Raspberry Pi 4: How to send sensor data to Azure IoT Hub”.
Install Azure Tables client library
Open your Raspberry Pi terminal and install Azure Tables client library for Python:
pip3 install azure-data-tables
Create an Azure Storage Account
We can create an Azure Storage Account using the Azure Portal. Please refer to the “Create a storage account” section on this page: Create a storage account. Then, in order to send the files to Azure Storage, we should get the connection string. The “View account access keys” section is available on this page Manage storage account access keys to help you with this. This connection string will be used by Python code to communicate with the Azure Storage.
Create and Debug Python Code on Raspberry Pi
Currently, there are several Python IDE on Raspberry Pi. Thonny Python IDE is bundled with the Raspbian OS. We can launch it by click Programming -> Thonny Python IDE. Then copy and paste the following code.
01.import asyncio
02.import time
03.import board
04.import RPi.GPIO as GPIO
05.import dht11
06.from datetime import datetime
07.from uuid import uuid4
08.from azure.data.tables import TableServiceClient
09.from azure.data.tables import UpdateMode
10.
11.#Azure Storage Connection String
12.Storage_CONNECTION_STRING =  "DefaultEndpointsProtocol=https;AccountName=***;AccountKey=***;EndpointSuffix=core.windows.net"
13.#Delay time, in seconds
14.DELAY =  5
15.
16.async def  main():
17.
18.    try:
19.        # Create instance of the storage client and table client
20.        table_service_client =  TableServiceClient.from_connection_string(Storage_CONNECTION_STRING)
21.        table_name =  "myTable"
22.        table_client =  table_service_client.create_table_if_not_exists(table_name)
23.        # Initialize GPIO
24.        GPIO.setwarnings(False)
25.        GPIO.setmode(GPIO.BCM)
26.        GPIO.cleanup()
27.
28.        # Read data using pin GPIO17
29.        dhtDevice =  dht11.DHT11(pin=17)
30.        # PIR
31.        GPIO.setup(4, GPIO.IN)
32.
33.        print("Sending serivce started. Press Ctrl-C to exit")
34.        while True:
35.
36.            try:
37.                #DHT11
38.                result =  dhtDevice.read()
39.                #PIR
40.                if GPIO.input(4):
41.                    pir =  1
42.                else:
43.                    pir =  0
44.
45.                if result.is_valid():
46.                    temperature =  result.temperature
47.                    humidity =  result.humidity
48.
49.                    my_entity =  {
50.                            u"PartitionKey": u"Raspberry Pi 4",
51.                            u"RowKey": uuid4(),
52.                            "temperature": temperature,
53.                            "humidity": humidity,
54.                            "PIR": pir,
55.                            "last_updated": datetime.today()
56.                        }
57.
58.                    # START insert entity
59.                    insert_entity =  table_client.upsert_entity(my_entity)
60.                    print("Inserted entity: {}".format(insert_entity))
61.
62.                else:
63.                    # print("Error: %d" % result.error_code)
64.                    continue
65.
66.                await asyncio.sleep(DELAY)
67.
68.            except KeyboardInterrupt:
69.                print("Service stopped")
70.                GPIO.cleanup()
71.                break
72.
73.    except Exception as error:
74.        print(error.args[0])
75.
76.if __name__ == '__main__':
77.    asyncio.run(main())
Please do substitute the connection string with yours that created in section “Create an Azure Storage Account”. Furthermore, note that a RowKey in Table Storage is your “primary key” within a partition. PartitionKey + RowKey form the composite unique identifier for an entity. If you leave the values of PartitionKey and RowKey unchanged, then the upsert_entity method will only update the entity, not insert a new one.
Press Run or Debug button to start the process. You will see the output in Shell window as shown in Fig. 1.

Fig. 1 Debug information on Shell window
The sensor data will be collected and transmitted to Azure Storage Table every 5 seconds.
Monitor the Blob Storage with Azure Storage Explorer
Install and run Azure Storage Explorer, choose the Tables that you created. And then click Reflash. We will see the temperature, humidity and PIR data as soon as the Python application send out. It is shown in Fig. 2.
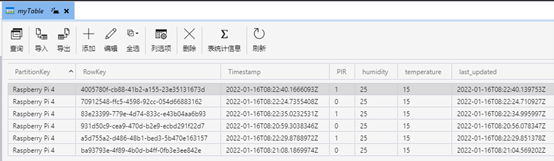
Fig. 2 Telemetry data displayed on Azure IoT Explorer
Visualize the data with Excel
We can export the Table storage as csv file to local computer. And it is quite convenient to draw a line chart according to the sensor data, which is shown in Fig. 3 as follows.

Fig. 3 Draw a line chart according to the sensor data
Summary
In this tutorial, we have presented how to collect senor data and send them to Azure Table Storage by Azure Tables client library for Python.
Resources
- MS Docs for Azure Table storage.
- MS Docs for Create a storage account.
- MS Docs for Manage storage account access keys.
See Also
1. Azure Cloud Services for Raspberry Pi 4: How to send sensor data to Azure IoT Hub
2. Azure Cloud Services for Raspberry Pi 4: How to capture and send image to Azure Blob Storage