Azure Cloud Services for Raspberry Pi 4: How to detect faces with Azure Computer Vision Services
Introduction
Microsoft Azure provides a variety of cloud computing services including artificial intelligence, machine learning, IoT, storage, security, networking, media, integration and so on. Among tens of thousands of IoT end devices, Raspberry Pi is one of the most popular and useful platforms that used in many areas because of its low cost, modularity, and open design. Raspberry Pi 4 is the latest powerful model with Quad core Cortex-A72 64-bit processor, 2 HDMI ports, 40 pin GPIO header and hardware video decode capability. Azure Computer Vision provide advanced algorithms that process images and return information based on the visual features you're interested in. Optical Character Recognition (OCR), Image Analysis and Spatial Analysis are three typical services that commonly used. Additionally, Azure Computer Vision provides capabilities to detect human faces within an image and give out rectangle coordinates for each detected face.
In this article, we will walk you through the steps required to send real time captured image to Azure Computer Vision on Raspberry Pi 4 model B with Azure Cognitive Services Computer Vision SDK for Python. Furthermore, we will mark the identified target with red rectangle and send the marked image to Azure Blob Storage. With Python Azure IoT SDK, we can also send the number of the identified faces to Azure IoT Hub.
Prerequisites
1. Raspberry Pi 4 model B
2. Azure Cognitive Services Computer Vision SDK for Python
3. Azure IoT Device SDK for Python
4. Azure Storage Blobs client library for Python
5. USB Web Camera or CSI Camera
Hardware Connection
In this project, we use Microsoft LifeCam HD-3000 USB web camera. This true HD camera features 720p HD video chat for a true HD-quality experience and TrueColor technology that automatically delivers a bright and colorful video.
Install Necessary Libraries
Open your Raspberry Pi terminal and install the following Libraries:
1.pip3 install azure-cognitiveservices-vision-computervision
2.pip3 install azure-iot-device
3.pip3 install asyncio
4.pip3 install azure-storage-blob
Create Necessary Services on Azure
In this project, we will use Azure Copmuter Vision, Azure IoTHub, as well as Azure Storage services. Please refer to the section “Create an Azure IoTHub and Register a New Device” in this wiki article “Azure Cloud Services for Raspberry Pi 4: How to send sensor data to Azure IoT Hub” to create services for Azure IoTHub. And the “Create an Azure Storage Account” section in this wiki article “Azure Cloud Services for Raspberry Pi 4: How to capture and send image to Azure Blob Storage” will guide you to create Azure Storage service. For Azure Computer Vision, this official docs “Quickstart: Create a Cognitive Services resource using the Azure portal” is a good start to create your own computer vision services. You will need the key and endpoint from the resource you create to connect your application to the Computer Vision service. The free pricing tier (F0) is enough for you to try the service.
Create and Debug Python Code on Raspberry Pi
Currently, there are several Python IDE on Raspberry Pi. Thonny Python IDE is bundled with the Raspbian OS. We can launch it by click Programming -> Thonny Python IDE. Then copy and paste the following code.
001.import cv2
002.from azure.cognitiveservices.vision.computervision  import  ComputerVisionClient
003.from azure.cognitiveservices.vision.computervision.models  import  OperationStatusCodes
004.from azure.cognitiveservices.vision.computervision.models  import  VisualFeatureTypes
005.from msrest.authentication import CognitiveServicesCredentials
006.from azure.storage.blob import ContentSettings, BlobClient
007.from azure.iot.device import Message
008.from azure.iot.device.aio import IoTHubDeviceClient
009.
010.import RPi.GPIO as GPIO
011.import asyncio
012.
013.#Computer Vision
014.subscription_key =  "Your Key"
015.endpoint =  "https://***.cognitiveservices.azure.com/"
016.computervision_client =  ComputerVisionClient(endpoint, CognitiveServicesCredentials(subscription_key))
017.#Bolb Storage
018.conn_str="DefaultEndpointsProtocol=https;AccountName=***;AccountKey=***;BlobEndpoint=https://***.blob.core.windows.net/;QueueEndpoint=https://***.queue.core.windows.net/;TableEndpoint=https://***.table.core.windows.net/;FileEndpoint=https://myiotservicestorage.file.core.windows.net/;"
019.container_name="raspberrypic"
020.blob_name="face_detect"
021.blob_client =  BlobClient.from_connection_string(conn_str, container_name, blob_name)
022.
023.# Azure IotHub
024.CONNECTION_STRING =  "HostName=***.azure-devices.net;DeviceId=***;SharedAccessKey=***"
025.# Create instance of the device client
026.iothub_client =  IoTHubDeviceClient.create_from_connection_string(CONNECTION_STRING)
027.PAYLOAD =  '{{"No. of faces": {face_num}}}'
028.
029.# Set the size of the image (in pixels)
030.img_width =  1280
031.img_height =  720
032.
033.camera =  cv2.VideoCapture(1)
034.camera.set(cv2.CAP_PROP_FRAME_WIDTH, img_width)
035.camera.set(cv2.CAP_PROP_FRAME_HEIGHT, img_height)
036.
037.# Select color for the bounding box
038.color =  (0,255,0)
039.# Delay 5 second
040.DELAY =  5
041.
042.async def  main():
043.    # Initialize GPIO
044.    GPIO.setwarnings(False)
045.    GPIO.setmode(GPIO.BCM)
046.    GPIO.cleanup()
047.    GPIO.setup(4, GPIO.IN) #PIR
048.    print("Detection started. Press Ctrl-C to exit")
049.    while True:
050.        if GPIO.input(4): #motion detected
051.            try:
052.                ret, image =  camera.read()
053.                cv2.imwrite('capture.jpg', image)
054.                # Open local image file
055.                local_image =  open("capture.jpg", "rb")
056.                print("===== Detect Faces - camera =====")
057.                # Select visual features(s) you want
058.                local_image_features =  ["faces"]
059.                # Call API with local image and features
060.                detect_faces_results_local =  computervision_client.analyze_image_in_stream(local_image, local_image_features)
061.
062.                #data formating
063.                data =  PAYLOAD.format(face_num=len(detect_faces_results_local.faces))
064.                message =  Message(data)
065.                # Send a message to the IoT hub
066.                print(f"Sending message to Azure IoTHub: {message}")
067.                await iothub_client.send_message(message)
068.                print("Message successfully sent")
069.
070.                # Print results with confidence score
071.                print("Faces in the local image: ")
072.                if (len(detect_faces_results_local.faces) == 0):
073.                    print("No faces detected.")
074.                else:
075.                    for face in detect_faces_results_local.faces:
076.                        left =  face.face_rectangle.left
077.                        top =  face.face_rectangle.top
078.                        right =  face.face_rectangle.left + face.face_rectangle.width
079.                        bottom =  face.face_rectangle.top + face.face_rectangle.height
080.                        print("'{}' of age {} at location {}, {}, {}, {}".format(face.gender, face.age, \
081.                        face.face_rectangle.left, face.face_rectangle.top, \
082.                        face.face_rectangle.left +  face.face_rectangle.width, \
083.                        face.face_rectangle.top +  face.face_rectangle.height))
084.                        result_image =  cv2.rectangle(image,(left,top),(right,bottom),color,3)
085.                        cv2.putText(result_image, f"{face.gender},{face.age}", (int(left), int(top)-10), fontFace =  cv2.FONT_HERSHEY_SIMPLEX, fontScale = 0.7, color  =  color, thickness =  2)
086.                        cv2.imwrite('result.jpg', result_image)
087.                    # show local image file
088.                    img =  cv2.imread('result.jpg')
089.                    cv2.imshow('result',img)
090.                    if cv2.waitKey(1000) & 0xFF  ==  ord('q'):
091.                        cv2.destroyAllWindows()
092.                        break
093.                    await asyncio.sleep(DELAY)
094.            except KeyboardInterrupt:
095.                print("Detection stopped")
096.                GPIO.cleanup()
097.                camera.release()
098.                break
099.if __name__ == '__main__':
100.asyncio.run(main())
Please do substitute the connection string with yours that created in section “Create Necessary Services on Azure”.
Press Run or Debug button to start the process. We use PIR sensor to launch the image taking process. Once the face detection operation is finished, the program will be delayed 5 seconds to prevent frequently calling the Computer Vision API. If any face is detected in the real time captured image, you will see the output in Shell window as shown in Fig. 1.

Fig. 1 Debug information on Shell window
The real time image will be captured by Open CV and it is transmitted to Azure Computer Vision service to detect the faces. Once the results are returned, the application will iterate through the results to find the faces. The number of the identified faces will be reported to Azure IoT Hub. Additionally, the identified faces will be marked with red rectangle and transmitted to Azure Blob Storage.
It’s worthy to note that the resolution of the real time captured image is 1280x720 here. You should adjust this parameter according to your web camera.
If there exists a face in the real time captured image, you will see the face with the green rectangle on the screen as follows. What’s more, the gender and the age will also be shown on the image.
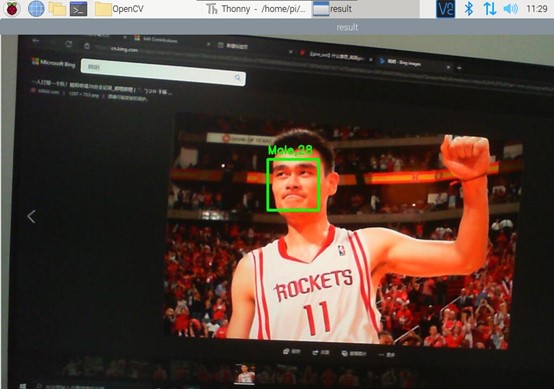
Fig. 2 The detected face on the image
Then, by closing the picture, the application will continue to send message to Azure IoTHub (show in Fig. 3) and upload the marked image to Azure Blob Storage.

Fig. 3 Message received by Azure IoTHub
Summary
In this tutorial, we have presented how to send real time captured image to Azure Copmuter Vision, mark the identified faces with green rectangle according to the returned results, send the marked image to Azure Blob Storage and send the number of the faces to Azure IoTHub.
Resources
1. MS Docs for Azure Table storage.
2. MS Docs for Create a storage account.
3. MS Docs for Manage storage account access keys.
4. MS Docs for Azure Computer Vision.
See Also
1. Azure Cloud Services for Raspberry Pi 4: How to send sensor data to Azure IoT Hub
2. Azure Cloud Services for Raspberry Pi 4: How to capture and send image to Azure Blob Storage
3. Azure Cloud Services for Raspberry Pi 4: How to send telemetry to Azure Storage Table
4.
Azure Cloud Services for Raspberry Pi 4: How to interact with Azure Custom Vision