Azure Cloud Services for Raspberry Pi 4: How to implement OCR with Azure Computer Vision Services
Introduction
Microsoft Azure provides a variety of cloud computing services including artificial intelligence, machine learning, IoT, storage, security, networking, media, integration and so on. Among tens of thousands of IoT end devices, Raspberry Pi is one of the most popular and useful platforms that used in many areas because of its low cost, modularity, and open design. Raspberry Pi 4 is the latest powerful model with Quad core Cortex-A72 64-bit processor, 2 HDMI ports, 40 pin GPIO header and hardware video decode capability. Optical character recognition (OCR) allows you to extract printed or handwritten text from images, such as photos of street signs and products, as well as from documents—invoices, bills, financial reports, articles, and more. Microsoft's OCR technologies support extracting printed text in several languages, including 7 languages for handwritten text and 122 languages for print text.
In this article, we will walk you through the steps required to send real time captured image to Azure Computer Vision on Raspberry Pi 4 model B with Azure Cognitive Services Computer Vision SDK for Python for optical character recognition. Furthermore, we will mark the identified texts with green rectangle.
Prerequisites
1. Raspberry Pi 4 model B
2. Azure Cognitive Services Computer Vision SDK for Python
3. USB Web Camera or CSI Camera
Hardware Connection
In this project, we use Microsoft LifeCam HD-3000 USB web camera. This true HD camera features 720p HD video chat for a true HD-quality experience and TrueColor technology that automatically delivers a bright and colorful video.
Install Necessary Libraries
Open your Raspberry Pi terminal and install the following Libraries:
1.pip3 install azure-cognitiveservices-vision-computervision
2.pip3 install asyncio
Create Computer Vision Service on Azure
In this project, we will use Azure Computer Vision services. OCR is one important service in Azure Computer Vision. For Azure Computer Vision, this official docs “Quickstart: Create a Cognitive Services resource using the Azure portal” is a good start to create your own computer vision services. You will need the key and endpoint from the resource you create to connect your application to the Computer Vision service. The free pricing tier (F0) is enough for you to try the service.
Create and Debug Python Code on Raspberry Pi
Currently, there are several Python IDE on Raspberry Pi. Thonny Python IDE is bundled with the Raspbian OS. We can launch it by click Programming -> Thonny Python IDE. Then copy and paste the following code.
01.import cv2
02.import numpy as np
03.import matplotlib.pylab as plt
04.from azure.cognitiveservices.vision.computervision  import  ComputerVisionClient
05.from azure.cognitiveservices.vision.computervision.models  import  OperationStatusCodes
06.from azure.cognitiveservices.vision.computervision.models  import  VisualFeatureTypes
07.from msrest.authentication import CognitiveServicesCredentials
08.from azure.storage.blob import ContentSettings, BlobClient
09.from azure.iot.device import Message
10.from azure.iot.device.aio import IoTHubDeviceClient
11.
12.import RPi.GPIO as GPIO
13.import asyncio
14.
15.#Computer Vision
16.subscription_key =  "Your Key"
17.endpoint =  "https://***.cognitiveservices.azure.com/"
18.computervision_client =  ComputerVisionClient(endpoint, CognitiveServicesCredentials(subscription_key))
19.
20.# Set the size of the image (in pixels)
21.img_width =  1280
22.img_height =  720
23.
24.camera =  cv2.VideoCapture(0)
25.camera.set(cv2.CAP_PROP_FRAME_WIDTH, img_width)
26.camera.set(cv2.CAP_PROP_FRAME_HEIGHT, img_height)
27.
28.# Select color for the bounding box
29.color =  (0,255,0)
30.# Delay 5 second
31.DELAY =  5
32.
33.async def  main():
34.    # Initialize GPIO
35.    GPIO.setwarnings(False)
36.    GPIO.setmode(GPIO.BCM)
37.    GPIO.cleanup()
38.    GPIO.setup(4, GPIO.IN) #PIR
39.    print("Detection started. Press Ctrl-C to exit")
40.    while True:
41.        if GPIO.input(4): #motion detected
42.            try:
43.                ret, image =  camera.read()
44.                cv2.imwrite('capture.jpg', image)
45.                # Open local image file
46.                read_image =  open("capture.jpg", "rb")
47.                print("===== OCR Demo - camera =====")
48.                # Call API with image and raw response (allows you to get the operation location)
49.                read_response =  computervision_client.read_in_stream(read_image, raw=True)
50.                # Get the operation location (URL with ID as last appendage)
51.                read_operation_location =  read_response.headers["Operation-Location"]
52.                # Take the ID off and use to get results
53.                operation_id =  read_operation_location.split("/")[-1]
54.
55.                # Call the "GET" API and wait for the retrieval of the results
56.                while True:
57.                    read_result =  computervision_client.get_read_result(operation_id)
58.                    if read_result.status.lower () not in  ['notstarted', 'running']:
59.                        break
60.                    print ('Waiting for result...')
61.                    await asyncio.sleep(1)
62.
63.                # Print results, line by line
64.                if read_result.status == OperationStatusCodes.succeeded:
65.                    for text_result in read_result.analyze_result.read_results:
66.                        for line in text_result.lines:
67.                            print(line.text)
68.                            print(line.bounding_box)
69.                            pts =  np.array(line.bounding_box, np.int32).reshape((-1,1,2))
70.                            image =  cv2.polylines(image, [pts], True, (0, 255,  0), 2)
71.                            cv2.imwrite('result.jpg', image)
72.                # show local image file
73.                img =  cv2.imread('result.jpg')
74.                cv2.imshow('result',img)
75.                if cv2.waitKey(1000) & 0xFF  ==  ord('q'):
76.                    cv2.destroyAllWindows()
77.                    break
78.            except KeyboardInterrupt:
79.                print("Detection stopped")
80.                GPIO.cleanup()
81.                camera.release()
82.                break
83.if __name__ == '__main__':
84.    asyncio.run(main())
Please do substitute the Key and Endpoint with yours that created in section “Create Necessary Services on Azure”.
Press Run or Debug button to start the process. We use PIR sensor to launch the image taking process. If any text is detected in the real time captured image, you will see the output in Shell window as shown in Fig. 1.
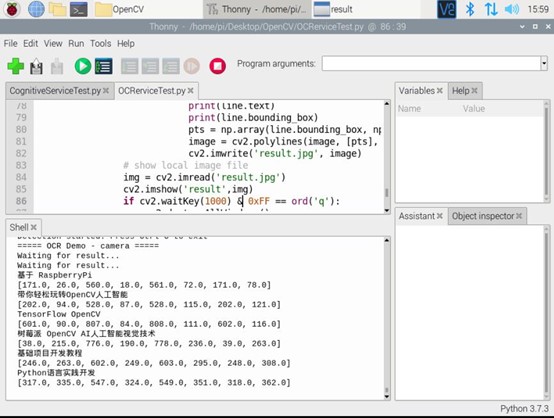
Fig. 1 Debug information on Shell window
The real time image will be captured by Open CV and it is transmitted to Azure Computer Vision service to detect the texts. Once the results are returned, the application will iterate through the results to find the texts. Additionally, the identified texts will be highlighted with green rectangle. It’s worthy to note that the resolution of the real time captured image is 1280x720 here. You should adjust this parameter according to your web camera. Another key information we should pay attention to is the returned values of bounding box, which presents the location of the identified text. The 8 numbers represent 4 pairs of (x,y) coordinates of the bounding box corners in the following order: top-left, top-right, bottom-right, bottom-left. The origin of the coordinates system is the bottom left of the image. We can highlight them with green lines as follows in Fig. 2. It’s quite impressive that all the texts including English and Chinese Simplified are recognized.

Fig. 2 The identified texts on the image
Summary
In this tutorial, we have presented how to send real time captured image to Azure Computer Vision, mark the recognized texts with green rectangle according to the returned results.
Resources
1. MS Docs for Azure Computer Vision.
2. MS Docs for Optical character recognition (OCR)
3. MS Docs for support languages.
See Also
1. Azure Cloud Services for Raspberry Pi 4: How to send sensor data to Azure IoT Hub
2. Azure Cloud Services for Raspberry Pi 4: How to capture and send image to Azure Blob Storage
3. Azure Cloud Services for Raspberry Pi 4: How to send telemetry to Azure Storage Table
4. Azure Cloud Services for Raspberry Pi 4: How to interact with Azure Custom Vision
5. Azure Cloud Services for Raspberry Pi 4: How to detect faces with Azure Computer Vision Services