Azure Cloud Services for Raspberry Pi 4: How to control your devices with IoTHub Direct Method
Introduction
Microsoft Azure provides a variety of cloud computing services including artificial intelligence, machine learning, IoT, storage, security, networking, media, integration and so on. Among tens of thousands of IoT end devices, Raspberry Pi is one of the most popular and useful platforms that used in many areas because of its low cost, modularity, and open design. Raspberry Pi 4 is the latest powerful model with Quad core Cortex-A72 64-bit processor, 2 HDMI ports, 40 pin GPIO header and hardware video decode capability. Azure IoT Hub is an Azure service that lets you manage your IoT devices from the cloud and ingest high volumes of device telemetry to the cloud for storage or processing. Direct methods for communications require immediate confirmation of the result. They are often used for interactive control of devices such as turning on a fan. You can use direct methods to remotely change the behavior of devices connected to your IoT hub.
In this article, we will walk you through the steps required to control your Raspberry Pi 4 model B with IoTHub Direct Method by Python Azure IoT SDK. We will send cloud to device messages that will trigger the image taking process and change the time interval for sensor data colleting.
Prerequisites
- Raspberry Pi 4 model B
- USB Camera
- DHT11 Temperature & Humidity sensor, PIR sensor
Hardware Connection
Here we use BCM Pin 17 as the communication channel between Raspberry Pi and DHT 11. And BCM Pin 4 is configured as the data input from PIR sensor to Raspberry Pi. The hardware scheme is the same as we presented here “Azure Cloud Services for Raspberry Pi 4: How to send sensor data to Azure IoT Hub”. In this project, we use Microsoft LifeCam HD-3000 USB web camera. This true HD camera features 720p HD video chat for a true HD-quality experience and TrueColor technology that automatically delivers a bright and colorful video.
Install Azure Tables client library
Open your Raspberry Pi terminal and install Azure Tables client library for Python:
1.pip3 install azure-iot-device
2.pip3 install asyncio
3.pip3 install azure-storage-blob
Create Azure Services
In this project, we will use Azure IoTHub and Azure Storage services. Please refer to the section “Create an Azure IoTHub and Register a New Device” in this wiki article “Azure Cloud Services for Raspberry Pi 4: How to send sensor data to Azure IoT Hub” to create services for Azure IoTHub. And the “Create an Azure Storage Account” section in this wiki article “Azure Cloud Services for Raspberry Pi 4: How to capture and send image to Azure Blob Storage” will guide you to create Azure Storage service. You will need the connection string from the resource you create to connect your application to the Azure services.
Create and Debug Python Code on Raspberry Pi
Currently, there are several Python IDE on Raspberry Pi. Thonny Python IDE is bundled with the Raspbian OS. We can launch it by click Programming -> Thonny Python IDE. Then copy and paste the following code.
001.from azure.storage.blob import ContentSettings, BlobClient
002.from azure.iot.device import IoTHubDeviceClient, Message, MethodResponse
003.import os
004.from PIL import Image
005.import matplotlib.pyplot as plt
006.import time
007.import cv2
008.import board
009.import RPi.GPIO as GPIO
010.import dht11
011.import asyncio
012.
013.# Azure IoThub
014.IoTHub_CONNECTION_STRING =  "HostName=***.azure-devices.net;DeviceId=***;SharedAccessKey=***"
015.TEMPERATURE =  20.0
016.HUMIDITY =  60
017.PAYLOAD =  '{{"temperature": {temperature}, "humidity": {humidity}, "PIR": {pir}}}'
018.
019.#Azure Blob Storage
020.storage_conn_str="DefaultEndpointsProtocol=https;AccountName=***;AccountKey=***;BlobEndpoint=https://***.blob.core.windows.net/;QueueEndpoint=https://***.queue.core.windows.net/;TableEndpoint=https://***.table.core.windows.net/;FileEndpoint=https://myiotservicestorage.file.core.windows.net/;"
021.container_name="raspberrypic"
022.blob_name="capture"
023.# Set the size of the image (in pixels)
024.img_width =  1280
025.img_height =  720
026.
027.INTERVAL =  5
028.# Initialize GPIO
029.GPIO.setwarnings(False)
030.GPIO.setmode(GPIO.BCM)
031.GPIO.cleanup()
032.# Read data using pin GPIO17
033.dhtDevice =  dht11.DHT11(pin=17)
034.#PIR
035.GPIO.setup(4, GPIO.IN)
036.
037.def create_client():
038.
039.    # Create instance of the device client
040.    iothub_client =  IoTHubDeviceClient.create_from_connection_string(IoTHub_CONNECTION_STRING)
041.    # Create Azure Blob Storage client
042.    blob_client =  BlobClient.from_connection_string(storage_conn_str, container_name, blob_name)
043.    image_content_setting =  ContentSettings(content_type='image/jpeg')
044.    # OpenCV camera
045.    camera =  cv2.VideoCapture(0)
046.    camera.set(cv2.CAP_PROP_FRAME_WIDTH, img_width)
047.    camera.set(cv2.CAP_PROP_FRAME_HEIGHT, img_height)
048.    # Define a method request handler
049.    def method_request_handler(method_request):
050.        if method_request.name == "SetTelemetryInterval":
051.            try:
052.                global INTERVAL
053.                INTERVAL =  int(method_request.payload)
054.                print("Change data collecting Interval to {}".format(INTERVAL))
055.            except ValueError:
056.                response_payload =  {"Response":  "Invalid parameter"}
057.                response_status =  400
058.            else:
059.                response_payload =  {"Response":  "Executed direct method {}".format(method_request.name)}
060.                response_status =  200
061.        elif method_request.name == "CaptureImage":
062.            try:
063.                ret, image =  camera.read()
064.                cv2.imwrite('capture.jpg', image)
065.                # show local image file
066.                img =  cv2.imread('capture.jpg')
067.                cv2.imshow('capture',img)
068.                cv2.waitKey(2000)
069.                cv2.destroyAllWindows()
070.                with open("capture.jpg", "rb") as data:
071.                    blob_client.upload_blob(data,overwrite=True,content_settings=image_content_setting)
072.                    print("Image Upload completed")
073.            except ValueError:
074.                response_payload =  {"Response":  "Invalid parameter"}
075.                response_status =  400
076.            else:
077.                response_payload =  {"Response":  "Executed direct method {}".format(method_request.name)}
078.                response_status =  200
079.        else:
080.            response_payload =  {"Response":  "Direct method {} not defined".format(method_request.name)}
081.            response_status =  404
082.
083.        method_response =  MethodResponse.create_from_method_request(method_request, response_status, response_payload)
084.        iothub_client.send_method_response(method_response)
085.
086.    try:
087.        # Attach the method request handler
088.        iothub_client.on_method_request_received =  method_request_handler
089.    except:
090.        # Clean up in the event of failure
091.        iothub_client.shutdown()
092.        raise
093.
094.    return iothub_client
095.
096.async def  run_telemetry_sample(client):
097.    # This sample will send temperature telemetry every second
098.    print("IoT Hub device sending periodic messages")
099.
100.    client.connect()
101.
102.    while True:
103.        #DHT11
104.        result =  dhtDevice.read()
105.        #PIR
106.        if GPIO.input(4):
107.            pir =  1
108.        else:
109.            pir =  0
110.
111.        if result.is_valid():
112.            temperature =  result.temperature
113.            humidity =  result.humidity
114.            data =  PAYLOAD.format(temperature=temperature, humidity=humidity, pir=pir)
115.            message =  Message(data)
116.
117.            # Add a custom application property to the message.
118.            # An IoT hub can filter on these properties without access to the message body.
119.            if temperature > 30:
120.                message.custom_properties["temperatureAlert"] =  "true"
121.            else:
122.                message.custom_properties["temperatureAlert"] =  "false"
123.            # Send a message to the IoT hub
124.            print(f"Sending message: {message}")
125.            client.send_message(message)
126.            print("Message successfully sent")
127.        else:
128.            # print("Error: %d" % result.error_code)
129.            continue
130.
131.        time.sleep(INTERVAL)
132.
133.async def  main():
134.
135.    print("Device application started. Press Ctrl-C to exit")
136.    iothub_client =  create_client()
137.    # send telemetry
138.    try:
139.        await run_telemetry_sample(iothub_client)
140.    except KeyboardInterrupt:
141.        print("IoTHubClient sample stopped by user")
142.    finally:
143.        # Upon application exit, shut down the client
144.        print("Shutting down IoTHubClient")
145.        iothub_client.shutdown()
146.        GPIO.cleanup()
147.
148.if __name__ == '__main__':
149.asyncio.run(main())
Please do substitute the connection string with yours that created in section “Create Azure Services”. Then, press Run or Debug button to start the process. You will see the output information in Shell window as shown in Fig. 1.
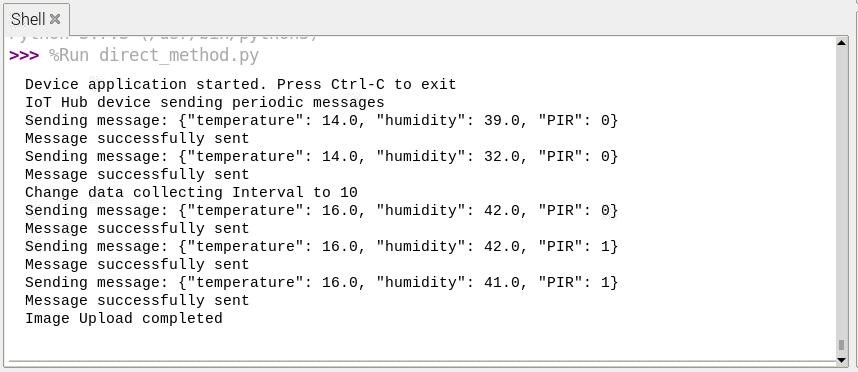
Fig. 1 Debug information on Shell window
The sensor data will be collected and transmitted to Azure IoT Hub every 5 seconds.
Remotely invoke method on device with Azure IoT Explorer
Install and run Azure IoT Explorer, choose the device that you created. And then click connect. We will see the device dashboard as it is shown in Fig. 2. Choose Direct method menu, input “CaptureImage” in the Method Name textbox, leave Payload empty, click Invoke method button, you will see the successful response if the method is invoked on the remote device.
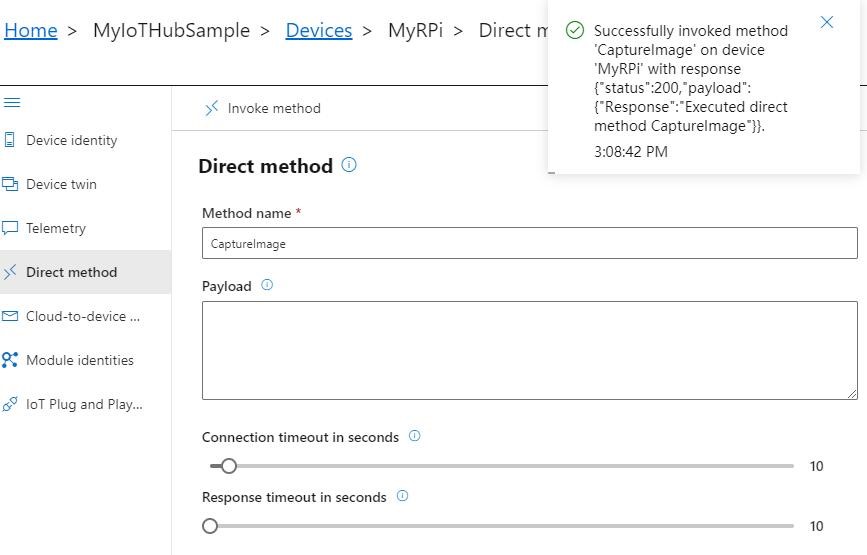
Fig. 2 Direct method CaptureImage on Azure IoT Explorer
On the device side, as soon as it receive the CaptureImage method invoke, it will capture the image by USB camera, save it to local path, and send it to Azure Blob Storage as well.
Furthermore, if you want to change the data colleting interval, the SetTelemetryInterval method can be used with specified payload to indicate the desired interval you want. Fig. 3 shows the detail information.

Fig. 3 Direct method SetTelemetryInterval on Azure IoT Explorer
If the method is invoked remotely on the device, you will see the debug information on the Shell window, which is shown on Fig. 1 above. Additionally, you will find that the time interval is changed to 10 seconds as soon as it receives the message.
Summary
In this tutorial, we have presented how to control your devices with IoTHub Direct Method by Azure client service librarys for Python.
Resources
- MS Docs for Azure IoT Hub
- MS Docs for Azure Table storage.
- MS Docs for Create a storage account.
- MS Docs for Manage storage account access keys.