Microsoft Codename "Cloud Numerics"
Microsoft codename “Cloud Numerics” lab (referred to as “Cloud Numerics” in the text that follows) is a numerical and data analytics library for data scientists, quantitative analysts, and others who write C# applications in Visual Studio. It enables these applications to be scaled out, deployed, and run on Windows Azure.
Providing Feedback and Getting Support
| For this type of correspondence… | Use this e-mail address… |
|---|---|
| Technical support. | cnumerics-support@microsoft.com |
| Product feedback, product documentation feedback, feature suggestions, and general observations. | cnumerics-feedback@microsoft.com |
| Specific issues observed with steps to recreate. | cnumerics-bugs@microsoft.com |
Overview
This section includes the following topics:
Feature Summary
Microsoft “Cloud Numerics” provides:
| Feature | Description |
|---|---|
| A .NET solution to scale-out numerical and data-analytics applications to Windows Azure. | This lab solution enables you to:
|
| Comprehensive math, array, and algorithm libraries. | These libraries include:
|
| A distributed runtime library. | This runtime library features:
|
| Ability to run distributed applications on a local development machine | This local distributed programming experience facilitates developing and running distributed applications that exercise the same code on your multi-core PC that would run on Windows Azure clusters.
A local programming experience has the following benefits:
|
| A configuration utility, Visual Studio project template, and workflow for deploying applications to Windows Azure. | This utility enables you to make application deployment cluster configuration settings from the development machine, publish them to Windows Azure along with associated infrastructure and dependencies and submit your code as a job to be run on Windows Azure. |
Application and Library Architecture
The following components comprise the “Cloud Numerics” lab:
- Mathematics, statistics, and numerics libraries for .NET.
- Distributed array and algorithm libraries for .NET.
- A GUI-driven utility for deploying and running .NET applications on Azure.
- A Visual Studio project type that includes a project template, a sample application, and logic for configuring and deploying your application to Windows Azure.
Cloud Numerics Mathematical Libraries for .NET
The table that follows lists the "Cloud Numerics" Mathematical Libraries for .NET.
| Namespace | Description |
|---|---|
| Numerics.Math | Elementary mathematics methods, operators, query methods, transformations, array manipulators, and reductions. |
| Numerics.LinearAlgebra | Algorithms and techniques for matrix operations, decompositions, and solvers of systems of linear equations. |
| Numerics.Signal | Thresholds, windowing, filter design, impulse response filters, and transfer functions. |
| Numerics.Statistics | Probability density, probability distribution, statistical inference and regression, data processing, machine learning, and descriptive statistics functions. |
| Numerics.TimeSeries | Analysis, forecast, estimation, and moving average functions. |
Cloud Numerics Distributed Array, Algorithm, and Runtime Libraries
The table that follows lists the "Cloud Numerics" Distributed Array and Runtime Libraries for .NET.
| Namespace | Description |
|---|---|
| Numerics | The Numerics namespace encapsulates the runtime engine. It includes initialization, shutdown, status, and basic primitive data types. |
| Numerics.Local | Local (non-distributed) n-dimensional arrays and array operations. |
| Numerics.Distributed | Distributed (locally or on Windows Azure) n-dimensional arrays and array operations. |
| Numerics.Distributed.IO | Reading and writing arrays to and from stable storage such as:
|
| Numierics.DataParallelOps | Methods for controlling and performing “embarrassingly parallel” data parallel operations over distributed arrays. |
Cloud Numerics Project Template
Cloud Numerics Deployment Utility

Modes of Use
“Cloud Numerics” has the following primary modes of use:
- Running a Distributed or Serial Application Locally
- Running on Azure
Run a Distributed or Serial Application Locally
As outlined in the following figure:
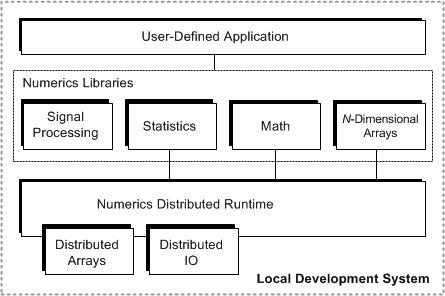
Running locally using the Numerics.Runtime provides the following functionality:
- Access from .NET applications and calling routines to a library of numerical algorithms ranging from simple math to advanced statistics to linear algebra and signal processing.
- Distributed and non-distributed n-dimensional arrays and the operators and functions to manipulate them.
- Ability to spread out your computation as well as your data over many cores in Single Instruction Multiple Data (SIMD) fashion.
- Ability to invoke user-defined methods in parallel in Single Program Mulitple Data (SPMD) fashion using the Apply Framework.
- A development environment where you can design, test, and iterate over your algorithms before you deploy and scale them out on Azure.
To leverage the "Cloud Numerics" libraries and distributed array data while running locally:
- Follow the steps to run a sample program in the Getting Started section titled Run a Distributed Application Locally.
- Modify the sample program, or copy a distributed example over the sample program, build it, and run it.
- View the pre-compiled, example programs in the Cloud Numerics API reference and in the Simple Examples section of this wiki.
- See the blog post titled Using Data for tips and code examples helpful for working with, casting, and loading arrays.
Note
You must initialize a Numerics.Runtime session to have access to distributed arrays.
Running on Azure (with Numerics Runtime)
As outlined in following figure:
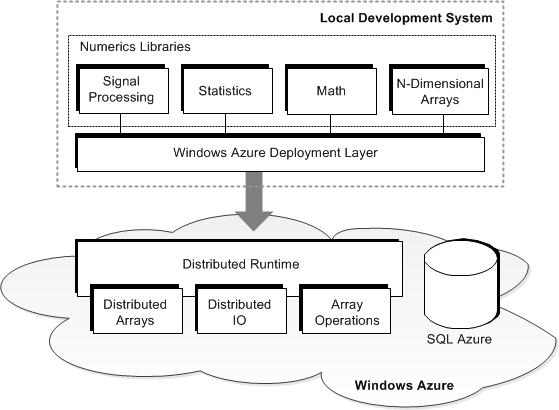
Running "Cloud Numerics" projects on Windows Azure provides the following functionality:
- Access from .NET applications and calling routines to a library of numerical algorithms ranging from simple math to advanced statistics to linear algebra and signal processing.
- Distributed and non-distributed n-dimensional arrays and the operators and functions to manipulate them.
- Ability to spread out your computation as well as your data in Single Instruction Multiple Data (SIMD) fashion.
- Ability to invoke user-defined methods in parallel in Single Program Mulitple Data (SPMD) fashion using the Apply Framework.
- Ability to scale out Azure cloud compute and Azure SQL storage resources on demand.
- Access to large scale staging, backup, or production environment resources, which can access SQL Azure data.
To leverage the "Cloud Numerics" libraries using either serial or distributed array data while running on Azure:
- Follow the steps to run a sample program in the Getting Started section titled Run a Distributed Application over an Azure Cluster.
- Modify the sample program, or copy a distributed example over the sample program, build it, and run it.
- View the pre-compiled, example programs in the Cloud Numerics function library reference help and in the section titled Simple Examples.
- See the blog post titled Using Data for tips and example code helpful for working with, casting, and loading arrays, and creating arrays from Windows Azure blob storage.
Software and Platform Requirements
This section contains the software and platform requirements for using the "Cloud Numerics" libraries for the following modes of use:
- Local distributed mode
- Distributed mode on Windows Azure
Note
The "Cloud Numerics Lab" runs on 64 bit platforms and requires 64 bit applications. When choosing applications from the dowload site, select the x64 version (not the x86 version) for all of the application and SDK prerequisites.
OS Requirements (for Local Development System)
You must have one of the following operating systems installed on your local development system to use the "Cloud Numerics" Lab:
- Windows 7 Home Premium (x64)
- Windows 7 Professional (x64)
- Windows 7 Ultimate (x64)
Application and SDK Requirements (Installed on Local Development System)
These requirements satisfy both:
- Local distributed mode
- Distributed mode on Windows Azure
To run code that uses “Cloud Numerics” libraries on the Windows Azure cloud, ensure that you have the following software installed on your local development machine. Portions of this software, which you will install locally, will be bundled up as part of the package you deploy to your Windows Azure cluster.
Note
Before you install these, ensure that you uninstall the earlier superseded Azure and Windows HPC packages.
| Required Software | Description |
|---|---|
| Visual Studio 2010 (SP1 or later) Professional or Ultimate Edition x64 | You develop your C# application and deploy your Azure package containing this application to the cloud using Visual Studio. |
| Windows Azure SDK 1.7 x64 | The Windows Azure SDK installs the following pieces:
> [!NOTE] > For this lab release, you must install Windows Azure SDK to the default destination folder. The Windows Azure SDK installer fills in the “Install to” field with a directory path from your local development machine. This is considered the default destination folder.
|
| Windows Azure HPC Scheduler SDK 1.7 x64 | All jobs are run through the Windows Azure HPC Scheduler.
http://go.microsoft.com/fwlink/?LinkId=231893
> [!NOTE] > For this lab release, you must install the Windows Azure HPC Scheduler SDK to the default destination folder. The Windows Azure HPC Scheduler SDK installer fills in the “Install to” field with a directory path from your local development machine. This is considered the default destination folder.
|
| Windows HPC Pack 2008 R2 with SP4 Client Utilities | http://go.microsoft.com/fwlink/?LinkId=231888
> [!NOTE] > For this lab release, you must install Windows HPC Pack 2008 with Client Utilities to the default destination folder. The Windows HPC Pack with Client Utilities installer fills in the “Install to” field with a directory path from your local development machine. This is considered the default destination folder.
|
| Microsoft HPC Pack 2008 R2 MS-MPI with SP4 redistributable package: | http://go.microsoft.com/fwlink/?LinkId=231890 |
Windows Azure-Specific Requirements
This section contains the additional environment-related requirements for using the "Cloud Numerics" libraries.
The following table lists the additional requirements you need to run your application using the “Cloud Numerics” distributed runtime libraries using the MPI-based local distributed libraries.
| Item | Description |
|---|---|
| A Windows Azure subscription | You need a Windows Azure Subscription to run your application in the cloud. You will begin to pay for Windows Azure time only when your cluster is deployed, using one or more cores, and in the created state.
> [!NOTE] > You can find instructions on how to get a Windows Azure subscription here: http://msdn.microsoft.com/en-us/library/windowsazure/gg433024.aspx
|
| An encrypted password certificate file. | In order to connect from your local development machine to Azure, you need to generate a .cer file and upload it to your Azure account. You can create this file using the "Cloud Numerics" Deployment Utility included in the “Cloud Numerics” lab product distribution. For details, refer to the section titled Run a Distributed Application over an Azure Cluster. |
| A gateway client | Depending on your site IT policy, you might need a gateway client in order to set up a connection with the Azure Storage service.
http://www.microsoft.com/en-us/server-cloud/forefront/threat-management-gateway-trial.aspx |
Note
MSDN subscribers can try out Windows Azure at no extra charge. For details, please see: http://www.microsoft.com/windowsazure/msdn-benefits/.
Install Cloud Numerics Software
After you satisfy the software and platform requirements, you can install the Microsoft codename “Cloud Numerics” software. Once you install the software to a local machine running Visual Studio, you can deploy and run the sample application supplied as part of the "Cloud Numerics" Visual Studio project deployment template.
The "Cloud Numerics" installer includes:
- Math, Statistics, and Signal Processing libraries as managed Dynamically Linked Library (DLL) files.
- DLLs for initializing and running jobs on Windows Azure used by the Math, Signal, and Statistics libraries.
- Associated IntelliSense files for the DLLs.
- A project deployment template and utility for deploying your application package to Azure.
Note
Please refer to the release notes for “Cloud Numerics” on the Microsoft Connect download site (http://connect.microsoft.com/).
Download the Lab Distribution Package
Once you are registered for the lab, you can download the software from: http://connect.microsoft.com/
The registration confirmation e-mail contains a hyperlink to the latest “Cloud Numerics” lab distribution media. If you do not yet have a confirmation e-mail, you can get one by registering here.
Install the Software
After you satisfy the software and platform requirements, you can install the “Cloud Numerics” software.
Note
You can choose to participate in the Customer Experience Improvement Program (CEIP) at installation time. To change your participation in the CEIP program from "opt-in" to "opt-out" or from "opt-out" to "opt-in" (after your initial installation session) you must uninstall Microsoft Codename "Cloud Numerics" and reinstall.
To install the “Cloud Numerics” software:
Run the installer.
Accept the Microsoft Software License Terms.

Choose an installation directory.

Click the Install button on the Ready to Install screen. After you see the Installation Complete screen, restart your machine, and proceed to the next section titled Getting Started: Deploy and Run a Sample Application.
Guidelines for Developing Locally and Launching on Azure
This section outlines the typical programming model and sequence for writing distributed applications.
Step 1: Develop and Run Locally
You can develop, test, debug, and refine you application and algorithms on a local development system such as a many-processor or multi-core workstation or laptop. This is outlined in the Modes of Use section in the subsection titled Running a Distributed or Serial Application Locally (with Numerics Runtime).
- If you have not already built parallel programming into your code, look for cases where data or execution can be distributed over processors.
- When you run in your development environment, you typically exercise your application on smaller sets of computation or data.
Step 2: Prepare the Distributed Application for Azure
Next, you must prepare your application to be run on Azure.
- To ensure the highest performance and to avoid blocking, ensure all input and output are read from or written to files or blobs. For example, search your program for interactive prompts or methods such as Console.ReadLine. Replace these instances with the appropriate file input functions.
- For guidelines and examples for partitioning your input data, see the blog post titled Creating Distributed Arrays from Azure Blobs, or view the examples in the online help.
- Ensure that exceptions are suitable for asynchronous execution on Azure.
- Do not generate modal or blocking alert dialogs.
- Non-critical exceptions should log messages rather than stopping program flow.
- Ensure you capture your output data and execution state when catching an exception and before program exit.
- Ensure distributed arrays are not initialized with null input references. Passing null inputs to distributed functions will trigger a null-argument exception (ArgumentNullException).
Step 3: Launch the Deployment
After you have created and compiled your "Cloud Numerics" project locally, you can switch to Azure simply by selecting a new Start Up Project and by providing your deployment and cluster information using the "Cloud Numerics" Deployment Utility. The "Cloud Numerics" Deployment Utility is detailed in the section titled Run a Distributed Application over an Azure Cluster.
Last Steps: Get, Filter, and Visualize Results
The final step is to get your results data from blob storage, filter it, and visualize it using your favorite visualization tool such as Microsoft Excel.
Get a Windows Azure Subscription
You will need a Windows Azure subscription ID when you use the "Cloud Numerics" Deployment Utility to set up your cluster's deployment configuration.
You can find instructions on how to get an Azure subscription here: http://www.microsoft.com/windowsazure/offers/.
To get a free Windows Azure platform trial, navigate to http://www.microsoft.com/windowsazure/free-trial/ and sign up for the free trial service.
Note
If you use a Windows Azure Trial subscription, you will be limited to using two Windows Azure nodes for your cluster. Trial subscriptions employ usage quotas for the number of cores you can allocate concurrently (20).
Run a Distributed Application Locally
To get started with “Cloud Numerics” and its associated distribute runtime, you can:
- Use the sample application provided in the project.
- Write your own application.
- Use one of the sample applications provided in this wiki page.
Build and Run Your Application
To run your distributed application on a local multi-core machine, complete the steps detailed in this section.
Note
The default number of cores for running locally is one, which as you develop your application is the easiest to debug. To run on more than one core, see the section titled Specifying the Number of Cores to Run On
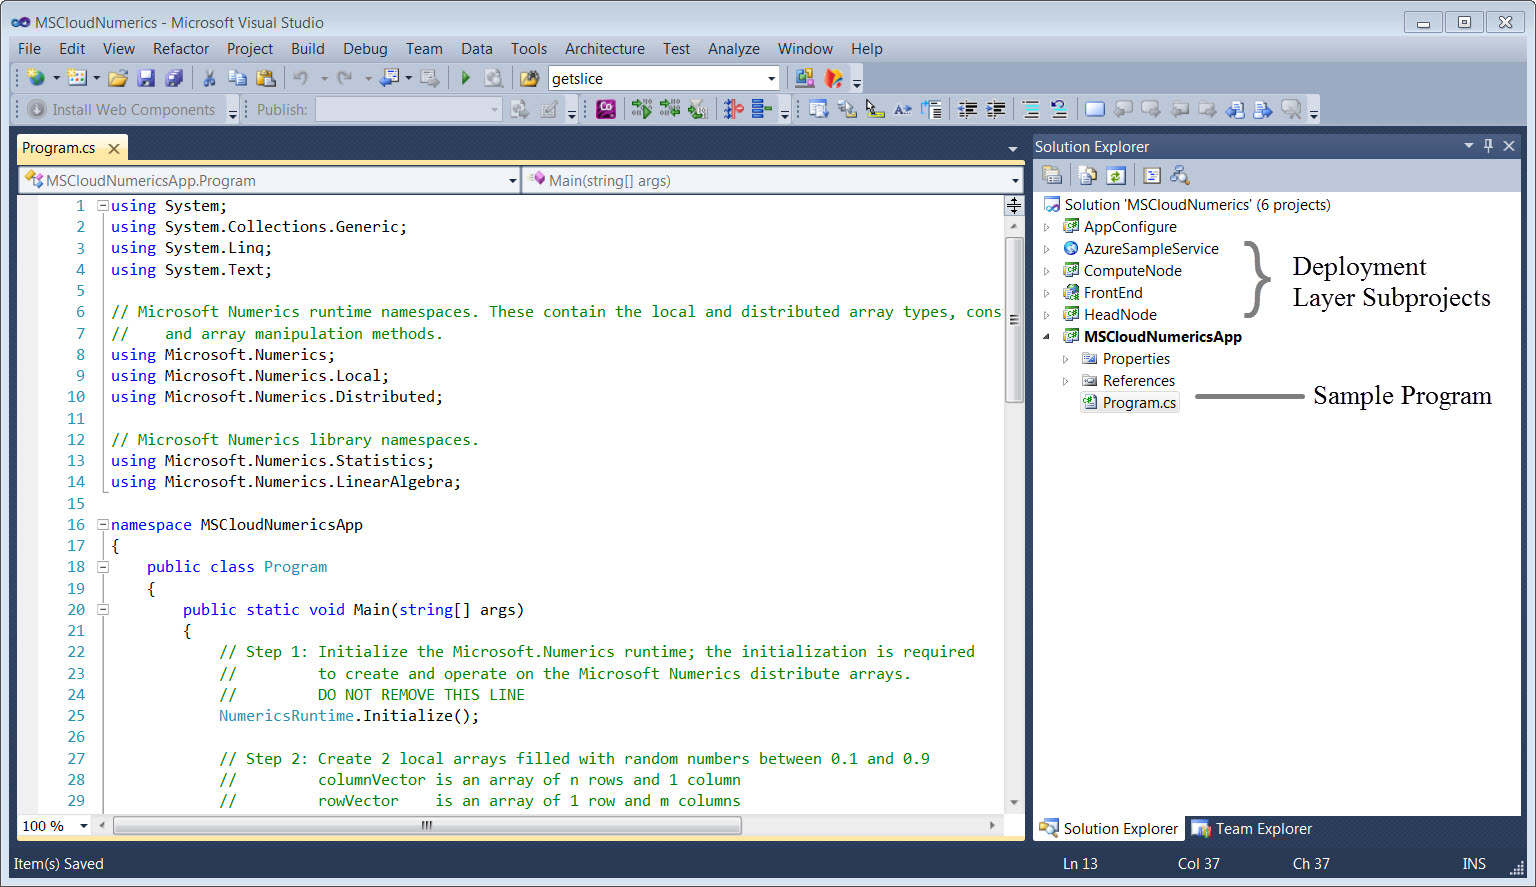
To create a Visual Studio project of type Microsoft Cloud Numerics:
Open Visual Studio as Administrator.
From the File menu, select New Project.
The New Project window displays.
From the New Project window, click Visual C# in the Installed Templates pane, and then select Microsoft Cloud Numerics Application.

Solution Explorer displays a newly created project. By default, the project is named MSCloudNumericsProject.
For this step, you can either:
- Use the sample code shipped with the project (Program.cs).
- Replace the body of the example code in Program.cs with the code example in the section titled Simple Distributed Example.
From the Visual Studio Build menu, select Build Solution.
From Solution Explorer in the Visual Studio IDE, right click the MsCloudNumericsApp subproject and select Set as Startup Project.
In Solution Explorer, right click MsCloudNumericsApp, choose Debug, and select Start New Instance.
A console window displays the sample application’s output.
Note
When you run for the first time in this mode, you might see an access message from Windows Firewall. This occurs in local distributed mode due to interprocess communication between cores on your machine in the form of network calls to localhost. In order for the application to execute, you must grant network access to this application.
Specifying the Number of Cores to Run On
In order to run you application locally on more than one processor core, use the following sequence of steps:
From the Solution Explorer window, right click the MsCloudNumericsApp and select Properties.
The project Properties window displays.
Click the Debug tab and click the external program option button.
The Debug tab displays.
In the Start Options frame, type in the number of cores you prefer to run on in the Command line arguments text input field.

Run your application.
- If your application is already built, right click MsCloudNumericsApp, choose Debug, and select Start New Instance.
- If you have not yet built your application, follow the instructions in the section titled Build and Run Your Application"
Run a Distributed Application over an Azure Cluster
This section details the sequence for how to:
- Configure and deploy a "Cloud Numerics" cluster on Windows Azure.
- Run your application or a sample application on the cluster.
The following table outlines the steps for both deploying "Cloud Numerics" to a cluster and running your distributed application. This process is detailed in the subsections that follow.
Summary of Steps
| Steps | Description |
|---|---|
| Step 1: Get an Azure Subscription ID | You need an Azure Subscription ID to run your application in Windows Azure cloud.
> [!NOTE] > You can find instructions on how to get an Azure subscription in the section titled Get an Azure Subscription and Step 1: Get an Azure Subscription ID.
|
| Step 2: Create a Numerics Project and Launch the Azure Deployment Utility
> [!NOTE] > The Cloud Numerics Deployment Utility prepopulates a Visual Studio project pre-configured for the Mixed Platforms build configuration setting. If you select a platform other than Mixed Platforms in your build properties configuration, this can cause issues when you try to deploy your cluster.
|
The Azure Deployment utility enables you to:
|
| Step 3: Configure Your Azure Service Account | Provide the username and password for an existing Windows Azure service account where you will create your Azure cluster, or create a new service account. You will also upload a credentials certificate in this step to the Windows Azure Service Portal. This enables the "Cloud Numerics" Deployment Utility to authenticate and interact with the Azure Management Service and the Azure Job Scheduler. |
| Step 4: Specify Cluster Sign on Information and Specify Number of Nodes | Specify your cluster characteristics such as the number of nodes to run on, or accept the default values. |
| Step 5: Manage Your SQL Azure Storage Service | Provide the username and password for an existing SQL Azure database or create a new database instance. |
| Step 6: Create, Configure, and Deploy a Numerics Cluster
> [!NOTE] > If you are submitting your application to an existing cluster you can skip this step.
|
After you fill in the required fields and choose settings from the various drop-down lists, you can use the Azure Deployment Utility to create, configure, and deploy a new "Cloud Numerics" cluster. |
| Step 7: Submit a Job | To run your .exe file on Azure, you submit it to the Azure Scheduler. |
| Step 8: Get Job Results Data | You can get results either through the Azure Deployment Utility or through the Azure Management Console. Results data on jobs run in Azure are output to Azure blob storage. |
Step 1: Get an Azure Subscription ID
To get your Azure subscription ID:
Navigate to the following URL (https://windows.azure.com/) and sign in to your Windows Azure Management Portal.

In the left pane, click the Hosted Services, Storage Accounts & CDN tab.
In the Subscription and Services view (center pane) click your active subscription.
The main view displays.
In the Properties pane, scroll down and copy your Subscription ID. You will need your subscription ID to deploy and configure your Azure cluster.

Proceed to the next section titled Step 2: Create a Numerics Project and Launch the Azure Deployment.
Step 2: Create a Cloud Numerics Project and Launch the Cloud Numerics Deployment Utility
To Launch the "Cloud Numerics" Deployment Utility:
Open Visual Studio as Administrator.
From the File menu, select New Project.
The New Project window displays.
From the New Project window, click Visual C# in the Installed Templates pane, and then select Microsoft Cloud Numerics Application.
Solution Explorer displays a newly created project named MSCloudNumericsProject.
For this step you can either:
- Do nothing and use the sample application (Program.cs) underneath the MSCloudNumericsApp subproject.
- Replace the body of the sample application (Program.cs underneath the MSCloudNumericsApp subproject) with the code example in the section titled Simple Distributed Example.
From Solution Explorer in the Visual Studio IDE, right click the AppConfigure project and select Set as Startup Project.
Press the F5 key. (Please note, this might take a few minutes to build the deployment package.)
The "Cloud Numerics" Deployment Utility displays.
Proceed to the section titled Step 3: Configure Your Azure Service Account.
Step 3: Configure Your Azure Service Account
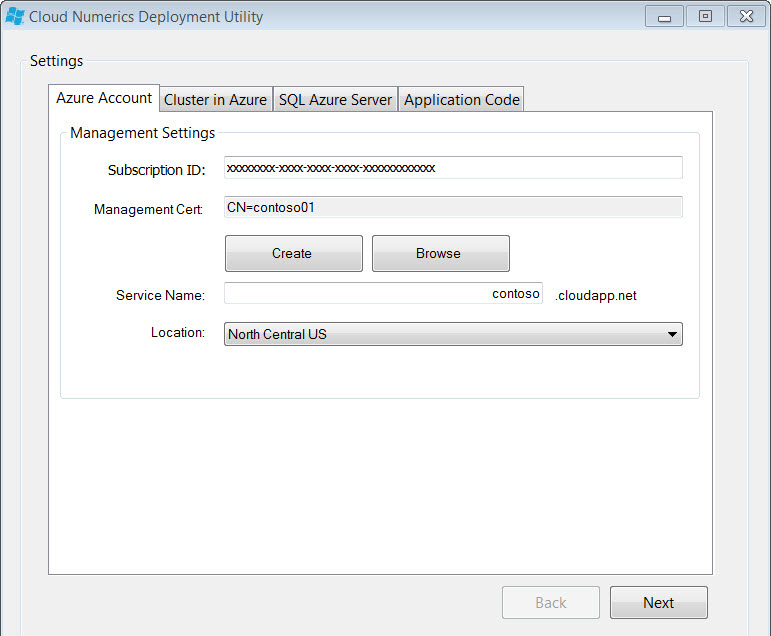
To configure your Azure service account from the "Cloud Numerics" Deployment Utility:
From the Azure Account tab, type in your Azure subscription ID you copied from the Azure Management Console.
Get a certificate (.cer) file for authentication of your remote machine with the Azure Management Console by either using an existing certificate file or by creating a new one. To get a certificate file, complete either of the following:
- Browse the file system and select an existing certificate file, or
- Click on the Create button (creates a new certificate).
Change the default friendly name in the Certificate Name text field to a unique and easy-to-identify name that you will recognize later.
Browse to the directory where you want to create the certificate file and specify a name for the output file.
Click OK
Note
If an alert box warns you are changing the credentials list on your local development machine, click Yes to accept the change and save your newly-created certificate. Make a note of the directory path where your certificate is created.
- Upload the certificate file you created or referenced in the previous step to Azure.
Navigate to the Windows Azure Platform portal at http://windows.azure.com, and sign in.
Click the Hosted Services, Storage Accounts, & CDN tab.
The main browser pane opens to the Deployment Health view.
On the navigation pane, click Management Certificates.
The management view for your active Azure subscription displays.
Click the Add Certificate icon.
The Add New Management Certificate dialog displays.
Note
If the Add Certificate icon is grayed out indicating that it is not enabled, you might have reached the limit of certificates you can upload for this account. The default setting for this limit is 10. To work around this, you can delete a single certificate. This will make the Add Certificate icon active (not grayed out) and enable you to add your certificate.
5.  Browse to the place on your local development machine where you created the certificate (.cer) file, click **Open** to select it, and click **OK** in the Add New Management Certificate dialog to upload it to your Azure account.

    You certificate has been uploaded to Azure. You can now continue filling out the fields in the **Azure Account** tab.
Add a service name to the Service Name text field.

You can add a service by either of the following:
- Type in a new service name in the Service Name text entry field.
- Type in the name of an existing service name associated with the current Azure subscription.
Select a data center location for your Azure cluster.
Note
You must upload your certificate file successfully to Azure before the Location drop down list becomes active. There might be a short delay after you upload your certificate for the location drop down list to become active and populate.
Click Next.
The Cluster in Azure tab displays.
Proceed to the next section titled Step 4: Configure Your Cluster.
Step 4: Specify Cluster Sign on Information and Specify Number of Nodes

To configure your Azure cluster through the "Cloud Numerics" Deployment Utility:
From the Cluster in Azure tab, create a cluster administrator user name or enter an existing name by typing it into the Name text field.
To add or create a password for this administrator, type it into the Password text fields.
If you want a different number of head nodes from the default, type the number in the Head text field.
If you want a different number of compute nodes from the default, type the number in the Compute text field.
Note
If you are using a Windows Azure Trial subscription, set the number of compute nodes to a value of two. Trial subscriptions employ a usage quota for concurrent cores (20). The cores used by the head node, compute nodes, and the web service ("Web FrontEnd") count towards this quota.
If you want a different number of administrative nodes from the default, type the number in the Web FrontEnd text field.
Click Next.
The SQL Azure Server tab displays.
Proceed to the next section titled Step 5: Manage Your SQL Azure Storage Service.
Step 5: Manage Your SQL Azure Storage Service

To manage your SQL Azure Storage Service through the "Cloud Numerics" Deployment Utility:
From the SQL Azure Server tab, complete either one of the following:
- Create a new SQL storage instance.
- Use an existing storage instance selecting it from the drop down list.
From the Database Server Credentials pane, complete either one of the following:
- Click the Use the Same Username and Password as the Cluster to use your Azure credentials to authenticate to your Azure SQL storage instance. (Recommended.)
- Specify the username and password to use when you authenticate to your Azure SQL storage instance.
Click Next.
The Application Code tab displays.
Proceed to the next section titled Step 6: Create, Configure, and Deploy a Cloud Numerics Cluster.
Step 6: Create, Configure, and Deploy a Cloud Numerics Cluster
After you fill in the necessary fields in the Azure Account, Cluster in Azure, and SQL Azure Server tabs, you can use the "Cloud Numerics" Deployment Utility to create, configure, and deploy a new "Cloud Numerics" Cluster. If you have previously deployed your cluster, do not attempt to redeploy over an existing cluster.
Note
If you are submitting an application to be run on a previously deployed cluster, skip this step.
To create, configure, and deploy your cluster.
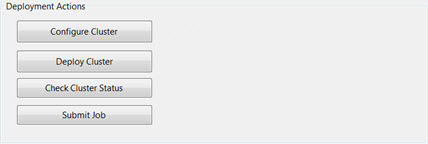
From the Deployment Actions frame of the "Cloud Numerics" Deployment Utility, click the Configure Cluster button to create and configure your Windows Azure cluster.
The status bar indicates the gradual progress of the configuration step. When it is finished, the Configuration complete” message displays.
Click the Deploy Cluster button to deploy the necessary services on your Azure HPC cluster. This step might take more than 10 minutes.
The status bar indicates the progress of the deployment. This step includes installing the necessary software on the Azure cluster nodes. When it is finished, the “Deployment complete” message displays.
Note
You can also access Cluster Deployment status from the Azure Management console or through the Azure Service Manager using your web browser.
Step 7: Submit a Job and View its Status and Output
This procedure lists how to submit a compiled .NET application as a job to be run on the Azure HPC Scheduler. It consists of the following parts:
- Submit a Job
- View Job Status and Output from the Azure HPC Scheduler Web Portal
Submit a Job
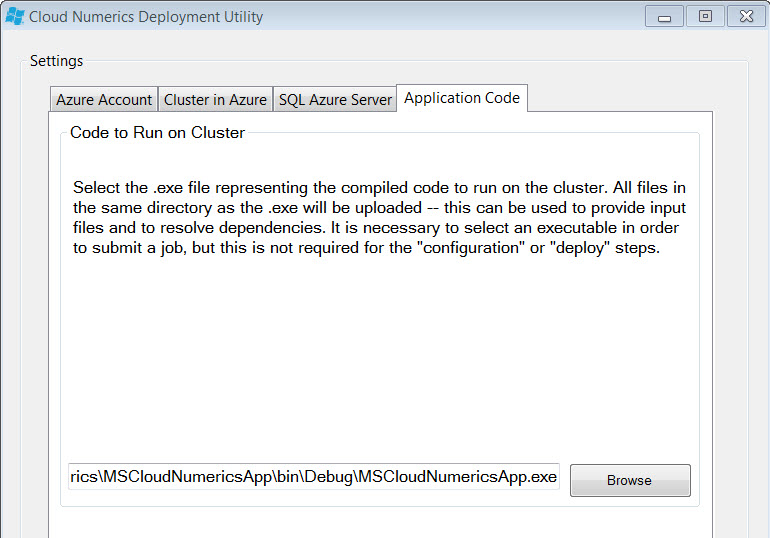
To submit a job to be run on your Windows Azure cluster:
Specify a compiled application (.exe) to deploy to the cluster. For this application, you can specify the sample application provided with the "Cloud Numerics" project. You can find the project executable in your Visual Studio Projects directory.
If you used the default project name, the default directory path for this project executable is in your Visual Studio Projects directory.
C:\Users*\user_name>*\Documents\Visual Studio 2010\Projects\MSCloudNumerics\MSCloudNumerics\MSCloudNumericsApp\bin\Debug\
From the Deployment Actions frame of the "Cloud Numerics" Deployment utility, click the Submit Job and View Status and Output button to submit the application and dependencies.
The status bar indicates the progress of the job submit step. When it is finished, the “Job successfully submitted” message displays.
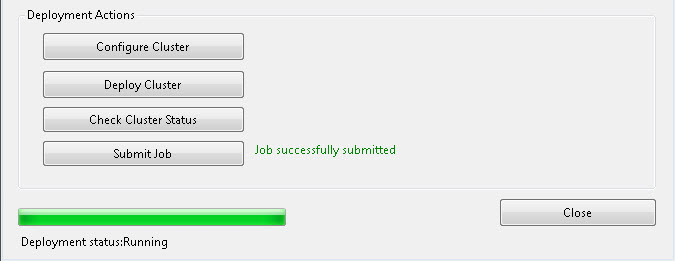
You can also access Job status from either the:
- Azure Management console.
- Azure Admin Service using a web browser or web client using the URL:https://<your service name>.cloudapp.net.
Get Job Status from the Azure HPC Scheduler Web Portal
To access job status and application console output from the Azure HPC Scheduler web portal.
In a web browser, navigate to https://<your service name>.cloudapp.net
Note
If the following message displays in an alert box:
“There is a problem with this website’s security certificate”

check that you have entered the correct service name. If the service name you typed is correct, click on the option **Continue to this website**.
The Windows Azure Sample Application page displays in your browser.
[](resources/6406.windows_5F00_azure_5F00_sample_5F00_application.jpg)
Click on Windows Azure HPC Scheduler Web Portal.
Enter your cluster user name and password when prompted.
When the page loads, the Windows Azure HPC Scheduler Web Portal Displays.
Click My Jobs.
When the web page loads, you will see the jobs submitted to the cluster scheduler in a table with the following column headings.

Find your job in the Name column, and click on it. If you used the default name created for you in the "Cloud Numerics" project, the job name is MSCloudNumericsApp.exe.

Click the Tasks tab and then click on the link under the Command line column that begins with "mpiexec" and ends with your application name.
Job results display in the Output frame.
Final Step: Get Job Results Data
You can get your results data by:
Signing into the Azure console, selecting the storage account you created, and viewing your blob.
Retrieving your results with the Blob Service REST API.
(http://msdn.microsoft.com/en-us/library/windowsazure/dd135733.aspx)
Extracting and Viewing the Function Library Reference Help
You can download the Microsoft codename “Cloud Numerics” library and distributed runtime reference help to your local development machine from the Microsoft Connect portal (http://connect.microsoft.com/). The “Cloud Numerics” library and runtime reference pages are encapsulated in a single compiled HTML archive or .CHM file.
If you registered to participate in the Microsoft codename "Cloud Numerics" lab, sign in to the Microsoft Connect portal with your Windows Live ID. Otherwise, use this link to register.
Use a web browser such as Internet Explorer to navigate to the Microsoft codename "Cloud Numerics" documentation download page. If you already registered to participate in the lab, and you signed in to Microsoft Connect, you can use this URL.
http://connect.microsoft.com/site1267/Downloads/DownloadDetails.aspx?DownloadID=40550
The Microsoft Connect download page appears.

Download the package to your local development machine.
Read the README.txt file.
Double click the .CHM file to open it with Windows Help Viewer.
The “Cloud Numerics” library function help file displays.
Note
If you do not see content in the right pane of the Help Viewer when you open the .CHM file, you must change a file property attribute that blocks it. Right click the .CHM file icon, select Properties, and under the Attributes section of the General tab click Unblock. For details, follow the instructions in the README.txt file.
Convert Existing C# Application to Use Cloud Numerics
This section outlines how to convert an existing C# Visual Studio application to use the "Cloud Numerics" distributed runtime by adding the necessary library references, calls to initialize a runtime session, and calls to create distributed data within your project and application.
Note
You can also convert your existing application by inserting it into the "Cloud Numerics" project template as outlined in the sections titled Run a Distributed Application Locally or the section titled Run a Distributed Application over an Azure Cluster. You can either paste your program over the example program in the "Cloud Numerics" project (Program.cs) or add your application directly to the "Cloud Numerics" project
To convert an existing C# project to use the "Cloud Numerics" Runtime:
- From the Add Reference dialog in Visual Studio, browse to the following “Cloud Numerics” DLLs and add them to your project. (By default, these DLLs are installed in C:\Program Files\Microsoft Numerics\v0.1\Bin)
- Microsoft.Numerics.DenseArrays
- Microsoft.Numerics.Distributed.IO
- Microsoft.Numerics.Distributed.DenseArrays
- Microsoft.Numerics.ManagedArrayImpl
- Microsoft.Numerics.Math
- Microsoft.Numerics.Runtime
- Microsoft.Numerics.Signal
- Microsoft.Numerics.Statistics
- TCDistArrayHandle
- Add the Numerics.Runtime.Intialize() routine to your program to initialize the session so that it can utilize distributed data or computation.
- For smaller programs you would typically add this right to the Main program scope.
- In larger programs, you can:
- Initialize the runtime session where you want to perform distributed data processing.
- Create distributed arrays using a method or constructor in the Microsoft.Numerics.Distributed namespace.
- Perform single program multiple data (SPMD) style data parallelism by passing in your method and a distributed data object to the "Cloud Numerics" Apply Framework or use a "Cloud Numerics" library method with a distributed overload for single instruction multiple data (SIMD) style data parallelism.
- Perform subsequent processing on the results data or save the results to a local array, with the NumericDenseArrayFactory.CreateFromSystemArray.method.
- Call Shutdown() on the Numerics.Runtime to end your distributed session.
- Output your results data to a file.
Simple Examples
The following serial and distributed examples can be used, along with any of those provided in the library function reference help, in place of the sample application provided in your Microsoft codename “Cloud Numerics” Visual Studio C# project. The library function reference help is available by way of the Microsoft Connect portal (http://connect.microsoft.com/).
Simple Serial Examples
The following example operates on local (non-distributed) arrays created using the Numerics.Local.NumericDenseArrayFactory method.
using System;
using Microsoft.Numerics;
using Microsoft.Numerics.Local;
using Microsoft.Numerics.Mathematics;
namespace BasicMathModExample
{
  class BasicMathModExample
  {
  public static  void Main()
  {
  // Construct input arrays
  var values =  NumericDenseArrayFactory.CreateFromSystemArray<double>
  (new double []
  {
  15.0,
  17.0,
  24.0,
  30.0
  });

  var divisors = NumericDenseArrayFactory.CreateFromSystemArray<double>
  (new double []
  {
  3.0,
  5.0,
  7.0,
  9.0
  });

  // Compute Mod function value and write result
  var modulus = BasicMath.Mod(values, divisors);
  Console.WriteLine(modulus);
  }
  }
}
The following is a serial signal processing example. The "Cloud Numerics" signal processing library methods can be used with local arrays.
using System;
using Microsoft.Numerics;
using Microsoft.Numerics.Local;
using Microsoft.Numerics.Signal;
namespace IIRExample
{
  class IIRExample
  {
  public static  void Main()
  {
  // Counting of signal
  int N = 100;

  // Generation of input singal
  var x = Microsoft.Numerics.Local.NumericDenseArrayFactory.UniformGrid<Double>
  (N,-2 * Microsoft.Numerics.Mathematics.BasicMath.PI,2 * Microsoft.Numerics.Mathematics.BasicMath.PI);

  var inputSignal = Microsoft.Numerics.Mathematics.BasicMath.Sin(x);

  // Frequencies
  double Freq = 0.25;
  double NoiseFreq = 0.1;

  // Generation of noise
  var t = Microsoft.Numerics.Local.NumericDenseArrayFactory.UniformGrid<Double>(N, 0, N-1);

  var Noise = Microsoft.Numerics.Mathematics.BasicMath.Sin(2 * Microsoft.Numerics.Mathematics.BasicMath.PI * NoiseFreq * t / Freq) / 2;

  //Input signal with noise
  inputSignal += Noise;

  // Creating of low-pass IIR Chebyshev-I filter
  int filterOrder = 8;
  double ripple = 0.001;
  double cutOffFreq = 0.5;
  var IIRFilter = IIR.ChebyshevI(filterOrder,FilterKind.LowPass,cutOffFreq,ripple);

  //Applying IIR filter to the input noised signal
  var outputSignal = Filtering.Filter(IIRFilter, inputSignal);

  Console.WriteLine("The filtered signal (IIR): {0}", outputSignal);
  }
  }
}
Simple Distributed Example
The following example creates local arrays with Numerics.Local.NumericDenseArrayFactory, operates on them with the Kronecker product method, casts the result array to be distributed, and then operates on this distributed array. You can run this example either by using the local distributed runtime or on Windows Azure
using System; using Microsoft.Numerics; using msnl = Microsoft.Numerics.Local; using msnd = Microsoft.Numerics.Distributed; using Microsoft.Numerics.Mathematics; namespace BasicMathExample { class BasicMathExample { public static void Main() { // Demonstrate identity sin(x)*sin(x) + cos(x)*cos(x) = 1, for local real, local complex, and distributed arrays // Initialize distributed runtime NumericsRuntime.Initialize(); long n = 10; double minValue = 0; double maxValue = 5; var values = msnl.NumericDenseArrayFactory.UniformGrid<double>(n, minValue, maxValue); var result = BasicMath.Pow(BasicMath.Sin(values), 2) + BasicMath.Pow(BasicMath.Cos(values), 2); Console.WriteLine("Identity check result: {0}", result); // Show that the identity holds for complex values too // Construct vector of complex numbers with specified phase and magnitude var phase = BasicMath.PI * msnl.NumericDenseArrayFactory.CreateFromSystemArray<double>(new double[] { -0.5, 0.0, 0.5, 1.0 }); var magnitude = msnl.NumericDenseArrayFactory.CreateFromSystemArray<double>(new double[] { 0.25, 0.5, 0.75, 1.0 }); var complexValues = magnitude.ConvertTo<Complex128>() * BasicMath.Cis(phase); // Apply formula var complexResult = BasicMath.Pow(BasicMath.Sin(complexValues), 2) + BasicMath.Pow(BasicMath.Cos(complexValues), 2); Console.WriteLine("Identity check for complex numbers"); Console.WriteLine("Magnitude: {0}", BasicMath.Abs(complexResult)); Console.WriteLine("Real Part: {0}", BasicMath.RealPart(complexResult)); Console.WriteLine("Complex Part: {0}", BasicMath.ImaginaryPart(complexResult)); // Show that the identity holds for large distributed array, // by using distributed function overloads // Use Kronecker product to expand vector into distributed matrix n = 2000; msnd.NumericDenseArray<double> row = msnl.NumericDenseArrayFactory.UniformGrid<double>(n, minValue, maxValue).Reshape(new long[] { 1, n }); msnd.NumericDenseArray<double> column = msnl.NumericDenseArrayFactory.UniformGrid<double>(n, minValue, maxValue).Reshape(new long[] { n, 1 }); var distributedValues = Microsoft.Numerics.LinearAlgebra.Operations.KroneckerProduct(column, row); // Compute distributed sin function and compare to exact result of 1 var distributedResult = BasicMath.Pow(BasicMath.Sin(values), 2) + BasicMath.Pow(BasicMath.Cos(values), 2); var maxError = ArrayMath.Max(BasicMath.Abs(distributedResult - 1)); Console.WriteLine("Maximum error in distributed result: {0}", maxError); // Shut down distributed runtime NumericsRuntime.Shutdown(); } } }