Client Hyper-V Survival Guide
Client Hyper-V is the name for the Hyper-V technology running on Windows 8 Consumer Preview. On release, it will be available only in Windows 8 Pro, as announced in this Building WIndows 8 blog post. This Building Windows 8 blog post explains Client Hyper-V. Read more about Windows Server 8 Beta and Hyper-V on the Windows Server Team Blog and Paul Thurrot's Windows 8 Tip: Virtualize with Hyper-V.
Client Hyper-V requires SLAT-capable CPUs.For help determining if your machine supports SLAT, see http://social.technet.microsoft.com/wiki/contents/articles/1401.aspx
This surivival Guide wiki topic explains the hardware requirements, usage scenarios, and installation procedures for Client Hyper-V in Windows 8 Pro.
Did you mean…
- Hyper-V Server? http://www.microsoft.com/en-us/server-cloud/hyper-v-server/default.aspx
- Windows Server 8 Hyper-V? What's New in Microsoft Hyper-V Server "8" Beta
- Windows Server 8 Beta?
- the "free" version of Hyper-V Server 8 Beta?
- XP Mode with Virtual PC? Wiki Page: Windows XP Mode – Overview, Prerequisites and Installation
- Microsoft Enterprise Desktop Virtualization (MED-V) 2.0 and Microsoft Application Virtualization (App-V) 4.6 SP1? http://windowsteamblog.com/windows/b/springboard/archive/2011/03/10/agility-and-compatibility-with-microsoft-app-v-and-med-v.aspx
Windows 8 Client Hyper-V
Client Hyper-V is the same computer virtualization technology previously available in Windows Server. In Windows 8 Consumer Preview, and on release in Windows 8 Pro, the technology is built in. These non-server versions of Windows are often called the “desktop” version because it does not run on server-class hardware. A similar functionality to Client Hyper-V in Windows 7 is called XP Mode with Virtual PC and is available as a free download (https://www.microsoft.com/en-us/download/details.aspx?id=3702). The free server version of the Hyper-V technology is called Microsoft Hyper-V Server 2008 R2 and is available for download (http://technet.microsoft.com/en-us/evalcenter/dd776191.aspx). Client Hyper-V provides the same virtualization capabilities as Hyper-V in Windows Server 8. IT professionals, developers, teachers, learners and security researchers will welcome the capabilities available in the past only when running the Windows Server operating system on desktop machines.
For more information see: http://blogs.msdn.com/b/b8/archive/2011/09/07/bringing-hyper-v-to-windows-8.aspx and http://channel9.msdn.com/Events/BUILD/BUILD2011/TOOL-455T
To understand the architecture of Hyper-V watch this short video http://www.microsoft.com/download/en/details.aspx?id=2688
Practical applications
Because Client Hyper-V in Windows 8 Pro is the same technology as server Hyper-V IT Pros and developers do not need to learn any new tools or commands. You can move virtual machines (VMs) from Client Hyper-V to server Hyper-V. For example, you can build a “test lab” infrastructure hosted entirely on your laptop or desktop machine and export the VMs you create and test from your laptop into production. As another example, assume you have an application that you must test on the Windows 8, Windows 7 and XP operating systems. You can create three VMs with these OS versions easily and complete your tests (except for scale/performance tests) on the Client Hyper-V machine instead of in production, or in a dedicated testing lab.
Client Hyper-V let you use both Hyper-V virtualization and wireless network adapters and sleep states on your desktop machine. For example, if you are running Client Hyper-V on a laptop and close the lid, the VMs that are running will be put into a saved state, and can be resumed when the machine wakes. Virtual machine management and other tools created for server Hyper-V, such as VMM P2V or sysinternals DisktoVHD tools will also work in Client Hyper-V. DisktoVHD is available for free at http://aka.ms/DtoVhd. Hyper-V virtual switch extensions and Windows PowerShell scripts for managing VMs that you develop and test on client Hyper-V can be moved to server Hyper-V. You can also export a virtual machine from your production environment, open it on your desktop with Client Hyper-V, perform your required troubleshooting, and then export it back into the production environment. Using VM Networking you can create a multi-machine environment for test/development/demonstration that is secure from affecting the production network.
NOTE: Bluetooth NICs do not appear as ethernet NICs and are not usable by Client Hyper-V VMs.
Microsoft has made no announcements concerning the upgrade of host machines from Client Hyper-V in Windows 8 Consumer Preview to the released versions, however, you can export all the virtual machines and their settings and then import them again on the released version of Client Hyper-V.
Windows PowerShell scripts for managing virtual machines that you create using Client Hyper-V are fully compatible in with Windows Server 8 Hyper-V. For example, assuming you had the .xml files for these VMs already available on your machine, network share, or USB storage, the following example Windows PowerShell command would start them all for you on your Client Hyper-V machine.
Dir *.xml | import-vm | start-vm
For more information on Windows 8, Hyper-V Windows PowerShell commands see: Windows PowerShell Support for Windows Server "8" Beta and Hyper-V Cmdlets for Windows Server "8" Beta.
There a few features included in Windows Server 8 Hyper-V that are not included in Client Hyper-V. These include:
- Remote FX capability to virtualize GPUs (software GPU in RDP 8)
- Live VM migration
- Hyper-V Replica
- SR-IOV networking
- Synthetic fibre channel.
For more information on the new Hyper-V features in Windows Server 8 see What's New in Microsoft Hyper-V Server "8" Beta.
Differences between Hyper-V Client, Hyper-V Server 8 and Windows Server 8 with Hyper-V see Differences between Hyper-V Client, Hyper-V Server 8 and Windows Server 8
Hardware requirements
Hyper-V requires a 64-bit system that has Second Level Address Translation (SLAT). For information on checking and changing the virtualization support settings of your system BIOS, consult your system manufacturer. Because BIOS support for virtualization is required, before you enable Client Hyper-V you should ensure that the machine has the latest BIOS version. See also: Hyper-V: How to Fix BIOS Errors Enabling Hyper-V. Hyper-V also supports the creation of both 32-bit and 64-bit operating systems in virtual machines.
NOTE: You must license each of the virtual machine operating systems you run on Client Hyper-V according to their requirements.
4GB RAM is required. The RAM on your Client Hyper-V machine is allocated and de-allocated dynamically as required by the VMs. You can run several VMs on a Client Hyper-V machine (also called a “host”) that has the minimum 4GB of RAM, but you will need additional RAM for more VMs, depending on the RAM requirements for each VM. The maximum RAM per VM limit is 512GB.
Client Hyper-V supports server Hyper-V’s “Live Storage Move” capability. This means you can use your VMs fairly independent of the underlying storage. You can move VMs to and from one local drive to another, to a USB stick, or to a remote file share without needing to stop the VM.
Software requirements
To use client Hyper-V, you must first enable the feature. Because Hyper-V is an optional feature in Windows 8 Consumer Preview, the files required for installation may or may not be present on your machine, depending on your organization’s IT policy. If you are connected to the internet, enabling the feature will automatically download the required files. If you are not connected to the internet, you can download the required files and manually copy them to your machine, or otherwise provide the installation media.
NOTE: If your Windows 8 Consumer Preview computer is in a managed IT environment, it is a good idea to check to see that there are no licensing, anti-virus, group policy, IP SEC or other IT processes or policies that may prevent you from running Client Hyper-V. The machine you install Client Hyper-V on will be able to "host" virtual machines, and thus may be treated as a "server" for certain policies and practices.
**
To enable Client Hyper-V**
- On the Control Panel click “Programs”, and then click “Programs and Features”
- Click “Turn Windows features on or off”
- Click “Hyper-V”, and then click “OK”, and then click “Close”
To enable Client Hyper-V using Windows PowerShell
At the PowerShell prompt (using administrator credentials) type the following:
*enable-WindowsOptionalFeature -Online -FeatureName Microsoft-Hyper-V -All *
To enable Client Hyper-V using the commandline
**
**On the command line (with administrator credentials) type the following:
Dism /online /enable-feature /featurename:Microsoft-Hyper-V -All
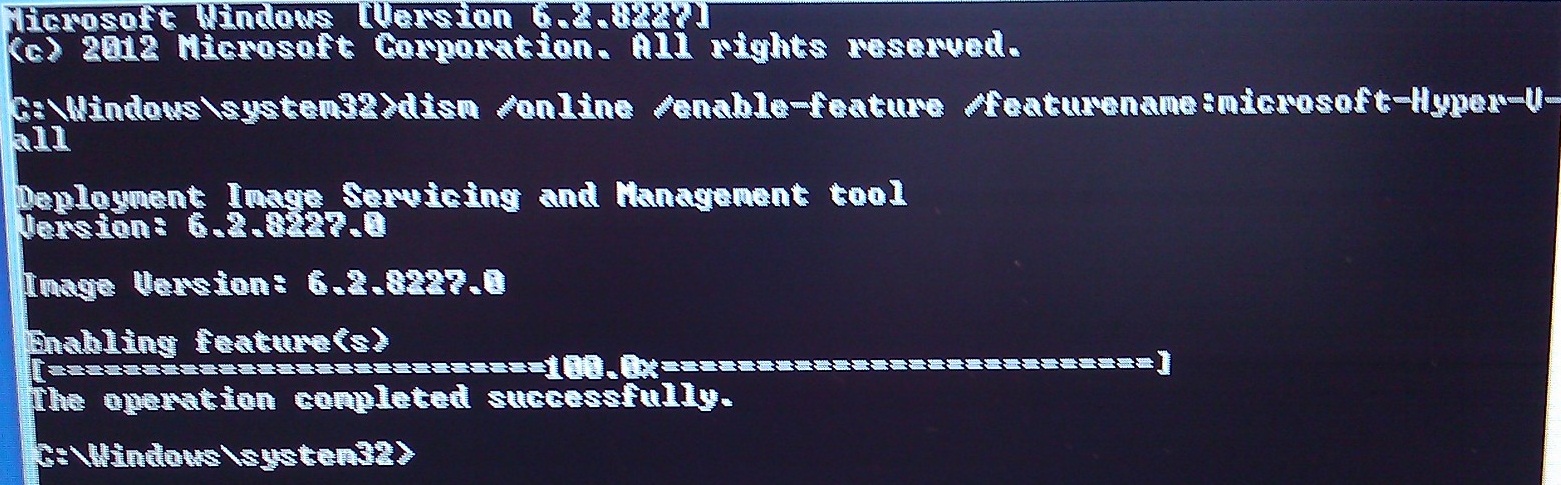
Note that You must reboot your machine (turn the power off), not just restart, to complete the installation. Depending on your manufacturer, you may have to pause a few seconds with the machine off before booting for the required changes to take effect. After restarting the machine, you can use the Hyper-V Manager or Windows PowerShell to create and manage Virtual Machines. You can also use the Virtual Machine Connection to connect to VMs remotely.

For more information about configuring Hyper-V see Install the Hyper-V role and configure a virtual machine For a library of Windows PowerShell cmdlets for VM management see (http://pshyperv.codeplex.com/)
Hyper-V Manager
Turning on the Hyper-V feature in Windows 8 Consumer Preview also installs Hyper-V Manager. You can use Hyper-V manager to create and manage your virtual machines.
For more information on Hyper-V Manager, see (http://technet.microsoft.com/en-us/library/cc770494.aspx)
For more information about Hyper-V Cmdlets see http://technet.microsoft.com/library/hh848559.aspx and Hyper-V Cmdlets In Windows Server 8.
If you have used Hyper-V before and are used to using RemoteFX to interact with VMs, you should note that the new version of RDP (mstsc.exe) includes support for :
- USB redirection (*if your IT organization group policy settings and security policies allow*)
To enable: in mstsc.exe>Show Options> Local Resources Tab>More
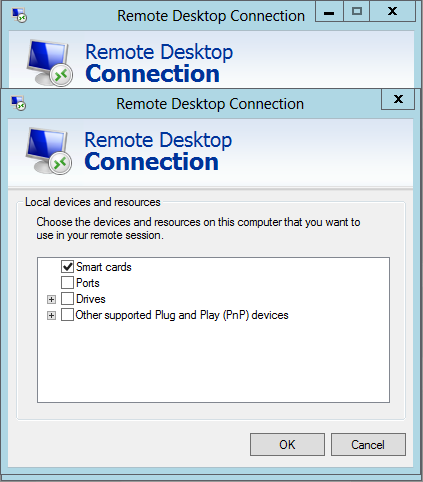
- Multi-point touch to a W8 VM if you’re on a touch enabled device
- Bi-directional audio
- Host folder sharing
- Host printer sharing
- Smartcard authentication
For more information on Remote Desktop Services see What’s new in Remote Desktop Services