AD RMS : Relocating databases (Part 1) - Preparing the new SQL Server
Overview
The following is an abridged version of the official TechNet documentation. This version is slightly shorter than the original and does not go into testing the databases once they have been moved. This version does, however, provide accompanying video to assist and clarify the steps. For the original TechNet, version see AD RMS Database Relocation without a CNAME Record – Step-by-Step (http://go.microsoft.com/fwlink/?LinkID=188464) or a full version can be downloaded from the Microsoft Download Center (http://go.microsoft.com/fwlink/?LinkId=191155) .
This topic consists of the following three articles:
- Relocating the AD RMS databases – Part 1 – Preparing the new SQL Server (http://go.microsoft.com/fwlink/?LinkID=191125)
- Relocating the AD RMS databases – Part 2 – Backing up the existing AD RMS databases (http://go.microsoft.com/fwlink/?LinkID=191126)
- Relocating the AD RMS databases – Part 3 – Restoring the AD RMS databases (http://go.microsoft.com/fwlink/?LinkID=191127)
Scenario description
Fabrikam, a fictitious company, wants to move their current AD RMS databases from an existing Microsoft SQL Server 2008 server to a brand new server. When AD RMS was originally installed, the old Fabrikam Administrator used the physical name of the SQL Server. The new Administrator wants to minimize the downtime for AD RMS in the event of disaster recovery. To do this, the new Administrator wants to move to use a CNAME record when the database is moved. Prior to doing this in production, Fabrikam would like to setup a test environment that will allow them to walk through the process of moving the database. This will also allow them to verify that everything is working after the database move.
Table 1 - Machines and Roles
Computer Name |
Forest |
Operating System |
Memory |
Applications and Services |
IP Address |
|---|---|---|---|---|---|
DC |
fabrikam.com |
Windows Server 2008 x64 SP2 |
512 |
Active Directory, DNS, Certificate Authority |
192.168.100.100 |
EX |
fabrikam.com |
Windows Server 2008 x64 SP2 |
2048 |
Exchange 2007, IIS 7.0. |
192.168.100.101 |
ADRMS |
fabrikam.com |
Windows Server 2008 x64 SP2 |
1024 |
AD RMS, IIS 7.0 |
192.168.100.102 |
SQL1 |
fabrikam.com |
Windows Server 2008 x64 SP2 |
1024 |
Microsoft SQL Server 2008 SP2 |
192.168.100.103 |
SQL2 |
fabrikam.com |
Windows Server® 2008 R2 x64 |
1024 |
Microsoft SQL Server 2008 SP2 |
192.168.100.104 |
CLT |
fabrikam.com |
Windows 7 Enterprise x86 |
1024 |
Microsoft Office 2007 Enterprise Edition SP2 |
192.168.100.105 |
Table 2 - Required Accounts
Account |
Display name |
Forest |
Group Membership |
Password |
Description |
|---|---|---|---|---|---|
ADRMSService |
ADRMS Service |
fabrikam.com |
NA |
Pass1word$ |
The ADRMS Service account. This account was used during the installation of ADRMS. Installing ADRMS is a prerequisite to using this document. |
Preparing the new SQL Server
The following steps cover how to prepare the new SQL server prior to moving the databases. This is done first, to minimize any downtown of the AD RMS Server. The following five steps are covered below:
- Add DisableStrictNameChecking Registry Key
- Enable SQL Firewall Ports
- Enable SQL Server Network Protocols
- Add ADRMSService to SQL Logins
- Create CNAME Record
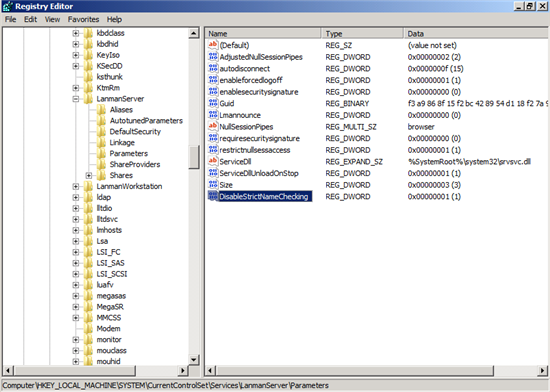
Add DisableStrictNameChecking Registry Key
This step explains how to add the DisableStrictNameChecking registry key. This key allows connections to be made to the SQL server by names other than the proper name. By default, SQL Server 2008 will not allow this.
To add the DisableStrictNameChecking Registry Key:
- Log on to SQL2.fabrikam.com as fabrikam\Administrator.
- Click Start, type regedit.exe in the Start Search box, and then press ENTER.
- Expand the following registry key: HKEY_LOCAL_MACHINE\SYSTEM\CurrentControlSet\Services\LanmanServer\Parameters
- Right-click Parameters, click New and then click DWORD (32-bit) Value.
- In the Value name box, type DisableStrictNameChecking, and then press ENTER.
- Double-click the DisableStrictNameChecking registry value and type 1 in the Value data box, and then click OK.
- Close Registry Editor.
Figure 1 - DisableStrictNameChecking
** Video 1** - Add DisableStrictNameChecking Registry Key
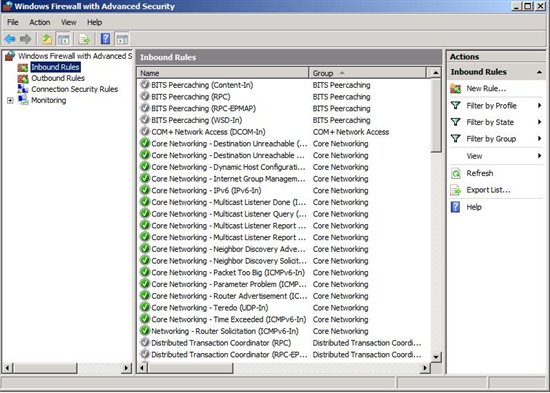
Enable SQL Firewall Ports
This step explains how to enable the firewall rules on the new SQL server. These rules are required to allow the AD RMS cluster to communicate with the SQL Server.
To enable the firewall ports on SQL2:
1. Log on to SQL2.fabrikam.com as fabrikam\Administrator.
2. Click Start, select Administrative Tools and click Windows Firewall with Advanced Security. This will bring up the Windows Firewall with Advanced Security.
Figure 2 – Windows Firewall with Advanced Security
3. On the left, select Inbound Rules and on the right click New Rule. This will bring up the New Inbound Rule Wizard.
Figure 3 – New Inbound Rule Wizard

4. On the Rule Type screen, select Port and click Next.
Figure 4 – Protocols and Ports
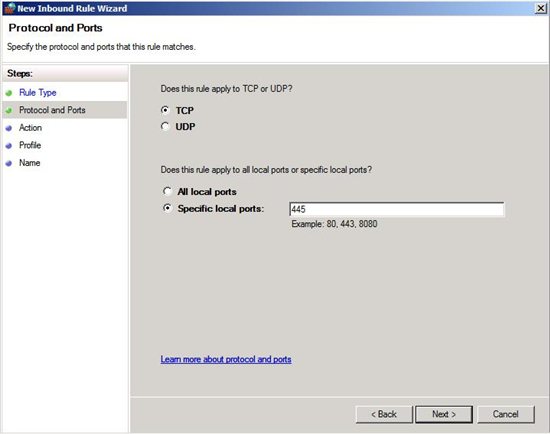
5. On the Protocol and ports screen, select TCP and enter 445 in the box next to Specific local ports: and click Next.
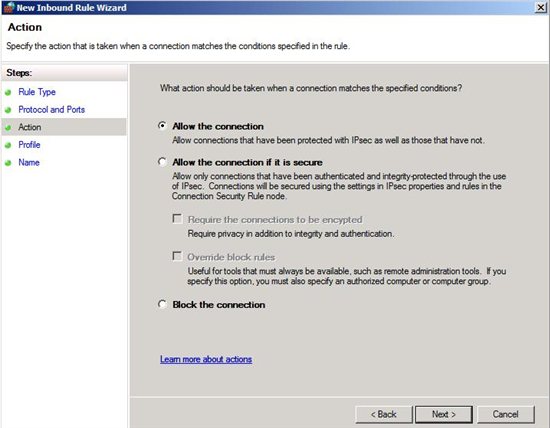
6. On the Action screen, select Allow the connection and click Next.
Figure 5 - Action
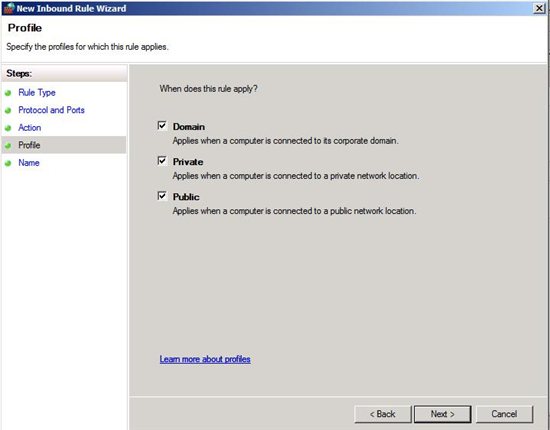
7. On the Profile screen, select Domain, Private, and Public then click Next.
Figure 6 - Profile
8. On the Name screen, enter SQL Server Named Pipes in the box and click Finish.
9. Repeat these steps for all of the entries in the table below.
Table 3 - SQL Server Firewall Port Exceptions
Protocol |
Port Number |
Name |
TCP |
445 |
SQL Server Named Pipes |
TCP |
1433 |
SQL Server Listening Port |
UDP |
1434 |
SQL Server Browser Service |
Video 2 - Enable SQL Firewall Ports
Enable SQL Server Network Protocols
This step explains how to enable the allowed network protocols for SQL2. This is done so that the AD RMS Server can communicate with the database server.
To enable SQL Server Network Protocols
1. Log on to SQL2.fabrikam.com as fabrikam\Administrator.
2. Click Start, select All Programs, click Microsoft SQL Server 2008, click Configuration Tools, and select SQL Server Configuration Manager. This will bring up the SQL Server Configuration Manager.
Figure 7 – SQL Server Configuration Manager
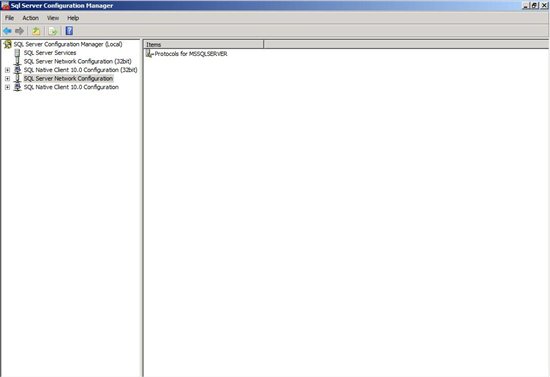
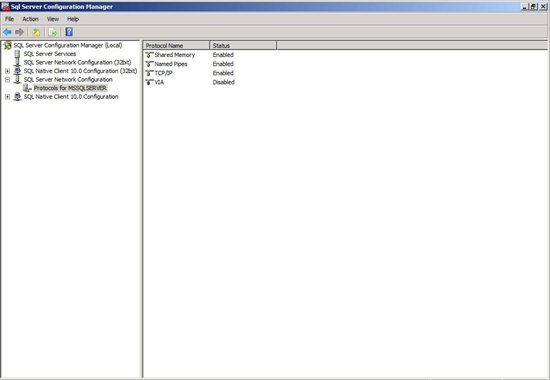
3. In SQL Server Configuration Manager, on the left, expand SQL Server Network Configuration and click Protocols for MSSQLSERVER. This will populate the right pane with four protocols and their status.
Figure 8 – Protocols for MSSQLSERVER
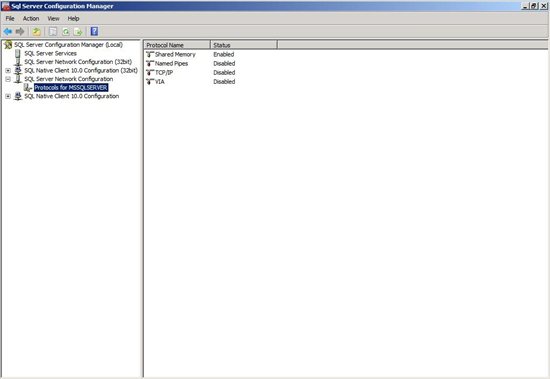
4. On the right, right-click Disabled next to Named Pipes and select Enable. This will bring up a pop-up box that says Any changes made will be saved; however, they will not take effect until the service is stopped and restarted. Click OK.
Figure 9 – Enable Protocols
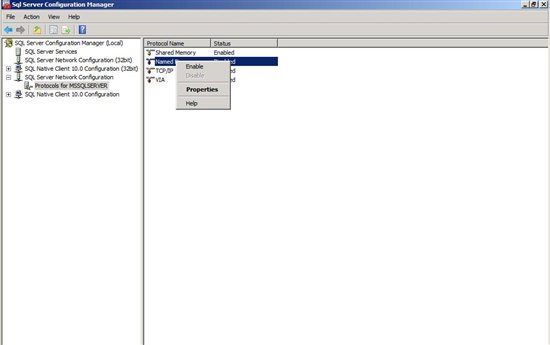
Figure 10 – Restart box

5. On the right, right-click Disabled next to TCP/IP and select Enable. This will bring up a pop-up box that says Any changes made will be saved; however, they will not take effect until the service is stopped and restarted. Click OK.
Figure 11 – Protocol Summary
6. In SQL Server Configuration Manager, on the left, click SQL Server Services. This will populate the right pane with three services and their state.
Figure 12 – SQL Server Services
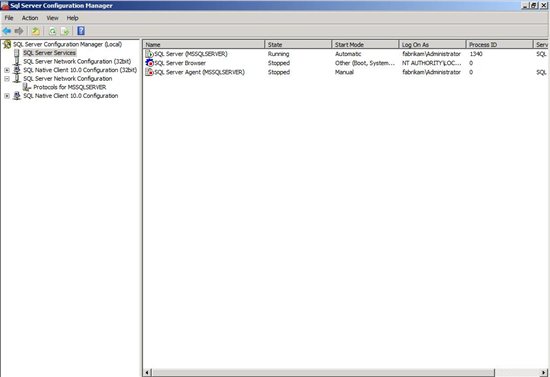
7. On the right, right-click SQL Server (MSSQLSERVER) and select Stop. This will stop the SQL Server service.
8. On the right, right-click SQL Server (MSSQLSERVER) and select Start. This will start the SQL Server service.
9. Close SQL Server Configuration Manager.
Video 3 - Enable SQL Server Network Protocols
Add ADRMSService to SQL Logins
This step explains how to add the AD RMS Service Account (ADRMSService) to SQL Logins on SQL2. This allows the service account to connect to SQL2.
To add ADRMSService to SQL Logins
1. Log on to SQL2.fabrikam.com as fabrikam\Administrator.
2. Click Start, select All Programs, click Microsoft SQL Server 2008 and select SQL Server Management Studio. This will bring up the Connect to Server dialog box. Ensure that the Server name is SQL2 and that Authentication is set to Windows Authentication. Click Connect.
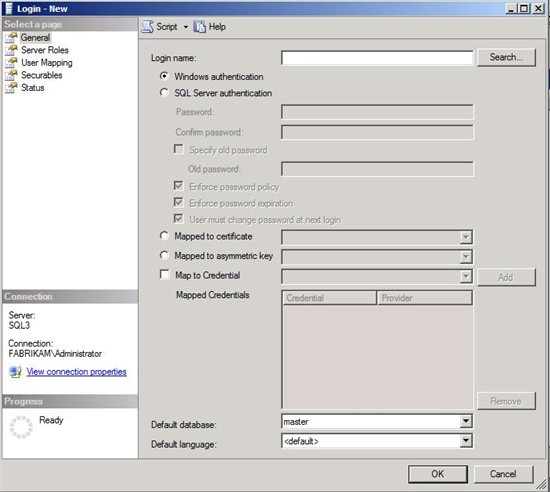
3. On the right, expand Security, right-click Logins, and select New Login. This will bring up the Login – New screen.
Figure 13 – Login - New
4. On the Login – New screen, click Search. This will bring up a Select User or Group box.
5. On the Select User or Group box, enter fabrikam\ADRMSService in the box below Enter the object name to select (examples) and click Check Names. This should resolve with an underline. Click Ok.
Figure 14 – Name Resolved
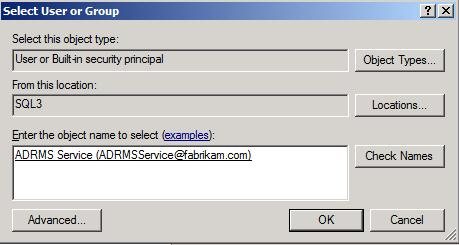
6. On the Login – New screen, click OK. This will close the Login – New screen.
7. Close SQL Server Management Studio.
** Video 4** - Add ADRMSService to SQL Logins
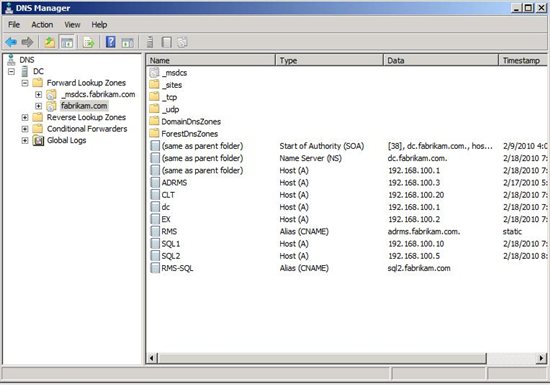
Create CNAME Record
This step explains how to create a CNAME record in DNS.
Figure 15 – Create CNAME Record

To create a CNAME Record:
1. Log on to DC.fabrikam.com as fabrikam\Administrator.
2. Click Start, point to Administrative Tools, and then click DNS. This will bring up the DNS Manager.
3. From the DNS Manager, on the left, expand DC, expand Forward Lookup Zone, and click fabrikam.com. On the right, right-click a blank portion of the screen and select New Alias (CNAME) from the menu. This will bring up the New Resource Record dialog box.
4. On the New Resource Record box, under Alias name (uses parent domain if left blank): enter RMS-SQL.
5. On the New Resource Record box, under Fully qualified domain name (FQDN) for target host: enter sql2.fabrikam.com. Click OK.
6. Close DNS Manager.
Figure 16 – DNS Manager
Video 5 - Create CNAME Record