ADRMS: Relocating the databases (Part 2) Backing up the existing databases
Overview
The following is an abridged version of the official TechNet documentation. This version is slightly shorter than the original and does not go into testing the databases once they have been moved. This version does, however, provide accompanying video to assist and clarify the steps. For the original TechNet, version see AD RMS Database Relocation without a CNAME Record – Step-by-Step (http://go.microsoft.com/fwlink/?LinkID=188464) or a full version can be downloaded from the Microsoft Download Center (http://go.microsoft.com/fwlink/?LinkId=191155).
Article series
This topic consists of the following three articles:
- Relocating the AD RMS databases – Part 1 – Preparing the new SQL Server (http://go.microsoft.com/fwlink/?LinkID=191125)
- Relocating the AD RMS databases – Part 2 – Backing up the existing AD RMS databases (http://go.microsoft.com/fwlink/?LinkID=191126)
- Relocating the AD RMS databases – Part 3 – Restoring the AD RMS databases (http://go.microsoft.com/fwlink/?LinkID=191127)
Backing up the existing AD RMS databases
The following steps cover how to back up the existing AD RMS databases. The following four steps are covered below:
- Export the Trusted User Domain and the Trusted Publishing Domain
- Stop IIS
- Verify MSMQ is Empty and Stop the AD RMS Logging Service
- Create database backups
1. Export the Trusted User Domain and Trusted Publishing Domain
This step explains how to export the Trusted User Domain and the Trusted Publishing Domain. This is done for backup and disaster recovery purposes.
To export the Trusted User Domain and the Trusted Publishing Domain:
Log on to ADRMS.fabrikam.com as fabrikam\Administrator.
On the Desktop, right-click and select New and select Folder from the drop-down.
Rename the new folder, ADRMSBackup.
Open the Active Directory Rights Management Services Administration console. Click Start, point to Administrative Tools and then click Active Directory Rights Management Services.
In the Active Directory Rights Management Services Administration console, expand the cluster name.
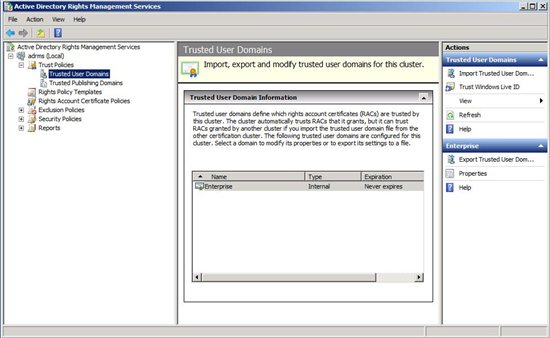
Expand Trusted Policies and select Trusted User Domains.
On the right, select Export Trusted User Domain. This will bring up the Export Trusted User Domain As box.
From the Export Trusted User Domain As box, on the left, select Desktop and select the ADRMSBackup folder.
Under File name enter ADRMSTUD and make sure Binary File (*.bin) is selected for Save As Type. Click Save. This will close the Export Trusted User Domain As box.
Figure 1 – Trusted User Domain
In the Active Directory Rights Management Services Administration console select Trusted Publishing Domains.
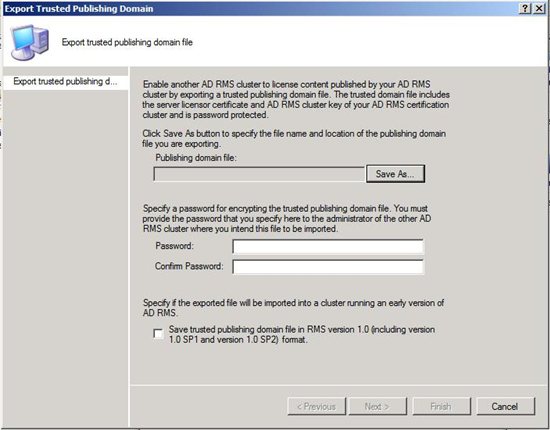
On the right, select Export Trusted Publishing Domain. This will bring up the Export Trusted Publishing Domain box.
From the Export Trusted Publishing Domain, click Save As. This will bring up the Export Trusted Publishing Domain File As box. From the Export Trusted Publishing Domain As box, on the left, select Desktop and select the ADRMSBackup folder.
Under File name enter ADRMSTPD and make sure XML File (*.xml) is selected for Save As Type. Click Save. This will close the Export Trusted Publishing Domain As box.
From the Export Trusted Publishing Domain box, enter Pass1word$ in the Password box. Enter Pass1word$ in the Confirm Password box.
Click Finish. Close the Active Directory Rights Management Services Administration console.
Figure 2 – Trusted Publishing Domain Wizard
Video 1 - Export the Trusted User Domain and the Trusted Publishing Domain
Stop IIS
This step explains how to stop the Internet Information Server that is running on the AD RMS databases.
To stop IIS:
- Log on to ADRMS.fabrikam.com as fabrikam\Administrator.
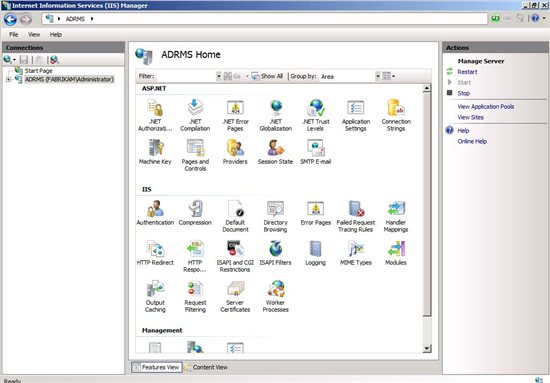
- Click Start, point to Administrative Tools and then click Internet Information Services (IIS) Manager. This will bring up the Internet Information Services (IIS) Manager.
- From the Internet Information Services (IIS) Manager, on the left, select ADRMS (FABRIKAM\Administrator). On the right, under Actions select Stop.
- Close the Internet Information Services (IIS) Manager.
Figure 3 – Internet Information Services (IIS) Manager
Video 2 - Stop IIS
Verify MSMQ is Empty and Stop the AD RMS Logging Service
This step explains how to verify the Microsoft Message Queuing is emptied and stop the AD RMS Logging Service. AD RMS uses MSMQ on each server in the AD RMS cluster to send information to the logging database. This needs to be done prior to backing up the AD RMS logging database.
To verify the MSMQ is empty:
- Log on to ADRMS.fabrikam.com as fabrikam\Administrator.
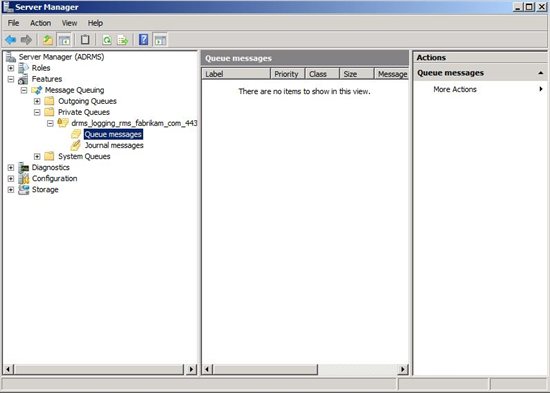
- Click Start, point to Administrative Tools and then click Server Manager.
- On the left, expand Features, expand Message Queuing, expand Private Queues, expand drms_logging_rms_fabrikam_com_443, and select Queue messages. This will populate the middle pane with Queue messages.
- Verify there are no messages in Queue messages. Close Server Manager.
Figure 4 – MSMQ
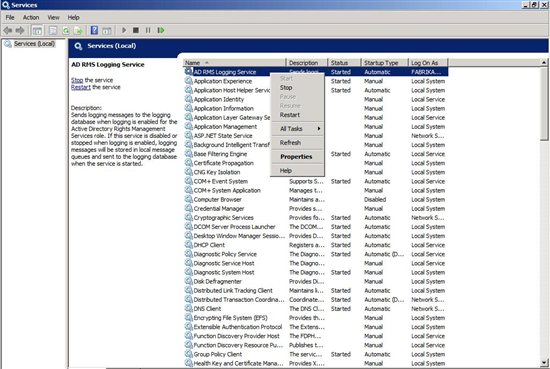
To stop the AD RMS Logging Service:
- Log on to ADRMS.fabrikam.com as fabrikam\Administrator.
- Click Start, point to Administrative Tools, and then click Services.
- On the Services screen, right-click AD RMS Logging Service, and select Stop.
- Close Services.
Figure 5 – Stop the AD RMS Logging Service
Video 3 - Verify MSMQ is Empty and Stop the AD RMS Logging Service
Create database backups
This step explains how to backup the SQL databases. There are three databases that will be backed up as part of this step.
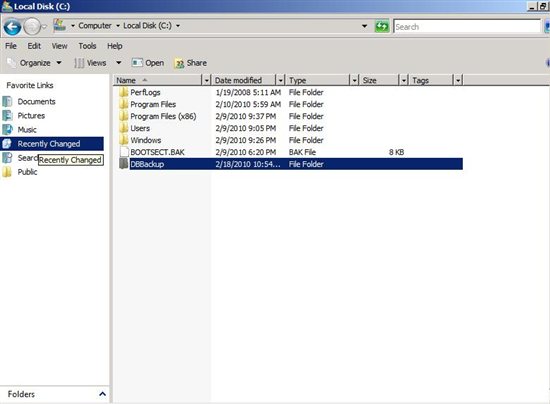
To create the DBBackup Folder:
- Log on to SQL1.fabrikam.com as fabrikam\Administrator
- Click Start, click Computer, and then double-click Local Disk (C:).
- Click File, point to New and then click Folder.
- Type DBBackup for the new folder, and then press ENTER.
Figure 6 – Create DBBackup Folder
To back up the DRMS_Config_rms_fabrikam_com_443 database:
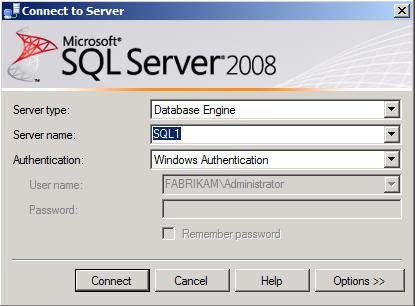
Log on to SQL1.fabrikam.com as Administrator.
Click Start, select All Programs, click Microsoft SQL Server 2008 and select SQL Server Management Studio. This will bring up the Connect to Server dialog box. Ensure that the Server name is SQL1 and that Authentication is set to Windows Authentication. Click Connect.
Figure 7 – Connect to SQL Server
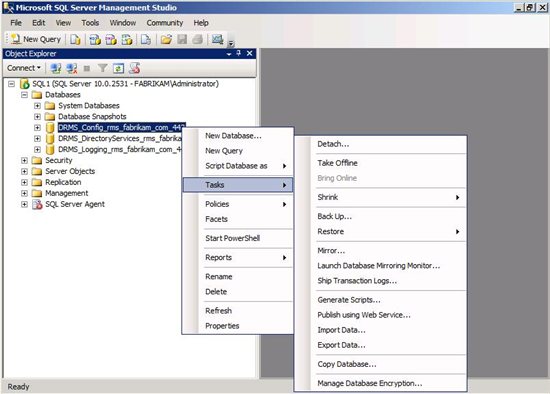
On the right, expand Databases. Right-click DRMS_Config_rms_fabrikam_com_443, select Tasks and choose Back Up. This will bring up the Back Up Database – DRMS_Config_rms_fabrikam_com_443 windows.
Figure 8 – Backup Database
From Back Up Database – DRMS_Config_rms_fabrikam_com_443, down under Destination, highlight the entry and click Remove. Click Add. This will bring up the Select Backup Destination box.
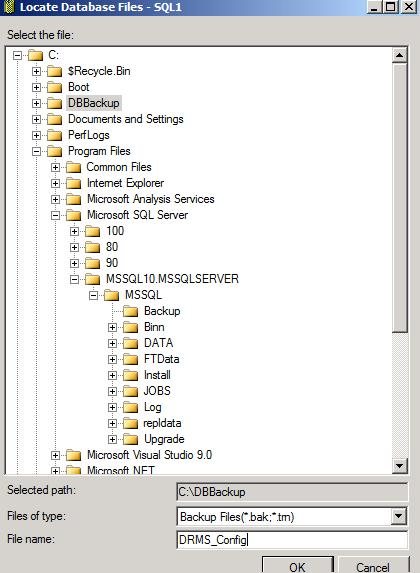
Click the … box. This will bring up the Locate Database Files – SQL1 window. Navigate to the folder that was created above. Enter DRMS_Config for the File Name and click OK.
Figure 9 – Locate Database Files
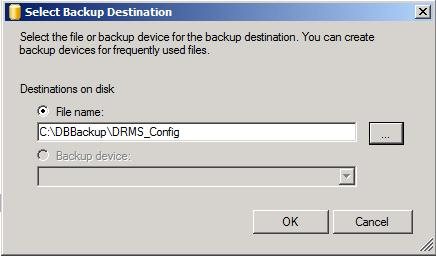
6. On the Select Backup Destination screen, click OK.
Figure 10 – Select Backup Destination
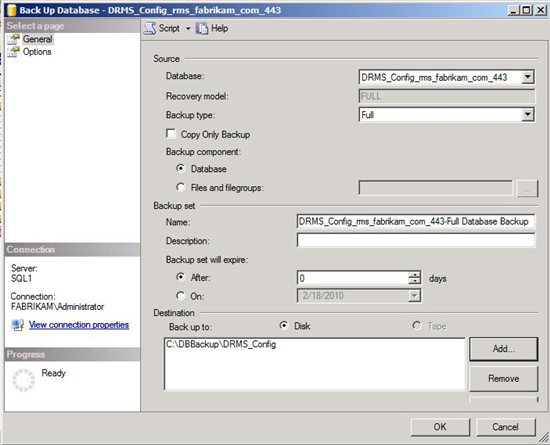
7. On the Back Up Database – DRMS_Config_rms_fabrikam_com_443 screen, click OK.
Figure 11 – How to Back Up Database should look before clicking OK
8. Once this has completed, a pop-up will say the database has been backed up successfully. Click OK.
Figure 12 – Backup Successful

To back up the DRMS_DirectoryServices_rms_fabrikam_com_443 database:
- Log on to SQL1.fabrikam.com as Administrator.
- Click Start, select All Programs, click Microsoft SQL Server 2008 and select SQL Server Management Studio. This will bring up the Connect to Server dialog box. Ensure that the Server name is SQL1 and that Authentication is set to Windows Authentication. Click Connect.
- On the right, expand Databases. Right-click DRMS_DirectoryServices_rms_fabrikam_com_443, select Tasks and choose Back Up. This will bring up the Back Up Database – DRMS_DirectoryServices_rms_fabrikam_com_443 windows.
- From Back Up Database – DRMS_DirectoryServices_rms_fabrikam_com_443, down under Destination, highlight the entry and click Remove. Click Add. This will bring up the Select Backup Destination box.
- Click the … box. This will bring up the Locate Database Files – SQL1 window. Navigate to the folder that was created above. Enter DRMS_Directory for the File Name and click OK.
- On the Select Backup Destination screen, click OK.
- On the Back Up Database – DRMS_DirectoryServices_rms_fabrikam_com_443 screen, click OK.
- Once this has completed, a pop-up will say the database has been backed up successfully. Click OK.
To back up the DRMS_Logging_rms_fabrikam_com_443 database:
- Log on to SQL1.fabrikam.com as Administrator.
- Click Start, select All Programs, click Microsoft SQL Server 2008 and select SQL Server Management Studio. This will bring up the Connect to Server dialog box. Ensure that the Server name is SQL1 and that Authentication is set to Windows Authentication. Click Connect.
- On the right, expand Databases. Right-click DRMS_Logging_rms_fabrikam_com_443, select Tasks and choose Back Up. This will bring up the Back Up Database – DRMS_Logging_rms_fabrikam_com_443 windows.
- From Back Up Database – DRMS_Logging_rms_fabrikam_com_443, down under Destination, highlight the entry and click Remove. Click Add. This will bring up the Select Backup Destination box.
- Click the … box. This will bring up the Locate Database Files – SQL1 window. Navigate to the folder that was created above. Enter DRMS_Logging for the File Name and click OK.
- On the Select Backup Destination screen, click OK.
- On the Back Up Database – DRMS_Logging_rms_fabrikam_com_443 screen, click OK.
- Once this has completed, a pop-up will say the database has been backed up successfully. Click OK.
Video 4 - Create database backups