AD RMS: Relocating databases (Part 3) Restoring the AD RMS databases
Overview
The following is an abridged version of the official TechNet documentation. This version is slightly shorter than the original and does not go into testing the databases once they have been moved. This version does, however, provide accompanying video to assist and clarify the steps. For the original TechNet, version see AD RMS Database Relocation without a CNAME Record – Step-by-Step (http://go.microsoft.com/fwlink/?LinkID=188464) or a full version can be downloaded from the Microsoft Download Center (http://go.microsoft.com/fwlink/?LinkId=191155).
Article Series
This topic consists of the following three articles:
- Relocating the AD RMS databases – Part 1 – Preparing the new SQL Server (http://go.microsoft.com/fwlink/?LinkID=191125)
- Relocating the AD RMS databases – Part 2 – Backing up the existing AD RMS databases (http://go.microsoft.com/fwlink/?LinkID=191126)
- Relocating the AD RMS databases – Part 3 – Restoring the AD RMS databases (http://go.microsoft.com/fwlink/?LinkID=191127)
Restoring the AD RMS databases
The following steps cover how to backup the existing AD RMS databases. The following four steps are covered below:
- Restore the Database to the New SQL Server
- Use RMSConfigEditor to edit DRMS_ClusterPolicies
- Modify the AD RMS Server Registry
- Restart IIS and AD RMS Logging Service
Restore the Database to the New SQL Server
This step explains how to restore the databases that were backed up from SQL1 in the last step.
To copy the databases over to SQL2:
- Log on to SQL2.fabrikam.com as fabrikam\Administrator
- Click Start, select Run and enter \SQL1\C$ in the box. Click OK.
- Navigate to C:\DBBackup on SQL1. Copy the entire folder to C:\DBBackup on SQL2.
- When the copy is complete you can close the SQL1\C$ window.
To restore the DRMS_Config_rms_fabriakam_com_443 databases from SQL1:
Log on to SQL2.fabrikam.com as fabrikam\Administrator.
Click Start, select All Programs, click Microsoft SQL Server 2008 and select SQL Server Management Studio. This will bring up the Connect to Server dialog box. Ensure that the Server name is SQL2 and that Authentication is set to Windows Authentication. Click Connect.
On the right, right-click Databases and select Restore Database. This will bring up the Restore Database window.
Figure 1 – Restore Database

On the Restore Database screen, select the From Device radio button and click the … box. This will bring up the Specify Backup screen.
Figure 2 – Select From Device

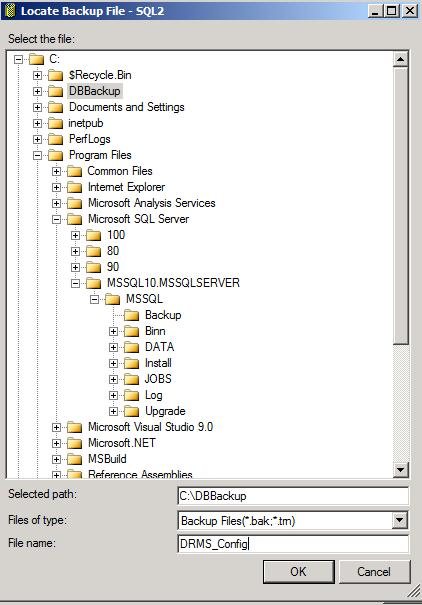
On the Specify Backup screen, click Add. This will bring up the Locate Backup File – SQL2 screen.
Figure 3 – Specify Backup

Select the DBBackup folder. Enter DRMS_Config for the File Name and click OK.
Figure 4 – Locate Backup File – SQL2
On the Specify Backup screen click OK.
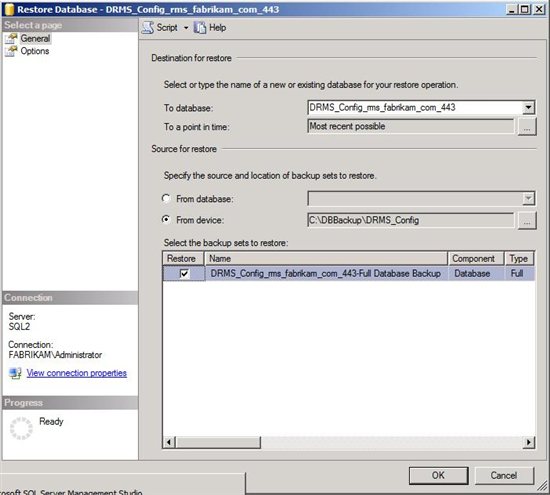
On the Restore Database screen, in the drop-down next to To database: select DRMS_Config_rms_fabrikam_com_443.
On the Restore Database screen, under Select the backup sets to restore: place a check in the Restore box, next to DRMS_Config_rms_fabrikam_com_443-Full Database Backup. Click OK.
Figure 5 - Restore
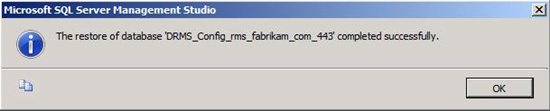
Once this has completed, a pop-up will say the database has been restored successfully. Click OK.
Figure 6 – Restore Successful
To restore the DRMS_DirectoryServices_rms_fabriakam_com_443 databases from SQL1:
- Log on to SQL2.fabrikam.com as fabrikam\Administrator.
- Click Start, select All Programs, click Microsoft SQL Server 2008 and select SQL Server Management Studio. This will bring up the Connect to Server dialog box. Ensure that the Server name is SQL2 and that Authentication is set to Windows Authentication. Click Connect.
- On the right, right-click Databases and select Restore Database. This will bring up the Restore Database window.
- On the Restore Database screen, select the From Device radio button and click the … box. This will bring up the Specify Backup screen.
- On the Specify Backup screen, click Add. This will bring up the Locate Backup File – SQL2 screen. Select the DBBackup folder. Enter DRMS_Directory for the File Name and click OK.
- On the Specify Backup screen click OK.
- On the Restore Database screen, in the drop-down next to To database: select DRMS_DirectoryServices_rms_fabrikam_com_443.
- On the Restore Database screen, under Select the backup sets to restore: place a check in the Restore box, next to DRMS_DirectoryServices_rms_fabrikam_com_443-Full Database Backup. Click OK.
- Once this has completed, a pop-up will say the database has been restored successfully. Click OK.
To restore the DRMS_Logging_rms_fabriakam_com_443 databases from SQL1:
- Log on to SQL2.fabrikam.com as fabrikam\Administrator.
- Click Start, select All Programs, click Microsoft SQL Server 2008 and select SQL Server Management Studio. This will bring up the Connect to Server dialog box. Ensure that the Server name is SQL2 and that Authentication is set to Windows Authentication. Click Connect.
- On the right, right-click Databases and select Restore Database. This will bring up the Restore Database window.
- On the Restore Database screen, select the From Device radio button and click the … box. This will bring up the Specify Backup screen.
- On the Specify Backup screen, click Add. This will bring up the Locate Backup File – SQL2 screen. Select the DBBackup folder. Enter DRMS_Logging for the File Name and click OK.
- On the Specify Backup screen click OK.
- On the Restore Database screen, in the drop-down next to To database: select DRMS_Logging_rms_fabrikam_com_443.
- On the Restore Database screen, under Select the backup sets to restore: place a check in the Restore box, next to DRMS_Logging_rms_fabrikam_com_443-Full Database Backup. Click OK.
- Once this has completed, a pop-up will say the database has been restored successfully. Click OK.
Video 1 - Restore the Database to the New SQL Server
Use RMSConfigEditor to edit DRMS_ClusterPolicies
This step explains how to use RMSConfigEditor to edit DRMS_ClusterPolicies. This is done so in order to change the configuration information that is stored in the AD RMS configuration database.
Figure 7 – RMS Config Editor

To use RMSConfigEditor:
Log on to ADRMS.fabrikam.com as fabrikam\Administrator.
Click Start, select Computer, double-click C: double-click Program Files (x86), double-click RMS SP2 Administration Toolkit, double-click RMSConfigEditor, and double-click RMSConfigEditor.exe. This will bring up the RMS Config Editor.
At the top, under Server: type SQL2 and click Go. This will populate the Database: box with DRMS_Config_rms_fabrikam_com. Click the Go button next to the Database. This will populate the left-side of the screen.
On the left, scroll down and select DRMS_ClusterPolicies. This will populate the middle of the screen with information.
Change the value for each item listed in the table below. Do this by clearing the value in PolicyData and replacing it with the value in the table, then hit the Persist button at the top.
Figure 8 – DRMS_Config_rms_fabrikam_com
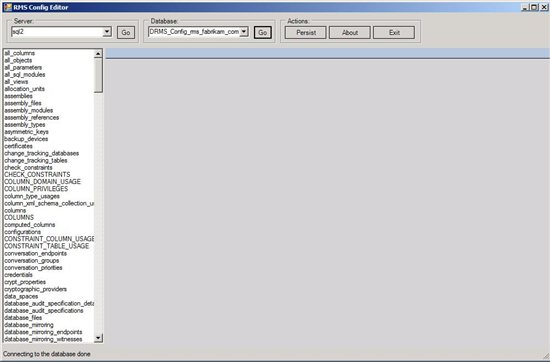
Table 1 - RMS Config Editor PolicyName and PolicyData
PolicyName
PolicyData
LoggingDatabaseServer
RMS-SQL
CertificationUserKeyStorageConnection
data source=RMS-SQL;integrated security=SSPI;persist security info=False;packet size=4096;database=DRMS_Config_rms_fabrikam_com_443
DirectoryServicesCacheDatabase
data source=RMS-SQL;integrated security=SSPI;persist security info=False;packet size=4096;database=DRMS_DirectoryServices_rms_fabrikam_com_443
Use the following steps for all the items listed in table 1 above.
Close RMS Config Editor.
Figure 9 – DRMS_ClusterPolicies

Video 2 - Use RMSConfigEditor to edit DRMS_ClusterPolicies
Modify the AD RMS Server Registry
This step explains how to modify the registry on the AD RMS server
To modify the AD RMS Registry:
Log on to ADRMS.fabrikam.com as fabrikam\Administrator.
Click Start, select Run and enter regedit in the box. Click OK. This will bring up the registry editor.
In the registry editor, navigate to HKEY_LOCAL_MACHINE\SYSTEM\ControlSet001\services\AdRmsLoggingService\Params
On the right, right-click ConnectionString and select Modify. Under Value data: enter data source=RMS-SQL;integrated security=SSPI;persist security info=False;packet size=4096;database=DRMS_Config_rms_fabrikam_com_443. Click OK.
Change the registry value for each item listed in the table below. Do this by navigating to the key, selecting the existing value and choosing Modify.
Figure 10 – Registry Editor
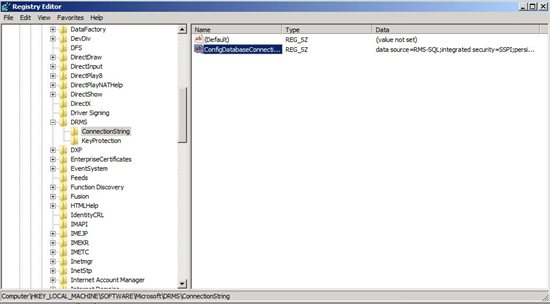
Table 2 - Registry Settings
Registry Key
Data
HKEY_LOCAL_MACHINE\SYSTEM\ControlSet001\services\AdRmsLoggingService\Params\ConnectionString
data source=RMS-SQL;integrated security=SSPI;persist security info=False;packet size=4096;database=DRMS_Config_rms_fabrikam_com_443
HKEY_LOCAL_MACHINE\SYSTEM\ControlSet001\services\AdRmsLoggingService\Params\LoggingDatabaseServer
RMS-SQL
HKEY_LOCAL_MACHINE\SOFTWARE\Microsoft\DRMS\2.0\ConnectionString\ConfigDatabaseConnectionString
data source=RMS-SQL;integrated security=SSPI;persist security info=False;packet size=4096;database=DRMS_Config_rms_fabrikam_com_443
Figure 11 - HKEY_LOCAL_MACHINE\SOFTWARE\Microsoft\DRMS\ConnectionString

For this step you will need to export the key, then edit the exported text file to change the name.
Remove the old one (you may want to save the original exported version)
Then import the changed one back in.
HKLM/Software/Microsoft/DRMS/2.0/KeyProtection
There will be a key in here that starts PasswordDerivedKey_<SQL Server>...
You will need to change this to reflect the new SQL database name.
Note: If you are using a database instance and/or port the name needs to reflect this. So if your SQL string is SQLServer01\RMSDB,11553, then your key needs to show PasswordDerivedKey_SQLServer01\RMSDB,11553...
HKLM\System\ControlSet\Services\AdRMSLoggingService\Params,
Value name: ConnectionString
Value name: LoggingDatabaseServer
HKLM\Software\Microsoft\DRMS\ConnectionString
Value name: ConfigDatabaseConnectionString
Close Registry Editor.
Video 3 - Modify the AD RMS Server Registry
Restart IIS and AD RMS Logging Service
This step explains how to start the Internet Information Server and the AD RMS Logging Service.
To start IIS:
- Log on to ADRMS.fabrikam.com as fabrikam\Administrator.
- Click Start, point to Administrative Tools and then click Internet Information Services (IIS) Manager. This will bring up the Internet Information Services (IIS) Manager.
- From the Internet Information Services (IIS) Manager, on the left, select ADRMS (FABRIKAM\Administrator). On the right, under Actions select Start.
- Close the Internet Information Services (IIS) Manager.
Figure 12 – Restart IIS

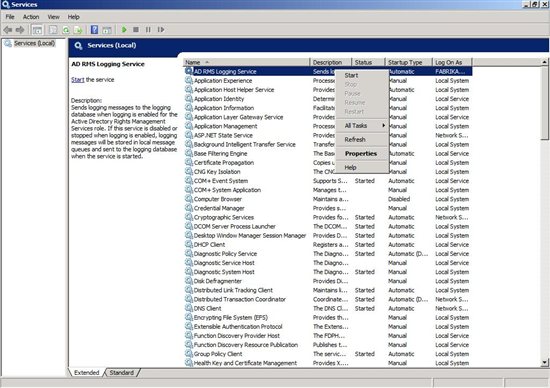
To start the AD RMS Logging Service:
- Log on to ADRMS.fabrikam.com as fabrikam\Administrator.
- Click Start, point to Administrative Tools, and then click Services.
- On the Services screen, right-click AD RMS Logging Service, and select Start.
- Close Services.
Figure 13 – Start AD RMS Logging Service
Video 4 - Restart IIS and AD RMS Logging Service