Disaster Recovery Guide for Active Directory Rights Management Services
Author:
Prasada Meegada
Technical Lead, Information Security Team,
Bangalore, Microsoft India
Abstract
This white paper provides information and describes best practices on disaster recovery of Microsoft Active Directory Rights Management Services (AD RMS) for a Microsoft Windows Server™ 2008 or Windows Server™ 2008 R2 deployment. This discussion is appropriate for any enterprise customer who is attempting to fulfill their requirements for AD RMS disaster recovery scenarios. This paper analyses the potential breakdown points in an AD RMS system and the possible impacts on the infrastructure and sensitive data should a loss of service occur. In addition, the paper includes suggestions as to how to mitigate the risks of failure and how to restore AD RMS services.
1 Introduction
By using Active Directory Rights Management Services (AD RMS) and the AD RMS client, you can augment an organization's security strategy by protecting information through persistent usage policies, which remain with the information, no matter where it is moved. You can use AD RMS to help prevent sensitive information—such as financial reports, product specifications, customer data, and confidential e-mail messages—from intentionally or accidentally getting into the wrong hands.
RMS home page: www.microsoft.com/rms
The following scenarios of disaster recovery have been discussed in this white paper which will ensure a quick and fully functional AD RMS deployment in case of failures.
- Recovering from a cluster node failure
- Recovering from a full cluster failure
- Recovering from a database failure
- Recovering from a catastrophic cluster and database failure.
- Recovering AD RMS protected content
- Decommission an AD RMS cluster
2 Disaster Recovery
Access to your sensitive data depends on the continuous availability of various components in the AD RMS system. Each of the AD RMS components has varying degree of impact on data access. This white paper talks about all such potential breakdown points, degree of impact and mitigation plans.
2.1 Recovering from a cluster node failure
If an AD RMS cluster node fails while there are other nodes still available in the same AD RMS cluster, the following process will enable full recovery.
Remove the server from the load balanced pool.
There’s no technical need to remove the node from the cluster as other cluster nodes will not reference it or contact it during normal operations, though if it is possible to uninstall the AD RMS role from the node this will clean up references to the node in the AD RMS database.
Verify that the RMS Message Queue is cleared and recovered.
After an RMS node failure there might still be messages in the local queue in the server that haven’t been flushed to the AD RMS databases. If the server is still functional and it is suspected that there might be outstanding messages in the local message queue, flush the Message Queue service to the database by using the RMS Queue Recovery tool from the AD RMS Administration Toolkit.
Shut down the server and reinstall all operating system software on it.
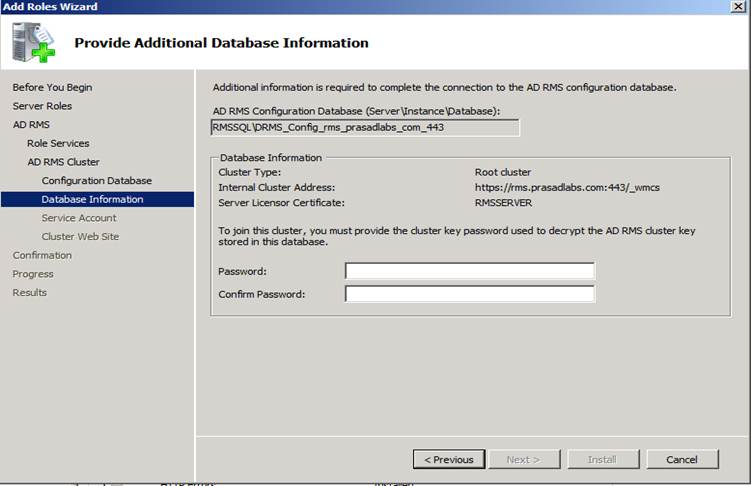
Reinstall the AD RMS role in the server by using the steps in the Step by Step deployment guides or see Join an AD RMS Server to an Existing Cluster, adding the AD RMS node to the existing cluster via the existing database as shown in figure 1 below. Make sure that the proper alias is used for the database and not the database server’s physical name.

Select the SQL server, database instance and the configuration database name.

*
*In the next screen, provide the password for cluster key.
2.2 Recovering from a full cluster failure
In the event that the last node in an existing cluster fails, or all of the nodes in an existing cluster become non-functional, the procedure remains same as mentioned in section 2.1 except for point number 2 mentioned below.
Remove the servers from the load balanced pool.
Identify the cause of the original failure and resolve it. If there are errors in the cluster’s configuration that caused the system failure, the errors might need to be corrected directly in the configuration database before continuing with the recovery.
There’s no technical need to remove the failed nodes from the cluster as new cluster nodes will not reference or contact them during normal operations, though if it is possible to uninstall the AD RMS role from the failed nodes this will clean up references to the nodes in the AD RMS database.
After an RMS node failure there might still be messages in the local queue in the servers that haven’t been flushed to the AD RMS databases. If the servers are still functional and it is suspected that there might be outstanding messages in the local message queues, flush the Message Queue service to the database by using the RMS Queue Recovery tool from the AD RMS Administration Toolkit.
Shut down the servers and reinstall all operating system software on them.
Reinstall the AD RMS role on each of the servers by using the steps in the Step by Step deployment guides or see Join an AD RMS Server to an Existing Cluster, adding the AD RMS node to the existing cluster via the existing database as shown in figure 1 below. Make sure that the proper alias is used for the database and not the database server’s physical name.
Add the servers back to the load balanced pool.
Note
In both the above scenarios (Recovering from a Cluster Node Failure and Recovering from a Full Cluster Failure), in environments where SCP (Service Connection Point) for AD RMS service discovery is not registered in Active Directory, the option for “Join an existing AD RMS cluster” in the AD RMS installation wizard will be greyed out. To enable this option, we need to create the following registry key.
Key Details
The full registry subkey path for server-side service discovery is:
HKEY_LOCAL_MACHINE\Software\Microsoft\DRMS\
The following table lists the entry that you can add to enable “Join an existing AD RMS cluster” option.
Name |
Type |
Value |
GicURL |
String |
http(or https)://server_name/_wmcs/certification/certification.asmx |
**Note
**In both the above scenarios (Recovering from a Cluster Node Failure and Recovering from a Full Cluster Failure), if the new AD RMS server names have changed and you want to clean up the old AD RMS server names from AD RMS management console, you will need to edit the DRMS_ ClusterServer table in the AD RMS configuration database using the following steps:
- Log on to the ADRMS server.
- Click Start, select Computer, double-click C:, double-click Program Files (x86), double-click RMS SP2 Administration Toolkit, double-click RMSConfigEditor, and then double-click RMSConfigEditor.exe. This will bring up the RMS Config Editor. RMS Config Editor is part of AD RMS Administration Toolkit.
- At the top, under Server: type the SQL server name and click Go. This will populate the Database: box with DRMS_Config_rms_fabrikam_com. Click the Go button next to Database. This will populate the left-side of the screen.
- On the left, scroll down and select DRMS_ ClusterServer. This will populate the middle of the screen with the names of the new and stale AD RMS servers
- Click the arrow next to any row you want to remove and then press Delete.
- Click the Persist button at the top.
2.3 Recovering from a database failure If the active AD RMS database server fails, AD RMS nodes will continue to work until rebooted or the service is restarted. In this situation the servers will work in reduced functionality in which the following functionality will not be available:
AD RMS cluster nodes cannot be restarted. If reboot, servers will not join the cluster until the database is available.
New AD RMS users, or existing users connecting from new computers or devices, will not be able to use AD RMS until connection to the database is restored, as the AD RMS certification pipelines will not be able to perform certification without access to the database. The same applies to existing users whose existing credentials expire, typically after one year from initial certification.
Exchange pre-licensing will not work until database connectivity is restored. Users will have to acquire licenses when consuming content since the pre-licensing functionality requires obtaining copies of the user’s RACs from the AD RMS configuration database. It is possible to configure AD RMS to pre-cache users RACs to speedup pre-licensing, and this will also enable Exchange pre-licensing to continue working offline when the AD RMS configuration database is not available.
It will not be possible to perform revocation of entities whose GUID needs to be obtained from the AD RMS databases, such as user’s RACs or workstations GUIDs.
Reporting will not be available until the AD RMS logging database becomes reachable.
If the Directory Services Cache database is unavailable, all the AD RMS group membership queries will be redirected to the global catalogs servers. There is no noticeable reduction in RMS services when this table is not available for short periods of time.
During this period, the AD RMS nodes will continue to operate and log operations, but the information generated by logging of AD RMS operations will continue to be stored in each node’s local message queue, and it will be flushed to the database when connectivity to the database server is restored.
In case of an AD RMS database failure, there might be the following two possible disaster recovery scenario.
Note
Do not reboot any AD RMS server until the database operation is restored, unless it is desired to stop the AD RMS service altogether.
2.3.1 Restoring AD RMS services when contingency database server is not available
Prepare the new database server which involves the following (Refer Appendix B for more information):
- Add DisableStrictNameChecking Registry Key
- Enable SQL Firewall Ports
- Enable SQL Server Network Protocols
- Add AD RMS service account to SQL Logins
- Change the CNAME record in DNS
Restore a prior backup of the existing database (in particular, the configuration database needs to be restored, the logging database needs to be restored to an empty state or to a recent state if it contains information of a period that’s of interest for reporting or troubleshooting and the Directory Services Caching database can be restored to any state, including the empty initial state, as it will be regenerated as needed). This step will involve the following (Refer Appendix C for more information):
Restore the database to the new SQL server.
NOTE: If CNAME record was not used earlier for SQL server, then we need to create a CNAME record instead of pointing to the physical server and do the following additional steps:
- Create CNAME record. For more information, see Step 18 - Create CNAME Record (http://technet.microsoft.com/en-us/library/ff660056(WS.10).aspx) in the AD RMS Database Relocation Step-by-Step Guide.
- Use RMSConfigEditor to edit DRMS_ClusterPolicies. For more information, see Step 19 - Use RMSConfigEditor to edit DRMS_ClusterPolicies(http://technet.microsoft.com/en-us/library/ff660023(WS.10).aspx) in the AD RMS Database Relocation Step-by-Step Guide.
- Modify the AD RMS server registry. For more information, see Step 20 - Modify the AD RMS server registry (http://technet.microsoft.com/en-us/library/ff660033(WS.10).aspx) in the AD RMS Database Relocation Step-by-Step Guide.
Restart IIS and restart the AD RMS logging service on the AD RMS server.
Reboot the AD RMS servers one by one to confirm they can connect to the new database server normally.
2.3.2 Restoring AD RMS services when contingency database server is available
This scenario is most appropriate when the local data center site has failed or the SQL storage has failed and need to bring the AD RMS services functional at a remote data center site.
Prepare the new database server which involves the following (Refer Appendix B for more information):
- Add DisableStrictNameChecking Registry Key
- Enable SQL Firewall Ports
- Enable SQL Server Network Protocols
- Add AD RMS service account to SQL Logins
- Change the CNAME record in DNS
Stop the existing database server. Fail over to the secondary database server (by changing the appropriate DNS server record or using some other redirection mechanisms).
Restore the database to the new SQL server.
NOTE: If CNAME record was not used earlier for SQL server, then we need to create a CNAME record instead of pointing to the physical server and do the following additional steps:
- Create a new CNAME record in the DNS namespace for the new SQL alias. For more information, see Step 18 - Create CNAME Record (http://technet.microsoft.com/en-us/library/ff660056(WS.10).aspx) in the AD RMS Database Relocation Step-by-Step Guide.
- Use RMSConfigEditor to edit DRMS_ClusterPolicies to replace the SQL server physical name with the new SQL server alias. For more information, see Step 19 - Use RMSConfigEditor to edit DRMS_ClusterPolicies(http://technet.microsoft.com/en-us/library/ff660023(WS.10).aspx) in the AD RMS Database Relocation Step-by-Step Guide.
- Modify the AD RMS server registry to let AD RMS server to point to the new SQL alias instead of pointing to the SQL server physical name. For more information, see Step 20 - Modify the AD RMS server registry (http://technet.microsoft.com/en-us/library/ff660033(WS.10).aspx) in the AD RMS Database Relocation Step-by-Step Guide.
If AD RMS cluster nodes are functional at the local site, then reboot the AD RMS servers one by one to confirm they can connect to the new database server normally.
If AD RMS cluster nodes also have failed at local site due to reasons like natural calamity, then install a new AD RMS cluster nodes by following the procedure mentioned in section 2.2 “Recovering from a full cluster failure” of this white paper.
Shut down and fix or reinstall the original database server and perform the necessary steps to reverse the direction of the replication of the database servers.
Note For more information on SQL log shipping and exporting the AD RMS databases, see Appendix D and Appendix A.
2.4 Recovering from a catastrophic cluster and database failure
If for any reason the AD RMS database servers are destroyed and there’s no valid, functional backup or secondary database containing valid data to restore the AD RMS cluster to a valid working state, the following process should be followed:
Confirm that a backup of the cluster’s Trusted Publishing Domain(TPD) is available. This backup should have been performed after initial installation and stored in a safe place, protected with a password that’s documented and stored in a separate safe location.
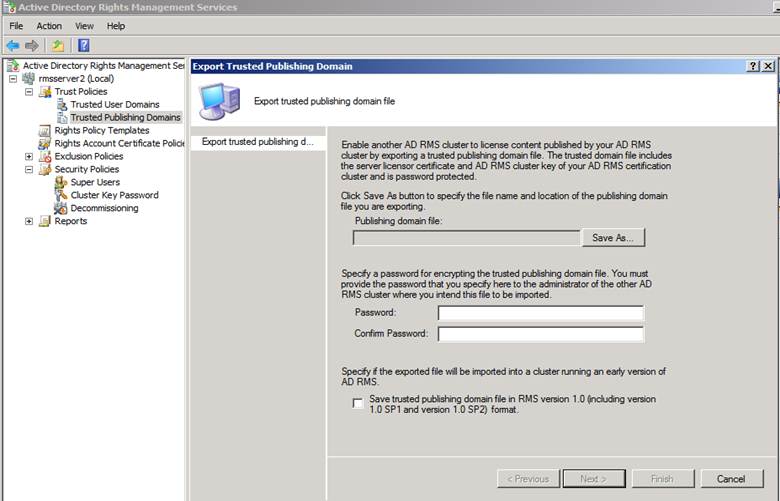
Figure 4: Exporting TPD file (includes Server Licensor Certificate and AD RMS cluster key)
NOTE: By default, an AD RMS Licensing Server can issue use licenses for only content where it originally issued the publishing license. In some situations, this may not be acceptable. By adding a TPD trust policy, it allows for one AD RMS cluster to issue use licenses against publishing licenses that were issued by a different AD RMS cluster. You add a trusted publishing domain by importing the server licensor certificate and private key of the server to trust.
The following are examples of when TPD trust policy is added to an AD RMS cluster:
- In a disaster recovery scenario like this where the AD RMS cluster and database are lost and existing rights protected content needs to be accessed.
- In the event when one cluster running AD RMS is to be discontinued, users may still want to access previously protected content that was issued a publishing license by that computer. Servers in other clusters can then add the to-be-discontinued server as a trusted publishing domain.
- One company acquires another company.
Install a new AD RMS cluster:
Delete the existing Service Connection Point from AD as shown in figure 5. This is critical as the existence of a registered Service Connection Point will prevent the installation of a new certification cluster in the same forest.
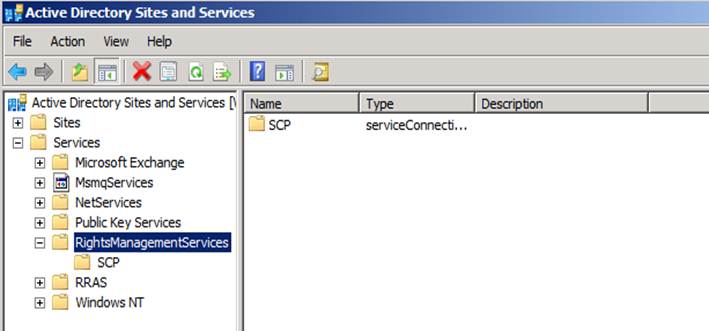
Figure 5 : Deleting AD RMS Service Connection Point (SCP) from AD
Install a new database server or provision a database server able to be used to host a new AD RMS database.
Install a new node on a new AD RMS certification cluster with the same AD RMS URLs, pointing it to the new AD RMS database.
If it has been decided to use a different AD RMS URL instead of the actual/old one, then the following additional actions are necessary:
- When content protected by the old/non-existent AD RMS servers is consumed, the request for use license will be generated for the old AD RMS URL as indicated in the publishing license (PL). To ensure clients can resolve the old AD RMS URL to the IP address of the new AD RMS server or to the load balanced IP address you will need to make the correpsonding changes in the DNS data.
- The SSL certificate used to bind with AD RMS website needs to accommodate both the new and old AD RMS URL’s. Typically a SAN (Subject Alternate Names) certificate is a good fit which can hold multiple URL entries. Alternately, a wild card certificate can also be used.
If using an HSM to protect the Server Licensor Certificate of the original cluster, a backup of the keys stored in that HSM for the cluster must be available. A new security world needs to be created in the HSM by importing the existing cluster’s keys.
Indicate setup to use a key stored in the database server if not using an HSM or in a specific cryptographic provider if an HSM will be used.
Finalize installation of the new cluster with identical parameters as used for the old cluster.
Import the Trusted Publishing Domain from the existing cluster. This will import the cluster’s private key definition and Server Licensor Certificate, which will enable the new cluster to issue licenses against documents protected with the old cluster as shown in the following figure.

Figure 6: Importing Trusted Publishing Domain file
Re-create any existing Rights Policy Templates using definitions similar to the ones in the old cluster. While importing the TPD will also import definitions of all the existing templates, the existing templates will be imported as Archived templates, not as Distributed Rights Policy templates. So the old templates will be available to the server in order to issue licenses to previously protected content, but new templates will be required for the users to be able to protect new documents.
It is recommended that the DRM folder in all the user’s personal profiles are deleted via a script, as this will make them begin using the new cluster keys.
2.5 Recovering AD RMS protected content
In any organization there’s often a need to identify content (typically in the form of documents or email) related to certain proceedings and grant access to those materials to specialized personnel. Another common situation involves the need for recovering information protected by employees without their cooperation, for example, because they no longer work for the company.
AD RMS provides tools and capabilities to regain access to protected documents in different situations, in either an automated or systematic manner or as individual recovery or search operations.
Documents protected with AD RMS can be stored in different locations, among them:
- A user’s workstation inside a personal folder
- A user workstation inside a PST connected to Outlook
- A file share
- A SharePoint library
- A user’s mailbox or in transit in an Exchange infrastructure
- An archival system
There are three common situations where access to protected information is needed:
The documents containing the information are already in the hands of the persons requiring access.
The documents are known to be located in a certain location but the particular documents containing the information in question are not identified.
There’s a need to proactively identify all documents pertaining to a certain matter and archive them in unprotected or accessible form.
In the first case, which is common when auditors have access to a user’s workstation and they want to read or unprotect a particular piece of information found in the user’s machine, access to the documents can be enabled by making that person, either temporarily or permanently, a member of the SuperUsers group and enabling SuperUsers functionality in AD RMS. Refer Figure 7.
When a user is a member of the AD RMS Superusers group that user is granted any license it requests, so the user can view, copy or unprotect the content at will. Obviously this functionality has to be managed in a very controlled way.
Enabling SuperUser’s group:
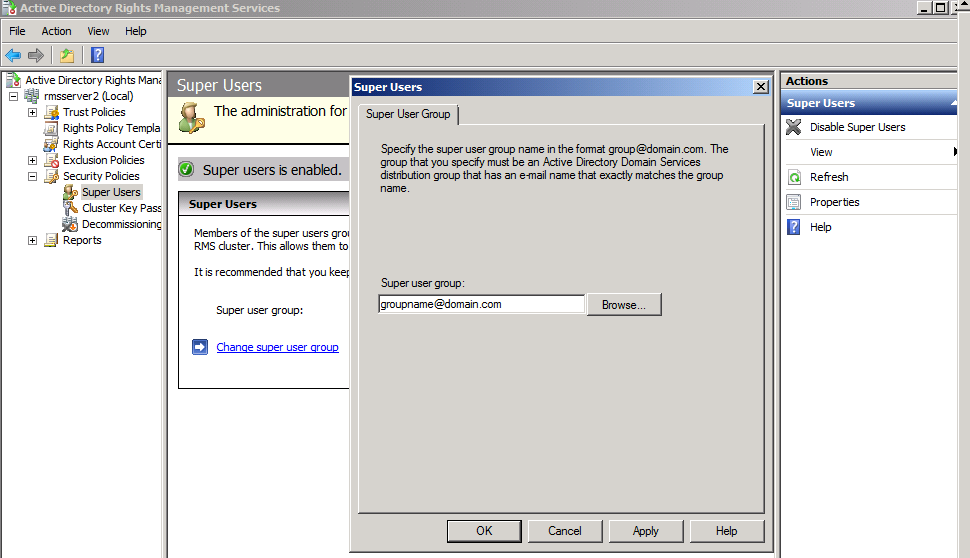
Figure 7: Enabling SuperUsers group
For additional step-by-step guidance on enabling the SuperUsers group, see Configure the AD RMS Super Users Group.
Another alternative for dealing with this case is to allow one person that is a member of the SuperUsers group to perform bulk decryption of all documents in a certain location, and then handling the protected documents to the person requiring access. The information can then be indexed and searched using normal tools for the task.
Considering that the information is likely sensitive, a formal and secure process for dealing with these proceedings needs to be defined.
For this task, Microsoft has published a tool called the AD RMS Bulk Protection Tool which can be used to encrypt files via the command line or, more importantly in this case, unprotect them. The bulk protection tool can be combined with a script to search all protected files in a system and unprotect them, allowing someone performing discovery full access to all the files in the system.
The Bulk Protection Tool can work not only on file shares, but also on emails and attachments stored in a PST. This way emails archived into a PST can also be unprotected in bulk, indexed and searched as needed. Typically, the bulk protection tool will be combined with SuperUser privileges in order to access files or emails in a user’s workstation.
The Bulk Protection tool can be downloaded from http://www.microsoft.com/downloads/details.aspx?displaylang=en&FamilyID=f9fbe58f-c175-41d0-afdc-6f160ab809cd.
Figure 8 shows a very simple usage scenario of bulk protection tool.
*
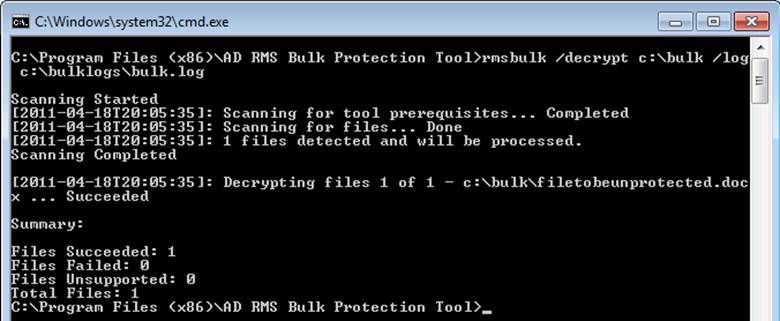
Figure 8: AD RMS Bulk Protection tool usage*
When files are stored in a protected SharePoint library, they are stored in the database in unprotected format, and they are only protected when downloaded via the SharePoint interfaces. So a person performing e-discovery only needs to be granted access rights over the SharePoint library in order to be able to perform searches or downloads of protected documents. Alternatively, by granting that person direct rights over the SQL Server database acting as the back-end of the SharePoint library the user will be able to extract the unprotected files directly from the database.
When information needs to be automatically and proactively decrypted for performing automated e-discovery or archival, similar solutions typically allow automating the task of unprotecting documents.
Since the Bulk Protection tool can also work with files stored in file shares, it can be also used combined with scripts and scheduled tasks, or with the File Server Resource Manager that’s part of Windows Server 2008 R2, to automatically create unprotected backups of protected files deposited in the file share. Once unprotected files can be accessed and indexed as desired.
2.6 Decommissioning an AD RMS cluster
Decommissioning allows an RMS cluster to be put in a state that will allow all existing documents to be unprotected. It is normally only done only when the use of AD RMS will be fully removed from an organization. To eliminate an AD RMS cluster in situations where other AD RMS clusters will continue to operate, a better solution might normally be to implement a Trusted User Domain (TUD) instead.
The following section provides step-by-step guidance steps to put an AD RMS cluster into the decommissioning state.
2.6.1 Enable decommissioning of an AD RMS cluster
Open the AD RMS console.
In the AD RMS console treeview, under Active Directory Rights Management Services, expand the current AD RMS cluster.
Expand Security Policies, and then click Decommissioning.
In the Actions pane, click Enable Decommissioning and then click Decommission.
Click Yes to confirm decommissioning of the AD RMS cluster.

Figure 9 : Enabling decommissioning serviceFigure 9: Enabling decommissioning of an AD RMS cluster
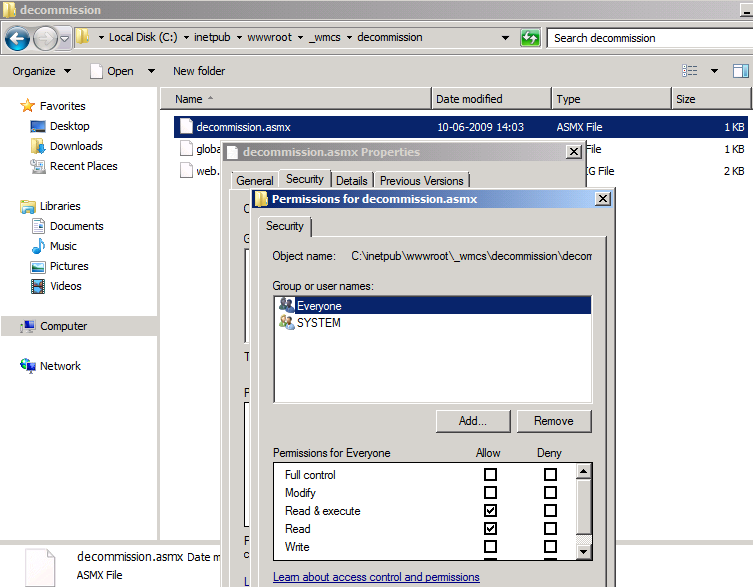
2.6.2 Modify permissions on the decommissioning pipeline
To complete the decommissioning process, you will want to modify permissions on the decommissioning pipeline. To do this, first you will want to grant the Active Directory Rights Management Services Service Group both Read & Execute permissions on the decommission folder. Next, you will want to give Everyone both Read & Execute permissions on the decommission.asmx file.
The decommission pipeline is located in the %systemroot%\inetpub\wwwroot\wmcs folder, where %systemroot% is the volume on which Windows Server 2008 is installed. For more information, refer to Figure 10 below.
- Click Start, type %systemdrive%\inetpub\wwwroot\wmcs in the Start Search box, and then press ENTER.
- Right-click the decommission folder, and then click Properties.
- Click the Security tab, then click Edit, and then click Add.
- In the Select Users, Computers, or Groups box, type %Active Directory Rights Management Services server name%\Active Directory Rights Management Services Service Group, and then click OK.
- Double-click the decommission folder, right-click decommission.asmx, and then click Properties.
- Click the Security tab, then click Edit, and then click Add.
- In the Select Users, Computers, or Groups box, type Everyone, and then click OK.
- In the Windows Security dialog box, enter the name and password of the domain administrator account.
- Click OK twice to close the properties sheet.
Figure 10: Read & Execute rights for Everyone on Decommissioning pipeline
2.6.3 Configure AD RMS-enabled applications to use the decommissioning pipeline
Configure the Active Directory Rights Management Services-enabled applications on the clients to obtain a content key from the decommissioning service and permanently decrypt the rights-protected content.
- Click Start, type regedit in the Start Search box, and then press ENTER.
- Navigate to HKEY_CURRENT_USER\Software\Microsoft\Office\12.0\Common\DRM.
- Right-click DRM, point to New, and then click Key.
- Type Decommission as the name for the registry key, and then press ENTER.
- Right-click Decommission, point to New, and then click String Value.
- Type https:// %Active Directory Rights Management Services server name%/_wmcs/licensing, and then press ENTER.
- Double-click the registry entry.
- In the Value data box, type https:// %Active Directory Rights Management Services server name%/_wmcs/decommission, and then click OK.
After you believe that all of the content is unprotected and saved, you should export the server licensor certificate. Then AD RMS nodes can be uninstalled. After uninstalling the last node, confirm that the AD RMS Service Connection Point has been removed in AD. If it hasn’t, it can be removed manually by deleting it from the AD RMS Sites and Services MMC, by using the PowerShell interface.
2.7 Backups required in a worst case DR scenario to rebuild AD RMS cluster from scratch
In a worst case DR scenario, the following backups are required:
A backup of SQL databases- Frequency of back up mentioned below
Configuration DB – A valid backup after each configuration change on the AD RMS cluster is a must.
Directory Services Cache DB - Can be restored to any state, including the empty initial state, as it will be regenerated as needed. Hence no recommendation on frequency.
Logging DB – Can be restored to an empty state or to a recent state if it contains information of a period that’s of interest for reporting or troubleshooting. If report generation is crucial, then a daily backup (or more frequent) of this database is required. In which ever state it is restored, it does not affect the AD RMS functionality.
A backup of Trusted Publishing Domain (TPD) – One time backup of TPD right after AD RMS is installed in the AD Forest. Please refer Appendix A.
Appendix A: Exporting AD RMS databases
The following steps cover how to full export all existing AD RMS databases for disaster recovery preparation:
- Export the Trusted Publishing Domain
- Stop the IIS (Web server) service, verify that the messaging queue is empty and then stop the AD RMS Logging service
- Create backups of all AD RMS databases
Export the Trusted Publishing Domain
The first step in exporting the AD RMS databases is to export or ensure you have backup of the trusted publishing domain (TPD) into an XML file. The following procedure helps explain how to accomplish this process.
To export the trusted publishing domain from your current AD RMS cluster deployment
In the AD RMS console, select Trusted Publishing Domains.
In the task pane on the right, select Export Trusted Publishing Domain.
This will bring up the Export Trusted Publishing Domain box.From the Export Trusted Publishing Domain, click Save As.
This will bring up the Export Trusted Publishing Domain File As box.In the Export Trusted Publishing Domain As box, select the folder on the left.
Under File name enter the filename and make sure XML File (*.xml) is selected for Save As Type, then click Save.
This will close the Export Trusted Publishing Domain As box.
From the Export Trusted Publishing Domain box, enter the password in the Password box, and then enter the password again in the Confirm Password box.
Click Finish.
Close the AD RMS console.

*Figure 1: Exporting Trusted Publishing Domain (TPD)
*
Stop IIS, Ensure MSMQ is Empty and Stop the AD RMS Logging Service
The next sequence of tasks to accomplish for preparing the export of the AD RMS databases is to stop dependent services and ensure that any pending acitivity that would make the databases inconsistent once exported (or when later restored) have been is resolved. This involves the following:procedures:
- Stop the IIS (Web server) service
- Ensure that the Messaging queue is empty
- Stop the AD RMS Logging service
To stop the IIS (Web Server) service
Click Start, point to Administrative Tools, and then click Internet Information Services (IIS) Manager on the AD RMS cluster node.
This will bring up the Internet Information Services (IIS) Manager.From the Internet Information Services (IIS) Manager, on the left, select the root node. On the right, under the Actions pane select Stop.
Close Internet Information Services (IIS) Manager.

Figure 2: Stop IIS
Ensure the Messaging Queue is Empty
This step explains how to verify the Microsoft Message Queuing is emptied and stop the AD RMS Logging Service. AD RMS uses MSMQ on each server in the AD RMS cluster to send information to the logging database. This needs to be done prior to backing up the AD RMS logging database.
Log on to AD RMS cluster node.
Click Start, point to Administrative Tools, and then click Server Manager.
In the console treeview on the left, expand Features, expand Message Queuing, expand Private Queues, expand drms_logging_rms_domain_com_443, and select Queue messages.
This will populate the middle pane with Queue messages.
Verify there are no messages remaining in Queue messages.as shown in the following figure.
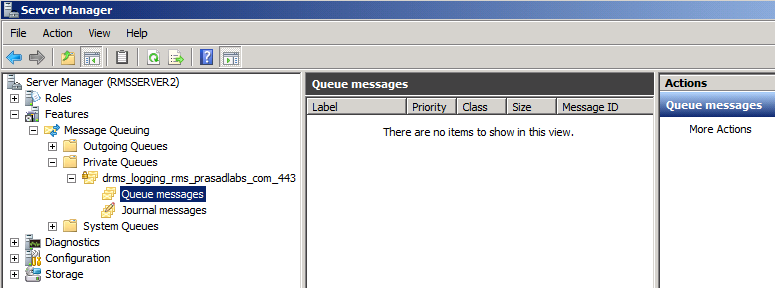
Figure 3: MSMQ is empty
Stop the AD RMS Logging Service
Log on to AD RMS cluster node.
Click Start, point to Administrative Tools, and then click Services.
On the Services screen, right-click AD RMS Logging Service, and select Stop.
Close Services.
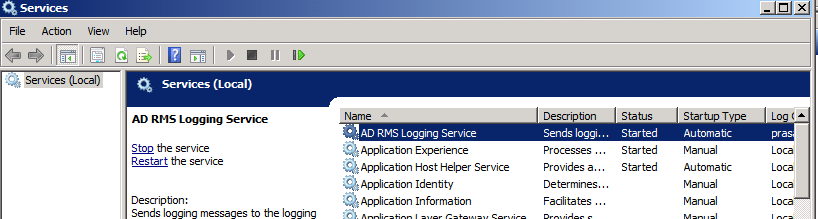
Figure 4: Stop AD RMS logging service
Create backups of all AD RMS databases
AD RMS uses three databases that will be hosted on a SQL database server installation:
- The configuration database – The configuration database is a critical component of an AD RMS installation because it stores, shares, and retrieves all configuration data and other data that the service needs to manage account certification, licensing, and publishing services for a whole cluster. The way the configuration database is managed directly affects the security and availability of rights-protected content. Each AD RMS cluster has one configuration database. The configuration database for the root cluster contains a list of Windows user identities and their rights account certificates (RACs). If the “Use AD RMS centrally managed key storage” option is enabled in the AD RMS configuration, the RMS cluster key pair is encrypted, before it is stored in the database, and used to sign certificates and licenses granted by the server.
- The directory services database contains information about users, identifiers (such as e-mail addresses), security ID (SID), group membership, and alternate identifiers. This information is a cache of directory services data, used by AD RMS, obtained via Lightweight Directory Access Protocol (LDAP) queries made to the Active Directory Domain Services (AD DS) global catalog by the AD RMS licensing service. It is used to improve performance and reduce the burden on the Active Directory infrastructure during licensing operations.
- The logging database - For each root or licensing-only cluster, by default, AD RMS installs a logging database in the same database server instance that hosts the configuration database. AD RMS also creates a private message queue for logging in the Microsoft Message Queue on each AD RMS server. The AD RMS logging service transmits data from this message queue to the logging database. A big difference between RMS v1 and AD RMS is that the certificate XrML text is, by default, not included in AD RMS logs. This information typically makes up almost 80-90% of the logging database space in RMS v1, but it is not logged by default in AD RMS, thus significantly reducing logging volumes. However, logging of full certificate XrML text can be enabled via a registry key.
To back up the AD RMS databases
Log on to the SQL server computer that hosts and stores your AD RMS databases.
From the Start menu, select All Programs, then click Microsoft SQL Server 2008 and then click SQL Server Management Studio.
This will bring up the Connect to Server dialog box. Ensure that the Server name is correct and that Authentication is set to Windows Authentication and then click Connect.
In the console treeview in SQL Serve Management Studio, expand Databases, then right-click DRMS_Config_rms_domain_com_443, select Tasks and then select Back Up.
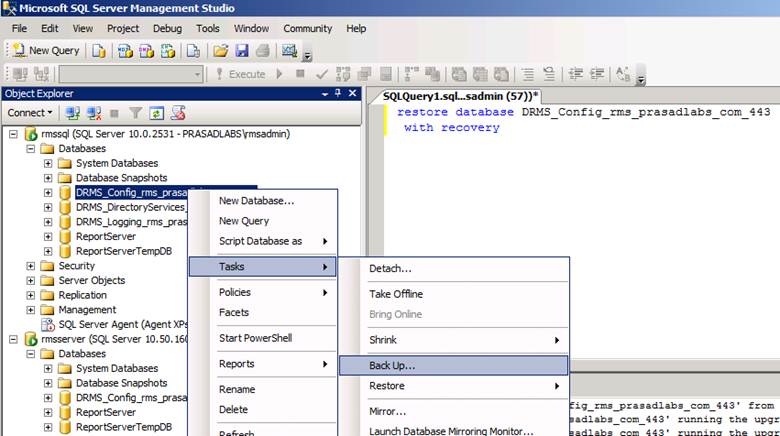
*Figure 5: Backup configuration database
*This will bring up the Back Up Database – DRMS_Config_rms_domain_com_443 window as shown in the following step.
In the Destination section as shown in the figure below, click Add and select the location.
*

Figure 6: Backup Configuration Database*
Click OK to finish the backup.
Repeat the above steps to backup logging and directory services cache database.
Appendix B: Preparing a new AD RMS database server
Before pointing the AD RMS cluster to a new SQL database server, following needs to be done:
- Add DisableStrictNameChecking Registry Key
- Enable SQL Firewall Ports
- Enable SQL Server Network Protocols
- Add AD RMS service account to SQL Logins
- Check the CNAME record in DNS
Add DisableStrictNameChecking Registry Key
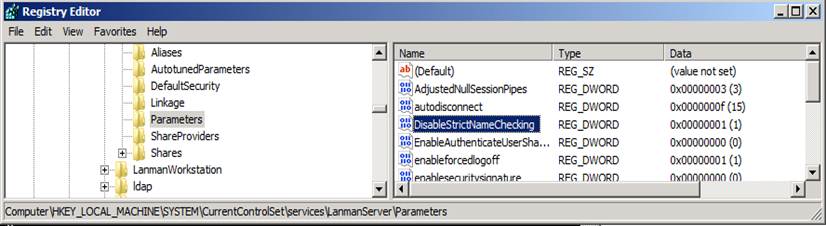
For disaster recovery purposes, it is a best practice to refer to the SQL server by a CNAME record and not by the physical server name. This allows for the SQL Server to be called something other than its proper name when a connection attempt is being made. In order to use a CNAME record with a SQL Server, the DisableStrictNameChecking registry key must be added and the value set to 1. This key allows connections to be made to the SQL server by names other than the proper name. By default, SQL Server 2008 will not allow this. Follow the procedure below to implement the registry change:
Log on to the SQL server.
Click Start, type regedit.exe in the Start Search box, and then press ENTER.
Expand the following registry key:
HKEY_LOCAL_MACHINE\SYSTEM\CurrentControlSet\Services\LanmanServer\Parameters
- Right-click Parameters, click New, and then click DWORD (32-bit) Value.
- In the Value name box, type DisableStrictNameChecking, and then press ENTER.
- Double-click the DisableStrictNameChecking registry value and type 1 in the Value data box, and then click OK.
- Close Registry Editor.
*
Figure 1: DisableStrictNameChecking registry key*
Enable SQL Firewall Ports
This step explains how to enable the firewall rules on the new SQL server. These rules are required to allow the AD RMS cluster to communicate with the SQL Server.
Log on to the SQL server.
Click Start, select Administrative Tools and click Windows Firewall with Advanced Security.
This will open the Windows Firewall with Advanced Security management console.

Figure 2 : Windows Firewall Advanced Security
On the left, select Inbound Rules and on the right click New Rule.
This will bring up the New Inbound Rule Wizard.
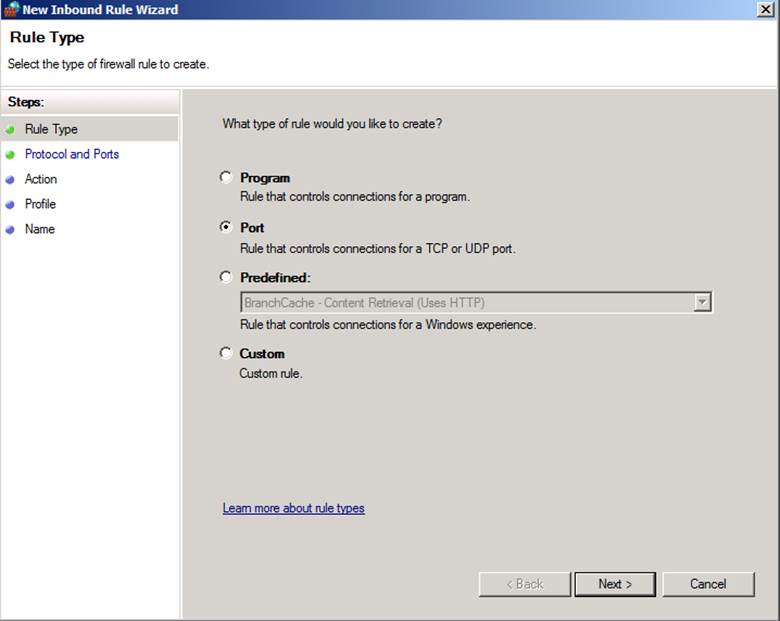
Figure 3: Inbound Rule Wizard
On the Rule Type screen, select Port and click Next.
On the Protocol and ports screen, select TCP and enter 445 in the box next to Specific local ports: and then click Next.
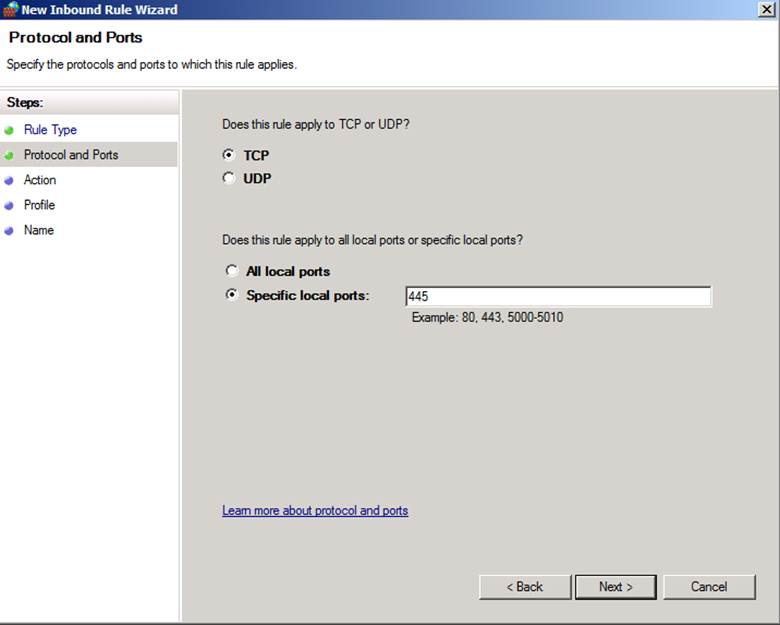
Figure 4: Firewall Protocols and Ports
On the Action screen, select Allow the connection and click Next.
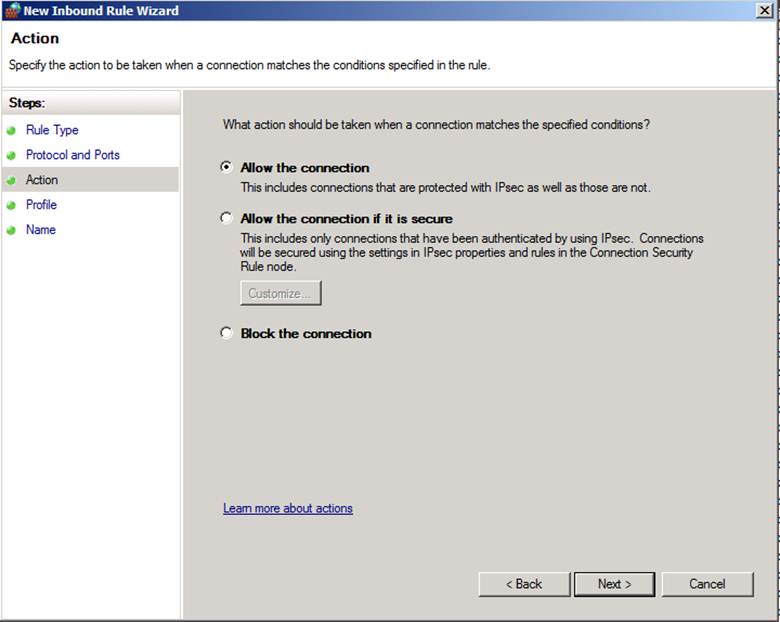
Figure 5: Action: Allow the connection
On the Profile screen, select Domain, Private, and Public then click Next.
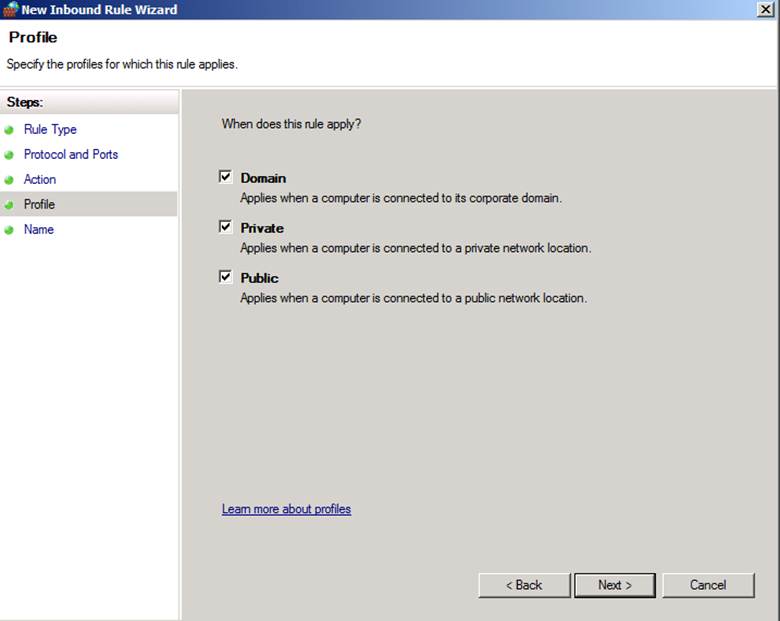
Figure 6: Rule profile
On the Name screen, enter SQL Server Named Pipes in the box and click Finish.
Repeat these steps for all of the entries in the table below.
Table 1 – SQL Server Firewall Port Exceptions
| Protocol | Port | Name |
| TCP | 445 | SQL Server Named Pipes |
| TCP | 1433 | SQL Server Listening Port |
| UDP | 1434 | SQL Server Browser Service |
Enable SQL Server Network Protocols
This section explains how to enable the allowed network protocols for the SQL server that supports your AD RMS deployment. This is done so that the AD RMS server can communicate with the SQLO database server.
To enable network protocols for the SQL server computer that supports your AD RMS deployment
Log on to SQL server.
From the Start menu, select All Programs, click Microsoft SQL Server 2008, click Configuration Tools, and select SQL Server Configuration Manager.
This will bring up the SQL Server Configuration Manager as shown in the following figure.

Figure 7: SQL Server Configuration ManagerIn SQL Server Configuration Manager, on the left, expand SQL Server Network Configuration and click Protocols for MSSQLSERVER. This will populate the right pane with four protocols and their status.
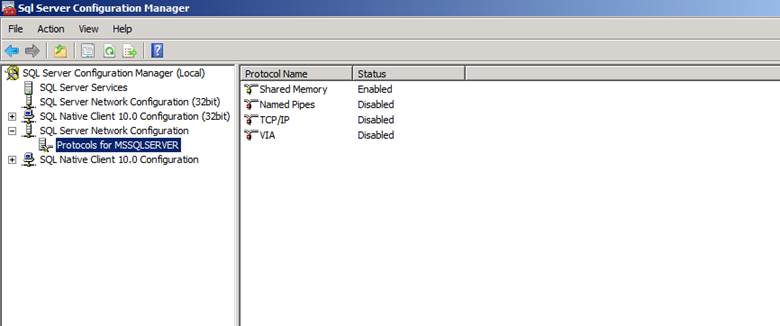
Figure 8: Protocols for MSSQLSERVER
On the right, right-click Disabled next to Named Pipes and select Enable.

Figure 9: Enable named pipes
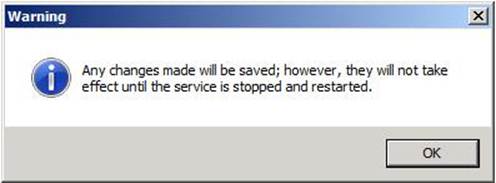
This will bring up a pop-up box such as the following that says any changes made will be saved, however, they will not take effect until the service is stopped and restarted.
Repeat step 4 for TCP/IP. On the right, right-click Disabled next to TCP/IP and select Enable.
This will bring up a warning dialog box that says any changes made will be saved but they will not take effect until the service is stopped and restarted.
Click OK.
In SQL Server Configuration Manager, on the left, click SQL Server Services. This will populate the right pane with three services and their state.
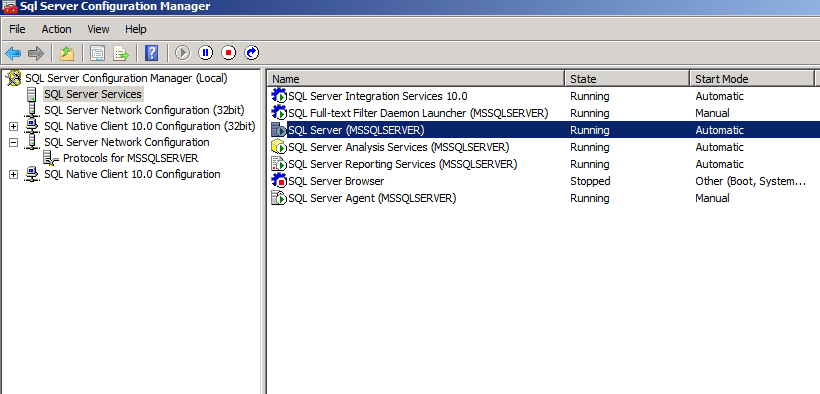
Figure 10: Stop and Start SQL server service
On the right, right-click SQL Server (MSSQLSERVER) and select Stop.
This will stop the SQL Server service.On the right, right-click SQL Server (MSSQLSERVER) and select Start.
This will start the SQL Server service.Close SQL Server Configuration Manager.
Add AD RMS Service Account to SQL Login
This step explains how to add the AD RMS Service Account to SQL Logins on SQL server. This allows the service account to connect to SQL server.
Log on to SQL server.
Click Start, select All Programs, click Microsoft SQL Server 2008 and select SQL Server Management Studio. This will bring up the Connect to Server dialog box. Ensure that the Server name is SQL2 and that Authentication is set to Windows Authentication. Click Connect.
On the right, expand Security, right-click Logins, and select New Login. This will bring up the Login – New screen.
On the Login – New screen, click Search. This will bring up a Select User or Group box.
On the Select User or Group box, enter domain\service account in the box below Enter the object name to select (examples) and click Check Names. This should resolve with an underline. Click Ok.
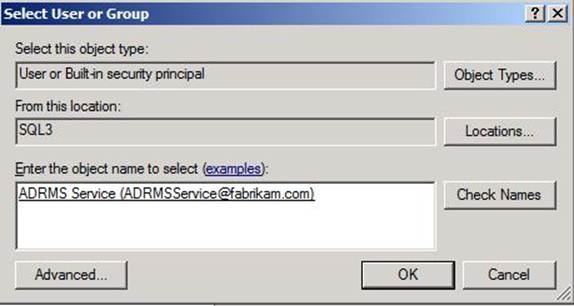
Figure 12: Select AD RMS service account
On the Login – New screen, click OK. This will close the Login – New screen.
Close SQL Server Management Studio.
Change The CNAME record in DNS
This step explains how to change the CNAME record in DNS. This will allow the AD RMS cluster to point to the new SQL server by canonical name and not by the physical server name.
Log on to the domain controller.
Click Start, point to Administrative Tools, and then click DNS. This will bring up the DNS Manager
From the DNS Manager, on the left, expand DC, expand Forward Lookup Zone, and click domain.com. On the right, right-click the CNAME record for the SQL server and select Properties.
On the properties page, enter the new SQL server name under Fully qualified domain name (FQDN) for target host: and click OK.

Figure 13: DNS CNAME record for SQL server
Close DNS Manager.
For more information, see Change CNAME Record in DNS.
Appendix C: Restoring Backup Of AD RMS Databases To New SQL Server
This step explains how to restore the AD RMS databases on a new SQL server.
Log on to the new SQL server.
Click Start, select All Programs, click Microsoft SQL Server 2008 and select SQL Server Management Studio. This will bring up the Connect to Server dialog box. Ensure that the Server name is correct and that Authentication is set to Windows Authentication. Click Connect.
On the right, right-click Databases and select Restore Database.
This will bring up the Restore Database window.
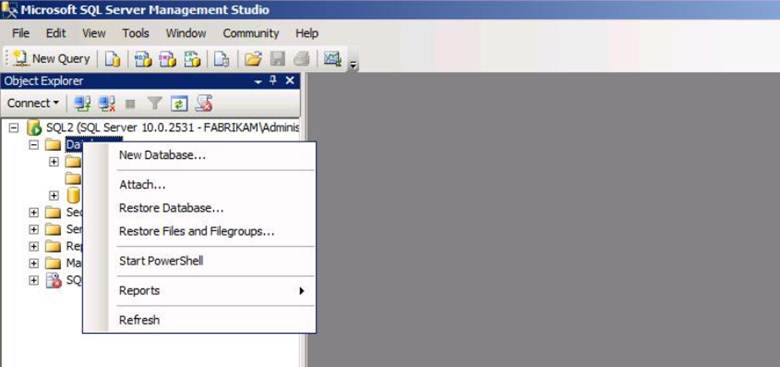
*
Figure 1: SQL Server Management Studio*
On the Restore Database screen, select the From Device radio button and click the … box.
This will bring up the Specify Backup screen.

Figure 2: Selecting "From Device"
On the Specify Backup screen, click Add.

*Figure 3: Specify backup
*This will bring up the Locate Backup File dialog box.
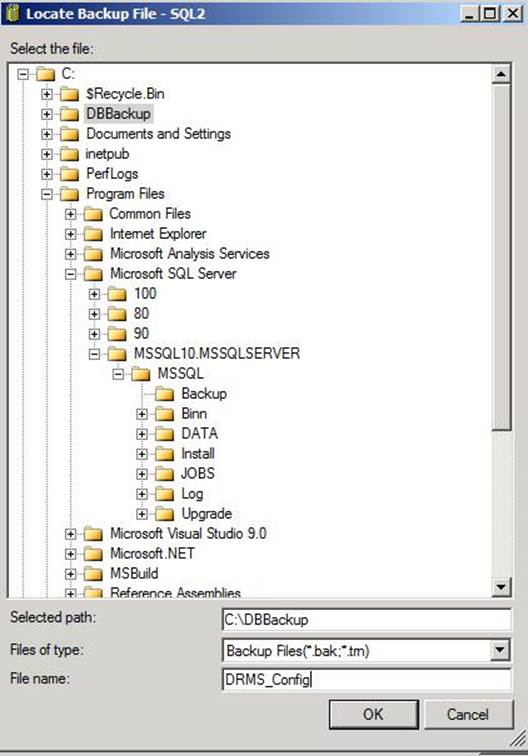
Figure 4: Locate backup file
For Selected path, select the C:\DBBackup folder and for File name, enter DRMS_Config and then click OK.
On the Specify Backup screen click OK.
On the Restore Database screen, in the drop-down next to To database: select DRMS_Config_rms_Fabrikam_com_443.
On the Restore Database screen, under Select the backup sets to restore: place a check in the Restore box, next to DRMS_Config_rms_fabrikam_com_443-Full Database Backup. Click OK.|
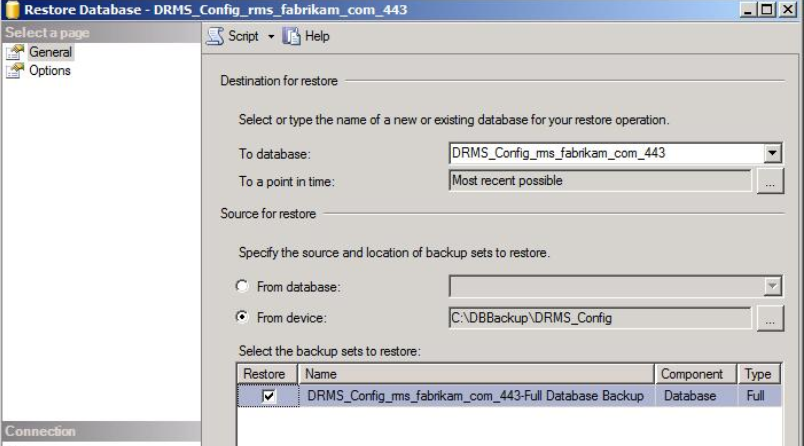
Figure 5: Restore Database window
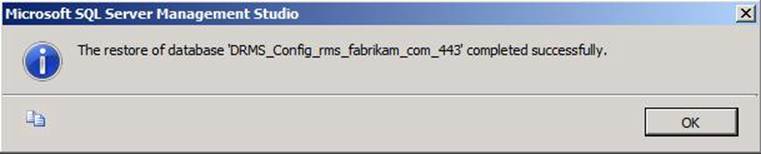
- Once this has completed, a pop-up will say the database has been restored successfully. Click OK.
- Repeat steps 3 to 9 for restoring AD RMS logging database and the directory services cache database.
Appendix D: Log Shipping Overview
This appendix only provides an overview on SQL Server log shipping and how we can leverage it for quick restoration AD RMS services in a disaster recovery scenario. Step by step guidance on configuring log shipping is out of scope of this white paper. For more information, see Log Shipping (Database Engine).
Log Shipping Overview
You can use log shipping to send transaction logs from one database (the primary database) to another (the secondary database in a remote site) on a constant basis. Continually backing up the transaction logs from a primary database and then copying and restoring them to a secondary database keeps the secondary database nearly synchronized with the primary database. In a scenario where the local site database server fails due to storage failure or natural calamity, AD RMS services can be restored by using the remote database server.
Log Shipping Operations
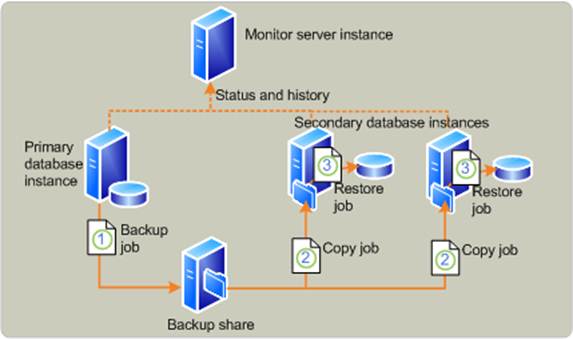
Log shipping consists of three jobs. Each job performs one of the following operations:
- Backs up the transaction log at the primary server instance
- Copies the transaction log file to the secondary server instance
- Restores the log backup on the secondary server instance
The following diagram describes log shipping.
The log can be shipped to multiple secondary server instances. In such cases, operations 2 and 3 are duplicated for each secondary server instance.
A log shipping configuration does not automatically fail over from the primary server to the secondary server. If the primary database becomes unavailable, any of the secondary databases can be brought online manually.
Log Shipping Server Roles
In Log shipping, there are three distinct types of server roles used.
- A primary server and databases
- Secondary servers and databases
- Monitor servers
Primary Server and Databases
The primary server in a log shipping configuration is the instance of the SQL Server Database Engine that is your production server. The primary database is the database on the primary server that you want to back up to another server. All administration of the log shipping configuration through SQL Server Management Studio is performed from the primary database.
The primary database must use the full or bulk-logged recovery model; switching the database to simple recovery will cause log shipping to stop functioning.
Secondary Server and Databases
The secondary server in a log shipping configuration is the server where you want to keep a warm standby copy of your primary database. A secondary server can contain backup copies of databases from several different primary servers. For example, a department could have five servers, each running a mission-critical database system. Rather than having five separate secondary servers, a single secondary server could be used. The backups from the five primary systems could be loaded onto the single backup system, reducing the number of resources required and saving money. It is unlikely that more than one primary system would fail at the same time. Additionally, to cover the remote chance that more than one primary system becomes unavailable at the same time, the secondary server could be of higher specification than the primary servers.
The secondary database must be initialized by restoring a full backup of the primary database. The restore can be completed using either the NORECOVERY or STANDBY option. This can be done manually or through SQL Server Management Studio.
Monitor Server
The optional monitor server tracks all of the details of log shipping, including:
- When the transaction log on the primary database was last backed up.
- When the secondary servers last copied and restored the backup files.
- Information about any backup failure alerts.
The monitor server should be on a server separate from the primary or secondary servers to avoid losing critical information and disrupting monitoring if the primary or secondary server is lost. A single monitor server can monitor multiple log shipping configurations. In such a case, all of the log shipping configurations that use that monitor server would share a single alert job.
For more information, see Monitoring Log Shipping.
Log Shipping Jobs
Log shipping involves four jobs, which are handled by dedicated SQL Server Agent jobs. These jobs include the backup job, copy job, restore job, and alert job.
The user controls how frequently log backups are taken, how frequently they are copied to each secondary server, and how frequently they are applied to the secondary database. To reduce the work required to bring a secondary server online, for example after the production system fails, you can copy and restore each transaction log backup soon after it is created. Alternatively, perhaps on a second secondary server, you can delay applying transaction log backups to the secondary database. This delay provides an interval during which you can notice and respond to a failure on the primary, such as accidental deletion of critical data.
Backup Job
A backup job is created on the primary server instance for each primary database. It performs the backup operation, logs history to the local server and the monitor server, and deletes old backup files and history information. By default, this job will run every 15 minutes, but the interval is customizable.
When log shipping is enabled, the SQL Server Agent job category "Log Shipping Backup" is created on the primary server instance.
SQL Server 2008 Enterprise and later versions support backup compression. When creating a log shipping configuration, you can control the backup compression behavior of log backups. For more information, see Backup Compression (SQL Server).
Copy Job
A copy job is created on each secondary server instance in a log shipping configuration. This job copies the backup files from the primary server to a configurable destination on the secondary server and logs history on the secondary server and the monitor server. The copy job schedule, which is customizable, should approximate the backup schedule.
When log shipping is enabled, the SQL Server Agent job category "Log Shipping Copy" is created on the secondary server instance.
Restore Job
A restore job is created on the secondary server instance for each log shipping configuration. This job restores the copied backup files to the secondary databases. It logs history on the local server and the monitor server, and deletes old files and old history information. The SQL Server job category "Log Shipping Restore" is created on the secondary server instance when log shipping is enabled.
On a given secondary server instance, the restore job can be scheduled as frequently as the copy job, or the restore job can delayed. Scheduling these jobs with the same frequency keeps the secondary database as closely aligned with the primary database as possible to create a warm standby database.
In contrast, delaying restore jobs, perhaps by several hours, can be useful in the event of a serious user error, such as a dropped table or inappropriately deleted table row. If the time of the error is known, you can move that secondary database forward to a time soon before the error. Then you can export the lost data and import it back into the primary database.
Alert Job
If a monitor server is used, an alert job is created on the monitor server instance. This alert job is shared by the primary and secondary databases of all log shipping configurations using this monitor server instance. Any change to the alert job (such as rescheduling, disabling, or enabling the job) affects all databases using that monitor server. This job raises alerts (for which you must specify alert numbers) for primary and secondary databases when backup and restore operations have not completed successfully within specified thresholds. You must configure these alerts to have an operator receive notification of the log shipping failure. The SQL Server Agent job category "Log Shipping Alert" is created on the monitor server instance when log shipping is enabled.
If a monitor server is not used, alert jobs are created locally on the primary server instance and each secondary server instance. The alert job on the primary server instance raises errors when backup operations have not completed successfully within a specified threshold. The alert job on the secondary server instance raises errors when local copy and restore operations have not completed successfully within a specified threshold.
A Typical Log Shipping Configuration
The following figure shows a log shipping configuration with the primary server instance, three secondary server instances, and a monitor server instance. The figure illustrates the steps performed by backup, copy, and restore jobs, as follows:
- The primary server instance runs the backup job to back up the transaction log on the primary database. This server instance then places the log backup into a primary log-backup file, which it sends to the backup folder. In this figure, the backup folder is on a shared directory—the backup share.
- Each of the three secondary server instances runs its own copy job to copy the primary log-backup file to its own local destination folder.
- Each secondary server instance runs its own restore job to restore the log backup from the local destination folder onto the local secondary database.
The primary and secondary server instances send their own history and status to the monitor server instance.
Appendix E: Designing a fault tolerant and highly available AD RMS infrastructure
A fault tolerant and highly available AD RMS infrastructure gives the users the continuous ability to protect and consume rights content. Fortunately AD RMS is, by design to some extent fault tolerant for protection and consumption of rights content for the following reasons:
- Content Protection: As of now typical protection of content in many cases is offline if the client is already activated. This is true especially for Office applications where activated clients use the existing certificates (CLC) to sign the publish license (PL). When protecting a document, a client will also issue itself an Author license, which will allow the user that has just protected the document to continue consuming the document without having to contact the server, even after closing it and reopening it.
- Content Consumption: Consuming protected content also many times does not require the client to contact the AD RMS infrastructure and it depends on several factors like:
- License already acquired for a specific content.
- License is cacheable
- License is not expired
Though tolerant to some extent, for situations where the client needs activation/renewal of client machine or user certificates it still needs connectivity to the AD RMS server. A client will also need to contact the AD RMS server for the initial consumption of a non-prelicensed piece of content or for consuming a document after any previously acquired license has expired. These situations are not uncommon and hence we need to design the AD RMS infrastructure to be highly available.
The following are the three server side components of AD RMS which needs high availability
- Active Directory
- Database Servers
- AD RMS servers
Active Directory
AD RMS servers always communicate with AD global catalog (GC) servers for group expansion and hence the AD RMS servers have to always have access to an AD GC in order to work effectively. Though to reduce the response time for licensing requests, AD RMS leverages the local Active Directory cache (on each RMS server in the root cluster and licensing-only cluster) or the shared Active Directory cache database, availability of the GC is of utmost importance for any new group expansion requests or for expired group expansion results in the cache. None of the above cache can be a proper substitute for a GC and any DC might be out of service at certain times, at least two GC’s should be implemented in the same AD site as AD RMS server.
Database Servers
AD RMS leverages three databases for its functionality. The various tasks performed by AD RMS using these three databases are listed below:
Configuration Database
The configuration database is a critical component of an AD RMS installation because it stores, shares, and retrieves all configuration data, settings including the Rights Policy Templates. It also stores and is used for retrieving Rights Accounts Certificates (RAC).
When AD RMS starts up, it picks up the configuration information, settings including the Rights Policy Templates from the configuration database. So once the AD RMS node is up and running,
it will continue to run even if the configuration database is unreachable. Hence AD RMS nodes cannot be rebooted when the database is not available.
For storing and retrieving Rights Accounts Certificates, AD RMS needs consistent connectivity with the configuration database. AD RMS needs access to the RMS DB every time a user is activated on a new machine in order to check for a pre-existing RAC and in order to save a RAC when one is created. AD RMS also needs access to pre-existing RACs when Exchange needs to pre-license content, since in order for Exchange to request a use license on behalf of the user the server needs to know the public key of the user it needs to be issued for.
Logging Database
AD RMS stores all the transactions into logging database. This is done asynchronously via Message Queuing service on each AD RMS node. This means that if the DB is not available at certain point of time AD RMS will continue to perform these operations while keeping the information in a queue in local memory until the database becomes available again, and it will dump the data into the database whenever it becomes available again. This means that AD RMS can continue to work for long periods of time without access to the AD RMS database and logging information will continue to be gathered.
Directory Services Database
For group expansions and user information, AD RMS would contact the global catalog servers if Directory Services Database is not available. This would only create some additional traffic to the global catalog servers and will not hinder AD RMS functionality which is fine for the period in which the database connectivity is restored.
Considering the above, the partial loss of functionality in most cases is tolerable while the database is not available for shorter duration of time like less than few hours. But this does not mean that the database itself is not important. AD RMS is not tolerant to database corruption or database disk failures in which case the entire rights protected data is lost. This in turn means that the high availability of database is not as significant as protecting the database itself from failure (database corruption, disk/hardware failure etc.) Hence it is very important to choose the right high availability solution.the following are available solutions for high availability with AD RMS:
SQL Failover Clustering
The strength of a failover cluster is that it provides almost immediate recovery for hardware, operational or application failures. But AD RMS by design is already tolerant to such short duration database interruptions as discussed earlier. Failover clustering also does not provide protection against database corruptions due to application faults or hardware/disk failures. So to conclude, failover clustering may not a very efficient way for providing fault tolerance for AD RMS.
SQL Log Shipping
You can use log shipping to send transaction logs from one database (the primary database) to another (the secondary database in a remote site) on a constant basis. Continually backing up the transaction logs from a primary database and then copying and restoring them to a secondary database keeps the secondary database nearly synchronized with the primary database. In a scenario where the local site database server fails due to storage failure or natural calamity, AD RMS services can be restored by using the remote database server. All of the above even if it takes an hour’s time for restoring complete AD RMS functionality does not impact the end user experience to most extent for a shorter duration. But log shipping provides protection against disk/storage hardware failures which is most important for AD RMS functionality.
Backup/Restore
A thoroughly tested and simulated backup/restore strategy could be as efficient as a warm standby mechanism like Log Shipping. When the real failure happens, we need to ensure that the backup/restore process happens smoothly as per plan within stipulated time period. AD RMS will continue to run after reconnecting to the DB and most users shouldn’t even notice the interruption.
NOTE: An efficient and quickest way of restoring database and pointing the AD RMS servers to the new database server is to use CNAME records for the SQL server. For more information on CNAME records in AD RMS, see The Importance of CNAME Record (http://technet.microsoft.com/en-us/library/ff660011(WS.10).aspx).
AD RMS Servers
The unavailability of AD RMS servers themselves can cause some inconvenience to end users but for most extent AD RMS is tolerant to outages of short duration. The most important tasks AD RMS servers perform are listed below:
User Activation
AD RMS requires that any user who intends to publish or consume protected content be issued with a rights account certificate (RAC). This enables trust and the Active Directory user account is signed into the AD RMS certificate hierarchy. The user is also issued with a Client Licensor Certificate (CLC) which is used to sign the publish license thus protecting the content offline.
Acquisition of Use Licenses
To be able to consume protected content, AD RMS server issues use licenses. But since most use licenses can be cached, a user only needs to acquire a use license for content that he or she hasn’t accessed before, content that wasn’t prelicensed by Microsoft Exchange or content whose use license has been expired or is marked as non-cacheable.
Considering the above, following is the loss of functionality when AD RMS servers are unreachable.
- User activation will fail for non-bootstrapped clients. Also renewal of expired rights account certificates will fail.
- Use license acquisition will fail for protected content for which use license was not acquired earlier.
AD RMS is implemented as web service on Internet Information Services on Windows. Hence like any other web application, adding additional AD RMS nodes is the most preferred method to provide high availability. An AD RMS cluster can be a single-server AD RMS installation or several AD RMS servers installed in a load-balancing environment to handle requests from AD RMS-enabled clients. All the AD RMS nodes of a single cluster point to the same database for creation/retrieval of configuration settings and logging.
Since clients are going to be talking to the URL stamped in the protected documents to acquire a license, you need to map that to the load-balanced IP address. This is why it is important never to configure the AD RMS URL to refer to the physical name of the first AD RMS server in the cluster. Always use a DNS alias (a manually configured Host A record) for the AD RMS URL which clients will point to.