Language Quality Game - Moderator Instructions
![]()
FAQ - Moderator
Welcome to the LQG - Language Quality Game Moderator role. Your role as a Moderator is vital to the success of LQG. You have chosen to participate in the review and triage of Player submissions, to identify actionable bugs that are new issues that are yet to be addressed in the product being tested. You will also notice some issues submitted with the "ship stopper" tag. These are particularly important to the program. You will have the opportunity to review Screen Shots, observe what the user has highlighted, add additional highlights and comments, and then submit them as bugs.
Games– Game titles are assigned to you directly by the Project Owners. You are responsible for triaging the Player feedback submitted as part of those Games
Getting Started – Your first visit to the site will instruct you on how to obtain permissions. The main Moderator landing page will be displayed once you obtain permissions and have specific Games assigned to you. The Game selection and Players will be different for each Moderator.

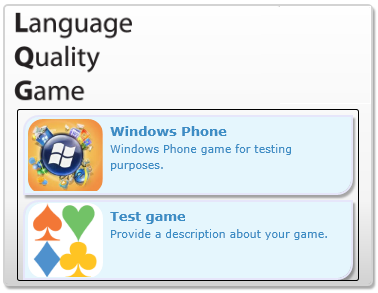
Main Moderator Landing Page – The main Moderator interface will be different depending on the Games enabled by the Project Owners. The Games represented in the main view correspond to the Games that are available for reviewing by the Players. The Games represent Microsoft products, projects, or services that have Screen Shot created and assembled for easy review.
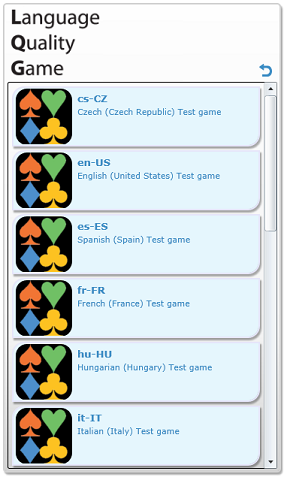
Language - The Games can have several languages associated with them. The number of languages displayed under each Game selection is controlled by the Project Owner. Once you have selected a specific Game, several languages will be made available under that selection. The number of languages assigned to you for review is determined by the Project Owner.
Return to Top
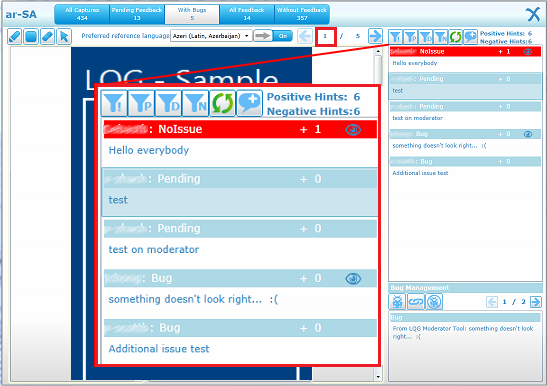
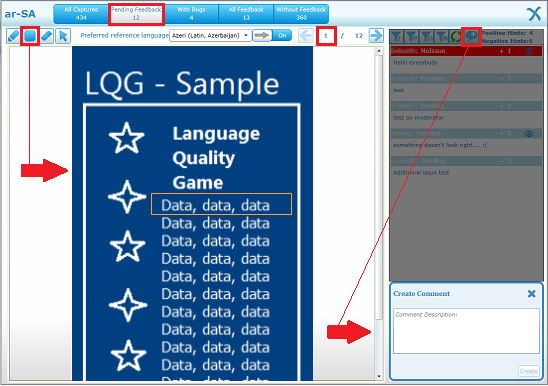
Moderator Interface - The layout of the Moderator interface consists of the main window that displays the Screen Shots and the corresponding feedback submitted by various Players. The two windows to the right contain comments and bugs. There are various tools, controls, and filters that are also part of this interface.
- Language version – Displayed in the upper left corner of the window in the title bar.
- Feedback filters - Filter tabs are displayed identifying the various options like; All Screen Shots, Pending Feedback, With Bugs, All Feedback, and Without Feedback.
- X in Right corner – The “X” on the title bar allows you to close the Moderator Interface and return to the previous landing page to select another title or reopen the original.
- ** Tool Set** – These tools allow you to manipulate and highlight the Screen Shots as an aid to point out the specific issues. There is a Marker, Rectangle, Eraser, and a Pointer tools.
- Comparison tool – Select a Preferred reference language available via dropdown selection, select slide button On or Off to compare your Screen Shots in a horizontal split screen against the same Screen Shot in another language.
- Advance or Return – Displays the total number of Screen Shots and specific number of the Screen Shot you are viewing. In your main window you can move forward or reverse to make a selection.
- Status Filters & Controls – Ship Stopper, Pending, Duplicate, and Not Issue Filters, a Refresh and Comment control buttons.
- Feedback listing – Window displays Player feedback and comments, status, and issues individually.
- Eye – Displayed on feedback, click to activate and display Player feedback on Screen Shots.
- Screen Shot – Displays the item with Player markups (once active) and comment from Players, also allows the Moderator to edit, change, comments and add markups.
- Bug Management tools – Tools are active once feedback is selected. Allows you to determine if there is a New Bug, Duplicate, or Not Issue, as well as add additional marking or comments and create bug.
- Bug Window – Displays related bugs.

Managing Player Submissions – The Player submissions for each Screen Shot in a collection show up on the right hand window. The Player submissions also display the individual status and comments pertaining to the Screen Shot. Each Screen Shot can have a number of Player feedback submissions. Once the display window is filled, a scroll bar will display allowing you to view all the Player submissions available for the selected Screen Shot. The Player feedback in the right display window will change with each Screen Shot selected, for example: 1 of 5 currently displayed.
Start Reviewing – Once you have selected the language version that you wish, the Moderator interface opens for you to start reviewing the Player feedback submissions represented in the category. The filters in the title bar display the Screen Shots in various states. You select a filter and the first Screen Shot in that group will display in the main window. Each filter list the number of Screen Shots available in a specific state. You can use the advance and return arrows to move through the Screen Shots available for the filter. Feedback for each Screen Shot will display in the right windows. Regular feedback titles appear in light blue. The titles with the red titles are marked for investigation as a “Ship stopper”. The Players and the Moderators can both utilize “Ship stopper” status, so if a Player submits regular feedback, the Moderator can mark it as a “Ship stopper” and bug it appropriately. There are also feedback filters on the top right window that sort feedback according to Ship Stopper, Pending, Duplicate, Not Issue assignments. There is also a Refresh button to update the selections as well icon to add New Comments.

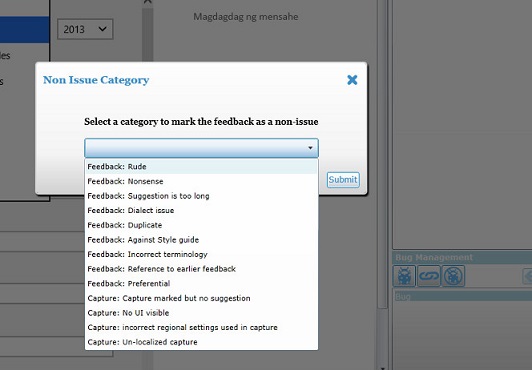
Marking non-issues (optional feature) - NOTE: This feature only works for projects where the project owner has enabled it. In LQG version 2.3 a feature was added that allows you to categorise "non-issues". Once you've selected a comment as "non-issue, a menu pops up with a selection of non-issue categories. Pick the one that is the reason why you've marked this issue as "non-issue" and hit "submit.
Return to Top
**
Bug Management** – These are the primary tools used in the Moderator role for the LQG. You use these tools to review the Player feedback submissions for each screen Shot. The tools become active once you select eligible Player feedback (Pending). The three icons displayed on the right of the Bug Management window are used to assign a review status to the feedback; they are New Bug, Duplicate, or Not Issue. Feedback that has the Duplicate or Not Issue designation can be changed; feedback classified as New Bug has “Bug” in the title and cannot be changed. The lower bug window displays comments listed for the feedback with Bugs.

Dealing with Duplicates - in version 2.3 of LQG additional features are added to track duplicate bugs across multiple screens. If you click the duplicate button a dialogue box will open, showing you all the other bugs for the same language.

Once you've found your bug, enter the number in the LQG Bug Id field, click "verify", and finally click "save" to store the results.
Review with Eye – You must select the  on the feedback title in the right window to view the markup submissions on the Screen Shot in the main window. You must do this with each Screen Shot you view. A single Screen Shot can have several Player feedback markups available for viewing. Click the “eye” on each title to view the markups available for each submission. You may view the markups separately or all at once. Just click the “eye” once the markups are in view and they will vanish. A white background will show up behind the eye once the markups are displayed.
Ship Stoppers – The Red highlighted title bars on the Player submission listings indicates a possible “Ship Stopper”. These are issues that merit increase scrutiny and consideration as a possible product stopping bugs. These bugs are assigned the highest priority and severity and could impact the product development cycle. Moderators may assign the “Ship Stopper” tag to submissions, even if the Player did not.

Compare Screen – A comparison tool is provided to aid you in identifying issues and to better understand the Player submissions. You can use the compare tool with any of the Screen Shots. Just go to the tool bar and select a Preferred reference language from the dropdown menu (number and type of languages may very) and click the slide button to “on” or “off”, to add or remove the spilt screen view.

Add Markup & Comments – It is important for the Moderators to isolate and clarify the issues fully before submitting a bug. To do this the Moderators can add additional markup and comments to the Screen Shot submitted by the Players. The Moderator’s markups and comments are added in addition to the Players. You can access the individual edits by going to the listing in the right panels and clicking on the “eye” in the title bar. Clicking on the “eye” again will remove it from the Screen Shot. Note that the “Pending Feedback” filter was used and the Screen Shot is 1 / 12 in the collection.
Return to Top
Triage & Resolve – The main function of the Moderator is to triage for bugs and resolve the submission results. Moderators are responsible for reviewing and determining if the feedback is actually a bug, a duplicate, or not an issue. The Moderator identifies the issue as a bug and checks to see if the bug has already been submitted, if so then they resolve the issue as a “duplicate”. If it is a new issue then the Moderator posts a new bug. Feedback submissions that are not issues will be resolved as “not issue”.
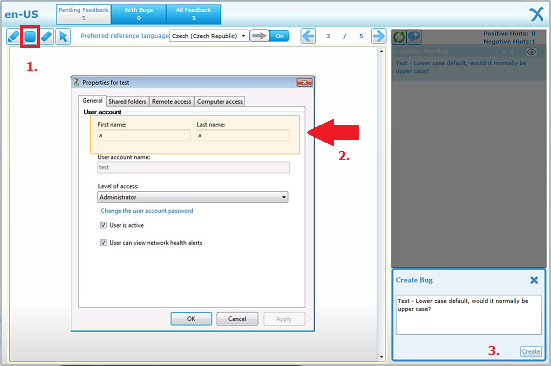
Create a New Bug - Identified issues should be researched in the bug database before a new bug is posted. Confirm that the bug isn’t already in the database and post a new bug for the issue. Select the feedback listing for the identified issue in the right panel. You should already have your markups and comments added for the issue before posting the new bug. Click the “new bug” icon to prompt the “create bug” dialog. Enter any remaining comments and click “create”. Make sure that you get your markup additions added to the Screen Shot to define the issues before creating a new bug, as shown on examples 1 and 2. If you haven’t already added your comments, you may add them in the comment box furnished in the “Create Bug” dialog shown on example 3.
Note: If you don’t have markup images displayed on the Screen Shot, you will get a Warning! Giving you the opportunity to click “ok” to continue, or click “cancel” to return to add markups
You will need to cancel the “create bug” dialog to enter or display Player markup. Click the “new bug” icon and “create” button on the “create bug” dialog. Create Bug Detail Information dialog with text dropdown selections displayed for you to create the new bug. These templates are generated depending on the collection that you were working from and generate a bug template matches a specific category that you are working in.
Bug Templates – The templates are synchronized to the categories that you are assigned to review. Many of the sections are prepopulated or have dropdown selections to choose from. There are a few text boxes where you are free to designate a title and details about the issues. Once you are satisfied with your template entries, you can click the “Create” button to submit a new bug. Below is an example of a standard bug template. Once you have filled out the template with required fields, and clicked “create”, a new bug will be generated and posted and connected to the affiliated Screen Shot. The Screen Shot will now show a bug connected through the filter in the title bar.

Dialog Title: Create Bug Detail Information – Example of typical bug template
- Title: WPLQG-[UI Language]- open for edits
- Sub Type: Awkward, Grammar, Spelling/Typo, Style, Terminology, Translation, and Truncation
- Severity: 1, 2, 3, 4 (first being top severity)
- Priority: 1, 2. 3, 4 (first being highest priority)
- Language: Varies according to languages listed in the dropdown and what you are actually using
- Description: Shows comments that were already entered by is also open for edits
Note: these fields may vary according to the bug template and the language that you are using.
Once you have filled out all the required fields, you click “Create” to post the bug. If you haven’t filled out all the required fields, you will be prompted to do so when saving.
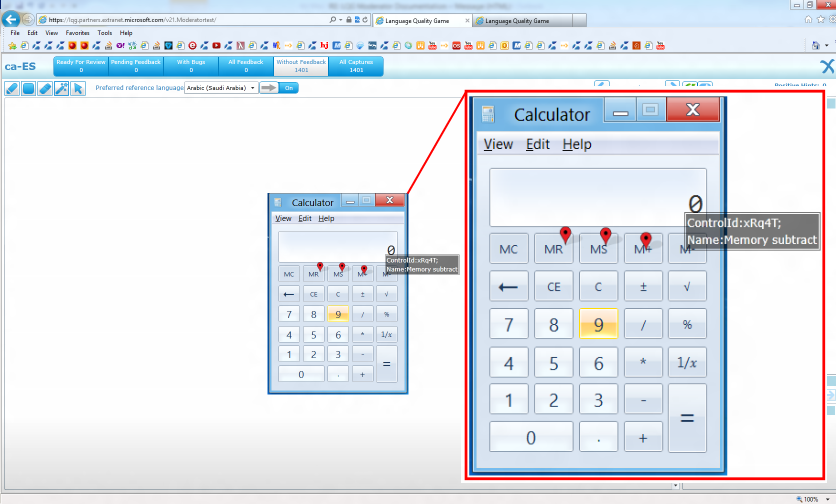
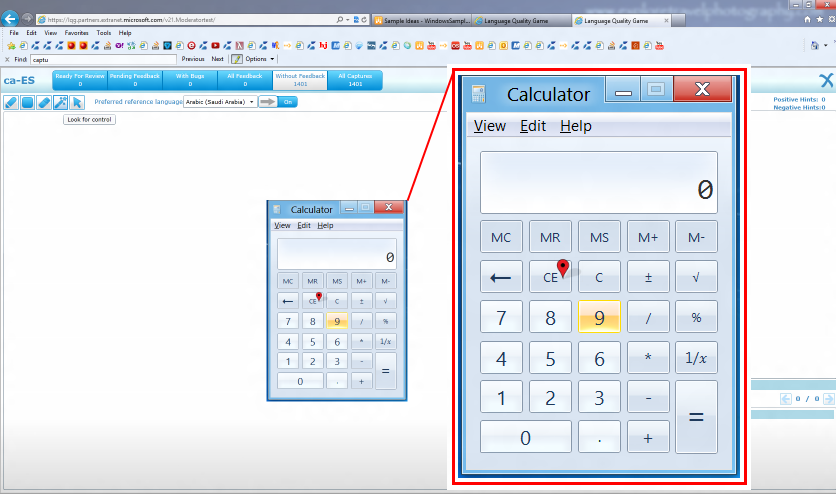
Added Feature Tool – The Wand Tool adds additional functionality to the Moderator section. In addition to providing the GUI information, the Wand Tool allows you to provide the pseudo-hash-ID, and resource information in the bug when submitted Product Studio.
The Wand Tool is available on the tool bar as shown. Using the Wand Tool allows you to hover over the Screen shot to reveal technical information about the various controls. Once you have revealed what you are looking for with the Wand Tool, you can place a Pin on the item. This allows you to submit not only the GUI information but also the specific resource information in in Product Studio.
Return to Top
Using the Wand Tool:
- Wand Tool
- Pin that is displayed when using the Wand Tool
- Hover information that appears with the control information
Once you select the Wand Tool from the tool bar, you can move it over the Screen Shot exposing UI element that represents controls. A hover message will pop up with the associated technical information about the control. Wait until information is displayed and confirm the resource named is the one that you are interested in and pin in to the Screen Shot. You are only allowed to pin to areas with active controls. You cannot have duplicate pins for the same resource info.

Additional Pin Placement – You can place more than one pin on the Screen shoot for bug submission, as long as it is not a duplicate.
Unpinning with the Wand Tool – Once a Pin is set on the Screen Shot, you are allow to UnPin it by selecting it and selecting the “X”. This will delete the Pin selection and allow you to make another.
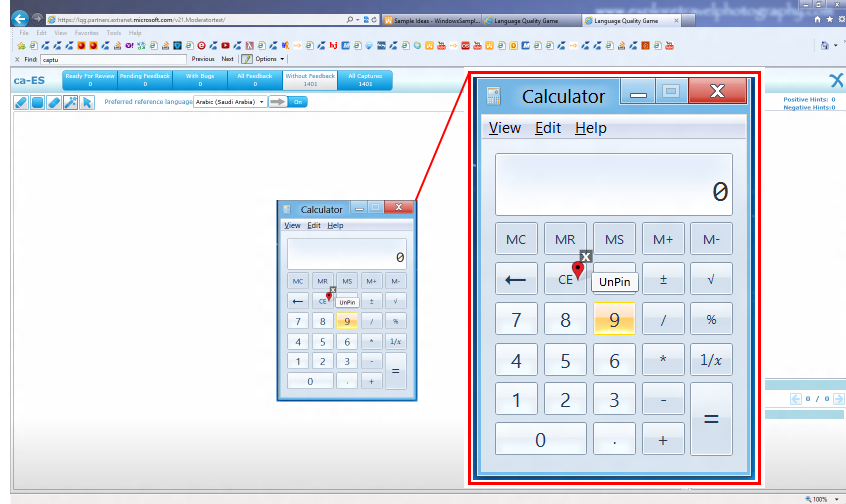
Pin placed and ready for bug submission – Once you have your Pin(s) confirmed and placed, you proceed with your bug submission. Details for bug submission are included on this page.
**Thanks for your participation!