Azure Active Directory B2C 사용자 지정 정책을 사용하여 사용자 입력 수집 및 조작
Azure AD B2C(Azure Active Directory B2C) 사용자 지정 정책을 사용하면 사용자 입력을 수집할 수 있습니다. 그런 다음 내장된 메서드를 사용하여 사용자 입력을 조작할 수 있습니다.
이 문서에서는 그래픽 사용자 인터페이스를 통해 사용자 입력을 수집하는 사용자 지정 정책을 작성하는 방법을 알아봅니다. 그런 다음 입력에 액세스하고 처리한 다음 마지막으로 JWT 토큰의 클레임으로 반환합니다. 이 작업을 완료하려면 다음을 수행합니다.
클레임을 선언합니다. 클레임은 Azure AD B2C 정책 실행 중에 데이터의 임시 스토리지를 제공합니다. 이름, 성 또는 사용자 또는 다른 시스템에서 가져오는 기타 클레임과 같은 사용자에 대한 정보를 저장할 수 있습니다. Azure AD B2C 사용자 지정 정책 개요에서 클레임에 대해 자세히 알아볼 수 있습니다.
기술 프로필을 정의합니다. 기술 프로필은 다양한 유형의 당사자와 통신하는 인터페이스를 제공합니다. 예를 들어, 사용자와 상호 작용하여 데이터를 수집할 수 있습니다.
선언하는 클레임을 조작하는 데 사용하는 클레임 변환을 구성합니다.
콘텐츠 정의를 구성합니다. 콘텐츠 정의는 로드할 사용자 인터페이스를 정의합니다. 나중에 고유의 사용자 지정 HTML 콘텐츠를 제공하여 사용자 인터페이스를 사용자 지정할 수 있습니다.
자체 어설션 기술 프로필 및 DisplayClaims를 사용하여 사용자에게 사용자 인터페이스를 구성하고 표시합니다.
오케스트레이션 단계에서 지정된 시퀀스로 기술 프로필을 호출합니다.
필수 조건
Azure 구독에 연결된 Azure AD B2C 테넌트가 아직 없으면 만듭니다.
웹 애플리케이션을 등록하고 ID 토큰 암시적 부여를 사용하도록 설정합니다. 리디렉션 URI의 경우 https://jwt.ms를 사용합니다.
컴퓨터에 VS Code(Visual Studio Code)가 설치되어 있어야 합니다.
첫 번째 Azure AD B2C 사용자 지정 정책 작성 - Hello World!의 단계를 완료합니다. 이 문서는 사용자 지정 정책 만들기 및 실행 방법 가이드 시리즈의 일부입니다.
참고 항목
이 문서는 Azure Active Directory B2C 방법 가이드 시리즈에서 사용자 고유의 사용자 지정 정책 만들기 및 실행의 일부입니다. 이 시리즈는 첫 번째 문서부터 시작하는 것이 좋습니다.
1단계 - 클레임 선언
objectId 및 message와 함께 추가 클레임을 선언합니다.
VS Code에서
ContosoCustomPolicy.XML파일을 엽니다.ClaimsSchema섹션에서 다음 ClaimType 선언을 추가합니다.<ClaimType Id="givenName"> <DisplayName>Given Name</DisplayName> <DataType>string</DataType> <UserHelpText>Your given name (also known as first name).</UserHelpText> <UserInputType>TextBox</UserInputType> </ClaimType> <ClaimType Id="surname"> <DisplayName>Surname</DisplayName> <DataType>string</DataType> <UserHelpText>Your surname (also known as family name or last name).</UserHelpText> <UserInputType>TextBox</UserInputType> </ClaimType> <ClaimType Id="displayName"> <DisplayName>Display Name</DisplayName> <DataType>string</DataType> <UserHelpText>Your display name.</UserHelpText> <UserInputType>TextBox</UserInputType> </ClaimType>
givenName, surname 및 displayName의 세 가지 클레임 형식을 선언했습니다. 이러한 선언에는 DataType, UserInputType 및 DisplayName 요소가 포함됩니다.
- DataType은 소유권 클레임이 보유한 값의 데이터 형식을 지정합니다. DataType 요소가 지원하는 데이터 형식에 대해 자세히 알아봅니다.
- UserInputType은 사용자로부터 클레임 값을 수집하려는 경우 사용자 인터페이스에 표시되는 UI 컨트롤을 지정합니다. Azure AD B2C가 지원하는 사용자 입력 형식에 대해 자세히 알아봅니다.
- DisplayName은 사용자로부터 클레임 값을 수집하려는 경우 사용자 인터페이스에 표시되는 UI 컨트롤의 레이블을 지정합니다.
2단계 - 클레임 변환 정의
ClaimsTransformation에는 지정된 클레임을 다른 클레임으로 변환하는 데 사용하는 함수가 포함되어 있습니다. 예를 들어, 문자열 클레임을 소문자에서 대문자로 변경할 수 있습니다. Azure AD B2C에서 지원하는 클레임 변환에 대해 자세히 알아봅니다.
ContosoCustomPolicy.XML파일에서<ClaimsTransformations>요소를BuildingBlocks섹션의 자식 항목으로 추가합니다.<ClaimsTransformations> </ClaimsTransformations>ClaimsTransformations요소 내부에 다음 코드를 추가합니다.<ClaimsTransformation Id="GenerateRandomObjectIdTransformation" TransformationMethod="CreateRandomString"> <InputParameters> <InputParameter Id="randomGeneratorType" DataType="string" Value="GUID"/> </InputParameters> <OutputClaims> <OutputClaim ClaimTypeReferenceId="objectId" TransformationClaimType="outputClaim"/> </OutputClaims> </ClaimsTransformation> <ClaimsTransformation Id="CreateDisplayNameTransformation" TransformationMethod="FormatStringMultipleClaims"> <InputClaims> <InputClaim ClaimTypeReferenceId="givenName" TransformationClaimType="inputClaim1"/> <InputClaim ClaimTypeReferenceId="surname" TransformationClaimType="inputClaim2"/> </InputClaims> <InputParameters> <InputParameter Id="stringFormat" DataType="string" Value="{0} {1}"/> </InputParameters> <OutputClaims> <OutputClaim ClaimTypeReferenceId="displayName" TransformationClaimType="outputClaim"/> </OutputClaims> </ClaimsTransformation> <ClaimsTransformation Id="CreateMessageTransformation" TransformationMethod="FormatStringClaim"> <InputClaims> <InputClaim ClaimTypeReferenceId="displayName" TransformationClaimType="inputClaim"/> </InputClaims> <InputParameters> <InputParameter Id="stringFormat" DataType="string" Value="Hello {0}"/> </InputParameters> <OutputClaims> <OutputClaim ClaimTypeReferenceId="message" TransformationClaimType="outputClaim"/> </OutputClaims> </ClaimsTransformation>세 가지 클레임 변환을 구성했습니다.
GenerateRandomObjectIdTransformation은 CreateRandomString 메서드에서 지정한 임의의 문자열을 만듭니다. objectId 클레임은
OutputClaim요소에서 지정한 대로 생성된 문자열로 업데이트됩니다.CreateDisplayNameTransformation은 givenName과 surname을 연결하여 displayName을 형성합니다.
CreateMessageTransformation은 Hello와 displayName을 연결하여 message를 형성합니다.
3단계 - 콘텐츠 정의 구성
ContentDefinitions를 사용하면 사용자에게 표시하는 웹 페이지의 레이아웃을 제어하는 HTML 템플릿에 대한 URL을 지정할 수 있습니다. 로그인 또는 등록, 암호 재설정 또는 오류 페이지와 같은 각 단계에 대한 특정 사용자 인터페이스를 지정할 수 있습니다.
콘텐츠 정의를 추가하려면 ContosoCustomPolicy.XML 파일의 BuildingBlocks 섹션에 다음 코드를 추가합니다.
<ContentDefinitions>
<ContentDefinition Id="SelfAssertedContentDefinition">
<LoadUri>~/tenant/templates/AzureBlue/selfAsserted.cshtml</LoadUri>
<RecoveryUri>~/common/default_page_error.html</RecoveryUri>
<DataUri>urn:com:microsoft:aad:b2c:elements:contract:selfasserted:2.1.7</DataUri>
</ContentDefinition>
</ContentDefinitions>
4단계 - 기술 프로필 구성
사용자 지정 정책에서 TechnicalProfile은 기능을 구현하는 요소입니다. 이제 클레임 및 클레임 변환을 정의했으므로 정의를 실행하려면 기술 프로필이 필요합니다. 기술 프로필은 ClaimsProvider 요소 내에서 선언됩니다.
Azure AD B2C는 일련의 기술 프로필을 제공합니다. 각 기술 프로필은 특정 역할을 수행합니다. 예를 들어, REST 기술 프로필을 사용하여 서비스 엔드포인트에 대한 HTTP 호출을 수행합니다. 클레임 변환 기술 프로필을 사용하여 클레임 변환에서 정의한 작업을 실행할 수 있습니다. Azure AD B2C 사용자 지정 정책이 제공하는 기술 프로필 형식에 대해 자세히 알아봅니다.
클레임 값 설정
objectId, displayName 및 message 클레임에 대한 값을 설정하려면 GenerateRandomObjectIdTransformation, CreateDisplayNameTransformation 및 CreateMessageTransformation 클레임 변환을 실행하는 기술 프로필을 구성합니다. 클레임 변환은 OutputClaimsTransformations 요소에 정의된 순서에 따라 실행됩니다. 예를 들어, 먼저 표시 이름을 만든 다음 메시지를 만듭니다.
다음
ClaimsProvider를ClaimsProviders섹션의 자식으로 추가합니다.<ClaimsProvider> <DisplayName>Technical Profiles to generate claims</DisplayName> </ClaimsProvider>objectId, displayName 및 message 클레임에 대한 값을 설정하려면 방금 만든
ClaimsProvider요소 내에 다음 코드를 추가합니다.<!--<ClaimsProvider>--> <TechnicalProfiles> <TechnicalProfile Id="ClaimGenerator"> <DisplayName>Generate Object ID, displayName and message Claims Technical Profile.</DisplayName> <Protocol Name="Proprietary" Handler="Web.TPEngine.Providers.ClaimsTransformationProtocolProvider, Web.TPEngine, Version=1.0.0.0, Culture=neutral, PublicKeyToken=null"/> <OutputClaims> <OutputClaim ClaimTypeReferenceId="objectId"/> <OutputClaim ClaimTypeReferenceId="displayName"/> <OutputClaim ClaimTypeReferenceId="message"/> </OutputClaims> <OutputClaimsTransformations> <OutputClaimsTransformation ReferenceId="GenerateRandomObjectIdTransformation"/> <OutputClaimsTransformation ReferenceId="CreateDisplayNameTransformation"/> <OutputClaimsTransformation ReferenceId="CreateMessageTransformation"/> </OutputClaimsTransformations> </TechnicalProfile> </TechnicalProfiles> <!--</ClaimsProvider>-->
사용자 입력 수집
givenName 및 surname에서 displayName 클레임을 생성하므로 사용자 입력으로 수집해야 합니다. 사용자 입력을 수집하려면 자체 어설션이라는 기술 프로필 형식을 사용합니다. 자체 어설션 기술 프로필을 구성할 때 자체 어설션 기술 프로필이 사용자 인터페이스 표시를 담당하므로 콘텐츠 정의를 참조해야 합니다.
다음
ClaimsProvider를ClaimsProviders섹션의 자식으로 추가합니다.<ClaimsProvider> <DisplayName>Technical Profiles to collect user's details </DisplayName> </ClaimsProvider>방금 만든
ClaimsProvider요소 내에 다음 코드를 추가합니다.<TechnicalProfiles> <TechnicalProfile Id="UserInformationCollector"> <DisplayName>Collect User Input Technical Profile</DisplayName> <Protocol Name="Proprietary" Handler="Web.TPEngine.Providers.SelfAssertedAttributeProvider, Web.TPEngine, Version=1.0.0.0, Culture=neutral, PublicKeyToken=null"/> <Metadata> <Item Key="ContentDefinitionReferenceId">SelfAssertedContentDefinition</Item> </Metadata> <DisplayClaims> <DisplayClaim ClaimTypeReferenceId="givenName" Required="true"/> <DisplayClaim ClaimTypeReferenceId="surname" Required="true"/> </DisplayClaims> <OutputClaims> <OutputClaim ClaimTypeReferenceId="givenName"/> <OutputClaim ClaimTypeReferenceId="surname"/> </OutputClaims> </TechnicalProfile> </TechnicalProfiles>givenName 및 surname 소유권 클레임에 대한 두 개의 표시 소유권 클레임에 주목합니다. 두 클레임 모두 필수로 표시되어 있으므로 사용자는 표시되는 양식을 제출하기 전에 값을 입력해야 합니다. 소유권 클레임은 지정된 이름 다음에 성과 같이 DisplayClaims 요소에 정의된 순서대로 화면에 표시됩니다.
5단계 - 사용자 경험 정의
사용자 경험을 사용하여 기술 프로필이 호출되는 순서를 정의합니다. OrchestrationSteps 요소를 사용하여 사용자 경험의 단계를 지정합니다.
HelloWorldJourney 사용자 경험의 기존 콘텐츠를 다음 코드로 바꿉니다.
<OrchestrationSteps>
<OrchestrationStep Order="1" Type="ClaimsExchange">
<ClaimsExchanges>
<ClaimsExchange Id="GetUserInformationClaimsExchange" TechnicalProfileReferenceId="UserInformationCollector"/>
</ClaimsExchanges>
</OrchestrationStep>
<OrchestrationStep Order="2" Type="ClaimsExchange">
<ClaimsExchanges>
<ClaimsExchange Id="GetMessageClaimsExchange" TechnicalProfileReferenceId="ClaimGenerator"/>
</ClaimsExchanges>
</OrchestrationStep>
<OrchestrationStep Order="3" Type="SendClaims" CpimIssuerTechnicalProfileReferenceId="JwtIssuer"/>
</OrchestrationSteps>
오케스트레이션 단계에 따라 사용자 입력을 수집하고 objectId, displayName 및 message 클레임에 대한 값을 설정하고 마지막으로 Jwt 토큰을 보냅니다.
6단계 - 신뢰 당사자 업데이트
RelyingParty 섹션의 OutputClaims 요소 콘텐츠를 다음 코드로 바꿉니다.
<OutputClaim ClaimTypeReferenceId="objectId" PartnerClaimType="sub"/>
<OutputClaim ClaimTypeReferenceId="displayName"/>
<OutputClaim ClaimTypeReferenceId="message"/>
6단계를 완료한 후 ContosoCustomPolicy.XML 파일은 다음 코드와 유사해야 합니다.
<?xml version="1.0" encoding="UTF-8" standalone="yes"?>
<TrustFrameworkPolicy xmlns:xsi="http://www.w3.org/2001/XMLSchema-instance"
xmlns:xsd="http://www.w3.org/2001/XMLSchema"
xmlns="http://schemas.microsoft.com/online/cpim/schemas/2013/06"
PolicySchemaVersion="0.3.0.0" TenantId="yourtenant.onmicrosoft.com"
PolicyId="B2C_1A_ContosoCustomPolicy"
PublicPolicyUri="http://yourtenant.onmicrosoft.com/B2C_1A_ContosoCustomPolicy">
<BuildingBlocks>
<ClaimsSchema>
<ClaimType Id="objectId">
<DisplayName>unique object Id for subject of the claims being returned</DisplayName>
<DataType>string</DataType>
</ClaimType>
<ClaimType Id="message">
<DisplayName>Will hold Hello World message</DisplayName>
<DataType>string</DataType>
</ClaimType>
    <ClaimType Id="givenName">
        <DisplayName>Given Name</DisplayName>
        <DataType>string</DataType>
        <UserHelpText>Your given name (also known as first name).</UserHelpText>
        <UserInputType>TextBox</UserInputType>
    </ClaimType>

    <ClaimType Id="surname">
        <DisplayName>Surname</DisplayName>
        <DataType>string</DataType>
        <UserHelpText>Your surname (also known as family name or last name).</UserHelpText>
        <UserInputType>TextBox</UserInputType>
    </ClaimType>
    <ClaimType Id="displayName">
        <DisplayName>Display Name</DisplayName>
        <DataType>string</DataType>
        <UserHelpText>Your display name.</UserHelpText>
        <UserInputType>TextBox</UserInputType>
    </ClaimType>
</ClaimsSchema>
<ClaimsTransformations>
    <ClaimsTransformation Id="GenerateRandomObjectIdTransformation" TransformationMethod="CreateRandomString">
        <InputParameters>
        <InputParameter Id="randomGeneratorType" DataType="string" Value="GUID"/>
        </InputParameters>
        <OutputClaims>
        <OutputClaim ClaimTypeReferenceId="objectId" TransformationClaimType="outputClaim"/>
        </OutputClaims>
    </ClaimsTransformation>

    <ClaimsTransformation Id="CreateDisplayNameTransformation" TransformationMethod="FormatStringMultipleClaims">
        <InputClaims>
        <InputClaim ClaimTypeReferenceId="givenName" TransformationClaimType="inputClaim1"/>
        <InputClaim ClaimTypeReferenceId="surname" TransformationClaimType="inputClaim2"/>
        </InputClaims>
        <InputParameters>
        <InputParameter Id="stringFormat" DataType="string" Value="{0} {1}"/>
        </InputParameters>
        <OutputClaims>
        <OutputClaim ClaimTypeReferenceId="displayName" TransformationClaimType="outputClaim"/>
        </OutputClaims>
    </ClaimsTransformation>

    <ClaimsTransformation Id="CreateMessageTransformation" TransformationMethod="FormatStringClaim">
        <InputClaims>
        <InputClaim ClaimTypeReferenceId="displayName" TransformationClaimType="inputClaim"/>
        </InputClaims>
        <InputParameters>
        <InputParameter Id="stringFormat" DataType="string" Value="Hello {0}"/>
        </InputParameters>
        <OutputClaims>
        <OutputClaim ClaimTypeReferenceId="message" TransformationClaimType="outputClaim"/>
        </OutputClaims>
    </ClaimsTransformation>
</ClaimsTransformations>
    <ContentDefinitions>
        <ContentDefinition Id="SelfAssertedContentDefinition">
            <LoadUri>~/tenant/templates/AzureBlue/selfAsserted.cshtml</LoadUri>
            <RecoveryUri>~/common/default_page_error.html</RecoveryUri>
            <DataUri>urn:com:microsoft:aad:b2c:elements:contract:selfasserted:2.1.7</DataUri>
        </ContentDefinition>
    </ContentDefinitions>
</BuildingBlocks>
<!--Claims Providers Here-->
<ClaimsProviders>
<ClaimsProvider>
<DisplayName>Token Issuer</DisplayName>
<TechnicalProfiles>
<TechnicalProfile Id="JwtIssuer">
<DisplayName>JWT Issuer</DisplayName>
<Protocol Name="None"/>
<OutputTokenFormat>JWT</OutputTokenFormat>
<Metadata>
<Item Key="client_id">{service:te}</Item>
<Item Key="issuer_refresh_token_user_identity_claim_type">objectId</Item>
<Item Key="SendTokenResponseBodyWithJsonNumbers">true</Item>
</Metadata>
<CryptographicKeys>
<Key Id="issuer_secret" StorageReferenceId="B2C_1A_TokenSigningKeyContainer"/>
<Key Id="issuer_refresh_token_key" StorageReferenceId="B2C_1A_TokenEncryptionKeyContainer"/>
</CryptographicKeys>
</TechnicalProfile>
</TechnicalProfiles>
</ClaimsProvider>
<ClaimsProvider>
<DisplayName>Trustframework Policy Engine TechnicalProfiles</DisplayName>
<TechnicalProfiles>
<TechnicalProfile Id="TpEngine_c3bd4fe2-1775-4013-b91d-35f16d377d13">
<DisplayName>Trustframework Policy Engine Default Technical Profile</DisplayName>
<Protocol Name="None"/>
<Metadata>
<Item Key="url">{service:te}</Item>
</Metadata>
</TechnicalProfile>
</TechnicalProfiles>
</ClaimsProvider>
<ClaimsProvider>
<DisplayName>Claim Generator Technical Profiles</DisplayName>
<TechnicalProfiles>
<TechnicalProfile Id="ClaimGenerator">
<DisplayName>Generate Object ID, displayName and message Claims Technical Profile.</DisplayName>
<Protocol Name="Proprietary" Handler="Web.TPEngine.Providers.ClaimsTransformationProtocolProvider, Web.TPEngine, Version=1.0.0.0, Culture=neutral, PublicKeyToken=null"/>
<OutputClaims>
<OutputClaim ClaimTypeReferenceId="objectId"/>
<OutputClaim ClaimTypeReferenceId="displayName"/>
<OutputClaim ClaimTypeReferenceId="message"/>
</OutputClaims>
<OutputClaimsTransformations>
<OutputClaimsTransformation ReferenceId="GenerateRandomObjectIdTransformation"/>
<OutputClaimsTransformation ReferenceId="CreateDisplayNameTransformation"/>
<OutputClaimsTransformation ReferenceId="CreateMessageTransformation"/>
</OutputClaimsTransformations>
</TechnicalProfile>
</TechnicalProfiles>
</ClaimsProvider>
<ClaimsProvider>
<DisplayName>Technical Profiles to collect user's details</DisplayName>
    <TechnicalProfiles>
        <TechnicalProfile Id="UserInformationCollector">
            <DisplayName>Collect User Input Technical Profile</DisplayName>
            <Protocol Name="Proprietary" Handler="Web.TPEngine.Providers.SelfAssertedAttributeProvider, Web.TPEngine, Version=1.0.0.0, Culture=neutral, PublicKeyToken=null"/>
            <Metadata>
                <Item Key="ContentDefinitionReferenceId">SelfAssertedContentDefinition</Item>
            </Metadata>
            <DisplayClaims>
                <DisplayClaim ClaimTypeReferenceId="givenName" Required="true"/>
                <DisplayClaim ClaimTypeReferenceId="surname" Required="true"/>
            </DisplayClaims>
            <OutputClaims>
                <OutputClaim ClaimTypeReferenceId="givenName"/>
                <OutputClaim ClaimTypeReferenceId="surname"/>
            </OutputClaims>
        </TechnicalProfile>
    </TechnicalProfiles>
</ClaimsProvider>
</ClaimsProviders>
<UserJourneys>
<UserJourney Id="HelloWorldJourney">
    <OrchestrationSteps>
        <OrchestrationStep Order="1" Type="ClaimsExchange">
            <ClaimsExchanges>
                <ClaimsExchange Id="GetUserInformationClaimsExchange" TechnicalProfileReferenceId="UserInformationCollector"/>
            </ClaimsExchanges>
        </OrchestrationStep>
        <OrchestrationStep Order="2" Type="ClaimsExchange">
            <ClaimsExchanges>
                <ClaimsExchange Id="GetMessageClaimsExchange" TechnicalProfileReferenceId="ClaimGenerator"/>
            </ClaimsExchanges>
        </OrchestrationStep>
        <OrchestrationStep Order="3" Type="SendClaims" CpimIssuerTechnicalProfileReferenceId="JwtIssuer"/>
    </OrchestrationSteps>
</UserJourney>
</UserJourneys>
<RelyingParty><!--
Relying Party Here that's your policy’s entry point
Specify the User Journey to execute
Specify the claims to include in the token that is returned when the policy runs
-->
<DefaultUserJourney ReferenceId="HelloWorldJourney"/>
<TechnicalProfile Id="HelloWorldPolicyProfile">
<DisplayName>Hello World Policy Profile</DisplayName>
<Protocol Name="OpenIdConnect"/>
<OutputClaims>
    <OutputClaim ClaimTypeReferenceId="objectId" PartnerClaimType="sub"/>
    <OutputClaim ClaimTypeReferenceId="displayName"/>
    <OutputClaim ClaimTypeReferenceId="message"/>
</OutputClaims>
<SubjectNamingInfo ClaimType="sub"/>
</TechnicalProfile>
</RelyingParty>
</TrustFrameworkPolicy>
아직 수행하지 않은 경우 yourtenant를 테넌트 이름의 하위 도메인 부분(예: contoso)으로 바꿉니다. 테넌트 이름 가져오기 방법에 대해 알아보세요.
7단계 - 사용자 지정 정책 파일 업로드
사용자 지정 정책 파일 업로드의 단계를 따릅니다. 이미 포털에 있는 파일과 이름이 같은 파일을 업로드하면 사용자 지정 정책이 이미 있는 경우 덮어쓰기를 선택해야 합니다.
8단계 - 사용자 지정 정책 테스트
사용자 지정 정책에서 B2C_1A_CONTOSOCUSTOMPOLICY를 선택합니다.
사용자 지정 정책의 개요 페이지에 있는 애플리케이션 선택에서 이전에 등록한 webapp1과 같은 웹 애플리케이션을 선택합니다. 회신 URL 선택 값이
https://jwt.ms로 설정되어 있는지 확인합니다.지금 실행 단추를 선택합니다.
지정된 이름과 성을 입력한 다음 계속을 선택합니다.
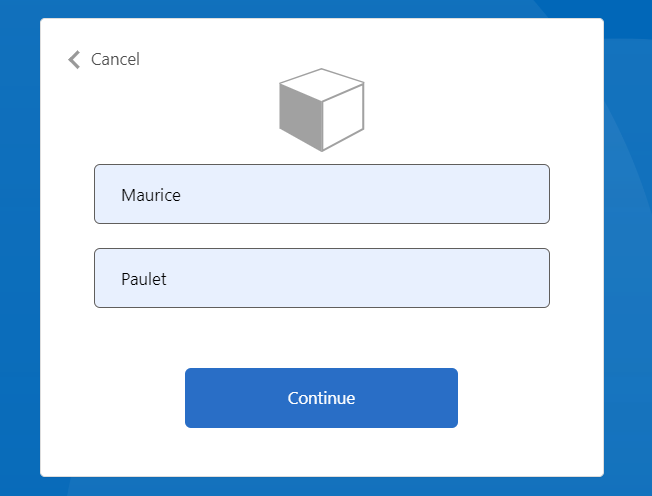
정책 실행이 완료되면 https://jwt.ms로 리디렉션되고 디코딩된 JWT 토큰이 표시됩니다. 다음 JWT 토큰 코드 조각과 유사합니다.
    {
      "typ": "JWT",
      "alg": "RS256",
      "kid": "pxLOMWFg...."
    }.{
      ...
      "sub": "c7ae4515-f7a7....",
      ...
      "acr": "b2c_1a_contosocustompolicy",
      ...
      "name": "Maurice Paulet",
      "message": "Hello Maurice Paulet"
    }.[Signature]
다음 단계
다음으로 알아봅니다.
Azure AD B2C 사용자 지정 정책의 기술 프로필 형식 정보
피드백
출시 예정: 2024년 내내 콘텐츠에 대한 피드백 메커니즘으로 GitHub 문제를 단계적으로 폐지하고 이를 새로운 피드백 시스템으로 바꿀 예정입니다. 자세한 내용은 다음을 참조하세요. https://aka.ms/ContentUserFeedback
다음에 대한 사용자 의견 제출 및 보기