중요합니다
2025년 5월 1일부터 새 고객을 위해 Azure AD B2C를 더 이상 구매할 수 없습니다. FAQ에서 자세히 알아보세요.
TOTP(시간 기반 일회용 암호) 표시 컨트롤을 사용하여 TOTP 메서드를 사용하여 다단계 인증을 사용하도록 설정합니다. 최종 사용자는 TOTP 코드를 생성하는 인증자 앱(예: Microsoft Authenticator 앱 또는 TOTP 확인을 지원하는 다른 인증자 앱)을 사용해야 합니다.
사용자 지정 정책 내에서 TOTP를 사용하도록 설정하려면 다음 표시 컨트롤을 사용합니다.
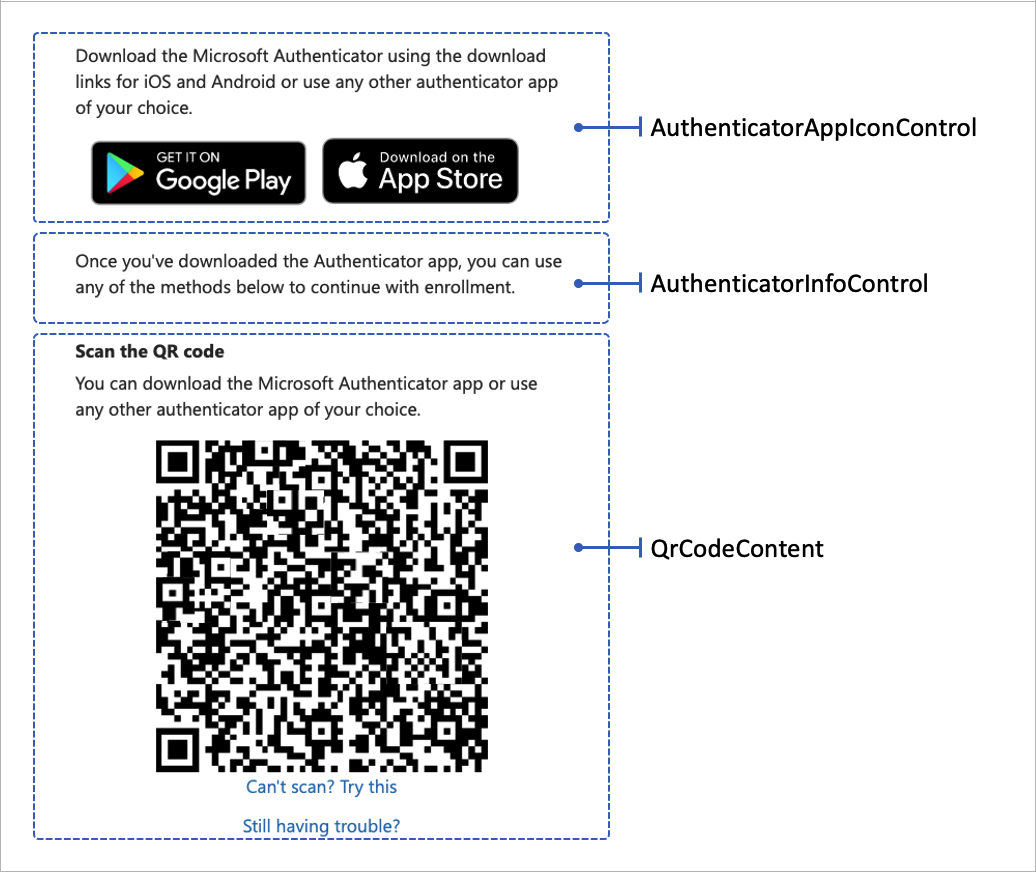
- totpQrCodeControl - QR 코드와 딥 링크를 렌더링합니다. 사용자가 QR 코드를 검색하거나 딥 링크를 열면 사용자가 등록 프로세스를 완료할 수 있도록 인증자 앱이 열립니다.
- AuthenticatorAppIconControl - 사용자의 모바일 디바이스에 앱을 다운로드하는 링크와 함께 Microsoft Authenticator 앱 아이콘을 렌더링합니다.
- AuthenticatorInfoControl - TOTP 소개를 렌더링합니다.
다음 스크린샷은 세 가지 표시 컨트롤을 보여 주는 TOTP 등록 페이지를 보여 줍니다.
다음 XML 코드 조각은 세 가지 표시 컨트롤을 보여 줍니다.
  <DisplayControls>
    <!-- Render the QR code by taking the URI (qrCodeContent) input claim and rendering it as a QR code-->
    <DisplayControl Id="totpQrCodeControl" UserInterfaceControlType="QrCodeControl">
      <InputClaims>
        <InputClaim ClaimTypeReferenceId="qrCodeContent" />
      </InputClaims>
      <DisplayClaims>
        <DisplayClaim ClaimTypeReferenceId="qrCodeContent" ControlClaimType="QrCodeContent" />
      </DisplayClaims>
    </DisplayControl>

    <!-- Render the TOTP information by taking the totpIdentifier and the secretKey input claims and rendering them in plain text-->
    <DisplayControl Id="authenticatorInfoControl" UserInterfaceControlType="AuthenticatorInfoControl">
      <InputClaims>
        <InputClaim ClaimTypeReferenceId="totpIdentifier" />
        <InputClaim ClaimTypeReferenceId="secretKey" />
      </InputClaims>
      <DisplayClaims>
        <DisplayClaim ClaimTypeReferenceId="totpIdentifier" />
        <DisplayClaim ClaimTypeReferenceId="secretKey" />
      </DisplayClaims>
    </DisplayControl>

    <!-- Render the authenticator apps icon. -->
    <DisplayControl Id="authenticatorAppIconControl" UserInterfaceControlType="AuthenticatorAppIconControl" />
  </DisplayControls>
디스플레이 컨트롤은 자체 어설션된 기술 프로필에서 참조됩니다. 자체 어설션된 기술 프로필은 입력 클레임 변환을 사용하여 필수 qrCodeContent 및 secretKey 입력 클레임을 준비합니다.
입력 클레임 변환은 다음 순서로 호출해야 합니다.
-
CreateSecretCreateOtpSecret의 클레임 변환 형식입니다. 클레임 변환은 TOTP 비밀 키를 만듭니다. 이 키는 나중에 Azure AD B2C의 사용자 프로필에 저장되며 인증자 앱과 공유됩니다. 인증자 앱은 키를 사용하여 사용자가 MFA를 통과해야 하는 TOTP 코드를 생성합니다. 사용자 지정 정책은 키를 사용하여 사용자가 제공한 TOTP 코드의 유효성을 검사합니다. -
CreateIssuerCreateStringClaim의 클레임 변환 형식입니다. 클레임 변환은 TOTP 발급자 이름을 만듭니다. 발급자 이름은 테넌트 이름(예: "Contoso demo")입니다. -
CreateUriLabelFormatStringMultipleClaims의 클레임 변환 형식입니다. 클레임 변환은 TOTP URI 레이블을 만듭니다. 레이블은 사용자의 고유 식별자(예: 이메일 주소) 및 발급자 이름(예:Contoso demo:emily@fabrikam.com)의 조합입니다. -
CreateUriStringBuildUri의 클레임 변환 형식입니다. 클레임 변환은 TOTP URI 문자열을 만듭니다. 문자열은 예를 들어otpauth://totp/Contoso%20demo:emily@fabrikam.com?secret=fay2lj7ynpntjgqa&issuer=Contoso+demoURI 레이블과 비밀 키의 조합입니다. 이 URI 레이블은 QR 코드 형식 및 딥 링크로 표시 컨트롤에 의해 렌더링됩니다.
다음 XML 코드는 입력 클레임 변환, 입력 클레임 및 표시 컨트롤이 있는 자체 어설션된 기술 프로필을 보여 EnableOTPAuthentication 줍니다.
<TechnicalProfile Id="EnableOTPAuthentication">
  <DisplayName>Sign up with Authenticator app</DisplayName>
  <Protocol Name="Proprietary" Handler="Web.TPEngine.Providers.SelfAssertedAttributeProvider, Web.TPEngine, Version=1.0.0.0, Culture=neutral, PublicKeyToken=null" />
  <Metadata>
    <Item Key="ContentDefinitionReferenceId">api.selfasserted.totp</Item>
    <Item Key="language.button_continue">Continue</Item>
  </Metadata>
  <CryptographicKeys>
    <Key Id="issuer_secret" StorageReferenceId="B2C_1A_TokenSigningKeyContainer" />
  </CryptographicKeys>
  <InputClaimsTransformations>
    <InputClaimsTransformation ReferenceId="CreateSecret" />
    <InputClaimsTransformation ReferenceId="CreateIssuer" />
    <InputClaimsTransformation ReferenceId="CreateUriLabel" />
    <InputClaimsTransformation ReferenceId="CreateUriString" />
  </InputClaimsTransformations>
  <InputClaims>
    <InputClaim ClaimTypeReferenceId="qrCodeContent" />
    <InputClaim ClaimTypeReferenceId="secretKey" />
  </InputClaims>
  <DisplayClaims>
    <DisplayClaim DisplayControlReferenceId="authenticatorAppIconControl" />
    <DisplayClaim ClaimTypeReferenceId="QrCodeScanInstruction" />
    <DisplayClaim DisplayControlReferenceId="totpQrCodeControl" />
    <DisplayClaim DisplayControlReferenceId="authenticatorInfoControl" />
  </DisplayClaims>
  <OutputClaims>
    <OutputClaim ClaimTypeReferenceId="objectId" />
    <OutputClaim ClaimTypeReferenceId="secretKey" />
  </OutputClaims>
  <UseTechnicalProfileForSessionManagement ReferenceId="SM-MFA-TOTP" />
</TechnicalProfile>
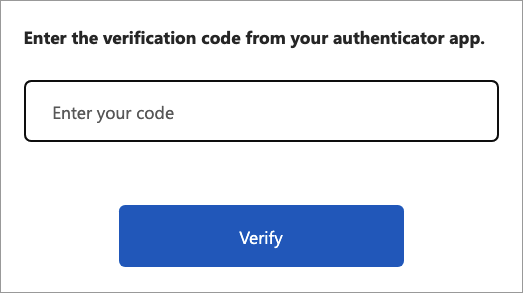
확인 흐름
확인 TOTP 코드는 표시 클레임 및 유효성 검사 기술 프로필을 사용하는 다른 자체 어설션된 기술 프로필에 의해 수행됩니다. 자세한 내용은 Azure AD B2C 사용자 지정 정책에서 Microsoft Entra ID 다단계 인증 기술 프로필 정의를 참조하세요.
다음 스크린샷은 TOTP 확인 페이지를 보여 줍니다.
다음 단계
Azure Active Directory B2C에서 다단계 인증 사용의 다단계 인증에 대해 자세히 알아보기
Microsoft Entra ID 다단계 인증 기술 프로필 정의에서 TOTP 코드의 유효성을 검사하는 방법을 알아봅니다.
GitHub에서 Authenticator 앱 사용자 지정 정책을 사용하여 TOTP에서 샘플 Azure AD B2C MFA를 탐색합니다.