암호 없는 인증을 위해 Azure Active Directory B2C를 사용하여 xID 구성
이 자습서에서는 Azure AD B2C(Azure Active Directory B2C) 인증을 xID 디지털 ID 솔루션과 통합하는 방법을 알아봅니다. xID 앱은 사용자에게 암호 없는 안전한 다단계 인증을 제공합니다. 일본 정부가 발급한 디지털 ID 카드인 My Number Card는 xID로 인증된 사용자 ID를 확인합니다. 사용자의 경우 조직은 xID API를 통해 확인된 개인 식별 정보(고객 콘텐츠)를 가져올 수 있습니다. 또한 xID 앱은 사용자 모바일 디바이스의 보안 영역에 프라이빗 키를 생성하여 디지털 서명 디바이스로 만듭니다.
필수 조건
Azure 구독
- 아직 없으면 Azure 체험 계정을 얻을 수 있습니다.
Azure 구독에 연결된 Azure AD B2C 테넌트
사용자의 xID 클라이언트 정보는 xID inc.에서 제공됩니다.
xID 클라이언트 정보를 보려면 xid.inc 문의하기 페이지로 이동합니다.
- 클라이언트 ID
- 클라이언트 암호
- 리디렉션 URL
- 범위
x-id.me로 이동하여 모바일 디바이스에 xID 앱을 설치합니다.
- My Number Card
- API UAT 버전을 사용하는 경우 xID 앱 UAT 버전을 가져오세요. 문의하기를 참조하세요.
시나리오 설명
다음 다이어그램은 아키텍처를 보여 줍니다.
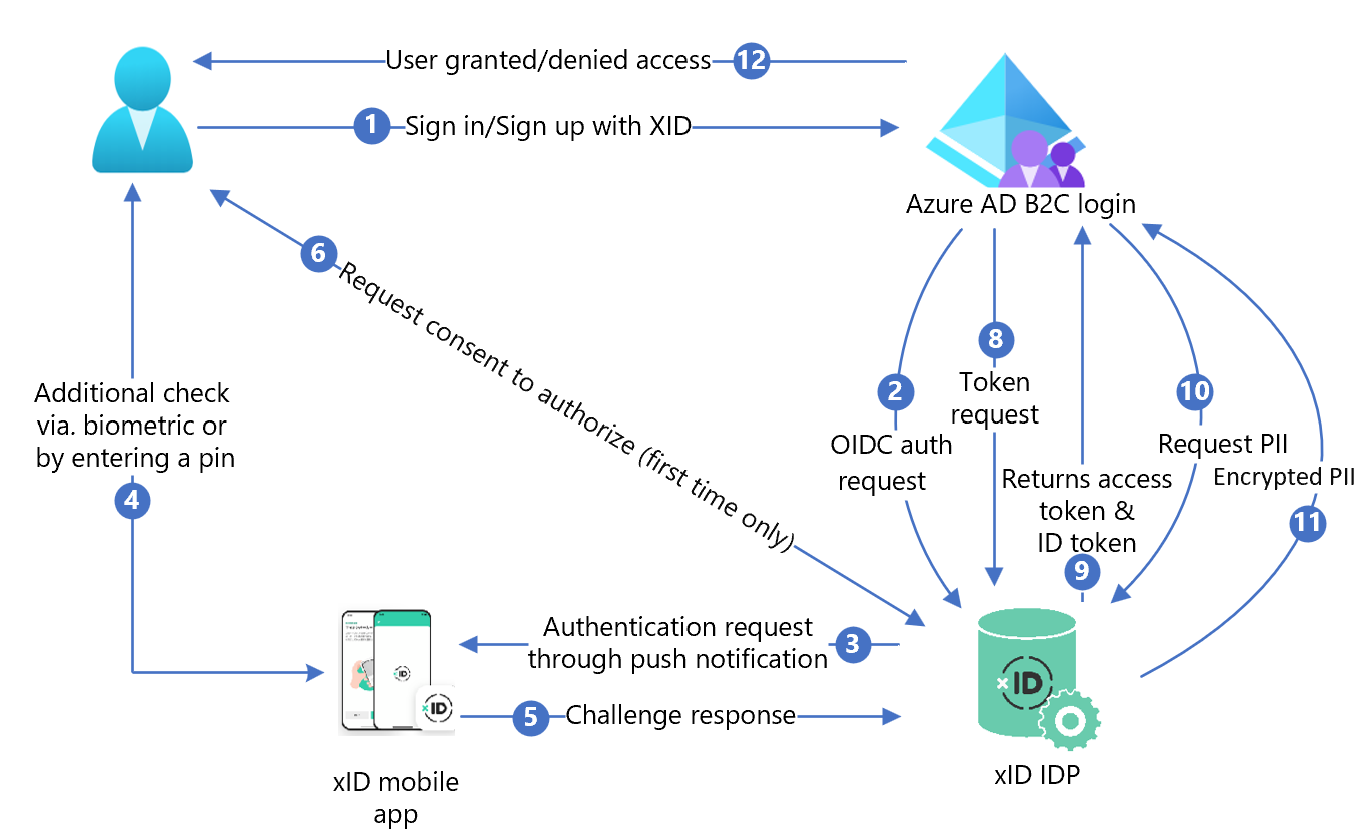
- Azure AD B2C 로그인 페이지에서 사용자는 로그인하거나 가입합니다.
- Azure AD B2C는 OIDC(OpenID Connect) 요청을 사용하여 사용자를 xID 권한 부여 API 엔드포인트로 리디렉션합니다. OIDC 엔드포인트에는 엔드포인트 정보가 있습니다. xID IdP(ID 공급자)는 사용자를 xID 권한 부여 로그인 페이지로 리디렉션합니다. 사용자가 이메일 주소를 입력합니다.
- xID IdP는 사용자 모바일 디바이스에 푸시 알림을 보냅니다.
- 사용자는 xID 앱을 열고, 요청을 확인하고, PIN을 입력하거나 생체 인식을 사용합니다. xID 앱은 프라이빗 키를 활성화하고 전자 서명을 만듭니다.
- xID 앱은 확인을 위해 서명을 xID IdP로 보냅니다.
- 서비스에 개인 정보를 제공하기 위한 동의 화면이 나타납니다.
- xID IdP는 OAuth 권한 부여 코드를 Azure AD B2C에 반환합니다.
- Azure AD B2C는 권한 부여 코드를 사용하여 토큰 요청을 보냅니다.
- xID IdP는 토큰 요청을 확인합니다. 유효한 경우 OAuth 액세스 토큰과 사용자 ID 및 이메일 주소가 포함된 ID 토큰이 반환됩니다.
- 사용자 고객 콘텐츠가 필요한 경우 Azure AD B2C는 xID 사용자 데이터 API를 호출합니다.
- xID 사용자 데이터 API는 암호화된 고객 콘텐츠를 반환합니다. 사용자는 xID 클라이언트 정보를 요청할 때 만들어진 프라이빗 키로 암호를 해독합니다.
- 사용자에게 고객 애플리케이션에 대한 액세스 권한이 부여되거나 거부됩니다.
xID 설치
- API 문서를 요청하려면 요청 양식을 작성합니다. 문의하기로 이동합니다.
- 메시지에서 Azure AD B2C를 사용하고 있음을 나타냅니다.
- xID 영업 담당자가 연락합니다.
- xID API 문서의 지침을 따릅니다.
- xID API 클라이언트를 요청합니다.
- xID 기술팀은 영업일 기준 3~4일 이내에 고객 정보를 사용자에게 보냅니다.
- 다음 패턴을 사용하여 사이트에 리디렉션 URI를 제공합니다. 사용자는 인증 후 다시 돌아옵니다.
https://<your-b2c-domain>.b2clogin.com/<your-b2c-domain>.onmicrosoft.com/oauth2/authresp
Azure AD B2C에서 웹 애플리케이션 등록
관리하는 테넌트에서 애플리케이션을 등록한 다음 Azure AD B2C와 상호 작용할 수 있습니다.
자세한 정보: Active Directory B2C에서 사용할 수 있는 애플리케이션 형식
테스트를 위해 브라우저를 벗어나지 않는 디코딩된 토큰 콘텐츠가 포함된 Microsoft 웹 애플리케이션인 https://jwt.ms를 등록합니다.
웹 애플리케이션을 등록하고 ID 토큰 암시적 부여를 사용하도록 설정
자습서: Azure AD B2C에 웹 애플리케이션 등록 완료
xID 정책 키 만들기
Azure AD B2C 테넌트에 xID의 클라이언트 암호를 저장합니다. 다음 지침에서는 Azure AD B2C 테넌트가 있는 디렉터리를 사용합니다.
- Azure Portal에 로그인합니다.
- 포털 도구 모음에서 디렉터리 + 구독을 선택합니다.
- 포털 설정 | 디렉터리 + 구독 페이지의 디렉터리 이름 목록에서 Azure AD B2C 디렉터리를 찾습니다.
- 전환을 선택합니다.
- Azure Portal의 왼쪽 위에서 모든 서비스를 선택합니다.
- Azure AD B2C를 검색하고 선택합니다.
- 개요에서 Identity Experience Framework를 선택합니다.
- 정책 키를 선택합니다.
- 추가를 선택합니다.
- 옵션에서 수동을 선택합니다.
- 정책 키의 정책 키 이름을 입력합니다. 접두사
B2C_1A_가 키 이름에 추가됩니다. - 비밀에 xID의 클라이언트 암호를 입력합니다.
- 키 사용으로는 서명을 선택합니다.
- 만들기를 선택합니다.
xID를 ID 공급자로 구성
사용자가 xID를 사용하여 로그인하려면 xID를 Azure AD B2C가 엔드포인트를 통해 통신하는 클레임 공급자로 만듭니다. 엔드포인트는 Azure AD B2C가 해당 디바이스에서 디지털 ID로 인증된 사용자를 확인하는 데 사용하는 클레임을 제공합니다.
xID를 클레임 공급자로 추가
GitHub에서 사용자 지정 정책 스타터 팩을 가져온 다음, Azure AD B2C 테넌트 이름을 사용하여 SocialAccounts 스타터 팩의 XML 파일을 업데이트합니다.
Zip 파일 active-directory-b2c-policy-starterpack-main을 다운로드하거나 리포지토리를 복제합니다. Azure-Samples/active-directory-b2c-custom-policy-starterpack을 참조하세요.
SocialAccounts 디렉터리의 파일에서 문자열
yourtenant를 Azure AD B2C 테넌트의 이름으로 바꿉니다. 예를 들어yourtenant.onmicrosoft.com은contoso.onmicrosoft.com이 됩니다.SocialAccounts/TrustFrameworkExtensions.xml을 엽니다.
ClaimsProviders 요소를 찾습니다. 없는 경우 루트 요소 아래에 추가합니다.
다음 예제와 유사한 새 ClaimsProvider를 추가:
 <ClaimsProvider>
   <Domain>X-ID</Domain>
   <DisplayName>X-ID</DisplayName>
   <TechnicalProfiles>
     <TechnicalProfile Id="X-ID-OIDC">
       <DisplayName>X-ID</DisplayName>
       <Description>Login with your X-ID account</Description>
       <Protocol Name="OpenIdConnect" />
       <Metadata>
         <Item Key="METADATA">https://oidc-uat.x-id.io/.well-known/openid-configuration</Item>
         <!-- Update the Client ID below to the X-ID Application ID -->
         <Item Key="client_id">00000000-0000-0000-0000-000000000000</Item>
         <Item Key="response_types">code</Item>
         <Item Key="scope">openid verification</Item>
         <Item Key="response_mode">query</Item>
         <Item Key="HttpBinding">POST</Item>
         <Item Key="UsePolicyInRedirectUri">false</Item>
         <Item Key="DiscoverMetadataByTokenIssuer">true</Item>
         <Item Key="token_endpoint_auth_method">client_secret_basic</Item>
         <Item Key="ClaimsEndpoint">https://oidc-uat.x-id.io/userinfo</Item>
         <Item Key="ValidTokenIssuerPrefixes">https://oidc-uat.x-id.io/</Item>
       </Metadata>
       <CryptographicKeys>
         <Key Id="client_secret" StorageReferenceId="B2C_1A_XIDSecAppSecret" />
       </CryptographicKeys>
       <OutputClaims>
         <OutputClaim ClaimTypeReferenceId="issuerUserId" PartnerClaimType="sub" />
         <OutputClaim ClaimTypeReferenceId="tenantId" PartnerClaimType="tid" />
         <OutputClaim ClaimTypeReferenceId="email" />
         <OutputClaim ClaimTypeReferenceId="sid" />
         <OutputClaim ClaimTypeReferenceId="userdataid" />
         <OutputClaim ClaimTypeReferenceId="XID_verified" />
         <OutputClaim ClaimTypeReferenceId="email_verified" />
         <OutputClaim ClaimTypeReferenceId="authenticationSource" DefaultValue="socialIdpAuthentication" AlwaysUseDefaultValue="true" />
         <OutputClaim ClaimTypeReferenceId="identityProvider" PartnerClaimType="iss" DefaultValue="https://oidc-uat.x-id.io/" />
         <OutputClaim ClaimTypeReferenceId="identityProviderAccessToken" PartnerClaimType="{oauth2:access_token}" />
       </OutputClaims>
       <OutputClaimsTransformations>
         <OutputClaimsTransformation ReferenceId="CreateRandomUPNUserName" />
         <OutputClaimsTransformation ReferenceId="CreateUserPrincipalName" />
         <OutputClaimsTransformation ReferenceId="CreateAlternativeSecurityId" />
         <OutputClaimsTransformation ReferenceId="CreateSubjectClaimFromAlternativeSecurityId" />
       </OutputClaimsTransformations>
       <UseTechnicalProfileForSessionManagement ReferenceId="SM-SocialLogin" />
     </TechnicalProfile>

   <TechnicalProfile Id="X-ID-Userdata">
     <DisplayName>Userdata (Personal Information)</DisplayName>
     <Protocol Name="Proprietary" Handler="Web.TPEngine.Providers.RestfulProvider, Web.TPEngine, Version=1.0.0.0, Culture=neutral, PublicKeyToken=null" />
     <Metadata>
       <Item Key="ServiceUrl">https://api-uat.x-id.io/v4/verification/userdata</Item>
       <Item Key="SendClaimsIn">Header</Item>
       <Item Key="AuthenticationType">Bearer</Item>
       <Item Key="UseClaimAsBearerToken">identityProviderAccessToken</Item>
       <!-- <Item Key="AllowInsecureAuthInProduction">true</Item> -->
       <Item Key="DebugMode">true</Item>
       <Item Key="DefaultUserMessageIfRequestFailed">Can't process your request right now, please try again later.</Item>
     </Metadata>
     <InputClaims>
       <!-- Claims sent to your REST API -->
       <InputClaim ClaimTypeReferenceId="identityProviderAccessToken" />
     </InputClaims>
     <OutputClaims>
       <!-- Claims parsed from your REST API -->
       <OutputClaim ClaimTypeReferenceId="last_name" />
       <OutputClaim ClaimTypeReferenceId="first_name" />
       <OutputClaim ClaimTypeReferenceId="previous_name" />
       <OutputClaim ClaimTypeReferenceId="year" />
       <OutputClaim ClaimTypeReferenceId="month" />
       <OutputClaim ClaimTypeReferenceId="date" />
       <OutputClaim ClaimTypeReferenceId="prefecture" />
       <OutputClaim ClaimTypeReferenceId="city" />
       <OutputClaim ClaimTypeReferenceId="address" />
       <OutputClaim ClaimTypeReferenceId="sub_char_common_name" />
       <OutputClaim ClaimTypeReferenceId="sub_char_previous_name" />
       <OutputClaim ClaimTypeReferenceId="sub_char_address" />
       <OutputClaim ClaimTypeReferenceId="gender" />
       <OutputClaim ClaimTypeReferenceId="verified_at" />
     </OutputClaims>
     <UseTechnicalProfileForSessionManagement ReferenceId="SM-Noop" />
   </TechnicalProfile>
 </TechnicalProfiles>
 </ClaimsProvider>
xID 애플리케이션 ID를 사용하여 client_id를 설정합니다.
저장을 선택합니다.
사용자 경험 추가
로그인 페이지에 ID 공급자를 추가합니다.
- 사용자 지정 사용자 경험이 있는 경우 사용자 경험에 ID 공급자 추가로 이동합니다. 그렇지 않으면 템플릿 사용자 경험의 복사본을 만듭니다.
- 시작 팩에서 TrustFrameworkBase.xml을 엽니다.
ID=SignUpOrSignIn을 포함하는 UserJourneys 요소의 콘텐츠를 찾아 복사합니다.- TrustFrameworkExtensions.xml을 열고 UserJourneys 요소를 찾습니다. 없는 경우 하나를 추가합니다.
- UserJourney 요소의 콘텐츠를 UserJourneys 요소의 자식 항목으로 붙여넣습니다.
- 사용자 경험 ID의 이름을 바꿉니다. 예를 들어
ID=CustomSignUpSignIn
사용자 경험에 ID 공급자 추가
사용자 경험에 새 ID 공급자를 추가합니다.
- 사용자 경험에서 Type=
CombinedSignInAndSignUp또는 Type=ClaimsProviderSelection인 오케스트레이션 단계 요소를 찾습니다. 일반적으로 첫 번째 오케스트레이션 단계입니다. ClaimsProviderSelections 요소에는 로그인을 위한 ID 공급자 목록이 있습니다. 요소의 순서는 로그인 단추의 순서를 제어합니다. - ClaimsProviderSelection XML 요소를 추가합니다.
- TargetClaimsExchangeId의 값을 친숙한 이름으로 설정합니다.
- ClaimsExchange 요소를 추가합니다.
- ID를 대상 클레임 교환 ID 값으로 설정합니다. 이 변경 내용은 xID 단추를
X-IDExchange작업에 연결합니다. - TechnicalProfileReferenceId 값을 만든 기술 프로필 ID(
X-ID-OIDC)로 업데이트합니다. - 인증된 사용자
X-ID-Userdata에 대한 클레임을 반환하기 위해 xID UserInfo 엔드포인트를 호출하는 오케스트레이션 단계를 추가합니다.
다음 XML은 xID ID 공급자를 사용한 사용자 경험 오케스트레이션을 보여 줍니다.
 <UserJourney Id="CombinedSignInAndSignUp">
   <OrchestrationSteps>

     <OrchestrationStep Order="1" Type="CombinedSignInAndSignUp" ContentDefinitionReferenceId="api.signuporsignin">
       <ClaimsProviderSelections>
         <ClaimsProviderSelection TargetClaimsExchangeId="X-IDExchange" />
       </ClaimsProviderSelections>
     </OrchestrationStep>

     <OrchestrationStep Order="2" Type="ClaimsExchange">
       <ClaimsExchanges>
         <ClaimsExchange Id="X-IDExchange" TechnicalProfileReferenceId="X-ID-OIDC" />
       </ClaimsExchanges>
     </OrchestrationStep>

     <OrchestrationStep Order="3" Type="ClaimsExchange">
       <ClaimsExchanges>
         <ClaimsExchange Id="X-ID-Userdata" TechnicalProfileReferenceId="X-ID-Userdata" />
       </ClaimsExchanges>
     </OrchestrationStep>

     <!-- For social IDP authentication, attempt to find the user account in the directory. -->
     <OrchestrationStep Order="4" Type="ClaimsExchange">
       <ClaimsExchanges>
         <ClaimsExchange Id="AADUserReadUsingAlternativeSecurityId" TechnicalProfileReferenceId="AAD-UserReadUsingAlternativeSecurityId-NoError" />
       </ClaimsExchanges>
     </OrchestrationStep>

     <!-- Show self-asserted page only if the directory does not have the user account already (i.e. we do not have an objectId).  -->
     <OrchestrationStep Order="5" Type="ClaimsExchange">
       <Preconditions>
         <Precondition Type="ClaimsExist" ExecuteActionsIf="true">
           <Value>objectId</Value>
           <Action>SkipThisOrchestrationStep</Action>
         </Precondition>
       </Preconditions>
       <ClaimsExchanges>
         <ClaimsExchange Id="SelfAsserted-Social" TechnicalProfileReferenceId="SelfAsserted-Social" />
       </ClaimsExchanges>
     </OrchestrationStep>

     <!-- The previous step (SelfAsserted-Social) could have been skipped if there were no attributes to collect
          from the user. So, in that case, create the user in the directory if one does not already exist
          (verified using objectId which would be set from the last step if account was created in the directory. -->
     <OrchestrationStep Order="6" Type="ClaimsExchange">
       <Preconditions>
         <Precondition Type="ClaimsExist" ExecuteActionsIf="true">
           <Value>objectId</Value>
           <Action>SkipThisOrchestrationStep</Action>
         </Precondition>
       </Preconditions>
       <ClaimsExchanges>
         <ClaimsExchange Id="AADUserWrite" TechnicalProfileReferenceId="AAD-UserWriteUsingAlternativeSecurityId" />
       </ClaimsExchanges>
     </OrchestrationStep>

     <OrchestrationStep Order="7" Type="SendClaims" CpimIssuerTechnicalProfileReferenceId="JwtIssuer" />

   </OrchestrationSteps>
   <ClientDefinition ReferenceId="DefaultWeb" />
 </UserJourney>
정책의 일부로 참조되는 ID 클레임 xID 지원이 있습니다. 클레임 스키마에서 클레임을 선언합니다. ClaimsSchema 요소에는 ClaimType 요소 목록이 있습니다. ClaimType 요소에는 Id 특성(클레임 이름)이 포함됩니다.
- TrustFrameworksExtension.xml을 엽니다.
- BuildingBlocks 요소를 찾습니다.
- TrustFrameworksExtension.xml 정책의 ClaimsSchema 요소에 다음 ClaimType 요소를 추가합니다.
 <BuildingBlocks>
    <ClaimsSchema>
      <!-- xID -->
      <ClaimType Id="sid">
        <DisplayName>sid</DisplayName>
        <DataType>string</DataType>
      </ClaimType>
      <ClaimType Id="userdataid">
        <DisplayName>userdataid</DisplayName>
        <DataType>string</DataType>
      </ClaimType>
      <ClaimType Id="xid_verified">
        <DisplayName>xid_verified</DisplayName>
        <DataType>boolean</DataType>
      </ClaimType>
      <ClaimType Id="email_verified">
        <DisplayName>email_verified</DisplayName>
        <DataType>boolean</DataType>
      </ClaimType>
      <ClaimType Id="identityProviderAccessToken">
        <DisplayName>Identity Provider Access Token</DisplayName>
        <DataType>string</DataType>
        <AdminHelpText>Stores the access token of the identity provider.</AdminHelpText>
      </ClaimType>
      <ClaimType Id="last_name">
        <DisplayName>last_name</DisplayName>
        <DataType>string</DataType>
      </ClaimType>
      <ClaimType Id="first_name">
        <DisplayName>first_name</DisplayName>
        <DataType>string</DataType>
      </ClaimType>
      <ClaimType Id="previous_name">
        <DisplayName>previous_name</DisplayName>
        <DataType>string</DataType>
      </ClaimType>
      <ClaimType Id="year">
        <DisplayName>year</DisplayName>
        <DataType>string</DataType>
      </ClaimType>
      <ClaimType Id="month">
        <DisplayName>month</DisplayName>
        <DataType>string</DataType>
      </ClaimType>
      <ClaimType Id="date">
        <DisplayName>date</DisplayName>
        <DataType>string</DataType>
      </ClaimType>
      <ClaimType Id="prefecture">
        <DisplayName>prefecture</DisplayName>
        <DataType>string</DataType>
      </ClaimType>
      <ClaimType Id="city">
        <DisplayName>city</DisplayName>
        <DataType>string</DataType>
      </ClaimType>
      <ClaimType Id="address">
        <DisplayName>address</DisplayName>
        <DataType>string</DataType>
      </ClaimType>
      <ClaimType Id="sub_char_common_name">
        <DisplayName>sub_char_common_name</DisplayName>
        <DataType>string</DataType>
      </ClaimType>
      <ClaimType Id="sub_char_previous_name">
        <DisplayName>sub_char_previous_name</DisplayName>
        <DataType>string</DataType>
      </ClaimType>
      <ClaimType Id="sub_char_address">
        <DisplayName>sub_char_address</DisplayName>
        <DataType>string</DataType>
      </ClaimType>
      <ClaimType Id="verified_at">
        <DisplayName>verified_at</DisplayName>
        <DataType>int</DataType>
      </ClaimType>
      <ClaimType Id="gender">
        <DisplayName>Gender</DisplayName>
        <DataType>string</DataType>
        <DefaultPartnerClaimTypes>
          <Protocol Name="OpenIdConnect" PartnerClaimType="gender" />
        </DefaultPartnerClaimTypes>
        <AdminHelpText>The user's gender.</AdminHelpText>
        <UserHelpText>Your gender.</UserHelpText>
        <UserInputType>TextBox</UserInputType>
      </ClaimType>
      <ClaimType Id="correlationId">
        <DisplayName>correlation ID</DisplayName>
        <DataType>string</DataType>
      </ClaimType>
      <!-- xID -->
    </ClaimsSchema>
  </BuildingBlocks>
신뢰 당사자 정책 구성
신뢰 당사자 정책(예: SignUpSignIn.xml)은 Azure AD B2C가 실행하는 사용자 경험을 지정합니다.
- 신뢰 당사자에서 DefaultUserJourney 요소를 찾습니다.
- ID 공급자에 추가한 사용자 경험 ID와 일치하도록 ReferenceId를 업데이트합니다.
다음 예에서는 xID 사용자 경험에 대해 ReferenceId가 CombinedSignInAndSignUp으로 설정됩니다.
   <RelyingParty>
        <DefaultUserJourney ReferenceId="CombinedSignInAndSignUp" />
        <TechnicalProfile Id="PolicyProfile">
          <DisplayName>PolicyProfile</DisplayName>
          <Protocol Name="OpenIdConnect" />
          <OutputClaims>
          <OutputClaim ClaimTypeReferenceId="objectId" PartnerClaimType="sub" />
          <OutputClaim ClaimTypeReferenceId="tenantId" AlwaysUseDefaultValue="true" DefaultValue="{Policy:TenantObjectId}" />
          <OutputClaim ClaimTypeReferenceId="correlationId" DefaultValue="{Context:CorrelationId}" />
          <OutputClaim ClaimTypeReferenceId="issuerUserId" />
          <OutputClaim ClaimTypeReferenceId="givenName" PartnerClaimType="first_name" />
          <OutputClaim ClaimTypeReferenceId="surName" PartnerClaimType="last_name" />
          <OutputClaim ClaimTypeReferenceId="previous_name" />
          <OutputClaim ClaimTypeReferenceId="year" />
          <OutputClaim ClaimTypeReferenceId="month" />
          <OutputClaim ClaimTypeReferenceId="date" />
          <OutputClaim ClaimTypeReferenceId="prefecture" />
          <OutputClaim ClaimTypeReferenceId="city" />
          <OutputClaim ClaimTypeReferenceId="address" />
          <OutputClaim ClaimTypeReferenceId="sub_char_common_name" />
          <OutputClaim ClaimTypeReferenceId="sub_char_previous_name" />
          <OutputClaim ClaimTypeReferenceId="sub_char_address" />
          <OutputClaim ClaimTypeReferenceId="gender" />
          <OutputClaim ClaimTypeReferenceId="verified_at" />
          <OutputClaim ClaimTypeReferenceId="email" />
          <OutputClaim ClaimTypeReferenceId="sid" />
          <OutputClaim ClaimTypeReferenceId="userdataid" />
          <OutputClaim ClaimTypeReferenceId="xid_verified" />
          <OutputClaim ClaimTypeReferenceId="email_verified" />
          </OutputClaims>
          <SubjectNamingInfo ClaimType="sub" />
        </TechnicalProfile>
      </RelyingParty>
사용자 지정 정책 업로드
다음 지침에서는 Azure AD B2C 테넌트가 있는 디렉터리를 사용합니다.
- Azure Portal에 로그인합니다.
- 포털 도구 모음에서 디렉터리 + 구독을 선택합니다.
- 포털 설정 | 디렉터리 이름 목록의 디렉터리 + 구독 페이지. Azure AD B2C 디렉터리를 찾습니다.
- 전환을 선택합니다.
- Azure Portal에서 Azure AD B2C를 검색하고 선택합니다.
- 정책에서 Identity Experience Framework를 선택합니다.
- 사용자 지정 정책 업로드를 선택합니다.
- 다음 순서로 파일을 업로드합니다.
- 기본 정책 파일:
TrustFrameworkBase.xml - 확장 정책:
TrustFrameworkExtensions.xml - 신뢰 당사자 정책:
SignUpSignIn.xml
사용자 지정 정책 테스트
- Azure AD B2C 테넌트의 정책에서 Identity Experience Framework를 선택합니다.
- 사용자 지정 정책에서 CustomSignUpSignIn을 선택합니다.
- 애플리케이션에 등록한 웹 애플리케이션을 선택합니다. 회신 URL은
https://jwt.ms입니다. - 지금 실행을 선택합니다.
- 브라우저가 xID 로그인 페이지로 리디렉션됩니다.
- 브라우저가
https://jwt.ms로 리디렉션됩니다. Azure AD B2C에서 반환된 토큰 콘텐츠가 표시됩니다.