빠른 시작: 사용자 지정 음성 도우미 만들기
이 빠른 시작에서는 Speech SDK를 사용하여 이미 작성하고 구성한 봇에 연결하는 사용자 지정 음성 도우미 애플리케이션을 만듭니다. 봇을 만들어야 하는 경우 더 포괄적인 가이드는 관련 자습서를 참조하세요.
몇 가지 필수 구성 요소를 충족한 후에는 사용자 도우미를 연결하는 데 몇 가지 단계만 거치면 됩니다.
- 구독 키 및 지역에서
BotFrameworkConfig개체를 만듭니다. - 위의
BotFrameworkConfig개체를 사용하여DialogServiceConnector개체를 만듭니다. -
DialogServiceConnector개체를 사용하여 단일 발화에 대한 수신 대기 프로세스를 시작합니다. - 반환된
ActivityReceivedEventArgs를 검사합니다.
참고 항목
C++, JavaScript, Objective-C, Python 및 Swift용 Speech SDK는 사용자 지정 음성 도우미를 지원하지만 아직 가이드를 포함하지 않았습니다.
GitHub에서 모든 Speech SDK C# 샘플을 보거나 다운로드할 수 있습니다.
필수 조건
시작하기 전에 다음을 확인해야 합니다.
- 음성 리소스 만들기
- 개발 환경 설정 및 빈 프로젝트 만들기
- Direct Line Speech 채널에 연결된 봇 만들기
- 오디오 캡처를 위해 마이크에 액세스할 수 있는지 확인합니다.
참고 항목
음성 도우미에 대한 지원되는 지역 목록을 참조하고 리소스가 해당 지역 중 하나에 배포되었는지 확인하세요.
Visual Studio에서 프로젝트 열기
첫 번째 단계로 Visual Studio에서 프로젝트를 열어야 합니다.
몇 가지 상용구 코드로 시작
프로젝트에 대한 기본 사항으로 작동하는 몇 가지 코드를 추가해 보겠습니다.
솔루션 탐색기에서
MainPage.xaml파일을 엽니다.디자이너의 XAML 보기에서 전체 콘텐츠를 기초적인 사용자 인터페이스를 정의하는 다음 코드 조각으로 바꿉니다.
<Page
    x:Class="helloworld.MainPage"
    xmlns="http://schemas.microsoft.com/winfx/2006/xaml/presentation"
    xmlns:x="http://schemas.microsoft.com/winfx/2006/xaml"
    xmlns:local="using:helloworld"
    xmlns:d="http://schemas.microsoft.com/expression/blend/2008"
    xmlns:mc="http://schemas.openxmlformats.org/markup-compatibility/2006"
    mc:Ignorable="d"
    Background="{ThemeResource ApplicationPageBackgroundThemeBrush}">

    <Grid>
        <StackPanel Orientation="Vertical" HorizontalAlignment="Center"
                    Margin="20,50,0,0" VerticalAlignment="Center" Width="800">
            <Button x:Name="EnableMicrophoneButton" Content="Enable Microphone"
                    Margin="0,0,10,0" Click="EnableMicrophone_ButtonClicked"
                    Height="35"/>
            <Button x:Name="ListenButton" Content="Talk to your bot"
                    Margin="0,10,10,0" Click="ListenButton_ButtonClicked"
                    Height="35"/>
            <StackPanel x:Name="StatusPanel" Orientation="Vertical"
                        RelativePanel.AlignBottomWithPanel="True"
                        RelativePanel.AlignRightWithPanel="True"
                        RelativePanel.AlignLeftWithPanel="True">
                <TextBlock x:Name="StatusLabel" Margin="0,10,10,0"
                           TextWrapping="Wrap" Text="Status:" FontSize="20"/>
                <Border x:Name="StatusBorder" Margin="0,0,0,0">
                    <ScrollViewer VerticalScrollMode="Auto"
                                  VerticalScrollBarVisibility="Auto" MaxHeight="200">
                        <!-- Use LiveSetting to enable screen readers to announce
                             the status update. -->
                        <TextBlock
                            x:Name="StatusBlock" FontWeight="Bold"
                            AutomationProperties.LiveSetting="Assertive"
                            MaxWidth="{Binding ElementName=Splitter, Path=ActualWidth}"
                            Margin="10,10,10,20" TextWrapping="Wrap"  />
                    </ScrollViewer>
                </Border>
            </StackPanel>
        </StackPanel>
        <MediaElement x:Name="mediaElement"/>
    </Grid>
</Page>
애플리케이션의 사용자 인터페이스를 표시하도록 디자인 보기가 업데이트됩니다.
-
솔루션 탐색기에서 코드 숨김 원본 파일
MainPage.xaml.cs를 엽니다.MainPage.xaml로 그룹화되어 있습니다. 이 파일의 내용을 다음을 포함하는 아래와 같이 바꿉니다.
Speech및Speech.Dialog네임스페이스에 대한using명령문단추 처리기에 연결된 마이크 액세스를 보장하는 간단한 구현
애플리케이션에서 메시지 및 오류를 표시하는 기본 UI 도우미
나중에 채울 초기화 코드 경로에 대한 시작 지점
텍스트를 음성으로 재생하는 도우미(스트리밍 지원 없음)
나중에 채울 수신 대기를 시작하는 빈 단추 처리기
using Microsoft.CognitiveServices.Speech;
using Microsoft.CognitiveServices.Speech.Audio;
using Microsoft.CognitiveServices.Speech.Dialog;
using System;
using System.Diagnostics;
using System.IO;
using System.Text;
using Windows.Foundation;
using Windows.Storage.Streams;
using Windows.UI.Xaml;
using Windows.UI.Xaml.Controls;
using Windows.UI.Xaml.Media;

namespace helloworld
{
    public sealed partial class MainPage : Page
    {
        private DialogServiceConnector connector;

        private enum NotifyType
        {
            StatusMessage,
            ErrorMessage
        };

        public MainPage()
        {
            this.InitializeComponent();
        }

        private async void EnableMicrophone_ButtonClicked(
            object sender, RoutedEventArgs e)
        {
            bool isMicAvailable = true;
            try
            {
                var mediaCapture = new Windows.Media.Capture.MediaCapture();
                var settings =
                    new Windows.Media.Capture.MediaCaptureInitializationSettings();
                settings.StreamingCaptureMode =
                    Windows.Media.Capture.StreamingCaptureMode.Audio;
                await mediaCapture.InitializeAsync(settings);
            }
            catch (Exception)
            {
                isMicAvailable = false;
            }
            if (!isMicAvailable)
            {
                await Windows.System.Launcher.LaunchUriAsync(
                    new Uri("ms-settings:privacy-microphone"));
            }
            else
            {
                NotifyUser("Microphone was enabled", NotifyType.StatusMessage);
            }
        }

        private void NotifyUser(
            string strMessage, NotifyType type = NotifyType.StatusMessage)
        {
            // If called from the UI thread, then update immediately.
            // Otherwise, schedule a task on the UI thread to perform the update.
            if (Dispatcher.HasThreadAccess)
            {
                UpdateStatus(strMessage, type);
            }
            else
            {
                var task = Dispatcher.RunAsync(
                    Windows.UI.Core.CoreDispatcherPriority.Normal,
                    () => UpdateStatus(strMessage, type));
            }
        }

        private void UpdateStatus(string strMessage, NotifyType type)
        {
            switch (type)
            {
                case NotifyType.StatusMessage:
                    StatusBorder.Background = new SolidColorBrush(
                        Windows.UI.Colors.Green);
                    break;
                case NotifyType.ErrorMessage:
                    StatusBorder.Background = new SolidColorBrush(
                        Windows.UI.Colors.Red);
                    break;
            }
            StatusBlock.Text += string.IsNullOrEmpty(StatusBlock.Text)
                ? strMessage : "\n" + strMessage;

            if (!string.IsNullOrEmpty(StatusBlock.Text))
            {
                StatusBorder.Visibility = Visibility.Visible;
                StatusPanel.Visibility = Visibility.Visible;
            }
            else
            {
                StatusBorder.Visibility = Visibility.Collapsed;
                StatusPanel.Visibility = Visibility.Collapsed;
            }
            // Raise an event if necessary to enable a screen reader
            // to announce the status update.
            var peer = Windows.UI.Xaml.Automation.Peers.FrameworkElementAutomationPeer.FromElement(StatusBlock);
            if (peer != null)
            {
                peer.RaiseAutomationEvent(
                    Windows.UI.Xaml.Automation.Peers.AutomationEvents.LiveRegionChanged);
            }
        }

        // Waits for and accumulates all audio associated with a given
        // PullAudioOutputStream and then plays it to the MediaElement. Long spoken
        // audio will create extra latency and a streaming playback solution
        // (that plays audio while it continues to be received) should be used --
        // see the samples for examples of this.
        private void SynchronouslyPlayActivityAudio(
            PullAudioOutputStream activityAudio)
        {
            var playbackStreamWithHeader = new MemoryStream();
            playbackStreamWithHeader.Write(Encoding.ASCII.GetBytes("RIFF"), 0, 4); // ChunkID
            playbackStreamWithHeader.Write(BitConverter.GetBytes(UInt32.MaxValue), 0, 4); // ChunkSize: max
            playbackStreamWithHeader.Write(Encoding.ASCII.GetBytes("WAVE"), 0, 4); // Format
            playbackStreamWithHeader.Write(Encoding.ASCII.GetBytes("fmt "), 0, 4); // Subchunk1ID
            playbackStreamWithHeader.Write(BitConverter.GetBytes(16), 0, 4); // Subchunk1Size: PCM
            playbackStreamWithHeader.Write(BitConverter.GetBytes(1), 0, 2); // AudioFormat: PCM
            playbackStreamWithHeader.Write(BitConverter.GetBytes(1), 0, 2); // NumChannels: mono
            playbackStreamWithHeader.Write(BitConverter.GetBytes(16000), 0, 4); // SampleRate: 16kHz
            playbackStreamWithHeader.Write(BitConverter.GetBytes(32000), 0, 4); // ByteRate
            playbackStreamWithHeader.Write(BitConverter.GetBytes(2), 0, 2); // BlockAlign
            playbackStreamWithHeader.Write(BitConverter.GetBytes(16), 0, 2); // BitsPerSample: 16-bit
            playbackStreamWithHeader.Write(Encoding.ASCII.GetBytes("data"), 0, 4); // Subchunk2ID
            playbackStreamWithHeader.Write(BitConverter.GetBytes(UInt32.MaxValue), 0, 4); // Subchunk2Size

            byte[] pullBuffer = new byte[2056];

            uint lastRead = 0;
            do
            {
                lastRead = activityAudio.Read(pullBuffer);
                playbackStreamWithHeader.Write(pullBuffer, 0, (int)lastRead);
            }
            while (lastRead == pullBuffer.Length);

            var task = Dispatcher.RunAsync(
                Windows.UI.Core.CoreDispatcherPriority.Normal, () =>
            {
                mediaElement.SetSource(
                    playbackStreamWithHeader.AsRandomAccessStream(), "audio/wav");
                mediaElement.Play();
            });
        }

        private void InitializeDialogServiceConnector()
        {
            // New code will go here
        }

        private async void ListenButton_ButtonClicked(
            object sender, RoutedEventArgs e)
        {
            // New code will go here
        }
    }
}
InitializeDialogServiceConnector의 메서드 본문에 다음 코드 조각을 추가합니다. 이 코드는 구독 정보를 사용하여DialogServiceConnector를 만듭니다.// Create a BotFrameworkConfig by providing a Speech service subscription key // the botConfig.Language property is optional (default en-US) const string speechSubscriptionKey = "YourSpeechSubscriptionKey"; // Your subscription key const string region = "YourServiceRegion"; // Your subscription service region. var botConfig = BotFrameworkConfig.FromSubscription(speechSubscriptionKey, region); botConfig.Language = "en-US"; connector = new DialogServiceConnector(botConfig);참고 항목
음성 도우미에 대한 지원되는 지역 목록을 참조하고 리소스가 해당 지역 중 하나에 배포되었는지 확인하세요.
참고 항목
봇 구성에 대한 자세한 내용은 Direct Line Speech 채널에 대한 Bot Framework 설명서를 참조하세요.
YourSpeechSubscriptionKey및YourServiceRegion문자열을 사용자 고유의 봇, 음성 구독 및 지역 값으로 바꿉니다.InitializeDialogServiceConnector의 메서드 본문 끝에 다음 코드 조각을 추가합니다. 이 코드는DialogServiceConnector에 의해 의존하는 이벤트에 대한 처리기를 설정하여 봇 작업, 음성 인식 결과 및 기타 정보를 전달합니다.// ActivityReceived is the main way your bot will communicate with the client // and uses bot framework activities connector.ActivityReceived += (sender, activityReceivedEventArgs) => { NotifyUser( $"Activity received, hasAudio={activityReceivedEventArgs.HasAudio} activity={activityReceivedEventArgs.Activity}"); if (activityReceivedEventArgs.HasAudio) { SynchronouslyPlayActivityAudio(activityReceivedEventArgs.Audio); } }; // Canceled will be signaled when a turn is aborted or experiences an error condition connector.Canceled += (sender, canceledEventArgs) => { NotifyUser($"Canceled, reason={canceledEventArgs.Reason}"); if (canceledEventArgs.Reason == CancellationReason.Error) { NotifyUser( $"Error: code={canceledEventArgs.ErrorCode}, details={canceledEventArgs.ErrorDetails}"); } }; // Recognizing (not 'Recognized') will provide the intermediate recognized text // while an audio stream is being processed connector.Recognizing += (sender, recognitionEventArgs) => { NotifyUser($"Recognizing! in-progress text={recognitionEventArgs.Result.Text}"); }; // Recognized (not 'Recognizing') will provide the final recognized text // once audio capture is completed connector.Recognized += (sender, recognitionEventArgs) => { NotifyUser($"Final speech to text result: '{recognitionEventArgs.Result.Text}'"); }; // SessionStarted will notify when audio begins flowing to the service for a turn connector.SessionStarted += (sender, sessionEventArgs) => { NotifyUser($"Now Listening! Session started, id={sessionEventArgs.SessionId}"); }; // SessionStopped will notify when a turn is complete and // it's safe to begin listening again connector.SessionStopped += (sender, sessionEventArgs) => { NotifyUser($"Listening complete. Session ended, id={sessionEventArgs.SessionId}"); };MainPage클래스의ListenButton_ButtonClicked메서드 본문에 다음 코드 조각을 추가합니다. 이 코드는 이미 구성을 설정하고 이벤트 처리기를 등록했으므로 수신 대기하도록DialogServiceConnector를 설정합니다.if (connector == null) { InitializeDialogServiceConnector(); // Optional step to speed up first interaction: if not called, // connection happens automatically on first use var connectTask = connector.ConnectAsync(); } try { // Start sending audio to your speech-enabled bot var listenTask = connector.ListenOnceAsync(); // You can also send activities to your bot as JSON strings -- // Microsoft.Bot.Schema can simplify this string speakActivity = @"{""type"":""message"",""text"":""Greeting Message"", ""speak"":""Hello there!""}"; await connector.SendActivityAsync(speakActivity); } catch (Exception ex) { NotifyUser($"Exception: {ex.ToString()}", NotifyType.ErrorMessage); }
앱 빌드 및 실행
이제 앱을 빌드하고 Speech Service를 사용하여 사용자 지정 음성 도우미를 테스트할 준비가 되었습니다.
메뉴 모음에서 빌드>솔루션 빌드를 선택하여 애플리케이션을 빌드합니다. 코드는 이제 오류 없이 컴파일됩니다.
디버그>디버깅 시작을 선택하거나, F5 키를 눌러 애플리케이션을 시작합니다. helloworld 창이 나타납니다.
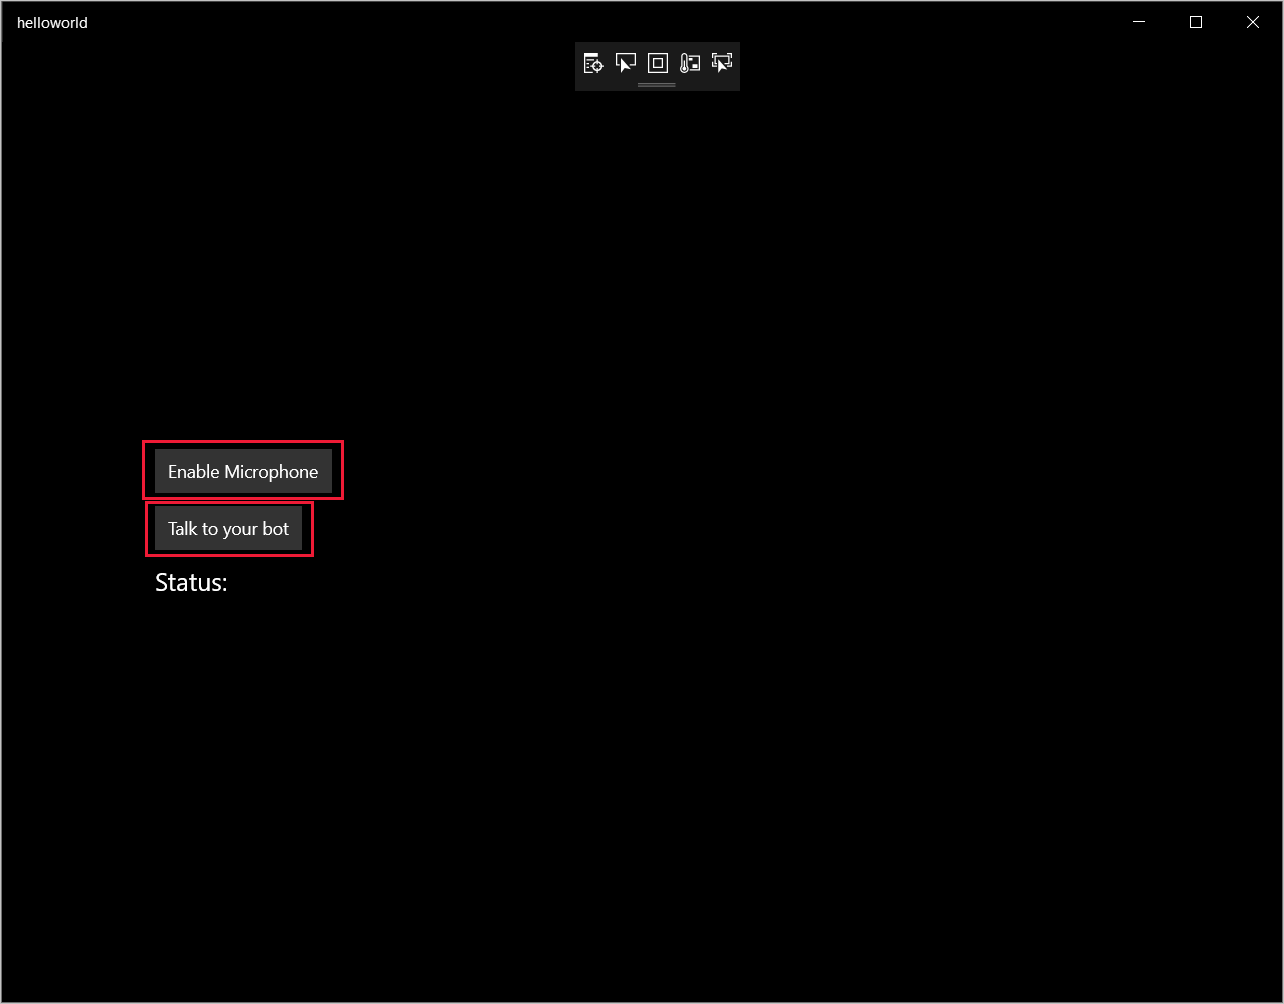
마이크 사용을 선택하고, 액세스 권한 요청이 팝업되면 예를 선택합니다.

봇에게 말하기를 선택하고, 디바이스의 마이크에 영어로 짧은 구나 문장을 말합니다. 음성은 Direct Line Speech 채널로 전송되어 텍스트로 전사되고 창에 표시됩니다.
다음 단계
GitHub에서 모든 Speech SDK Java 샘플을 보거나 다운로드할 수 있습니다.
대상 환경 선택
필수 조건
시작하기 전에 다음을 확인해야 합니다.
- 음성 리소스 만들기
- 개발 환경 설정 및 빈 프로젝트 만들기
- Direct Line Speech 채널에 연결된 봇 만들기
- 오디오 캡처를 위해 마이크에 액세스할 수 있는지 확인합니다.
참고 항목
음성 도우미에 대한 지원되는 지역 목록을 참조하고 리소스가 해당 지역 중 하나에 배포되었는지 확인하세요.
프로젝트 만들기 및 구성
Eclipse 프로젝트 만들기 및 Speech SDK 설치
또한 로깅을 사용하려면 다음 종속성을 포함하도록 pom.xml 파일을 업데이트합니다.
 <dependency>
     <groupId>org.slf4j</groupId>
     <artifactId>slf4j-simple</artifactId>
     <version>1.7.5</version>
 </dependency>
샘플 코드 추가
Java 프로젝트에 새로운 빈 클래스를 추가하려면 파일>새로 만들기>클래스를 선택합니다.
새 Java 클래스 창에서, 패키지 필드에 speechsdk.quickstart를 입력하고, 이름 필드에 기본을 입력합니다.
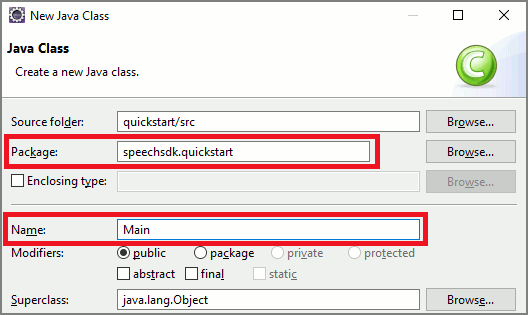
새로 만든
Main클래스를 열고Main.java파일의 내용을 다음 시작 코드로 바꿉니다.package speechsdk.quickstart; import com.microsoft.cognitiveservices.speech.audio.AudioConfig; import com.microsoft.cognitiveservices.speech.audio.PullAudioOutputStream; import com.microsoft.cognitiveservices.speech.dialog.BotFrameworkConfig; import com.microsoft.cognitiveservices.speech.dialog.DialogServiceConnector; import org.slf4j.Logger; import org.slf4j.LoggerFactory; import javax.sound.sampled.AudioFormat; import javax.sound.sampled.AudioSystem; import javax.sound.sampled.DataLine; import javax.sound.sampled.SourceDataLine; import java.io.InputStream; public class Main { final Logger log = LoggerFactory.getLogger(Main.class); public static void main(String[] args) { // New code will go here } private void playAudioStream(PullAudioOutputStream audio) { ActivityAudioStream stream = new ActivityAudioStream(audio); final ActivityAudioStream.ActivityAudioFormat audioFormat = stream.getActivityAudioFormat(); final AudioFormat format = new AudioFormat( AudioFormat.Encoding.PCM_SIGNED, audioFormat.getSamplesPerSecond(), audioFormat.getBitsPerSample(), audioFormat.getChannels(), audioFormat.getFrameSize(), audioFormat.getSamplesPerSecond(), false); try { int bufferSize = format.getFrameSize(); final byte[] data = new byte[bufferSize]; SourceDataLine.Info info = new DataLine.Info(SourceDataLine.class, format); SourceDataLine line = (SourceDataLine) AudioSystem.getLine(info); line.open(format); if (line != null) { line.start(); int nBytesRead = 0; while (nBytesRead != -1) { nBytesRead = stream.read(data); if (nBytesRead != -1) { line.write(data, 0, nBytesRead); } } line.drain(); line.stop(); line.close(); } stream.close(); } catch (Exception e) { e.printStackTrace(); } } }main메서드에서는 먼저DialogServiceConfig를 구성하고DialogServiceConnector인스턴스를 만드는 데 사용할 것입니다. 이 인스턴스는 Direct Line Speech 채널에 연결하여 봇과 상호 작용하게 됩니다.AudioConfig인스턴스는 오디오 입력의 소스를 지정할 때도 사용됩니다. 이 예제에서는AudioConfig.fromDefaultMicrophoneInput()을 통해 기본 마이크를 사용합니다.-
YourSubscriptionKey문자열을 Azure Portal에서 얻을 수 있는 음성 리소스 키로 바꿉니다. - 문자열
YourServiceRegion을 음성 리소스와 연결된 지역으로 바꿉니다.
참고 항목
음성 도우미에 대한 지원되는 지역 목록을 참조하고 리소스가 해당 지역 중 하나에 배포되었는지 확인하세요.
final String subscriptionKey = "YourSubscriptionKey"; // Your subscription key final String region = "YourServiceRegion"; // Your speech subscription service region final BotFrameworkConfig botConfig = BotFrameworkConfig.fromSubscription(subscriptionKey, region); // Configure audio input from a microphone. final AudioConfig audioConfig = AudioConfig.fromDefaultMicrophoneInput(); // Create a DialogServiceConnector instance. final DialogServiceConnector connector = new DialogServiceConnector(botConfig, audioConfig);-
DialogServiceConnector커넥터는 여러 이벤트를 사용하여 봇 작업, 음성 인식 결과 및 기타 정보를 전달합니다. 그 후에는 다음 이벤트 수신기를 추가합니다.// Recognizing will provide the intermediate recognized text while an audio stream is being processed. connector.recognizing.addEventListener((o, speechRecognitionResultEventArgs) -> { log.info("Recognizing speech event text: {}", speechRecognitionResultEventArgs.getResult().getText()); }); // Recognized will provide the final recognized text once audio capture is completed. connector.recognized.addEventListener((o, speechRecognitionResultEventArgs) -> { log.info("Recognized speech event reason text: {}", speechRecognitionResultEventArgs.getResult().getText()); }); // SessionStarted will notify when audio begins flowing to the service for a turn. connector.sessionStarted.addEventListener((o, sessionEventArgs) -> { log.info("Session Started event id: {} ", sessionEventArgs.getSessionId()); }); // SessionStopped will notify when a turn is complete and it's safe to begin listening again. connector.sessionStopped.addEventListener((o, sessionEventArgs) -> { log.info("Session stopped event id: {}", sessionEventArgs.getSessionId()); }); // Canceled will be signaled when a turn is aborted or experiences an error condition. connector.canceled.addEventListener((o, canceledEventArgs) -> { log.info("Canceled event details: {}", canceledEventArgs.getErrorDetails()); connector.disconnectAsync(); }); // ActivityReceived is the main way your bot will communicate with the client and uses Bot Framework activities. connector.activityReceived.addEventListener((o, activityEventArgs) -> { final String act = activityEventArgs.getActivity().serialize(); log.info("Received activity {} audio", activityEventArgs.hasAudio() ? "with" : "without"); if (activityEventArgs.hasAudio()) { playAudioStream(activityEventArgs.getAudio()); } });connectAsync()메서드를 호출하여DialogServiceConnector를 Direct Line Speech에 연결합니다. 봇을 테스트하려면listenOnceAsync메서드를 호출하여 마이크로 오디오 입력을 보내면 됩니다.sendActivityAsync메서드를 사용하여 사용자 지정 작업을 직렬화된 문자열로 보낼 수도 있습니다. 이러한 사용자 지정 작업은 봇이 대화에 사용하는 추가 데이터를 제공할 수 있습니다.connector.connectAsync(); // Start listening. System.out.println("Say something ..."); connector.listenOnceAsync(); // connector.sendActivityAsync(...)변경 내용을
Main파일에 저장합니다.응답 재생을 지원할 수 있도록 getAudio() API에서 반환된 PullAudioOutputStream 개체를 java InputStream으로 변환하는 추가 클래스를 추가합니다. 이
ActivityAudioStream은 Direct Line Speech 채널의 오디오 응답을 처리하는 특수 클래스입니다. 재생 처리에 필요한 오디오 형식 정보를 가져오는 접근자를 제공합니다. 이 경우 파일>새로 만들기>클래스를 차례로 선택합니다.새 Java 클래스 창에서 패키지 필드에는 speechsdk.quickstart를 입력하고, 이름 필드에는 ActivityAudioStream을 입력합니다.
새로 만든
ActivityAudioStream클래스를 열고, 내용을 다음 코드로 바꿉니다.package com.speechsdk.quickstart; import com.microsoft.cognitiveservices.speech.audio.PullAudioOutputStream; import java.io.IOException; import java.io.InputStream; public final class ActivityAudioStream extends InputStream { /** * The number of samples played per second (16 kHz). */ public static final long SAMPLE_RATE = 16000; /** * The number of bits in each sample of a sound that has this format (16 bits). */ public static final int BITS_PER_SECOND = 16; /** * The number of audio channels in this format (1 for mono). */ public static final int CHANNELS = 1; /** * The number of bytes in each frame of a sound that has this format (2). */ public static final int FRAME_SIZE = 2; /** * Reads up to a specified maximum number of bytes of data from the audio * stream, putting them into the given byte array. * * @param b the buffer into which the data is read * @param off the offset, from the beginning of array <code>b</code>, at which * the data will be written * @param len the maximum number of bytes to read * @return the total number of bytes read into the buffer, or -1 if there * is no more data because the end of the stream has been reached */ @Override public int read(byte[] b, int off, int len) { byte[] tempBuffer = new byte[len]; int n = (int) this.pullStreamImpl.read(tempBuffer); for (int i = 0; i < n; i++) { if (off + i > b.length) { throw new ArrayIndexOutOfBoundsException(b.length); } b[off + i] = tempBuffer[i]; } if (n == 0) { return -1; } return n; } /** * Reads the next byte of data from the activity audio stream if available. * * @return the next byte of data, or -1 if the end of the stream is reached * @see #read(byte[], int, int) * @see #read(byte[]) * @see #available * <p> */ @Override public int read() { byte[] data = new byte[1]; int temp = read(data); if (temp <= 0) { // we have a weird situation if read(byte[]) returns 0! return -1; } return data[0] & 0xFF; } /** * Reads up to a specified maximum number of bytes of data from the activity audio stream, * putting them into the given byte array. * * @param b the buffer into which the data is read * @return the total number of bytes read into the buffer, or -1 if there * is no more data because the end of the stream has been reached */ @Override public int read(byte[] b) { int n = (int) pullStreamImpl.read(b); if (n == 0) { return -1; } return n; } /** * Skips over and discards a specified number of bytes from this * audio input stream. * * @param n the requested number of bytes to be skipped * @return the actual number of bytes skipped * @throws IOException if an input or output error occurs * @see #read * @see #available */ @Override public long skip(long n) { if (n <= 0) { return 0; } if (n <= Integer.MAX_VALUE) { byte[] tempBuffer = new byte[(int) n]; return read(tempBuffer); } long count = 0; for (long i = n; i > 0; i -= Integer.MAX_VALUE) { int size = (int) Math.min(Integer.MAX_VALUE, i); byte[] tempBuffer = new byte[size]; count += read(tempBuffer); } return count; } /** * Closes this audio input stream and releases any system resources associated * with the stream. */ @Override public void close() { this.pullStreamImpl.close(); } /** * Fetch the audio format for the ActivityAudioStream. The ActivityAudioFormat defines the sample rate, bits per sample, and the # channels. * * @return instance of the ActivityAudioFormat associated with the stream */ public ActivityAudioStream.ActivityAudioFormat getActivityAudioFormat() { return activityAudioFormat; } /** * Returns the maximum number of bytes that can be read (or skipped over) from this * audio input stream without blocking. * * @return the number of bytes that can be read from this audio input stream without blocking. * As this implementation does not buffer, this will be defaulted to 0 */ @Override public int available() { return 0; } public ActivityAudioStream(final PullAudioOutputStream stream) { pullStreamImpl = stream; this.activityAudioFormat = new ActivityAudioStream.ActivityAudioFormat(SAMPLE_RATE, BITS_PER_SECOND, CHANNELS, FRAME_SIZE, AudioEncoding.PCM_SIGNED); } private PullAudioOutputStream pullStreamImpl; private ActivityAudioFormat activityAudioFormat; /** * ActivityAudioFormat is an internal format which contains metadata regarding the type of arrangement of * audio bits in this activity audio stream. */ static class ActivityAudioFormat { private long samplesPerSecond; private int bitsPerSample; private int channels; private int frameSize; private AudioEncoding encoding; public ActivityAudioFormat(long samplesPerSecond, int bitsPerSample, int channels, int frameSize, AudioEncoding encoding) { this.samplesPerSecond = samplesPerSecond; this.bitsPerSample = bitsPerSample; this.channels = channels; this.encoding = encoding; this.frameSize = frameSize; } /** * Fetch the number of samples played per second for the associated audio stream format. * * @return the number of samples played per second */ public long getSamplesPerSecond() { return samplesPerSecond; } /** * Fetch the number of bits in each sample of a sound that has this audio stream format. * * @return the number of bits per sample */ public int getBitsPerSample() { return bitsPerSample; } /** * Fetch the number of audio channels used by this audio stream format. * * @return the number of channels */ public int getChannels() { return channels; } /** * Fetch the default number of bytes in a frame required by this audio stream format. * * @return the number of bytes */ public int getFrameSize() { return frameSize; } /** * Fetch the audio encoding type associated with this audio stream format. * * @return the encoding associated */ public AudioEncoding getEncoding() { return encoding; } } /** * Enum defining the types of audio encoding supported by this stream. */ public enum AudioEncoding { PCM_SIGNED("PCM_SIGNED"); String value; AudioEncoding(String value) { this.value = value; } } }변경 내용을
ActivityAudioStream파일에 저장합니다.
앱 빌드 및 실행
F11 키를 선택하거나 실행>디버그를 선택합니다.
콘솔에 "Say something."이라는 메시지가 표시됩니다. 이때 봇이 이해할 수 있는 영어 문구 또는 문장을 말합니다. 사용자의 음성이 Direct Line Speech 채널을 통해 봇으로 전송되면 봇이 음성을 인식하고 처리합니다. 응답은 작업으로 반환됩니다. 봇이 응답으로 음성을 반환하는 경우 AudioPlayer 클래스를 사용하여 오디오가 재생됩니다.

다음 단계
GitHub에서 모든 Speech SDK Go 샘플을 보거나 다운로드할 수 있습니다.
필수 조건
시작하기 전에 다음을 수행합니다.
- 음성 리소스 만들기
- 개발 환경을 설정하고 빈 프로젝트 만들기
- Direct Line Speech 채널에 연결된 봇 만들기
- 오디오 캡처를 위해 마이크에 액세스할 수 있는지 확인합니다.
참고 항목
음성 도우미에 대해 지원되는 지역 목록을 참조하고 리소스가 해당 지역 중 하나에 배포되었는지 확인합니다.
환경 설정
이 줄을 추가하여 최신 SDK 버전으로 go.mod 파일을 업데이트합니다.
require (
    github.com/Microsoft/cognitive-services-speech-sdk-go v1.15.0
)
몇 가지 상용구 코드로 시작
원본 파일의 내용(예 quickstart.go: )을 다음을 포함하는 아래로 바꿉니다.
- "main" 패키지 정의
- Speech SDK에서 필요한 모듈 가져오기
- 이 빠른 시작의 뒷부분에서 대체되는 봇 정보를 저장하기 위한 변수
- 오디오 입력에 마이크를 사용하는 간단한 구현
- 음성 상호 작용 중에 발생하는 다양한 이벤트에 대한 이벤트 처리기
package main

import (
    "fmt"
    "time"

    "github.com/Microsoft/cognitive-services-speech-sdk-go/audio"
    "github.com/Microsoft/cognitive-services-speech-sdk-go/dialog"
    "github.com/Microsoft/cognitive-services-speech-sdk-go/speech"
)

func main() {
    subscription :=  "YOUR_SUBSCRIPTION_KEY"
    region := "YOUR_BOT_REGION"

    audioConfig, err := audio.NewAudioConfigFromDefaultMicrophoneInput()
    if err != nil {
        fmt.Println("Got an error: ", err)
        return
    }
    defer audioConfig.Close()
    config, err := dialog.NewBotFrameworkConfigFromSubscription(subscription, region)
    if err != nil {
        fmt.Println("Got an error: ", err)
        return
    }
    defer config.Close()
    connector, err := dialog.NewDialogServiceConnectorFromConfig(config, audioConfig)
    if err != nil {
        fmt.Println("Got an error: ", err)
        return
    }
    defer connector.Close()
    activityReceivedHandler := func(event dialog.ActivityReceivedEventArgs) {
        defer event.Close()
        fmt.Println("Received an activity.")
    }
    connector.ActivityReceived(activityReceivedHandler)
    recognizedHandle := func(event speech.SpeechRecognitionEventArgs) {
        defer event.Close()
        fmt.Println("Recognized ", event.Result.Text)
    }
    connector.Recognized(recognizedHandle)
    recognizingHandler := func(event speech.SpeechRecognitionEventArgs) {
        defer event.Close()
        fmt.Println("Recognizing ", event.Result.Text)
    }
    connector.Recognizing(recognizingHandler)
    connector.ListenOnceAsync()
    <-time.After(10 * time.Second)
}
YOUR_SUBSCRIPTION_KEY 및 YOUR_BOT_REGION 값을 음성 리소스의 실제 값으로 바꿉니다.
Azure Portal로 이동하여 음성 리소스를 엽니다.
왼쪽의 키 및 엔드포인트에는 사용 가능한 두 개의 구독 키가 있습니다.
-
YOUR_SUBSCRIPTION_KEY값 대체로 하나를 사용합니다.
-
왼쪽의 개요에서 지역을 확인하고 지역 식별자에 매핑합니다.
- 지역 식별자를
YOUR_BOT_REGION값 대체로 사용합니다(예: 미국 서부의 경우"westus").
참고 항목
음성 도우미에 대해 지원되는 지역 목록을 참조하고 리소스가 해당 지역 중 하나에 배포되었는지 확인합니다.
참고 항목
봇 구성에 대한 자세한 내용은 Direct Line Speech 채널에 대한 Bot Framework 설명서를 참조하세요.
- 지역 식별자를
코드 설명
음성 구성 개체를 만들려면 음성 구독 키와 지역이 필요합니다. 음성 인식기 개체를 인스턴스화하려면 구성 개체가 필요합니다.
인식기 인스턴스는 음성을 인식하는 여러 가지 방법을 제공합니다. 이 예제에서는 음성이 지속적으로 인식됩니다. 이 기능을 통해 Speech Service는 인식을 위해 많은 구를 보내고 프로그램이 종료되어 음식 인식을 중지할 때 알려줍니다. 결과가 생성되면 코드에서 콘솔에 씁니다.
빌드 및 실행
이제 Speech Service를 사용하여 프로젝트를 빌드하고 사용자 지정 음성 도우미를 테스트할 수 있도록 설정했습니다.
- 프로젝트 빌드(예 : "빌드 이동")
- 모듈을 실행하고 디바이스의 마이크에 구나 문장을 말합니다. 음성은 Direct Line Speech 채널로 전송되어 출력으로 표시되는 텍스트로 전환됩니다.
참고 항목
Speech SDK는 기본적으로 언어에 en-us를 사용하여 인식합니다. 원본 언어 선택에 대한 정보는 음성을 인식하는 방법을 참조하세요.
다음 단계
추가 언어 및 플랫폼 지원
이 탭을 클릭한 경우 선호하는 프로그래밍 언어의 빠른 시작이 표시되지 않을 수 있습니다. 걱정하지 마세요. GitHub에서 사용할 수 있는 추가 빠른 시작 자료 및 코드 샘플이 있습니다. 표를 사용하여 프로그래밍 언어 및 플랫폼/OS 조합에 적합한 샘플을 찾습니다.
| 언어 | 샘플 코드 |
|---|---|
| C# | .NET Framework, .NET Core, UWP, Unity |
| C++ | Windows, Linux, macOS |
| Java | Android, JRE |
| JavaScript | Browser, Node.js |
| Objective-C | iOS, macOS |
| Python | Windows, Linux, macOS |
| Swift | iOS, macOS |
