AKS(Azure Kubernetes Service)에서 OpenFaaS 사용
OpenFaaS는 컨테이너를 사용하여 서버리스 함수를 빌드하는 프레임워크입니다. 오픈 소스 프로젝트로써 커뮤니티 내에서 대규모로 채택되었습니다. 이 문서에서는 AKS(Azure Kubernetes Service) 클러스터에서 OpenFaas를 설치하고 사용하는 방법을 자세히 설명합니다.
시작하기 전에
- 이 문서에서는 Kubernetes 개념에 대한 기본 지식이 있다고 가정합니다. 자세한 내용은 AKS(Azure Kubernetes Service)의 Kubernetes 핵심 개념을 참조하세요.
- 활성 상태인 Azure 구독이 필요합니다. 구독이 없으면 시작하기 전에 계정을 만드세요.
- AKS 클러스터가 필요합니다. 기존 클러스터가 없는 경우 Azure CLI, Azure PowerShell 또는 Azure Portal을 사용하여 만들 수 있습니다.
- OpenFaaS CLI를 설치해야 합니다. 설치 옵션은 OpenFaaS CLI 설명서를 참조하세요.
OpenFaaS helm 차트 리포지토리 추가
Azure Cloud Shell로 이동합니다.
helm명령을 사용하여 OpenFaaS helm 차트 리포지토리를 추가하고 최신 버전으로 업데이트합니다.helm repo add openfaas https://openfaas.github.io/faas-netes/ helm repo update
OpenFaaS 배포
좋은 방법은 OpenFaaS 및 OpenFaaS 함수를 고유한 Kubernetes 네임스페이스에 저장하는 것입니다.
kubectl apply명령을 사용하여 OpenFaaS 시스템과 함수의 네임스페이스를 만듭니다.kubectl apply -f https://raw.githubusercontent.com/openfaas/faas-netes/master/namespaces.yml다음 명령을 사용하여 OpenFaaS UI 포털 및 REST API의 암호를 생성합니다. helm 차트에서 이 암호를 사용하면 클라우드 LoadBalancer를 통해 인터넷에 노출되는 OpenFaaS 게이트웨이에서 기본 인증을 사용할 수 있습니다.
# generate a random password
PASSWORD=$(head -c 12 /dev/urandom | shasum| cut -d' ' -f1)

kubectl -n openfaas create secret generic basic-auth \
--from-literal=basic-auth-user=admin \
--from-literal=basic-auth-password="$PASSWORD"
Important
인증에 사용자 이름과 암호를 사용하는 것은 안전하지 않은 패턴입니다. OpenFaaS 엔터프라이즈 라이선스가 있는 경우 OpenFaaS에 IAM(ID 및 액세스 관리)을 대신 사용하는 것이 좋습니다.
echo명령을 사용하여 암호 값을 가져옵니다.echo $PASSWORDhelm upgrade명령을 사용하여 AKS 클러스터에 OpenFaaS를 배포합니다.helm upgrade openfaas --install openfaas/openfaas \ --namespace openfaas \ --set basic_auth=true \ --set functionNamespace=openfaas-fn \ --set serviceType=LoadBalancer출력은 다음과 같이 요약된 예제 출력과 비슷하게 됩니다.
NAME: openfaas
LAST DEPLOYED: Tue Aug 29 08:26:11 2023
NAMESPACE: openfaas
STATUS: deployed
...
NOTES:
To verify that openfaas has started, run:

kubectl --namespace=openfaas get deployments -l "release=openfaas, app=openfaas"
...
OpenFaaS 게이트웨이에 액세스하기 위해 공용 IP 주소를 생성합니다.
kubectl get service명령을 사용하여 IP 주소를 가져옵니다.kubectl get service -l component=gateway --namespace openfaas출력은 다음 예제 출력과 비슷하게 됩니다.
NAME               TYPE           CLUSTER-IP     EXTERNAL-IP    PORT(S)          AGE
gateway            ClusterIP      10.0.156.194   <none>         8080/TCP         7m
gateway-external   LoadBalancer   10.0.28.18     52.186.64.52   8080:30800/TCP   7m
이 예제에서는 로그인하라는 메시지가 표시되는 포트 8080(
http://52.186.64.52:8080)의 외부 IP 주소로 이동하여 OpenFaaS 시스템을 테스트합니다. 기본 사용자는admin이고 암호는echo $PASSWORD를 사용하여 검색할 수 있습니다.
포트 8080에서 외부 IP 주소의 URL로
$OPENFAAS_URL을 설정하고 다음 명령을 사용하여 Azure CLI에 로그인합니다.export OPENFAAS_URL=http://52.186.64.52:8080 echo -n $PASSWORD | ./faas-cli login -g $OPENFAAS_URL -u admin --password-stdin
첫 번째 함수 만들기
OpenFaaS URL을 사용하여 OpenFaaS 시스템으로 이동합니다.
새 함수 배포를 선택하여 OpenFaas 포털을 사용하는 함수를 만들고 Figlet을 검색합니다.
Figlet 함수를 선택한 다음 배포를 선택합니다.

curl명령을 사용하여 함수를 호출합니다. 다음 예제의 IP 주소를 OpenFaas 게이트웨이 주소로 바꿉니다.curl -X POST http://52.186.64.52:8080/function/figlet -d "Hello Azure"출력은 다음 예제 출력과 비슷하게 됩니다.
 _   _      _ _            _
| | | | ___| | | ___      / \    _____   _ _ __ ___
| |_| |/ _ \ | |/ _ \    / _ \  |_  / | | | '__/ _ \
|  _  |  __/ | | (_) |  / ___ \  / /| |_| | | |  __/
|_| |_|\___|_|_|\___/  /_/   \_\/___|\__,_|_|  \___|
두 번째 함수 만들기
Azure Cosmos DB 인스턴스 구성
Azure Cloud Shell로 이동합니다.
az group create명령을 사용하여 Azure Cosmos DB 인스턴스에 새 리소스 그룹을 만듭니다.az group create --name serverless-backing --location eastusaz cosmosdb create명령을 사용하여 종류MongoDB의 Azure Cosmos DB 인스턴스를 배포합니다.openfaas-cosmos를 고유한 인스턴스 이름으로 바꿉니다.az cosmosdb create --resource-group serverless-backing --name openfaas-cosmos --kind MongoDBaz cosmosdb keys list명령을 사용하여 Azure Cosmos DB 데이터베이스 연결 문자열을 가져오고 변수에 저장합니다.--resource-group인수의 값을 리소스 그룹의 이름으로 바꾸고,--name인수를 Azure Cosmos DB 인스턴스의 이름으로 바꿉니다.COSMOS=$(az cosmosdb keys list \ --type connection-strings \ --resource-group serverless-backing \ --name openfaas-cosmos \ --output tsv)plans.json이라는 파일을 만들고 다음 json에 복사하여 Azure Cosmos DB를 테스트 데이터로 채웁니다.{ "name" : "two_person", "friendlyName" : "Two Person Plan", "portionSize" : "1-2 Person", "mealsPerWeek" : "3 Unique meals per week", "price" : 72, "description" : "Our basic plan, delivering 3 meals per week, which will feed 1-2 people.", "__v" : 0 }
함수 만들기
MongoDB 도구를 설치합니다. 다음 예제 명령은 brew를 사용하여 이러한 도구를 설치합니다. 자세한 설치 옵션은 MongoDB 설명서를 참조하세요.
brew install mongodbmongoimport 도구를 사용하여 데이터가 포함된 Azure Cosmos DB 인스턴스를 로드합니다.
mongoimport --uri=$COSMOS -c plans < plans.json출력은 다음 예제 출력과 비슷하게 됩니다.
2018-02-19T14:42:14.313+0000    connected to: localhost
2018-02-19T14:42:14.918+0000    imported 1 document
faas-cli deploy명령을 사용하여 함수를 만듭니다.-g인수 값을 OpenFaaS 게이트웨이 주소로 업데이트합니다.faas-cli deploy -g http://52.186.64.52:8080 --image=shanepeckham/openfaascosmos --name=cosmos-query --env=NODE_ENV=$COSMOS배포되면 출력이 다음 예제 출력과 비슷하게 표시됩니다.
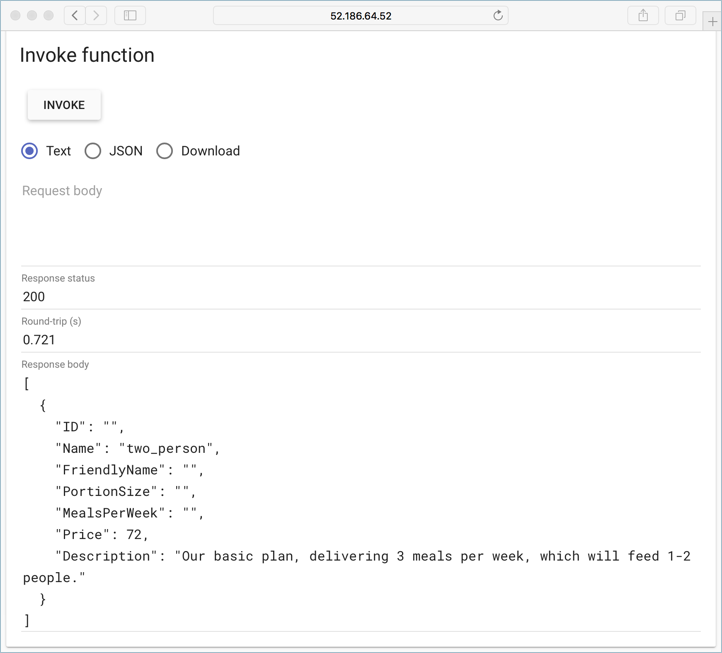
Deployed. 202 Accepted. URL: http://52.186.64.52:8080/function/cosmos-querycurl명령을 사용하여 함수를 테스트합니다. OpenFaaS 게이트웨이 주소로 IP 주소를 업데이트합니다.curl -s http://52.186.64.52:8080/function/cosmos-query출력은 다음 예제 출력과 비슷하게 됩니다.
[{"ID":"","Name":"two_person","FriendlyName":"","PortionSize":"","MealsPerWeek":"","Price":72,"Description":"Our basic plan, delivering 3 meals per week, which will feed 1-2 people."}]참고 항목
또한 OpenFaaS UI 내에서 함수를 테스트할 수 있습니다.
다음 단계
OpenFaaS 워크샵을 통해 계속 배울 수 있습니다. 여기에는 고유한 GitHub 봇 만들기, 비밀 사용, 메트릭 보기, 자동 스케일링 방법과 같은 주제를 다루는 실습 랩 집합이 포함되어 있습니다.

Azure Kubernetes Service