Azure Automation에서 인증서 관리
Azure Automation은 Azure Resource Manager 리소스에 대해 Get-AzAutomationCertificate cmdlet을 사용하여 Runbook 및 DSC 구성에서 액세스하기 위해 인증서를 안전하게 저장합니다. 보안 인증서 스토리지를 사용하여 인증을 위해 인증서를 사용하는 Runbook 및 DSC 구성을 만들거나 Azure 또는 타사 리소스에 추가할 수 있습니다.
참고 항목
Azure Automation의 보안 자산으로는 자격 증명, 인증서, 연결, 암호화된 변수가 있습니다. 이러한 자산은 각 Automation 계정에 대해 생성되는 고유 키를 사용하여 암호화되고 Automation에 저장됩니다. Automation은 시스템 관리 Key Vault 서비스에 키를 저장합니다. 보안 자산을 저장하기 전에 Automation이 Key Vault에서 키를 로드한 다음, 자산을 암호화하는 데 사용합니다.
인증서에 액세스하는 데 사용되는 PowerShell cmdlet
다음 표에 나와 있는 cmdlet은 PowerShell을 사용하여 Automation 인증서를 만들고 관리합니다. Az 모듈의 일부로 제공됩니다.
| cmdlet | 설명 |
|---|---|
| Get-AzAutomationCertificate | Runbook 또는 DSC 구성에 사용할 인증서 정보를 검색합니다. 내부 Get-AutomationCertificate cmdlet을 사용해야 인증서 자체를 검색할 수 있습니다. |
| New-AzAutomationCertificate | Automation에서 새 인증서를 만듭니다. |
| Remove-AzAutomationCertificate | Automation에서 인증서를 제거합니다. |
| Set-AzAutomationCertificate | 인증서 파일 업로드 및 .pfx 암호 설정을 포함하여 기존 인증서에 대한 속성을 설정합니다. |
Add-AzureCertificate cmdlet을 사용하여 지정된 클라우드 서비스에 대한 서비스 인증서를 업로드할 수도 있습니다.
인증서에 액세스하는 데 사용되는 내부 cmdlet
다음 테이블의 내부 cmdlet은 Runbook의 인증서에 액세스하는 데 사용됩니다. 이 cmdlet은 전역 모듈 Orchestrator.AssetManagement.Cmdlets와 함께 제공됩니다. 자세한 내용은 내부 cmdlet을 참조하세요.
| 내부 cmdlet | 설명 |
|---|---|
Get-AutomationCertificate |
Runbook 또는 DSC 구성에 사용할 인증서를 가져옵니다. System.Security.Cryptography.X509Certificates.X509Certificate2 개체를 반환합니다. |
참고 항목
Runbook 또는 DSC 구성에서 Get-AutomationCertificate의 Name 매개 변수에 변수를 사용하지 않는 것이 좋습니다. 이러한 변수로 디자인 타임에 Runbook 또는 DSC 구성과 Automation 변수 간의 종속성 검색이 복잡해질 수 있습니다.
인증서에 액세스하는 Python 함수
다음 테이블의 함수를 사용하여 Python 2 및 3 Runbook의 인증서에 액세스합니다. Python 3 Runbook은 현재 미리 보기로 제공됩니다.
| 함수 | 설명 |
|---|---|
automationassets.get_automation_certificate |
인증서 자산에 대한 정보를 검색합니다. |
참고 항목
자산 함수에 액세스하려면 Python Runbook의 시작 부분에서 automationassets 모듈을 가져와야 합니다.
새 인증서 만들기
새 인증서를 만들 때 .cer 또는 .pfx 파일을 Automation에 업로드합니다. 인증서를 내보내기 가능한 것으로 표시한 경우 Automation 인증서 저장소 외부로 전송할 수 있습니다. 내보낼 수 없는 경우, Runbook 또는 DSC 구성 내에서 사용할 수 있는 것만 서명합니다. Automation을 사용하려면 인증서의 공급자가 Microsoft Enhanced RSA and AES Cryptographic Provider여야 합니다.
Azure Portal을 사용하여 새 인증서 만들기
- Automation 계정의 왼쪽 창에서 공유 리소스 아래에 있는 인증서를 선택합니다.
- 인증서 페이지에서 인증서 추가를 선택합니다.
- 이름 필드에서 인증서의 이름을 입력합니다.
- .cer 또는 .pfx 파일을 찾아보려면 인증서 파일 업로드 아래에서 파일 선택을 선택합니다. .pfx 파일을 선택하는 경우 암호를 지정하고 내보낼 수 있는지 여부를 나타냅니다. Azure Automation 포털을 사용하여 인증서를 업로드하는 경우 파트너(CSP) 계정에 대해 실패할 수 있습니다. 이 문제를 해결하려면 PowerShell cmdlet을 해결 방법으로 사용하는 것이 좋습니다.
- 만들기를 선택하여 새 인증서 자산을 저장합니다.
PowerShell을 사용하여 새 인증서 만들기
다음 예제에서는 새 Automation 인증서를 만들고 내보내기 가능한 것으로 표시하는 방법을 보여 줍니다. 이 예제에서는 기존 .pfx 파일을 가져옵니다.
$certificateName = 'MyCertificate'
$PfxCertPath = '.\MyCert.pfx'
$CertificatePassword = ConvertTo-SecureString -String 'P@$$w0rd' -AsPlainText -Force
$ResourceGroup = "ResourceGroup01"

New-AzAutomationCertificate -AutomationAccountName "MyAutomationAccount" -Name $certificateName -Path $PfxCertPath -Password $CertificatePassword -Exportable -ResourceGroupName $ResourceGroup
Resource Manager 템플릿을 사용하여 새 인증서 만들기
다음 예제에서는 PowerShell을 통해 Resource Manager 템플릿을 사용하여 Automation 계정에 인증서를 배포하는 방법을 보여 줍니다.
$AutomationAccountName = "<automation account name>"
$PfxCertPath = '<PFX cert path and filename>'
$CertificatePassword = '<password>'
$certificateName = '<certificate name>' #A name of your choosing
$ResourceGroupName = '<resource group name>' #The one that holds your automation account
$flags = [System.Security.Cryptography.X509Certificates.X509KeyStorageFlags]::Exportable `
    -bor [System.Security.Cryptography.X509Certificates.X509KeyStorageFlags]::PersistKeySet `
    -bor [System.Security.Cryptography.X509Certificates.X509KeyStorageFlags]::MachineKeySet
# Load the certificate into memory
$PfxCert = New-Object -TypeName System.Security.Cryptography.X509Certificates.X509Certificate2 -ArgumentList @($PfxCertPath, $CertificatePassword, $flags)
# Export the certificate and convert into base 64 string
$Base64Value = [System.Convert]::ToBase64String($PfxCert.Export([System.Security.Cryptography.X509Certificates.X509ContentType]::Pkcs12))
$Thumbprint = $PfxCert.Thumbprint


$json = @"
{
    '`$schema': 'https://schema.management.azure.com/schemas/2015-01-01/deploymentTemplate.json#',
    'contentVersion': '1.0.0.0',
    'resources': [
        {
            'name': '$AutomationAccountName/$certificateName',
            'type': 'Microsoft.Automation/automationAccounts/certificates',
            'apiVersion': '2015-10-31',
            'properties': {
                'base64Value': '$Base64Value',
                'thumbprint': '$Thumbprint',
                'isExportable': true
            }
        }
    ]
}
"@

$json | out-file .\template.json
New-AzResourceGroupDeployment -Name NewCert -ResourceGroupName $ResourceGroupName -TemplateFile .\template.json
인증서 얻기
인증서를 검색하려면 내부 Get-AutomationCertificate cmdlet을 사용합니다. Get-AzAutomationCertificate cmdlet은 인증서 자산에 대한 정보를 반환하지만 인증서 자체는 반환하지 않으므로 사용할 수 없습니다.
텍스트 Runbook 예제
다음 예제에서는 Runbook에서 클라우드 서비스에 인증서를 추가하는 방법을 보여 줍니다. 이 샘플에서는 암호화된 자동화 변수에서 암호를 검색합니다.
$serviceName = 'MyCloudService'
$cert = Get-AutomationCertificate -Name 'MyCertificate'
$certPwd = Get-AzAutomationVariable -ResourceGroupName "ResourceGroup01" `
-AutomationAccountName "MyAutomationAccount" -Name 'MyCertPassword'
Add-AzureCertificate -ServiceName $serviceName -CertToDeploy $cert
그래픽 Runbook 예제
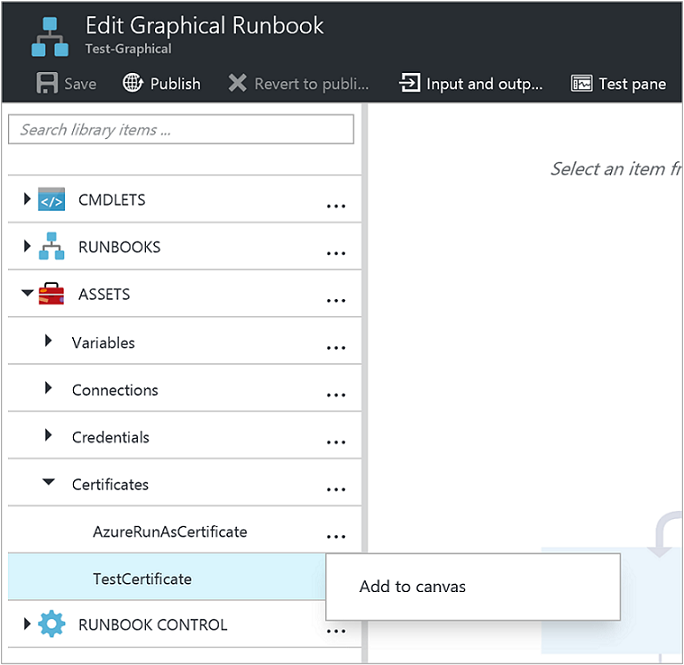
라이브러리 창에서 인증서를 마우스 오른쪽 단추로 클릭하고 캔버스에 추가를 선택하여 내부 Get-AutomationCertificate cmdlet에 대한 작업을 그래픽 Runbook에 추가합니다.

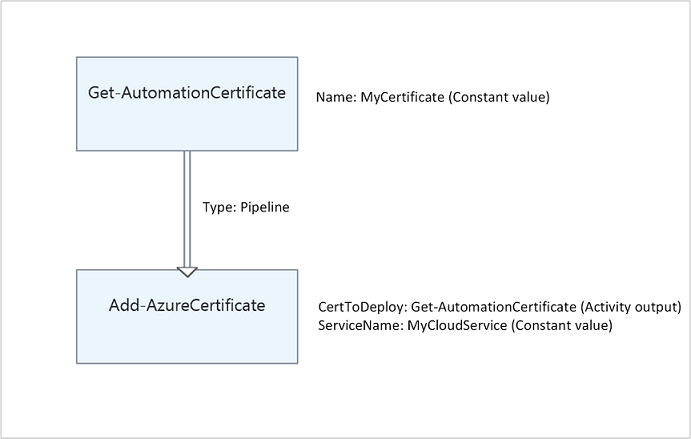
다음 그림에서는 그래픽 Runbook에서 인증서를 사용하는 예제를 보여 줍니다.

다음 단계
- 인증서에 액세스하는 데 사용되는 cmdlet에 대한 자세한 내용은 Azure Automation에서 모듈 관리를 참조하세요.
- Runbook에 대한 일반적인 정보는 Azure Automation에서 Runbook 실행을 참조하세요.
- DSC 구성에 대한 자세한 내용은 Azure Automation State Configuration 개요를 참조하세요.