기호 계층 추가(Android SDK)
이 문서에서는 Azure Maps Android SDK를 사용하여 데이터 원본의 점 데이터를 맵의 기호 계층으로 렌더링하는 방법을 보여 줍니다. 기호 계층은 점을 맵의 이미지 및 텍스트로 렌더링합니다.
참고 항목
Azure Maps Android SDK 사용 중지
이제 Android용 Azure Maps 네이티브 SDK는 더 이상 사용되지 않으며 2025년 3월 31일에 사용 중지됩니다. 서비스 중단을 방지하려면 2025년 3월 31일까지 Azure Maps 웹 SDK로 마이그레이션합니다. 자세한 내용은 Azure Maps Android SDK 마이그레이션 가이드를 참조하세요.
팁
기본적으로 기호 계층은 데이터 원본에 있는 모든 도형의 좌표를 렌더링합니다. 계층이 점 기하 도형 기능만 렌더링하도록 제한하려면 계층의 filter 옵션을 eq(geometryType(), "Point")로 설정합니다. MultiPoint 기능도 포함하려면 계층의 filter 옵션을 any(eq(geometryType(), "Point"), eq(geometryType(), "MultiPoint"))로 설정합니다.
필수 조건
빠른 시작: Android 앱 만들기 문서의 단계를 완료해야 합니다. 이 문서의 코드 블록은 맵 onReady 이벤트 처리기에 삽입할 수 있습니다.
기호 계층 추가
맵에 기호 계층을 추가하려면 몇 가지 단계를 수행해야 합니다. 먼저 데이터 원본을 만들어 맵에 추가합니다. 기호 계층을 만듭니다. 그런 다음, 데이터 원본을 기호 계층에 전달하여 데이터 원본에서 데이터를 검색합니다. 마지막으로, 렌더링할 수 있도록 데이터를 데이터 원본에 추가합니다.
다음 코드는 맵이 로드된 후 맵에 추가되어야 하는 항목을 보여 줍니다. 이 샘플에서는 기호 계층을 사용하여 맵에 단일 점을 렌더링합니다.
//Create a data source and add it to the map.
DataSource source = new DataSource();
map.sources.add(source);

//Create a point and add it to the data source.
source.add(Point.fromLngLat(0, 0));

//Create a symbol layer to render icons and/or text at points on the map.
SymbolLayer layer = new SymbolLayer(source);

//Add the layer to the map.
map.layers.add(layer);
//Create a data source and add it to the map.
val source = DataSource()
map.sources.add(source)

//Create a point and add it to the data source.
source.add(Point.fromLngLat(0, 0))

//Create a symbol layer to render icons and/or text at points on the map.
val layer = SymbolLayer(source)

//Add the layer to the map.
map.layers.add(layer)
맵에 추가할 수 있는 점 데이터 유형은 다음의 세 가지가 있습니다.
- GeoJSON 점 기하 도형 - 이 개체는 점의 좌표만 포함하고, 그 외에는 아무것도 포함하지 않습니다.
Point.fromLngLat정적 메서드를 사용하여 이러한 개체를 쉽게 만들 수 있습니다. - GeoJSON MultiPoint 기하 도형 - 이 개체는 여러 점의 좌표를 포함하고, 그 외에는 아무것도 포함하지 않습니다. 점 배열을
MultiPoint클래스에 전달하여 이러한 개체를 만듭니다. - GeoJSON 기능 - 이 개체는 모든 GeoJSON 기하 도형 및 기하 도형에 연결된 메타데이터를 포함하는 속성 집합으로 구성됩니다.
자세한 정보는 데이터 만들기 및 맵에 추가하기에 대한 데이터 원본 만들기 문서를 참조하세요.
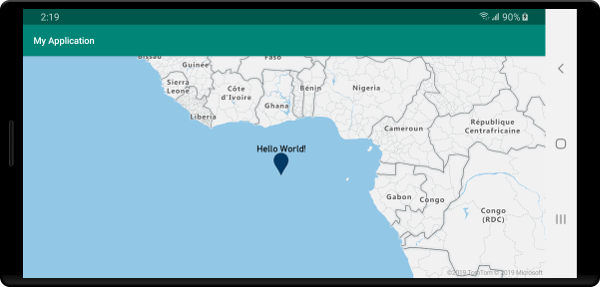
다음 샘플 코드는 GeoJSON 점 기하 도형을 만들고 GeoJSON 기능에 전달하며, 해당 속성에 title 값이 추가됩니다. title속성은 맵의 기호 아이콘 위에 텍스트로 표시됩니다.
//Create a data source and add it to the map.
DataSource source = new DataSource();
map.sources.add(source);

//Create a point feature.
Feature feature = Feature.fromGeometry(Point.fromLngLat(0, 0));

//Add a property to the feature.
feature.addStringProperty("title", "Hello World!");

//Add the feature to the data source.
source.add(feature);

//Create a symbol layer to render icons and/or text at points on the map.
SymbolLayer layer = new SymbolLayer(source,
    //Get the title property of the feature and display it on the map.
    textField(get("title"))
);

//Add the layer to the map.
map.layers.add(layer);
//Create a data source and add it to the map.
val source = DataSource()
map.sources.add(source)

//Create a point feature.
val feature = Feature.fromGeometry(Point.fromLngLat(0, 0))

//Add a property to the feature.
feature.addStringProperty("title", "Hello World!")

//Add the feature to the data source.
source.add(feature)

//Create a symbol layer to render icons and/or text at points on the map.
val layer = SymbolLayer(
    source,  //Get the title property of the feature and display it on the map.
    textField(get("title"))
)

//Add the layer to the map.
map.layers.add(layer)
다음 스크린샷은 기호 계층의 아이콘과 텍스트 레이블을 사용하여 점 형상을 렌더링하는 위의 코드를 보여 줍니다.
팁
기본적으로 기호 계층은 겹치는 기호를 숨겨서 기호 렌더링을 최적화합니다. 확대하면 숨겨진 기호가 표시됩니다. 이 기능을 사용하지 않고 모든 기호를 항상 렌더링하려면 iconAllowOverlap 및 textAllowOverlap 옵션을 true로 설정합니다.
기호 계층에 사용자 지정 아이콘 추가
기호 계층은 WebGL을 사용하여 렌더링됩니다. 아이콘 이미지와 같은 이러한 모든 리소스는 WebGL 컨텍스트에 로드해야 하기 때문입니다. 이 샘플에서는 맵 리소스에 사용자 지정 아이콘을 추가하는 방법을 보여 줍니다. 이 아이콘은 맵에서 사용자 지정 기호를 사용하여 점 데이터를 렌더링하는 데 사용됩니다. 기호 계층의 textField 속성에는 식을 지정해야 합니다. 이 경우, 온도 속성을 렌더링하려고 합니다. 온도는 숫자이므로 문자열로 변환해야 합니다. 또한 "° F"를 추가하고자 합니다. 식을 사용하여 이 연결을 수행할 수 있습니다(concat(Expression.toString(get("temperature")), literal("°F"))).
//Load a custom icon image into the image sprite of the map.
map.images.add("my-custom-icon", R.drawable.showers);

//Create a data source and add it to the map.
DataSource source = new DataSource();
map.sources.add(source);

//Create a point feature.
Feature feature = Feature.fromGeometry(Point.fromLngLat(-73.985708, 40.75773));

//Add a property to the feature.
feature.addNumberProperty("temperature", 64);

//Add the feature to the data source.
source.add(feature);

//Create a symbol layer to render icons and/or text at points on the map.
SymbolLayer layer = new SymbolLayer(source,
    iconImage("my-custom-icon"),
    iconSize(0.5f),

    //Get the title property of the feature and display it on the map.
    textField(concat(Expression.toString(get("temperature")), literal("°F"))),
    textOffset(new Float[]{0f, -1.5f})
);
//Load a custom icon image into the image sprite of the map.
map.images.add("my-custom-icon", R.drawable.showers)

//Create a data source and add it to the map.
val source = DataSource()
map.sources.add(source)

//Create a point feature.
val feature = Feature.fromGeometry(Point.fromLngLat(-73.985708, 40.75773))

//Add a property to the feature.
feature.addNumberProperty("temperature", 64)

//Add the feature to the data source.
source.add(feature)

//Create a symbol layer to render icons and/or text at points on the map.
val layer = SymbolLayer(
    source,
    iconImage("my-custom-icon"),
    iconSize(0.5f),  //Get the title property of the feature and display it on the map.
    textField(concat(Expression.toString(get("temperature")), literal("°F"))),
    textOffset(arrayOf(0f, -1.5f))
)
이 샘플의 경우 다음 이미지가 앱의 드로어블 폴더에 로드됩니다.
 |
|---|
| showers.png |
다음 스크린샷은 기호 계층과, 사용자 지정 아이콘 및 서식 있는 텍스트 레이블을 사용하여 점 형상을 렌더링하는 위의 코드를 보여 줍니다.

팁
기호 계층이 있는 텍스트만 렌더링하려는 경우 아이콘 옵션의 iconImage 속성을 "none"으로 선택하여 아이콘을 숨길 수 있습니다.
기호 색 수정
Azure Maps Android SDK는 기본 마커 아이콘의 미리 정의된 색 변형 세트와 함께 제공됩니다. 예를 들어, marker-red를 기호 계층의 iconImage 옵션에 전달하여 해당 계층에서 마커 아이콘의 빨간색 버전을 렌더링할 수 있습니다.
SymbolLayer layer = new SymbolLayer(source,
    iconImage("marker-red")
);
val layer = SymbolLayer(source,
    iconImage("marker-red")
)
아래 표에는 사용할 수 있는 모든 기본 제공 아이콘 이미지 이름이 나열되어 있습니다. 이러한 마커는 재정의할 수 있는 색 리소스에서 색을 가져옵니다. 그러나 이러한 마커 색 중 하나를 재정의하면 해당 아이콘 이미지를 사용하는 모든 계층에 적용됩니다.
| 아이콘 이미지 이름 | 색 리소스 이름 |
|---|---|
marker-default |
azure_maps_marker_default |
marker-black |
azure_maps_marker_black |
marker-blue |
azure_maps_marker_blue |
marker-darkblue |
azure_maps_marker_darkblue |
marker-red |
azure_maps_marker_red |
marker-yellow |
azure_maps_marker_yellow |
azure_maps_marker_border 색 리소스 이름을 사용하여 모든 마커의 테두리 색을 재정의할 수도 있습니다. 앱의 colors.xml 파일에 같은 이름의 색을 추가하여 이 마커의 색을 재정의할 수 있습니다. 예를 들어 다음 colors.xml 파일은 기본 마커 색을 밝은 녹색으로 지정합니다.
<?xml version="1.0" encoding="utf-8"?>
<resources>
    <color name="azure_maps_marker_default">#00FF00</color>
</resources>
다음 코드는 기본 마커의 사용자 지정을 만들기 위해 수정할 수 있는 기본 마커 벡터 XML의 수정된 버전입니다. 수정된 버전을 앱의 drawable 폴더에 추가하고 map.images.add를 사용하여 맵 이미지 스프라이트에 추가한 다음, 기호 계층에 사용할 수 있습니다.
<vector xmlns:android="http://schemas.android.com/apk/res/android"
    android:width="24.5dp"
    android:height="36.5dp"
    android:viewportWidth="24.5"
    android:viewportHeight="36.5">
    <path
        android:pathData="M12.25,0.25a12.2543,12.2543 0,0 0,-12 12.4937c0,6.4436 6.4879,12.1093 11.059,22.5641 0.5493,1.2563 1.3327,1.2563 1.882,0C17.7621,24.8529 24.25,19.1857 24.25,12.7437A12.2543,12.2543 0,0 0,12.25 0.25Z"
        android:strokeWidth="0.5"
        android:fillColor="@color/azure_maps_marker_default"
        android:strokeColor="@color/azure_maps_marker_border"/>
</vector>
다음 단계
맵에 추가할 더 많은 코드 예제를 보려면 다음 문서를 참조하세요.