봇을 만들 때의 주요 목표는 의미 있는 대화에 사용자를 참여시키는 것입니다. 이 목표를 달성하는 가장 좋은 방법 중 하나는 사용자가 처음 연결하는 순간부터 봇의 기본 목적과 기능, 봇이 만들어진 이유를 이해하는 것입니다. 이 문서에서는 봇에 사용자를 환영하는 데 도움이 되는 코드 예제를 제공합니다.
참고 항목
Bot Framework JavaScript, C#및 Python SDK는 계속 지원되지만 Java SDK는 2023년 11월에 종료되는 최종 장기 지원으로 사용 중지됩니다.
Java SDK를 사용하여 빌드된 기존 봇은 계속 작동합니다.
새 봇 빌드의 경우 Power Virtual Agents 사용을 고려하고 올바른 챗봇 솔루션을 선택하는 방법을 읽어 보세요.
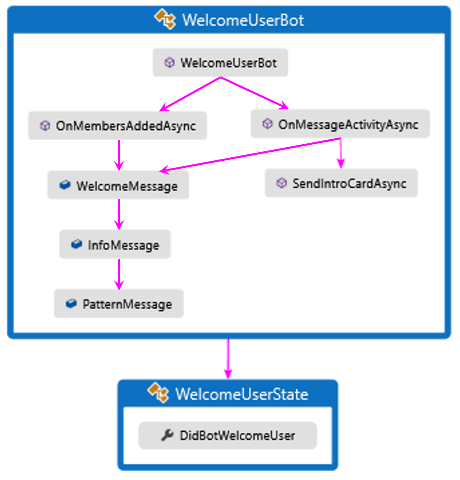
새 사용자가 연결될 때마다 봇과 함께 WelcomeMessageInfoMessagePatternMessage 제공됩니다.
새 사용자 입력이 수신되면 봇이 WelcomeUserState의 DidBotWelcomeUser가 true 로 설정되어 있는지 확인합니다. 그렇지 않은 경우 초기 시작 사용자 메시지가 사용자에게 반환됩니다.
봇에서 발생하는 두 기본 이벤트는 다음과 같습니다.
onMembersAdded새 사용자가 봇에 연결할 때 호출됩니다.
onMessage은 봇이 새 사용자 입력을 받을 때 호출됩니다.
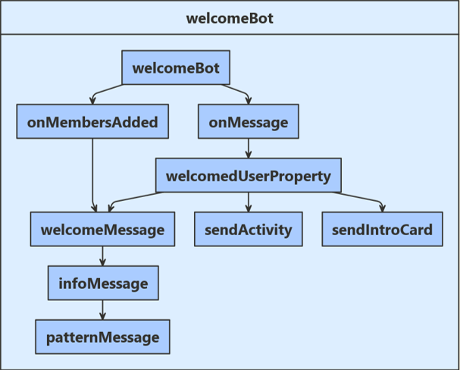
새 사용자가 연결될 때마다 봇과 함께 welcomeMessageinfoMessagepatternMessage 제공됩니다.
새 사용자 입력이 수신되면 welcomedUserProperty true로 설정되었는지 확인하기 didBotWelcomeUser 위해 검사. 그렇지 않은 경우 초기 시작 사용자 메시지가 사용자에게 반환됩니다.
DidBotWelcomeUser가 true일 경우 사용자 입력이 평가됩니다. 사용자의 입력 내용에 따라 이 봇은 다음 중 하나를 수행합니다.
사용자로부터 받은 인사말을 다시 에코합니다.
봇에 대한 추가 정보를 제공하는 hero 카드 표시합니다.
이 봇의 올바른 입력을 설명하는 WelcomeMessage를 다시 보냅니다.
봇에서 발생하는 두 기본 이벤트는 다음과 같습니다.
onMembersAdded새 사용자가 봇에 연결할 때 호출됩니다.
onMessageActivity은 봇이 새 사용자 입력을 받을 때 호출됩니다.
새 사용자가 연결될 때마다 봇과 함께 WELCOME_MESSAGEINFO_MESSAGEPATTERN_MESSAGE 제공됩니다.
새 사용자 입력이 수신되면 봇이 WelcomeUserState의 getDidBotWelcomeUser()가 true 로 설정되어 있는지 확인합니다. 그렇지 않은 경우 초기 시작 사용자 메시지가 사용자에게 반환됩니다.
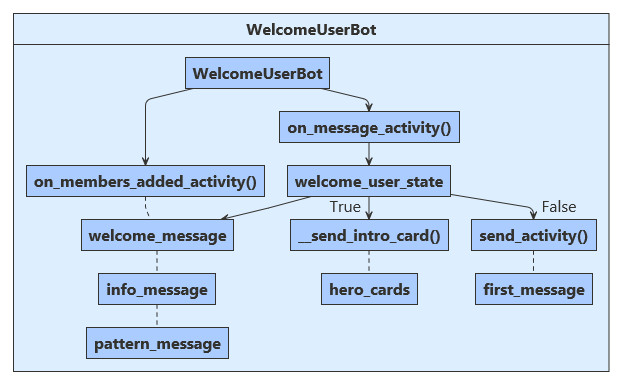
봇에서 발생하는 두 기본 이벤트는 다음과 같습니다.
on_members_added_activity새 사용자가 봇에 연결할 때 호출됩니다.
on_message_activity은 봇이 새 사용자 입력을 받을 때 호출됩니다.
새 사용자가 연결될 때마다 봇이 환영 메시지, 정보 메시지 및 패턴 메시지를 제공합니다.
새 사용자 입력을 받으면 속성이 welcome_user_state.did_welcome_user 검사. true로 설정되지 않은 경우 초기 시작 사용자 메시지가 사용자에게 반환됩니다. true로 설정된 경우 사용자의 입력 내용에 따라 이 봇은 다음 중 하나를 수행합니다.
// Create the Bot Framework Authentication to be used with the Bot Adapter.
services.AddSingleton<BotFrameworkAuthentication, ConfigurationBotFrameworkAuthentication>();

// Create the Bot Adapter with error handling enabled.
Bots\WelcomeUserBot.cs
// Initializes a new instance of the "WelcomeUserBot" class.
public WelcomeUserBot(UserState userState)
{
    _userState = userState;
}
시작 시 사용자 상태는 index.js에 정의되며 봇 생성자가 사용합니다.
index.js
// Create HTTP server
const server = restify.createServer();
server.use(restify.plugins.bodyParser());

server.listen(process.env.port || process.env.PORT || 3978, function() {
    console.log(`\n${ server.name } listening to ${ server.url }`);
    console.log('\nGet Bot Framework Emulator: https://aka.ms/botframework-emulator');
사용자 상태 개체는 시작 시 만들어지고 종속성은 Spring 컨테이너에 의해 봇 생성자에 주입됩니다.
Application.java
@Bean
public Bot getBot(UserState userState) {
    return new WelcomeUserBot(userState);
}
WelcomeUserBot.java
private final UserState userState;

// Initializes a new instance of the "WelcomeUserBot" class.
@Autowired
public WelcomeUserBot(UserState withUserState) {
    userState = withUserState;
}
시작 시 사용자 상태는 app.py에 정의되며 봇 생성자가 사용합니다.
app.py
# Create the Bot
BOT = WelcomeUserBot(USER_STATE)


# Listen for incoming requests on /api/messages.
이제 OnMessageActivityAsync 메서드 내에서 WelcomeUserState에 대한 핸들을 제공하는 속성 접근자를 만듭니다.
그런 다음 메서드를 GetAsync 호출하여 적절한 범위의 키를 가져옵니다. 그리고 SaveChangesAsync 메서드를 사용한 각 사용자 입력 반복 후 사용자 상태 데이터를 저장합니다.
Bots\WelcomeUserState.cs
// Gets or sets whether the user has been welcomed in the conversation.
public bool DidBotWelcomeUser { get; set; } = false;
Bots\WelcomeUserBot.cs
var didBotWelcomeUser = await welcomeUserStateAccessor.GetAsync(turnContext, () => new WelcomeUserState(), cancellationToken);
this.onMessage(async (context, next) => {
    // Read UserState. If the 'DidBotWelcomedUser' does not exist (first time ever for a user)
    // set the default to false.
    const didBotWelcomedUser = await this.welcomedUserProperty.get(context, false);
/**
 * Override the ActivityHandler.run() method to save state changes after the bot logic completes.
 */
async run(context) {
    await super.run(context);

    // Save state changes
    await this.userState.saveChanges(context);
}
이제 onMessageActivity 메서드 내에서 WelcomeUserState에 대한 핸들을 제공하는 속성 접근자를 만듭니다.
그런 다음 메서드를 get 호출하여 적절한 범위의 키를 가져옵니다. 그리고 saveChanges 메서드를 사용한 각 사용자 입력 반복 후 사용자 상태 데이터를 저장합니다.
WelcomeUserBot.java
// Get state data from UserState.
StatePropertyAccessor<WelcomeUserState> stateAccessor =
    userState.createProperty("WelcomeUserState");
CompletableFuture<WelcomeUserState> stateFuture =
    stateAccessor.get(turnContext, WelcomeUserState::new);
on_message_activity 처리기에서 속성 접근자를 사용하고 on_turn 처리기를 재정의하여 턴이 끝나기 전에 상태를 저장합니다.
# Get the state properties from the turn context.
welcome_user_state = await self.user_state_accessor.get(
    turn_context, WelcomeUserState
)
async def on_turn(self, turn_context: TurnContext):
    await super().on_turn(turn_context)

    # save changes to WelcomeUserState after each turn
    await self._user_state.save_changes(turn_context)
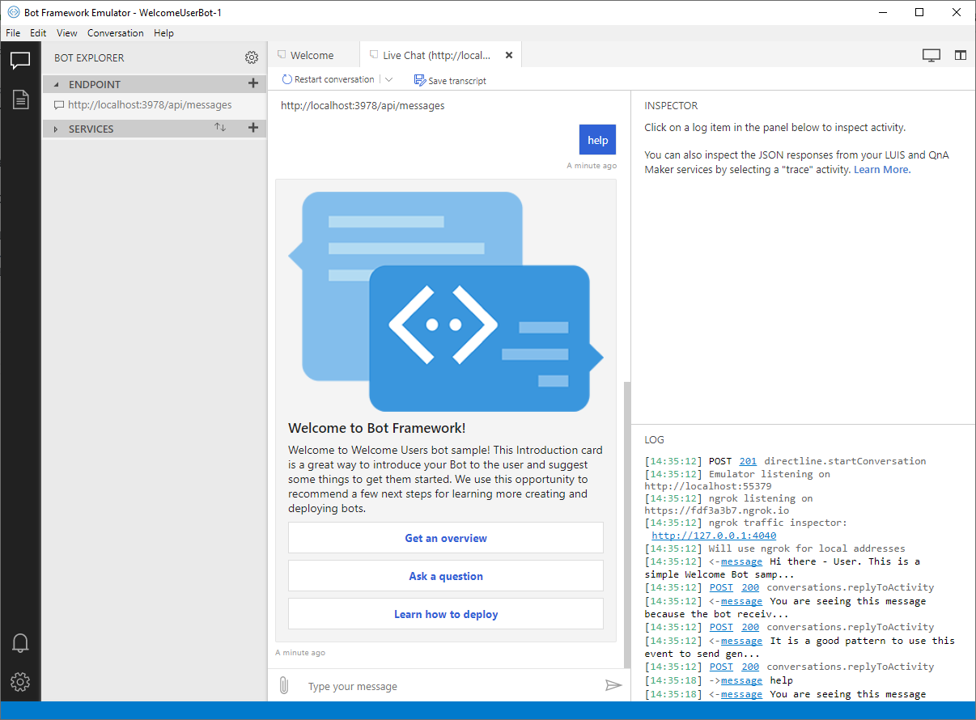
WelcomeUserBot에서는 새 사용자가 대화에 추가되었는지 확인하고 3개의 초기 환영 메시지 InfoMessageWelcomeMessagePatternMessage집합을 보내도록 활동 OnMembersAddedAsync() 업데이트를 검사. 이 상호 작용의 전체 코드는 다음과 같습니다.
Bots\WelcomeUserBot.cs
public class WelcomeUserBot : ActivityHandler
{
    // Messages sent to the user.
    private const string WelcomeMessage = "This is a simple Welcome Bot sample. This bot will introduce you " +
                                            "to welcoming and greeting users. You can say 'intro' to see the " +
                                            "introduction card. If you are running this bot in the Bot Framework " +
                                            "Emulator, press the 'Start Over' button to simulate user joining " +
                                            "a bot or a channel";

    private const string InfoMessage = "You are seeing this message because the bot received at least one " +
                                        "'ConversationUpdate' event, indicating you (and possibly others) " +
                                        "joined the conversation. If you are using the emulator, pressing " +
                                        "the 'Start Over' button to trigger this event again. The specifics " +
                                        "of the 'ConversationUpdate' event depends on the channel. You can " +
                                        "read more information at: " +
                                        "https://aka.ms/about-botframework-welcome-user";

    private const string LocaleMessage = "You can use the activity's 'GetLocale()' method to welcome the user " +
                                         "using the locale received from the channel. " +
                                         "If you are using the Emulator, you can set this value in Settings.";
{
    foreach (var member in membersAdded)
    {
        if (member.Id != turnContext.Activity.Recipient.Id)
        {
            await turnContext.SendActivityAsync($"Hi there - {member.Name}. {WelcomeMessage}", cancellationToken: cancellationToken);
            await turnContext.SendActivityAsync(InfoMessage, cancellationToken: cancellationToken);
            await turnContext.SendActivityAsync($"{LocaleMessage} Current locale is '{turnContext.Activity.GetLocale()}'.", cancellationToken: cancellationToken);
            await turnContext.SendActivityAsync(PatternMessage, cancellationToken: cancellationToken);
        }
    }
}
이 JavaScript 코드는 사용자가 추가되면 초기 환영 메시지를 보냅니다. 이 작업은 대화 활동을 검사 새 멤버가 대화에 추가되었는지 확인하여 수행됩니다.
bots/welcomeBot.js
// Sends welcome messages to conversation members when they join the conversation.
// Messages are only sent to conversation members who aren't the bot.
this.onMembersAdded(async (context, next) => {
    // Iterate over all new members added to the conversation
    for (const idx in context.activity.membersAdded) {
        // Greet anyone that was not the target (recipient) of this message.
        // Since the bot is the recipient for events from the channel,
        // context.activity.membersAdded === context.activity.recipient.Id indicates the
        // bot was added to the conversation, and the opposite indicates this is a user.
        if (context.activity.membersAdded[idx].id !== context.activity.recipient.id) {
            await context.sendActivity(`Welcome to the 'Welcome User' Bot. This bot will introduce you to welcoming and greeting users.`);
            await context.sendActivity(`You are seeing this message because the bot received at least one 'ConversationUpdate' ` +
                `event, indicating you (and possibly others) joined the conversation. If you are using the emulator, ` +
                `pressing the 'Start Over' button to trigger this event again. The specifics of the 'ConversationUpdate' ` +
                `event depends on the channel. You can read more information at https://aka.ms/about-botframework-welcome-user`);
            await context.sendActivity(`You can use the activity's 'locale' property to welcome the user ` +
                `using the locale received from the channel. ` +
                `If you are using the Emulator, you can set this value in Settings. ` +
                `Current locale is '${ context.activity.locale }'`);
            await context.sendActivity(`It is a good pattern to use this event to send general greeting to user, explaining what your bot can do. ` +
                `In this example, the bot handles 'hello', 'hi', 'help' and 'intro'. ` +
                `Try it now, type 'hi'`);
        }
    }

    // By calling next() you ensure that the next BotHandler is run.
    await next();
});
WelcomeUserBot에서는 새 사용자가 대화에 추가되었는지 확인하고 3개의 초기 환영 메시지 INFO_MESSAGEWELCOME_MESSAGEPATTERN_MESSAGE집합을 보내도록 활동 onMembersAdded() 업데이트를 검사. 이 상호 작용의 전체 코드는 다음과 같습니다.
WelcomeUserBot.java
public class WelcomeUserBot extends ActivityHandler {
    // Messages sent to the user.
    private static final String WELCOME_MESSAGE =
        "This is a simple Welcome Bot sample. This bot will introduce you "
            + "to welcoming and greeting users. You can say 'intro' to see the "
            + "introduction card. If you are running this bot in the Bot Framework "
            + "Emulator, press the 'Start Over' button to simulate user joining "
            + "a bot or a channel";

    private static final String INFO_MESSAGE =
        "You are seeing this message because the bot received at least one "
            + "'ConversationUpdate' event, indicating you (and possibly others) "
            + "joined the conversation. If you are using the emulator, pressing "
            + "the 'Start Over' button to trigger this event again. The specifics "
            + "of the 'ConversationUpdate' event depends on the channel. You can "
            + "read more information at: " + "https://aka.ms/about-botframework-welcome-user";

    private String localeMessage =
        "You can use the activity's GetLocale() method to welcome the user "
            + "using the locale received from the channel. "
            + "If you are using the Emulator, you can set this value in Settings.";

    private static final String PATTERN_MESSAGE =
        "It is a good pattern to use this event to send general greeting"
            + "to user, explaining what your bot can do. In this example, the bot "
            + "handles 'hello', 'hi', 'help' and 'intro'. Try it now, type 'hi'";
on_members_added_activity 검사 새 사용자가 추가되었는지 확인하고 시작 메시지, 정보 메시지 및 패턴 메시지의 세 가지 초기 환영 메시지를 보냅니다.
bots/welcome-user-bot.py
"""
Greet when users are added to the conversation.
Note that all channels do not send the conversation update activity.
If you find that this bot works in the emulator, but does not in
another channel the reason is most likely that the channel does not
send this activity.
"""
for member in members_added:
    if member.id != turn_context.activity.recipient.id:
        await turn_context.send_activity(
            f"Hi there { member.name }. " + self.WELCOME_MESSAGE
        )

        await turn_context.send_activity(self.INFO_MESSAGE)

        await turn_context.send_activity(
            f"{ self.LOCALE_MESSAGE } Current locale is { turn_context.activity.locale }."
        )

        await turn_context.send_activity(self.PATTERN_MESSAGE)
또한 사용자의 입력에 실제로 유용한 정보가 포함될 수 있는 경우를 고려해야 하며 채널마다 다를 수 있습니다. 사용자가 가능한 모든 채널에서 좋은 환경을 갖출 수 있도록 상태 플래그 didBotWelcomeUser를 검사 이 플래그가 "false"이면 초기 사용자 입력을 처리하지 않습니다. 대신 사용자에게 초기 환영 메시지를 제공합니다. bool welcomedUserProperty 는 UserState에 저장된 "true"로 설정되고 코드는 이제 모든 추가 메시지 활동에서 이 사용자의 입력을 처리합니다.
Bots\WelcomeUserBot.cs
{
    var welcomeUserStateAccessor = _userState.CreateProperty<WelcomeUserState>(nameof(WelcomeUserState));
    var didBotWelcomeUser = await welcomeUserStateAccessor.GetAsync(turnContext, () => new WelcomeUserState(), cancellationToken);

    if (didBotWelcomeUser.DidBotWelcomeUser == false)
    {
        didBotWelcomeUser.DidBotWelcomeUser = true;

        // the channel should sends the user name in the 'From' object
        var userName = turnContext.Activity.From.Name;

        await turnContext.SendActivityAsync("You are seeing this message because this was your first message ever to this bot.", cancellationToken: cancellationToken);
        await turnContext.SendActivityAsync($"It is a good practice to welcome the user and provide personal greeting. For example, welcome {userName}.", cancellationToken: cancellationToken);
    }
    else
또한 사용자의 입력에 실제로 유용한 정보가 포함될 수 있는 경우를 고려해야 하며 채널마다 다를 수 있습니다. 사용자가 가능한 모든 채널에서 좋은 환경을 갖출 수 있도록 didBotWelcomedUser 속성을 검사, 존재하지 않는 경우 "false"로 설정하고 초기 사용자 입력을 처리하지 않습니다. 대신 사용자에게 초기 환영 메시지를 제공합니다. 그런 다음 bool didBotWelcomeUser가 "true"로 설정되고 코드는 모든 추가 메시지 활동에서 사용자 입력을 처리합니다.
bots/welcomeBot.js
this.onMessage(async (context, next) => {
    // Read UserState. If the 'DidBotWelcomedUser' does not exist (first time ever for a user)
    // set the default to false.
    const didBotWelcomedUser = await this.welcomedUserProperty.get(context, false);

    // Your bot should proactively send a welcome message to a personal chat the first time
    // (and only the first time) a user initiates a personal chat with your bot.
    if (didBotWelcomedUser === false) {
        // The channel should send the user name in the 'From' object
        const userName = context.activity.from.name;
        await context.sendActivity('You are seeing this message because this was your first message ever sent to this bot.');
        await context.sendActivity(`It is a good practice to welcome the user and provide personal greeting. For example, welcome ${ userName }.`);

        // Set the flag indicating the bot handled the user's first message.
        await this.welcomedUserProperty.set(context, true);
    } else {
    }

    // By calling next() you ensure that the next BotHandler is run.
    await next();
});
사용자의 입력에 유용한 정보가 포함될 수 있는 경우를 고려해야 합니다. 이 정보는 채널마다 다를 수 있습니다. 사용자가 가능한 모든 채널에서 좋은 환경을 갖출 수 있도록 상태 플래그 getDidBotWelcomeUser를 검사 이 플래그가 "false"이면 초기 사용자 입력을 처리하지 않습니다. 대신 사용자에게 초기 환영 메시지를 제공합니다. 그런 다음 Bool setDidBotWelcomeUser 가 "true"로 설정되고 UserState에 저장되고 코드는 이제 모든 추가 메시지 활동에서 이 사용자의 입력을 처리합니다.
WelcomeUserBot.java
@Override
protected CompletableFuture<Void> onMessageActivity(TurnContext turnContext) {
    // Get state data from UserState.
    StatePropertyAccessor<WelcomeUserState> stateAccessor =
        userState.createProperty("WelcomeUserState");
    CompletableFuture<WelcomeUserState> stateFuture =
        stateAccessor.get(turnContext, WelcomeUserState::new);

    return stateFuture.thenApply(thisUserState -> {
        if (!thisUserState.getDidBotWelcomeUser()) {
            thisUserState.setDidBotWelcomeUser(true);

            // the channel should send the user name in the 'from' object
            String userName = turnContext.getActivity().getFrom().getName();
            return turnContext
                .sendActivities(
                    MessageFactory.text(FIRST_WELCOME_ONE),
                    MessageFactory.text(String.format(FIRST_WELCOME_TWO, userName))
                );
// Save any state changes.
.thenApply(response -> userState.saveChanges(turnContext))
또한 사용자의 입력에 실제로 유용한 정보가 포함될 수 있는 경우를 고려하는 것이 중요합니다. 이는 채널마다 다를 수 있습니다. 사용자가 가능한 모든 채널 on_message_activity 에서 좋은 환경을 갖도록 하려면 속성을 검사did_welcome_user. 처음으로 false로 설정하고 사용자 입력을 처리하지 않습니다. 대신 사용자에게 초기 환영 메시지를 제공합니다. 그런 다음 true로 설정하고 did_welcome_user 모든 추가 메시지 활동에서 사용자 입력을 처리합니다.
bots/welcome-user-bot.py
if not welcome_user_state.did_welcome_user:
    welcome_user_state.did_welcome_user = True

    await turn_context.send_activity(
        "You are seeing this message because this was your first message ever to this bot."
    )

    name = turn_context.activity.from_property.name
    await turn_context.send_activity(
        f"It is a good practice to welcome the user and provide personal greeting. For example: Welcome {name}"
    )
추가 입력 처리
새 사용자를 환영하면 각 메시지 턴에 대한 사용자 입력 정보가 평가되고 봇은 해당 사용자 입력의 컨텍스트에 따라 응답을 제공합니다. 다음 코드는 해당 응답을 생성하는 데 사용되는 결정 논리를 보여줍니다.
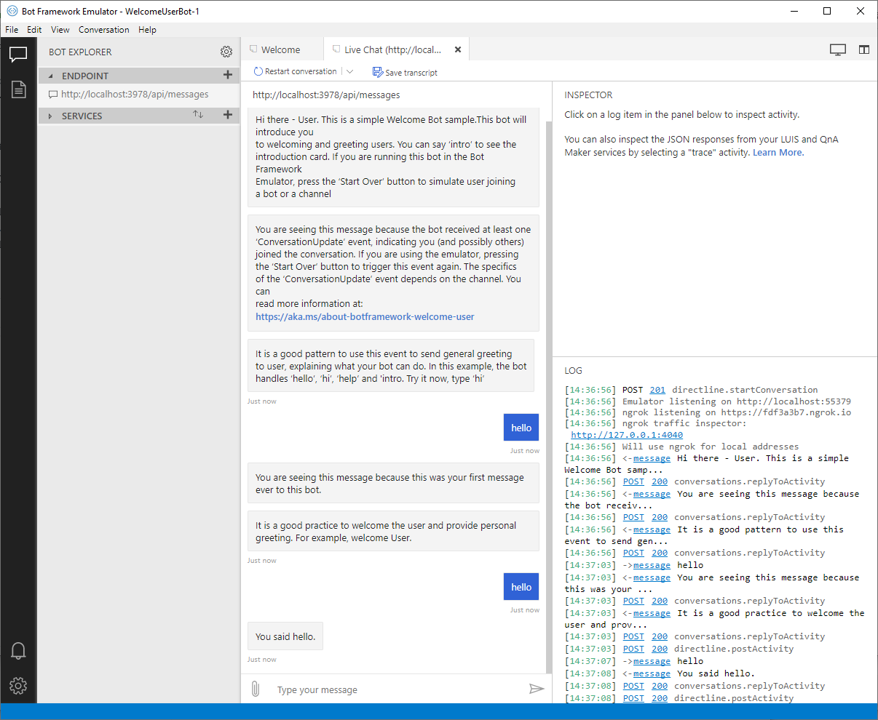
'소개' 또는 'help'의 입력은 함수 SendIntroCardAsync 를 호출하여 사용자에게 정보 영웅 카드 제공합니다. 이 코드는 이 문서의 다음 섹션에서 검사됩니다.
Bots\WelcomeUserBot.cs
    switch (text)
    {
        case "hello":
        case "hi":
            await turnContext.SendActivityAsync($"You said {text}.", cancellationToken: cancellationToken);
            break;
        case "intro":
        case "help":
            await SendIntroCardAsync(turnContext, cancellationToken);
            break;
        default:
            await turnContext.SendActivityAsync(WelcomeMessage, cancellationToken: cancellationToken);
            break;
    }
}
'소개' 또는 '도움말'의 입력은 CardFactory를 사용하여 사용자에게 소개 적응형 카드를 제공합니다. 이 코드는 이 문서의 다음 섹션에서 검사됩니다.
bots/welcomeBot.js
// This example uses an exact match on user's input utterance.
// Consider using LUIS or QnA for Natural Language Processing.
const text = context.activity.text.toLowerCase();
switch (text) {
case 'hello':
case 'hi':
    await context.sendActivity(`You said "${ context.activity.text }"`);
    break;
case 'intro':
case 'help':
    await this.sendIntroCard(context);
    break;
default:
    await context.sendActivity(`This is a simple Welcome Bot sample. You can say 'intro' to
                                    see the introduction card. If you are running this bot in the Bot
                                    Framework Emulator, press the 'Start Over' button to simulate user joining a bot or a channel`);
}
'소개' 또는 'help'의 입력은 함수 sendIntroCard 를 호출하여 사용자에게 정보 영웅 카드 제공합니다. 이 코드는 이 문서의 다음 섹션에서 검사됩니다.
WelcomeUserBot.java
// This example hardcodes specific utterances.
// You should use LUIS or QnA for more advance language understanding.
String text = turnContext.getActivity().getText().toLowerCase();
switch (text) {
    case "hello":
    case "hi":
        return turnContext.sendActivities(MessageFactory.text("You said " + text));

    case "intro":
    case "help":
        return sendIntroCard(turnContext);

    default:
        return turnContext.sendActivity(WELCOME_MESSAGE);
}
사용자의 소개 또는 도움말 입력으로 인해 봇이 호출__send_intro_card되어 사용자에게 내향적 적응형 카드 제공합니다.
bots/welcome-user-bot.py
if text in ("hello", "hi"):
    await turn_context.send_activity(f"You said { text }")
elif text in ("intro", "help"):
    await self.__send_intro_card(turn_context)
else:
    await turn_context.send_activity(self.WELCOME_MESSAGE)
    {
        var card = new HeroCard
        {
            Title = "Welcome to Bot Framework!",
            Text = @"Welcome to Welcome Users bot sample! This Introduction card
                     is a great way to introduce your Bot to the user and suggest
                     some things to get them started. We use this opportunity to
                     recommend a few next steps for learning more creating and deploying bots.",
            Images = new List<CardImage>() { new CardImage("https://aka.ms/bf-welcome-card-image") },
            Buttons = new List<CardAction>()
            {
                new CardAction(ActionTypes.OpenUrl, "Get an overview", null, "Get an overview", "Get an overview", "https://docs.microsoft.com/en-us/azure/bot-service/?view=azure-bot-service-4.0"),
                new CardAction(ActionTypes.OpenUrl, "Ask a question", null, "Ask a question", "Ask a question", "https://stackoverflow.com/questions/tagged/botframework"),
                new CardAction(ActionTypes.OpenUrl, "Learn how to deploy", null, "Learn how to deploy", "Learn how to deploy", "https://docs.microsoft.com/en-us/azure/bot-service/bot-builder-howto-deploy-azure?view=azure-bot-service-4.0"),
            }
        };

        var response = MessageFactory.Attachment(card.ToAttachment());
        await turnContext.SendActivityAsync(response, cancellationToken);
    }
}
bots/welcomeBot.js
async sendIntroCard(context) {
    const card = CardFactory.heroCard(
        'Welcome to Bot Framework!',
        'Welcome to Welcome Users bot sample! This Introduction card is a great way to introduce your Bot to the user and suggest some things to get them started. We use this opportunity to recommend a few next steps for learning more creating and deploying bots.',
        ['https://aka.ms/bf-welcome-card-image'],
        [
            {
                type: ActionTypes.OpenUrl,
                title: 'Get an overview',
                value: 'https://docs.microsoft.com/en-us/azure/bot-service/?view=azure-bot-service-4.0'
            },
            {
                type: ActionTypes.OpenUrl,
                title: 'Ask a question',
                value: 'https://stackoverflow.com/questions/tagged/botframework'
            },
            {
                type: ActionTypes.OpenUrl,
                title: 'Learn how to deploy',
                value: 'https://docs.microsoft.com/en-us/azure/bot-service/bot-builder-howto-deploy-azure?view=azure-bot-service-4.0'
            }
        ]
    );

    await context.sendActivity({ attachments: [card] });
}
WelcomeUserBot.java
private CompletableFuture<ResourceResponse> sendIntroCard(TurnContext turnContext) {
    HeroCard card = new HeroCard();
    card.setTitle("Welcome to Bot Framework!");
    card.setText(
        "Welcome to Welcome Users bot sample! This Introduction card "
            + "is a great way to introduce your Bot to the user and suggest "
            + "some things to get them started. We use this opportunity to "
            + "recommend a few next steps for learning more creating and deploying bots."
    );

    CardImage image = new CardImage();
    image.setUrl("https://aka.ms/bf-welcome-card-image");

    card.setImages(Collections.singletonList(image));

    CardAction overviewAction = new CardAction();
    overviewAction.setType(ActionTypes.OPEN_URL);
    overviewAction.setTitle("Get an overview");
    overviewAction.setText("Get an overview");
    overviewAction.setDisplayText("Get an overview");
    overviewAction.setValue(
        "https://docs.microsoft.com/en-us/azure/bot-service/?view=azure-bot-service-4.0"
    );

    CardAction questionAction = new CardAction();
    questionAction.setType(ActionTypes.OPEN_URL);
    questionAction.setTitle("Ask a question");
    questionAction.setText("Ask a question");
    questionAction.setDisplayText("Ask a question");
    questionAction.setValue("https://stackoverflow.com/questions/tagged/botframework");

    CardAction deployAction = new CardAction();
    deployAction.setType(ActionTypes.OPEN_URL);
    deployAction.setTitle("Learn how to deploy");
    deployAction.setText("Learn how to deploy");
    deployAction.setDisplayText("Learn how to deploy");
    deployAction.setValue(
        "https://docs.microsoft.com/en-us/azure/bot-service/bot-builder-howto-deploy-azure?view=azure-bot-service-4.0"
    );
    card.setButtons(Arrays.asList(overviewAction, questionAction, deployAction));

    Activity response = MessageFactory.attachment(card.toAttachment());
    return turnContext.sendActivity(response);
}
bots/welcome-user-bot.py
async def __send_intro_card(self, turn_context: TurnContext):
    card = HeroCard(
        title="Welcome to Bot Framework!",
        text="Welcome to Welcome Users bot sample! This Introduction card "
        "is a great way to introduce your Bot to the user and suggest "
        "some things to get them started. We use this opportunity to "
        "recommend a few next steps for learning more creating and deploying bots.",
        images=[CardImage(url="https://aka.ms/bf-welcome-card-image")],
        buttons=[
            CardAction(
                type=ActionTypes.open_url,
                title="Get an overview",
                text="Get an overview",
                display_text="Get an overview",
                value="https://docs.microsoft.com/en-us/azure/bot-service/?view=azure-bot-service-4.0",
            ),
            CardAction(
                type=ActionTypes.open_url,
                title="Ask a question",
                text="Ask a question",
                display_text="Ask a question",
                value="https://stackoverflow.com/questions/tagged/botframework",
            ),
            CardAction(
                type=ActionTypes.open_url,
                title="Learn how to deploy",
                text="Learn how to deploy",
                display_text="Learn how to deploy",
                value="https://docs.microsoft.com/en-us/azure/bot-service/bot-builder-howto-deploy-azure?view=azure-bot-service-4.0",
            ),
        ],
    )

    return await turn_context.send_activity(
        MessageFactory.attachment(CardFactory.hero_card(card))
    )