빠른 시작: 고급 메시지를 사용하여 WhatsApp 메시지 보내기
Azure Communication Services를 사용하면 WhatsApp 메시지를 보내고 받을 수 있습니다. 이 빠른 시작에서는 Azure Communication Advanced Messages SDK와 앱 통합을 시작하고 WhatsApp 메시지 보내기/받기를 시작합니다. 이 빠른 시작을 완료하면 Azure 계정에서 USD 센트 이하의 작은 비용이 발생합니다.
필수 조건
메시지를 받을 활성 WhatsApp 전화 번호
.NET 개발 환경(예: Visual Studio, Visual Studio Code 또는 .NET CLI)
설정
.NET 프로젝트 만들기
프로젝트를 만들려면 Visual Studio를 사용하여 .NET 콘솔 애플리케이션 만들기의 자습서를 따릅니다.
코드를 컴파일하려면 Ctrl+F7을 누릅니다.
패키지 설치
C# 프로젝트에 Azure.Communication.Messages NuGet 패키지를 설치합니다.
Project>Manage NuGet Packages...에서 NuGet 패키지 관리자를 엽니다.- 패키지
Azure.Communication.Messages를 검색합니다. - 최신 릴리스를 설치합니다.
앱 프레임워크 설정
텍스트 편집기에서 Program.cs 파일을 엽니다.
Program.cs의 내용을 다음 코드로 바꿉니다.
using System;
using System.Collections.Generic;
using System.Threading.Tasks;
using Azure;
using Azure.Communication.Messages;

namespace AdvancedMessagingQuickstart
{
    class Program
    {
        public static async Task Main(string[] args)
        {
            Console.WriteLine("Azure Communication Services - Send WhatsApp Messages");

            // Quickstart code goes here
        }
    }
}
고급 메시징 기능을 사용하려면 Azure.Communication.Messages 네임스페이스를 포함하도록 using 지시문을 추가합니다.
using Azure.Communication.Messages;
개체 모델
다음 클래스 및 인터페이스는 .NET용 Azure Communication Services 고급 메시징 SDK의 주요 기능 중 일부를 처리합니다.
| 속성 | 설명 |
|---|---|
| NotificationMessagesClient | 이 클래스는 Azure Communication Services 리소스에 연결합니다. 메시지를 보냅니다. |
| MessageTemplate | 이 클래스는 사용하는 템플릿과 메시지에 대한 템플릿 속성의 콘텐츠를 정의합니다. |
| TemplateNotificationContent | 이 클래스는 보내려는 템플릿 메시지의 "who" 및 "what"을 정의합니다. |
| TextNotificationContent | 이 클래스는 보내려는 문자 메시지의 "who" 및 "what"을 정의합니다. |
| MediaNotificationContent | 이 클래스는 보내려는 미디어 메시지의 "who" 및 "what"을 정의합니다. |
코드 예제
다음 단계에 따라 필요한 코드 조각을 Program.cs 파일의 Main 함수에 추가합니다.
- 클라이언트 인증
- 채널 등록 ID 설정
- 수신자 목록 설정
- 기업과 WhatsApp 사용자 간에 메시지 보내기 시작
- WhatsApp 사용자에게 문자 메시지 보내기
- WhatsApp 사용자에게 미디어 메시지 보내기
클라이언트 인증
NotificationMessagesClient는 Azure Communication Services 리소스에 연결하는 데 사용됩니다.
간단히 하기 위해 이 빠른 시작에서는 연결 문자열을 사용하여 인증합니다. 프로덕션 환경에서는 서비스 주체를 사용하는 것이 좋습니다.
Azure Portal의 Azure Communication Services 리소스에서 연결 문자열을 가져옵니다. 왼쪽에서 Keys 탭으로 이동합니다. 기본 키의 Connection string 필드를 복사합니다. 연결 문자열은 endpoint=https://{your Azure Communication Services resource name}.communication.azure.com/;accesskey={secret key} 형식입니다.

환경 변수 COMMUNICATION_SERVICES_CONNECTION_STRING을 연결 문자열 값으로 설정합니다.
콘솔 창을 열고 다음 명령을 입력합니다.
setx COMMUNICATION_SERVICES_CONNECTION_STRING "<your connection string>"
환경 변수를 추가한 후에는 콘솔 창을 포함하여 실행 중인 프로그램 중에서 환경 변수를 읽어야 하는 프로그램을 다시 시작해야 할 수도 있습니다. 예를 들어 편집기로 Visual Studio를 사용하는 경우 Visual Studio를 다시 시작한 후 예제를 실행합니다.
시스템의 환경 변수를 설정하는 방법에 대한 자세한 내용은 환경 변수에 연결 문자열 저장의 단계를 수행합니다.
NotificationMessagesClient를 인스턴스화하려면 다음 코드를 Main 메서드에 추가합니다.
// Retrieve connection string from environment variable
string connectionString =
    Environment.GetEnvironmentVariable("COMMUNICATION_SERVICES_CONNECTION_STRING");

// Instantiate the client
var notificationMessagesClient = new NotificationMessagesClient(connectionString);

채널 등록 ID 설정
채널 등록 ID GUID는 채널 등록 중에 만들어졌습니다. Azure Communication Services 리소스의 채널 탭에 있는 포털에서 조회할 수 있습니다.

channelRegistrationId라는 변수에 할당합니다.
var channelRegistrationId = new Guid("<your channel registration ID GUID>");
수신자 목록 설정
WhatsApp 계정과 연결된 실제 전화 번호를 제공해야 합니다. 이 WhatsApp 계정은 이 빠른 시작에서 보낸 템플릿, 문자 및 미디어 메시지를 받습니다. 이 빠른 시작에서는 이 전화 번호가 개인 전화 번호일 수 있습니다.
수신자 전화 번호는 WhatsApp 채널 등록과 연결된 회사 전화 번호(발신자 ID)일 수 없습니다. 발신자 ID는 수신자에게 보낸 텍스트 및 미디어 메시지의 발신자로 표시됩니다.
전화 번호에는 국가 번호가 포함되어야 합니다. 전화 번호 형식에 대한 자세한 내용은 전화 번호 형식에 대한 WhatsApp 설명서를 참조하세요.
참고 항목
현재 수신자 목록에서는 전화 번호가 하나만 지원됩니다.
다음과 같이 수신자 목록을 만듭니다.
var recipientList = new List<string> { "<to WhatsApp phone number>" };
예시:
// Example only
var recipientList = new List<string> { "+14255550199" };
기업과 WhatsApp 사용자 간에 메시지 보내기 시작
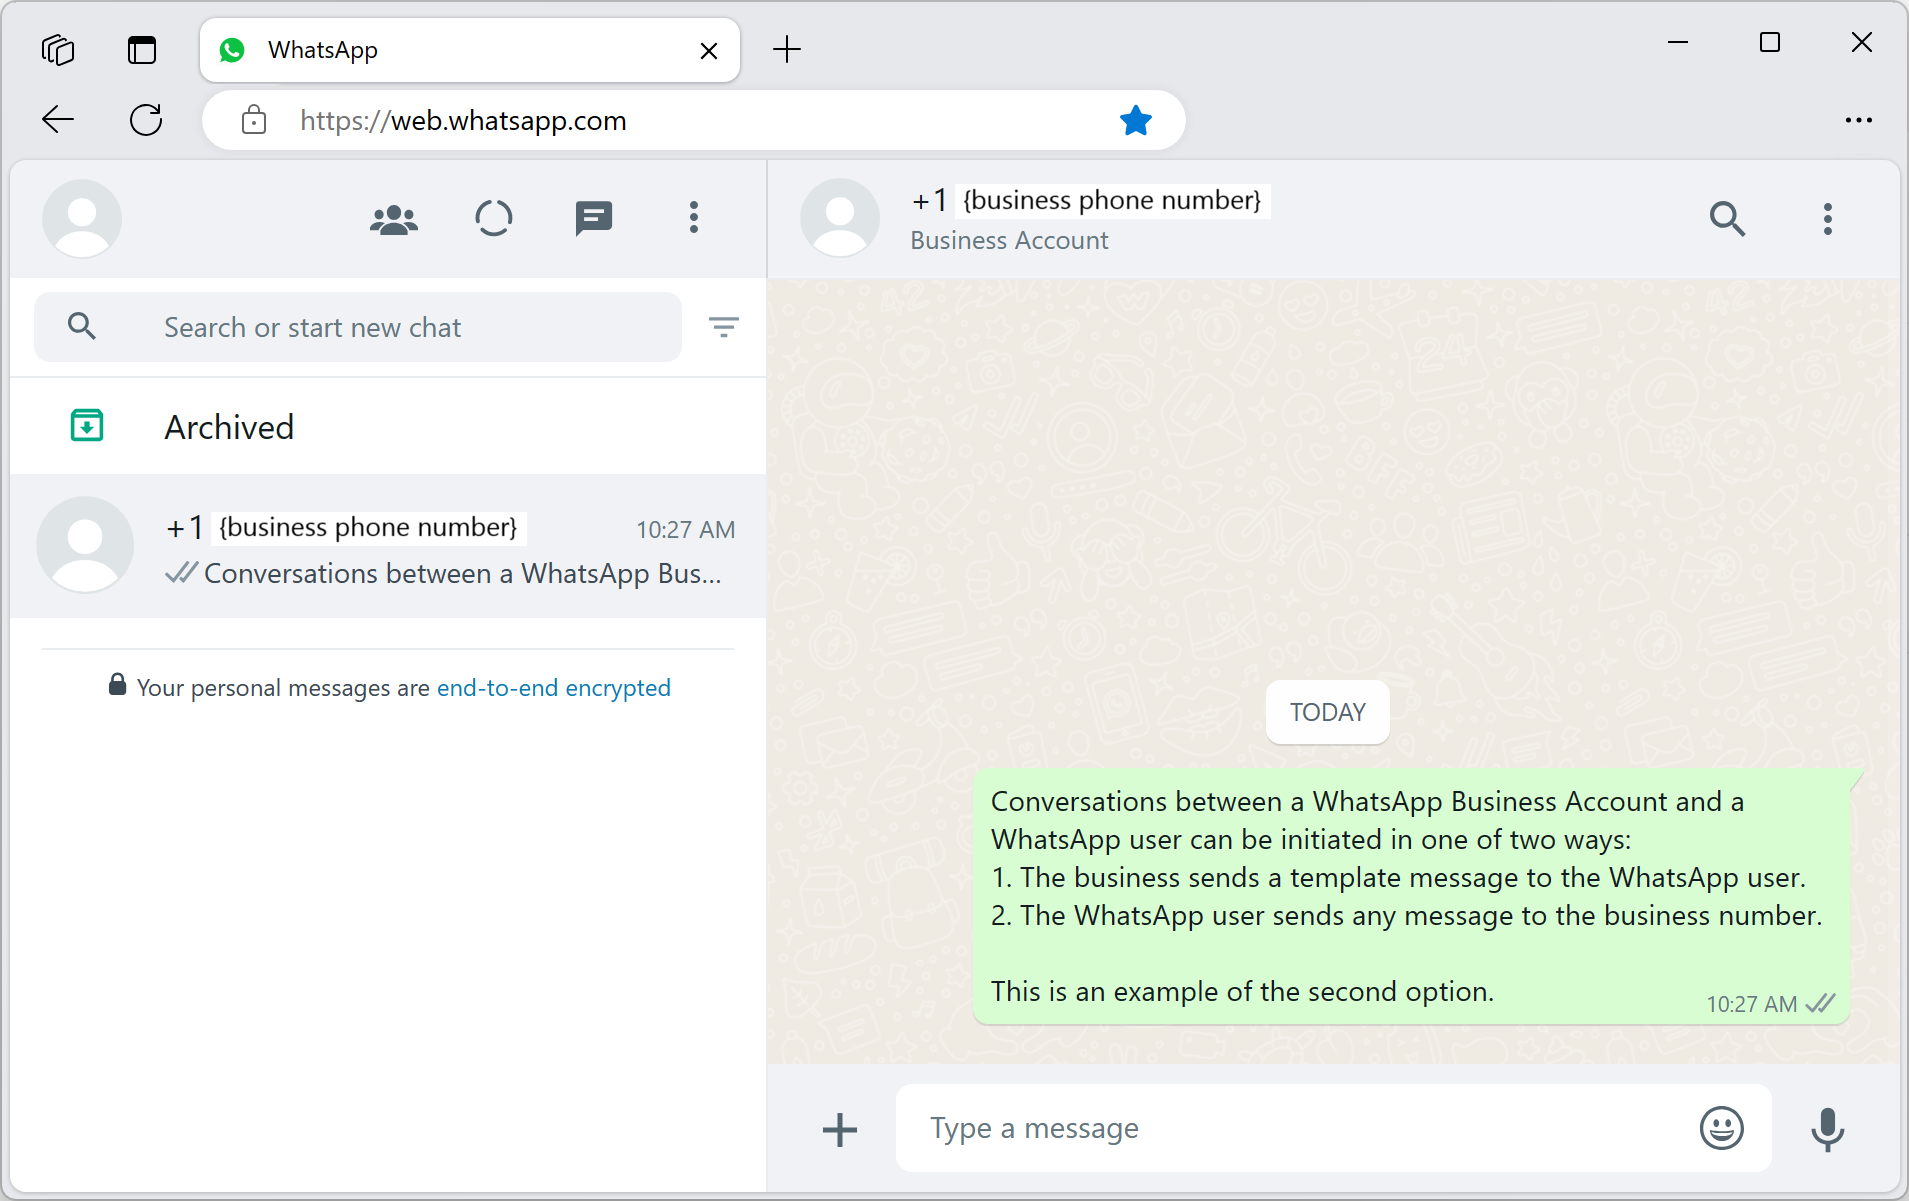
WhatsApp 비즈니스 계정과 WhatsApp 사용자 간의 대화는 다음 두 가지 방법 중 하나로 시작할 수 있습니다.
- 기업은 WhatsApp 사용자에게 템플릿 메시지를 보냅니다.
- WhatsApp 사용자는 비즈니스 번호로 메시지를 보냅니다.
대화가 시작된 방식에 관계없이 기업은 사용자가 기업에 메시지를 보낼 때까지 템플릿 메시지만 보낼 수 있습니다. 사용자가 기업에 메시지를 보낸 후에만 기업은 활성 대화 중에 사용자에게 문자 또는 미디어 메시지를 보낼 수 있습니다. 24시간 대화 창이 만료되면 대화를 다시 시작해야 합니다. 대화에 대해 자세히 알아보려면 WhatsApp Business Platform의 정의를 참조하세요.
(옵션 1) 비즈니스에서 대화 시작 - 템플릿 메시지 보내기
템플릿 메시지를 보내 대화를 시작합니다.
먼저 템플릿의 값을 사용하여 MessageTemplate을 만듭니다.
기본 템플릿(sample_template)을 사용한 MessageTemplate 생성은 다음과 같습니다.
sample_template을 사용할 수 없는 경우 옵션 2로 건너뜁니다. 고급 사용자의 경우 옵션 1을 사용하여 다른 템플릿을 보내는 방법을 이해하려면 템플릿 페이지를 참조하세요.
메시지 SDK를 사용하면 Contoso는 WhatsApp 사용자에게 템플릿 기반 WhatsApp 메시지를 보낼 수 있습니다. 템플릿 메시지를 보내려면 아래 세부 정보가 필요합니다.
- WhatsApp 채널 ID
- E16 형식의 수신자 전화 번호
- 템플릿 세부 정보
- 'sample_template'과 같은 이름
- 'en_us'와 같은 언어
- 매개 변수(있는 경우)
// Assemble the template content
string templateName = "sample_template";
string templateLanguage = "en_us";
var messageTemplate = new MessageTemplate(templateName, templateLanguage);
MessageTemplate을 어셈블하는 방법과 고유한 템플릿을 만드는 방법에 대한 자세한 예제는 다음 리소스를 참조하세요.
템플릿에 대한 추가 WhatsApp 요구 사항은 WhatsApp Business Platform API 참조를 참조하세요.
어셈블한 다음, 템플릿 메시지를 보냅니다.
// Assemble template message
var templateContent =
    new TemplateNotificationContent(channelRegistrationId, recipientList, messageTemplate);

// Send template message
Response<SendMessageResult> sendTemplateMessageResult =
    await notificationMessagesClient.SendAsync(templateContent);
이제 사용자는 템플릿 메시지에 응답해야 합니다. WhatsApp 사용자 계정에서 WhatsApp 비즈니스 계정에서 받은 템플릿 메시지에 회신합니다. 메시지의 내용은 이 시나리오와 관련이 없습니다.
Important
텍스트 또는 미디어 메시지가 수신자에게 전달되기 전에 수신자는 템플릿 메시지에 응답하여 대화를 시작해야 합니다.
(옵션 2) 사용자로부터 대화 시작
WhatsApp Business 계정과 WhatsApp 사용자 간에 대화를 시작하는 다른 옵션은 사용자가 대화를 시작하도록 하는 것입니다. 이렇게 하려면 개인 WhatsApp 계정에서 회사 번호(발신자 ID)로 메시지를 보냅니다.

WhatsApp 사용자에게 문자 메시지 보내기
메시지 SDK를 사용하면 Contoso는 WhatsApp 사용자가 시작한 WhatsApp 메시지를 보낼 수 있습니다. 문자 메시지를 보내려면 아래 세부 정보가 필요합니다.
- WhatsApp 채널 ID
- E16 형식의 수신자 전화 번호
- 보낼 메시지 본문/텍스트
Important
WhatsApp에 사용자에게 문자 메시지를 보내려면 WhatsApp 사용자가 먼저 WhatsApp 비즈니스 계정으로 메시지를 보내야 합니다. 자세한 내용은 기업과 WhatsApp 사용자 간에 메시지 보내기 시작을 참조하세요.
이 예제에서는 WhatsApp 사용자에게 "피드백 주셔서 감사합니다.\n 알림 메시징 SDK에서"라는 문자로 회신합니다.
어셈블한 다음, 문자 메시지를 보냅니다.
// Assemble text message
var textContent =
    new TextNotificationContent(channelRegistrationId, recipientList, "Thanks for your feedback.\n From Notification Messaging SDK");

// Send text message
Response<SendMessageResult> sendTextMessageResult =
    await notificationMessagesClient.SendAsync(textContent);
WhatsApp 사용자에게 미디어 메시지 보내기
메시지 SDK를 사용하면 Contoso는 WhatsApp 사용자에게 이미지 WhatsApp 메시지를 보낼 수 있습니다. 이미지가 포함된 메시지를 보내려면 아래 세부 정보가 필요합니다.
- WhatsApp 채널 ID
- E16 형식의 수신자 전화 번호
- 이미지의 MediaUri
Important
WhatsApp에 사용자에게 문자 메시지를 보내려면 WhatsApp 사용자가 먼저 WhatsApp 비즈니스 계정으로 메시지를 보내야 합니다. 자세한 내용은 기업과 WhatsApp 사용자 간에 메시지 보내기 시작을 참조하세요.
예를 들어 URI를 만듭니다.
var uri = new Uri("https://aka.ms/acsicon1");
어셈블한 다음, 미디어 메시지를 보냅니다.
// Assemble media message
var mediaContent =
    new MediaNotificationContent(channelRegistrationId, recipientList, uri);

// Send media message
Response<SendMessageResult> sendMediaMessageResult =
    await notificationMessagesClient.SendAsync(mediaContent);
코드 실행
프로그램을 빌드하고 실행합니다.
WhatsApp 사용자에게 문자 및 미디어 메시지를 보내려면 WhatsApp 비즈니스 계정과 WhatsApp 사용자 간에 활성 대화가 있어야 합니다.
활성 대화가 없는 경우 이 빠른 시작의 목적에 따라 템플릿 메시지 보내기와 문자 메시지 보내기 사이에 대기 시간을 추가해야 합니다. 이렇게 추가된 지연으로 인해 사용자의 WhatsApp 계정으로 비즈니스에 회신할 수 있는 충분한 시간이 제공됩니다. 참고로 샘플 코드의 전체 예제에서는 다음 메시지를 보내기 전에 사용자가 수동으로 입력하라는 메시지를 표시합니다.
성공하면 사용자의 WhatsApp 계정에서 세 개의 메시지를 받게 됩니다.
- 코드를 컴파일하려면 Ctrl+F7을 누릅니다.
- 디버깅하지 않고 프로그램을 실행하려면 Ctrl+F5를 누릅니다.
전체 샘플 코드
using System;
using System.Collections.Generic;
using System.Linq;
using System.Threading.Tasks;
using Azure;
using Azure.Communication.Messages;

namespace AdvancedMessagingQuickstart
{
    class Program
    {
        public static async Task Main(string[] args)
        {
            Console.WriteLine("Azure Communication Services - Send WhatsApp Messages\n");

            string connectionString = Environment.GetEnvironmentVariable("COMMUNICATION_SERVICES_CONNECTION_STRING");
            NotificationMessagesClient notificationMessagesClient =
                new NotificationMessagesClient(connectionString);

            var channelRegistrationId = new Guid("<Your Channel ID>");
            var recipientList = new List<string> { "<Recipient's WhatsApp Phone Number>" };

            // Send sample template sample_template
            string templateName = "sample_template";
            string templateLanguage = "en_us";
            MessageTemplate sampleTemplate = new MessageTemplate(templateName, templateLanguage);
            TemplateNotificationContent templateContent =
                new TemplateNotificationContent(channelRegistrationId, recipientList, sampleTemplate);
            Response<SendMessageResult> sendTemplateMessageResult =
                await notificationMessagesClient.SendAsync(templateContent);

            PrintResult(sendTemplateMessageResult);
            Console.WriteLine("Template message sent.\nWait until the WhatsApp user responds " +
                "to the template message, then press any key to continue.\n");
            Console.ReadKey();

            // Send a text message
            string messageText = "Thanks for your feedback.";
            TextNotificationContent textContent =
                new TextNotificationContent(channelRegistrationId, recipientList, messageText);
            Response<SendMessageResult> sendTextMessageResult =
                await notificationMessagesClient.SendAsync(textContent);

            PrintResult(sendTextMessageResult);
            Console.WriteLine($"Text message sent to my phoneNumber.\nPress any key to continue.\n");
            Console.ReadKey();

            // Send a media message
            Uri uri = new Uri("https://aka.ms/acsicon1");
            MediaNotificationContent mediaContent =
                new MediaNotificationContent(channelRegistrationId, recipientList, uri);
            Response<SendMessageResult> sendMediaMessageResult =
                await notificationMessagesClient.SendAsync(mediaContent);

            PrintResult(sendMediaMessageResult);
            Console.WriteLine("Media message sent.\nPress any key to exit.\n");
            Console.ReadKey();
        }

        public static void PrintResult(Response<SendMessageResult> result)
        {
            Console.WriteLine($"Response: {result.GetRawResponse().Status} " +
                $"({result.GetRawResponse().ReasonPhrase})");
            Console.WriteLine($"Date: " +
                $"{result.GetRawResponse().Headers.First(header => header.Name == "Date").Value}");
            Console.WriteLine($"ClientRequestId: {result.GetRawResponse().ClientRequestId}");
            Console.WriteLine($"MS-CV: " +
                $"{result.GetRawResponse().Headers.First(header => header.Name == "MS-CV").Value}");
            foreach (var receipts in result.Value.Receipts)
            {
                Console.WriteLine($"MessageId: {receipts.MessageId}");
            }
            Console.WriteLine($"\n");
        }
    }
}
필수 조건
메시지를 받을 활성 WhatsApp 전화 번호
JDK(Java Development Kit) 버전 8 이상
설정
메시지 전송을 위한 환경을 설정하려면 다음 섹션의 단계를 수행합니다.
새 Java 애플리케이션 만들기
터미널 또는 명령 창을 열고 Java 애플리케이션을 만들 디렉터리로 이동합니다. 다음 명령을 실행하여 maven-archetype-quickstart 템플릿에서 Java 프로젝트를 생성합니다.
mvn archetype:generate -DgroupId="com.communication.quickstart" -DartifactId="communication-quickstart" -DarchetypeArtifactId="maven-archetype-quickstart" -DarchetypeVersion="1.4" -DinteractiveMode="false"
generate 목표는 artifactId 값과 동일한 이름으로 디렉터리를 만듭니다. 이 디렉터리 아래에서 src/main/java 디렉터리는 프로젝트 소스 코드를 포함하고, src/test/java 디렉터리는 테스트 원본을 포함하고, pom.xml 파일은 프로젝트의 POM(프로젝트 개체 모델)입니다.
패키지 설치
텍스트 편집기에서 pom.xml 파일을 엽니다. 종속성 그룹에 다음 종속성 요소를 추가합니다.
<dependency>
    <groupId>com.azure</groupId>
    <artifactId>azure-communication-messages</artifactId>
    <version>1.0.0</version>
</dependency>
앱 프레임워크 설정
텍스트 편집기에서 /src/main/java/com/communication/quickstart/App.java를 열고, 가져오기 지시문을 추가하고, System.out.println("Hello world!"); 문을 제거합니다.
package com.communication.quickstart;

import com.azure.communication.messages.*;
import com.azure.communication.messages.models.*;

import java.util.ArrayList;
import java.util.List;
public class App
{
    public static void main( String[] args )
    {
        // Quickstart code goes here.
    }
}
개체 모델
다음 클래스 및 인터페이스는 Java용 Azure Communication Services 고급 메시징 SDK의 주요 기능 중 일부를 처리합니다.
| 속성 | 설명 |
|---|---|
| NotificationMessagesClientBuilder | 이 클래스는 알림 메시지 클라이언트를 만듭니다. 엔드포인트 및 자격 증명을 제공합니다. |
| NotificationMessagesClient | WhatsApp 메시지를 보내고 미디어 파일을 다운로드하려면 이 클래스가 필요합니다. |
| NotificationMessagesAsyncClient | WhatsApp 메시지를 보내고 미디어 파일을 비동기적으로 다운로드하려면 이 클래스가 필요합니다. |
| SendMessageResult | 이 클래스에는 알림 메시지를 보내기 위한 고급 메시징 서비스의 결과가 포함됩니다. |
| MessageTemplateClientBuilder | 이 클래스는 메시지 템플릿 클라이언트를 만듭니다. 엔드포인트 및 자격 증명을 제공합니다. |
| MessageTemplateClient | 이 클래스는 WhatsApp 템플릿 목록을 가져오는 데 필요합니다. |
| MessageTemplateAsyncClient | 이 클래스는 WhatsApp 템플릿 목록을 비동기적으로 가져오는 데 필요합니다. |
코드 예제
다음 단계에 따라 필요한 코드 조각을 App.java 파일의 주 함수에 추가합니다.
- 클라이언트 인증
- 채널 등록 ID 설정
- 수신자 목록 설정
- 기업과 WhatsApp 사용자 간에 메시지 보내기 시작
- WhatsApp 사용자에게 문자 메시지 보내기
- WhatsApp 사용자에게 미디어 메시지 보내기
클라이언트 인증
메시지 클라이언트를 인증하는 데 사용할 수 있는 몇 가지 옵션이 있습니다.
클라이언트를 인증하려면 연결 문자열로 NotificationMessagesClient 또는 MessageTemplateClient를 인스턴스화합니다. com.azure.core.http.HttpClient 인터페이스를 구현하는 사용자 지정 HTTP 클라이언트로 클라이언트를 초기화할 수도 있습니다.
간단히 하기 위해 이 빠른 시작에서는 연결 문자열을 사용하여 인증합니다. 프로덕션 환경에서는 서비스 주체를 사용하는 것이 좋습니다.
Azure Portal의 Azure Communication Services 리소스에서 연결 문자열을 가져옵니다. 왼쪽에서 Keys 탭으로 이동합니다. Primary key에 대한 Connection string 필드를 복사합니다. 연결 문자열은 endpoint=https://{your Azure Communication Services resource name}.communication.azure.com/;accesskey={secret key} 형식입니다.
환경 변수 COMMUNICATION_SERVICES_CONNECTION_STRING을 연결 문자열 값으로 설정합니다.
콘솔 창을 열고 다음 명령을 입력합니다.
setx COMMUNICATION_SERVICES_CONNECTION_STRING "<your connection string>"
시스템의 환경 변수를 설정하는 방법에 대한 자세한 내용은 환경 변수에 연결 문자열 저장의 단계를 수행합니다.
NotificationMessagesClient를 인스턴스화하려면 main 메서드에 다음 코드를 추가합니다.
// You can get your connection string from your resource in the Azure portal.
String connectionString = System.getenv("COMMUNICATION_SERVICES_CONNECTION_STRING");

NotificationMessagesClient notificationClient = new NotificationMessagesClientBuilder()
    .connectionString(connectionString)
    .buildClient();
채널 등록 ID 설정
채널 등록 ID GUID는 채널 등록 중에 만들어졌습니다. Azure Communication Services 리소스의 채널 탭에 있는 포털에서 조회할 수 있습니다.
channelRegistrationId라는 변수에 할당합니다.
String channelRegistrationId = "<your channel registration id GUID>";
수신자 목록 설정
WhatsApp 계정과 연결된 실제 전화 번호를 제공해야 합니다. 이 WhatsApp 계정은 이 빠른 시작에서 보낸 텍스트 및 미디어 메시지를 받습니다. 이 빠른 시작에서는 이 전화 번호가 개인 전화 번호일 수 있습니다.
수신자 전화 번호는 WhatsApp 채널 등록과 연결된 회사 전화 번호(발신자 ID)일 수 없습니다. 발신자 ID는 수신자에게 보낸 텍스트 및 미디어 메시지의 발신자로 표시됩니다.
전화 번호에는 국가 번호가 포함되어야 합니다. 전화 번호 형식에 대한 자세한 내용은 전화 번호 형식에 대한 WhatsApp 설명서를 참조하세요.
참고 항목
현재 수신자 목록에서는 전화 번호가 하나만 지원됩니다.
다음과 같이 수신자 목록을 만듭니다.
List<String> recipientList = new ArrayList<>();
recipientList.add("<to WhatsApp phone number>");
예시:
// Example only
List<String> recipientList = new ArrayList<>();
recipientList.add("+14255550199");
기업과 WhatsApp 사용자 간에 메시지 보내기 시작
WhatsApp 비즈니스 계정과 WhatsApp 사용자 간의 대화는 다음 두 가지 방법 중 하나로 시작할 수 있습니다.
- 기업은 WhatsApp 사용자에게 템플릿 메시지를 보냅니다.
- WhatsApp 사용자는 비즈니스 번호로 메시지를 보냅니다.
대화가 시작된 방식에 관계없이 기업은 사용자가 기업에 메시지를 보낼 때까지 템플릿 메시지만 보낼 수 있습니다. 사용자가 기업에 메시지를 보낸 후에만 기업은 활성 대화 중에 사용자에게 문자 또는 미디어 메시지를 보낼 수 있습니다. 24시간 대화 창이 만료되면 대화를 다시 시작해야 합니다. 대화에 대해 자세히 알아보려면 WhatsApp Business Platform의 정의를 참조하세요.
(옵션 1) 비즈니스에서 대화 시작 - 템플릿 메시지 보내기
템플릿 메시지를 보내 대화를 시작합니다.
먼저 템플릿의 값을 사용하여 MessageTemplate을 만듭니다.
기본 템플릿(sample_template)을 사용한 MessageTemplate 생성은 다음과 같습니다.
sample_template을 사용할 수 없는 경우 옵션 2로 건너뜁니다. 고급 사용자의 경우 옵션 1을 사용하여 다른 템플릿을 보내는 방법을 이해하려면 템플릿 페이지를 참조하세요.
메시지 SDK를 사용하면 Contoso는 WhatsApp 사용자에게 템플릿 기반 WhatsApp 메시지를 보낼 수 있습니다. 템플릿 메시지를 보내려면 아래 세부 정보가 필요합니다.
- WhatsApp 채널 ID
- E16 형식의 수신자 전화 번호
- 템플릿 세부 정보
- 'sample_template'과 같은 이름
- 'en_us'와 같은 언어
- 매개 변수(있는 경우)
// Assemble the template content
String templateName = "sample_template";
String templateLanguage = "en_us";
MessageTemplate messageTemplate = new MessageTemplate(templateName, templateLanguage);

// Assemble template message
TemplateNotificationContent templateContent = new TemplateNotificationContent(channelRegistrationId, recipientList, messageTemplate);

// Send template message
SendMessageResult templateMessageResult = notificationClient.send(templateContent);

// Process result
for (MessageReceipt messageReceipt : templateMessageResult.getReceipts()) {
    System.out.println("Message sent to:" + messageReceipt.getTo() + " and message id:" + messageReceipt.getMessageId());
}
이제 사용자는 템플릿 메시지에 응답해야 합니다. WhatsApp 사용자 계정에서 WhatsApp 비즈니스 계정에서 받은 템플릿 메시지에 회신합니다. 메시지의 내용은 이 시나리오와 관련이 없습니다.
Important
텍스트 또는 미디어 메시지가 수신자에게 전달되기 전에 수신자는 템플릿 메시지에 응답하여 대화를 시작해야 합니다.
(옵션 2) 사용자로부터 대화 시작
WhatsApp Business 계정과 WhatsApp 사용자 간에 대화를 시작하는 다른 옵션은 사용자가 대화를 시작하도록 하는 것입니다. 이렇게 하려면 개인 WhatsApp 계정에서 회사 번호(발신자 ID)로 메시지를 보냅니다.
WhatsApp 사용자에게 문자 메시지 보내기
메시지 SDK를 사용하면 Contoso는 WhatsApp 사용자가 시작한 WhatsApp 메시지를 보낼 수 있습니다. 문자 메시지를 보내려면 아래 세부 정보가 필요합니다.
- WhatsApp 채널 ID
- E16 형식의 수신자 전화 번호
- 보낼 메시지 본문/텍스트
Important
WhatsApp에 사용자에게 문자 메시지를 보내려면 WhatsApp 사용자가 먼저 WhatsApp 비즈니스 계정으로 메시지를 보내야 합니다. 자세한 내용은 기업과 WhatsApp 사용자 간에 메시지 보내기 시작을 참조하세요.
이 예제에서는 WhatsApp 사용자에게 "피드백 주셔서 감사합니다.\n 알림 메시징 SDK에서"라는 문자로 회신합니다.
어셈블한 다음, 문자 메시지를 보냅니다.
// Assemble text message
TextNotificationContent textContent = new TextNotificationContent(channelRegistrationId, recipientList, "“Thanks for your feedback.\n From Notification Messaging SDK");

// Send text message
SendMessageResult textMessageResult = notificationClient.send(textContent);

// Process result
for (MessageReceipt messageReceipt : textMessageResult.getReceipts()) {
    System.out.println("Message sent to:" + messageReceipt.getTo() + " and message id:" + messageReceipt.getMessageId());
}
WhatsApp 사용자에게 미디어 메시지 보내기
메시지 SDK를 사용하면 Contoso는 WhatsApp 사용자에게 이미지 WhatsApp 메시지를 보낼 수 있습니다. 이미지가 포함된 메시지를 보내려면 아래 세부 정보가 필요합니다.
- WhatsApp 채널 ID
- E16 형식의 수신자 전화 번호
- 이미지의 MediaUri
Important
WhatsApp에 사용자에게 문자 메시지를 보내려면 WhatsApp 사용자가 먼저 WhatsApp 비즈니스 계정으로 메시지를 보내야 합니다. 자세한 내용은 기업과 WhatsApp 사용자 간에 메시지 보내기 시작을 참조하세요.
예를 들어 URI를 만듭니다.
String mediaUrl = "https://aka.ms/acsicon1";
어셈블한 다음, 미디어 메시지를 보냅니다.
// Assemble media message
MediaNotificationContent mediaContent = new MediaNotificationContent(channelRegistrationId, recipientList, mediaUrl);

// Send media message
SendMessageResult mediaMessageResult = notificationClient.send(mediaContent);

// Process result
for (MessageReceipt messageReceipt : mediaMessageResult.getReceipts()) {
    System.out.println("Message sent to:" + messageReceipt.getTo() + " and message id:" + messageReceipt.getMessageId());
}
코드 실행
pom.xml 파일이 포함된 디렉터리로 이동하고
mvn명령을 사용하여 프로젝트를 컴파일합니다.mvn compile다음
mvn명령을 실행하여 앱을 실행합니다.mvn exec:java -D"exec.mainClass"="com.communication.quickstart.App" -D"exec.cleanupDaemonThreads"="false"
전체 샘플 코드
GitHub에서 이 빠른 시작에 대한 최종 코드를 찾습니다.
필수 조건
메시지를 받을 활성 WhatsApp 전화 번호
Node.js 활성 LTS 및 유지 관리 LTS 버전(8.11.1 및 10.14.1 권장)
- 터미널 또는 명령 창에서
node --version을 실행하여 Node.js가 설치되어 있는지 확인합니다.
- 터미널 또는 명령 창에서
설정
메시지 전송을 위한 환경을 설정하려면 다음 섹션의 단계를 수행합니다.
새 Node.js 애플리케이션 만들기
앱에 대한 새 디렉터리를 만들고 터미널 또는 명령 창을 열어 해당 디렉터리로 이동한 후, 다음 명령을 실행합니다.
mkdir advance-messages-quickstart && cd advance-messages-quickstart다음 명령을 실행하여 기본 설정으로 package.json 파일을 만듭니다.
npm init -y텍스트 편집기를 사용하여 프로젝트 루트 디렉터리에 send-messages.js라는 파일을 만듭니다.
send-messages.js 파일에 다음 코드 조각을 추가합니다.
async function main() {
    // Quickstart code goes here.
}

main().catch((error) => {
    console.error("Encountered an error while sending message: ", error);
    process.exit(1);
});
다음 섹션에서는 이 빠른 시작의 모든 소스 코드를 사용자가 만든 send-messages.js 파일에 추가했습니다.
패키지 설치
npm install 명령을 사용하여 JavaScript용 Azure Communication Services 고급 메시징 SDK를 설치합니다.
npm install @azure-rest/communication-messages --save
--save 옵션은 라이브러리를 package.json 파일의 종속성으로 나열합니다.
개체 모델
다음 클래스 및 인터페이스는 JavaScript용 Azure Communication Services 고급 메시징 SDK의 주요 기능 중 일부를 처리합니다.
| 속성 | 설명 |
|---|---|
| MessageClient | 이 클래스는 Azure Communication Services 리소스에 연결합니다. 메시지를 보냅니다. |
| MessageTemplate | 이 클래스는 사용하는 템플릿과 메시지에 대한 템플릿 속성의 콘텐츠를 정의합니다. |
코드 예제
다음 단계에 따라 필요한 코드 조각을 send-messages.js 파일의 주 함수에 추가합니다.
- 클라이언트 인증
- 채널 등록 ID 설정
- 수신자 목록 설정
- 기업과 WhatsApp 사용자 간에 메시지 보내기 시작
- WhatsApp 사용자에게 문자 메시지 보내기
- WhatsApp 사용자에게 미디어 메시지 보내기
클라이언트 인증
다음 코드는 dotenv 패키지를 사용하여 COMMUNICATION_SERVICES_CONNECTION_STRING이라는 환경 변수에서 리소스에 대한 연결 문자열을 검색합니다.
간단히 하기 위해 이 빠른 시작에서는 연결 문자열을 사용하여 인증합니다. 프로덕션 환경에서는 서비스 주체를 사용하는 것이 좋습니다.
Azure Portal의 Azure Communication Services 리소스에서 연결 문자열을 가져옵니다. 왼쪽에서 Keys 탭으로 이동합니다. Primary key에 대한 Connection string 필드를 복사합니다. 연결 문자열은 endpoint=https://{your Azure Communication Services resource name}.communication.azure.com/;accesskey={secret key} 형식입니다.
환경 변수 COMMUNICATION_SERVICES_CONNECTION_STRING을 연결 문자열 값으로 설정합니다.
콘솔 창을 열고 다음 명령을 입력합니다.
setx COMMUNICATION_SERVICES_CONNECTION_STRING "<your connection string>"
시스템의 환경 변수를 설정하는 방법에 대한 자세한 내용은 환경 변수에 연결 문자열 저장의 단계를 수행합니다.
MessageClient를 인스턴스화하려면 다음 코드를 Main 메서드에 추가합니다.
const MessageClient = require("@azure-rest/communication-messages").default;

// Set Connection string
const connectionString = process.env["COMMUNICATION_SERVICES_CONNECTION_STRING"];

// Instantiate the client
const client = MessageClient(connectionString);
채널 등록 ID 설정
채널 등록 ID GUID는 채널 등록 중에 만들어졌습니다. Azure Communication Services 리소스의 채널 탭에 있는 포털에서 조회할 수 있습니다.
channelRegistrationId라는 변수에 할당합니다.
const channelRegistrationId = "<your channel registration id GUID>";
수신자 목록 설정
WhatsApp 계정과 연결된 실제 전화 번호를 제공해야 합니다. 이 WhatsApp 계정은 이 빠른 시작에서 보낸 템플릿, 문자 및 미디어 메시지를 받습니다. 이 빠른 시작에서는 이 전화 번호가 개인 전화 번호일 수 있습니다.
수신자 전화 번호는 WhatsApp 채널 등록과 연결된 회사 전화 번호(발신자 ID)일 수 없습니다. 발신자 ID는 수신자에게 보낸 텍스트 및 미디어 메시지의 발신자로 표시됩니다.
전화 번호에는 국가 번호가 포함되어야 합니다. 전화 번호 형식에 대한 자세한 내용은 전화 번호 형식에 대한 WhatsApp 설명서를 참조하세요.
참고 항목
현재 수신자 목록에서는 전화 번호가 하나만 지원됩니다.
다음과 같이 수신자 목록을 만듭니다.
const recipientList = ["<to WhatsApp phone number>"];
예시:
// Example only
const recipientList = ["+14255550199"];
기업과 WhatsApp 사용자 간에 메시지 보내기 시작
WhatsApp 비즈니스 계정과 WhatsApp 사용자 간의 대화는 다음 두 가지 방법 중 하나로 시작할 수 있습니다.
- 기업은 WhatsApp 사용자에게 템플릿 메시지를 보냅니다.
- WhatsApp 사용자는 비즈니스 번호로 메시지를 보냅니다.
대화가 시작된 방식에 관계없이 기업은 사용자가 기업에 메시지를 보낼 때까지 템플릿 메시지만 보낼 수 있습니다. 사용자가 기업에 메시지를 보낸 후에만 기업은 활성 대화 중에 사용자에게 문자 또는 미디어 메시지를 보낼 수 있습니다. 24시간 대화 창이 만료되면 대화를 다시 시작해야 합니다. 대화에 대해 자세히 알아보려면 WhatsApp Business Platform의 정의를 참조하세요.
(옵션 1) 비즈니스에서 대화 시작 - 템플릿 메시지 보내기
템플릿 메시지를 보내 대화를 시작합니다.
먼저 템플릿의 값을 사용하여 MessageTemplate을 만듭니다.
기본 템플릿(sample_template)을 사용한 MessageTemplate 생성은 다음과 같습니다.
sample_template을 사용할 수 없는 경우 옵션 2로 건너뜁니다. 고급 사용자의 경우 옵션 1을 사용하여 다른 템플릿을 보내는 방법을 이해하려면 템플릿 페이지를 참조하세요.
메시지 SDK를 사용하면 Contoso는 WhatsApp 사용자에게 템플릿 기반 WhatsApp 메시지를 보낼 수 있습니다. 템플릿 메시지를 보내려면 아래 세부 정보가 필요합니다.
- WhatsApp 채널 ID
- E16 형식의 수신자 전화 번호
- 템플릿 세부 정보
- 'sample_template'과 같은 이름
- 'en_us'와 같은 언어
- 매개 변수(있는 경우)
// Assemble the template content
const template = {
    name: "sample_template",
    language: "en_US"
};
MessageTemplate을 어셈블하는 방법과 고유한 템플릿을 만드는 방법에 대한 자세한 예제는 다음 리소스를 참조하세요.
템플릿에 대한 추가 WhatsApp 요구 사항은 WhatsApp Business Platform API 참조를 참조하세요.
// Send template message
const templateMessageResult = await client.path("/messages/notifications:send").post({
    contentType: "application/json",
    body: {
        channelRegistrationId: channelRegistrationId,
        to: recipientList,
        kind: "template",
        template: template
    }
});

// Process result
if (templateMessageResult.status === "202") {
    templateMessageResult.body.receipts.forEach((receipt) => {
        console.log("Message sent to:"+receipt.to+" with message id:"+receipt.messageId);
    });
} else {
    throw new Error("Failed to send message");
}
이제 사용자는 템플릿 메시지에 응답해야 합니다. WhatsApp 사용자 계정에서 WhatsApp 비즈니스 계정에서 받은 템플릿 메시지에 회신합니다. 메시지의 내용은 이 시나리오와 관련이 없습니다.
Important
텍스트 또는 미디어 메시지가 수신자에게 전달되기 전에 수신자는 템플릿 메시지에 응답하여 대화를 시작해야 합니다.
(옵션 2) 사용자로부터 대화 시작
WhatsApp Business 계정과 WhatsApp 사용자 간에 대화를 시작하는 다른 옵션은 사용자가 대화를 시작하도록 하는 것입니다. 이렇게 하려면 개인 WhatsApp 계정에서 회사 번호(발신자 ID)로 메시지를 보냅니다.
WhatsApp 사용자에게 문자 메시지 보내기
메시지 SDK를 사용하면 Contoso는 WhatsApp 사용자가 시작한 WhatsApp 메시지를 보낼 수 있습니다. 문자 메시지를 보내려면 아래 세부 정보가 필요합니다.
- WhatsApp 채널 ID
- E16 형식의 수신자 전화 번호
- 보낼 메시지 본문/텍스트
Important
WhatsApp에 사용자에게 문자 메시지를 보내려면 WhatsApp 사용자가 먼저 WhatsApp 비즈니스 계정으로 메시지를 보내야 합니다. 자세한 내용은 기업과 WhatsApp 사용자 간에 메시지 보내기 시작을 참조하세요.
이 예제에서는 WhatsApp 사용자에게 "피드백 주셔서 감사합니다.\n 알림 메시징 SDK에서"라는 문자로 회신합니다.
미디어 메시지를 어셈블하고 보냅니다.
// Send text message
const textMessageResult = await client.path("/messages/notifications:send").post({
    contentType: "application/json",
    body: {
        channelRegistrationId: channelRegistrationId,
        to: recipientList,
        kind: "text",
        content: "Thanks for your feedback.\n From Notification Messaging SDK"
    }
});

// Process result
if (textMessageResult.status === "202") {
    textMessageResult.body.receipts.forEach((receipt) => {
        console.log("Message sent to:"+receipt.to+" with message id:"+receipt.messageId);
    });
} else {
    throw new Error("Failed to send message");
}
WhatsApp 사용자에게 미디어 메시지 보내기
메시지 SDK를 사용하면 Contoso는 WhatsApp 사용자에게 이미지 WhatsApp 메시지를 보낼 수 있습니다. 이미지가 포함된 메시지를 보내려면 아래 세부 정보가 필요합니다.
- WhatsApp 채널 ID
- E16 형식의 수신자 전화 번호
- 이미지의 MediaUri
Important
WhatsApp에 사용자에게 문자 메시지를 보내려면 WhatsApp 사용자가 먼저 WhatsApp 비즈니스 계정으로 메시지를 보내야 합니다. 자세한 내용은 기업과 WhatsApp 사용자 간에 메시지 보내기 시작을 참조하세요.
미디어 메시지를 보내려면 이미지에 URL을 제공합니다. 예를 들어
const url = "https://aka.ms/acsicon1";
미디어 메시지를 어셈블하고 보냅니다.
// Send media message
const mediaMessageResult = await client.path("/messages/notifications:send").post({
    contentType: "application/json",
    body: {
        channelRegistrationId: channelRegistrationId,
        to: recipientList,
        kind: "image",
        mediaUri: url
    }
});

// Process result
if (mediaMessageResult.status === "202") {
    mediaMessageResult.body.receipts.forEach((receipt) => {
        console.log("Message sent to:"+receipt.to+" with message id:"+receipt.messageId);
    });
} else {
    throw new Error("Failed to send message");
}
코드 실행
node 명령을 사용하여 send-messages.js 파일에 추가한 코드를 실행합니다.
node ./send-messages.js
전체 샘플 코드
샘플 앱은 GitHub에서 다운로드할 수 있습니다.
필수 조건
메시지를 받을 활성 WhatsApp 전화 번호입니다.
운영 체제용 Python 3.7 이상
설정
새 Python 애플리케이션 만들기
터미널 또는 콘솔 창에서 애플리케이션에 대한 새 폴더를 만들고 해당 폴더로 이동합니다.
mkdir messages-quickstart && cd messages-quickstart
패키지 설치
Python 버전 1.0.0 이상용 Azure Communication Messages 클라이언트 라이브러리를 사용해야 합니다.
콘솔 프롬프트에서 다음 명령을 실행합니다.
pip install azure-communication-messages
앱 프레임워크 설정
messages-quickstart.py라는 새 파일을 만들고 기본 프로그램 구조를 추가합니다.
type nul > messages-quickstart.py
기본 프로그램 구조
import os

class MessagesQuickstart(object):
    print("Azure Communication Services - Advanced Messages SDK Quickstart")

if __name__ == '__main__':
    messages = MessagesQuickstart()
개체 모델
다음 클래스 및 인터페이스는 Python용 Azure Communication Services 메시지 SDK의 주요 기능 중 일부를 처리합니다.
| 속성 | 설명 |
|---|---|
| NotificationMessagesClient | 이 클래스는 Azure Communication Services 리소스에 연결합니다. 메시지를 보냅니다. |
| MessageTemplate | 이 클래스는 사용하는 템플릿과 메시지에 대한 템플릿 속성의 콘텐츠를 정의합니다. |
| TemplateNotificationContent | 이 클래스는 보내려는 템플릿 메시지의 "who" 및 "what"을 정의합니다. |
| TextNotificationContent | 이 클래스는 보내려는 문자 메시지의 "who" 및 "what"을 정의합니다. |
| ImageNotificationContent | 이 클래스는 보내려는 이미지 미디어 메시지의 "who" 및 "what"을 정의합니다. |
코드 예제
다음 단계에 따라 필요한 코드 조각을 messages-quickstart.py python 프로그램에 추가합니다.
- 클라이언트 인증
- 채널 등록 ID 설정
- 수신자 목록 설정
- 기업과 WhatsApp 사용자 간에 메시지 보내기 시작
- WhatsApp 사용자에게 문자 메시지 보내기
- WhatsApp 사용자에게 미디어 메시지 보내기
클라이언트 인증
메시지 전송은 NotificationMessagesClient를 사용하여 수행됩니다. NotificationMessagesClient는 Azure Portal의 Azure Communication Services 리소스에서 획득한 연결 문자열을 사용하여 인증됩니다. 연결 문자열에 대한 자세한 내용은 access-your-connection-strings-and-service-endpoints를 참조하세요.
스크린샷에 표시된 대로 Azure Portal에서 Azure Communication Resource 연결 문자열을 가져옵니다. 왼쪽에서 Keys 탭으로 이동합니다. 기본 키의 Connection string 필드를 복사합니다. 연결 문자열은 endpoint=https://{your Azure Communication Services resource name}.communication.azure.com/;accesskey={secret key} 형식입니다.

환경 변수 COMMUNICATION_SERVICES_CONNECTION_STRING을 연결 문자열 값으로 설정합니다.
콘솔 창을 열고 다음 명령을 입력합니다.
setx COMMUNICATION_SERVICES_CONNECTION_STRING "<your connection string>"
환경 변수를 추가한 후에는 콘솔 창을 포함하여 실행 중인 프로그램 중에서 환경 변수를 읽어야 하는 프로그램을 다시 시작해야 할 수도 있습니다. 예를 들어 편집기로 Visual Studio를 사용하는 경우 Visual Studio를 다시 시작한 후 예제를 실행합니다.
시스템의 환경 변수를 설정하는 방법에 대한 자세한 내용은 환경 변수에 연결 문자열 저장의 단계를 수행합니다.
    # Get a connection string to our Azure Communication Services resource.
    connection_string = os.getenv("COMMUNICATION_SERVICES_CONNECTION_STRING")

    def send_template_message(self):
        from azure.communication.messages import NotificationMessagesClient

        # Create NotificationMessagesClient Client
        messaging_client = NotificationMessagesClient.from_connection_string(self.connection_string)
채널 등록 ID 설정
채널 등록 ID GUID는 채널 등록 중에 만들어졌습니다. Azure Communication Services 리소스의 채널 탭에 있는 포털에서 조회할 수 있습니다.
channelRegistrationId라는 변수에 할당합니다.
channelRegistrationId = os.getenv("WHATSAPP_CHANNEL_ID_GUID")
수신자 목록 설정
WhatsApp 계정과 연결된 실제 전화 번호를 제공해야 합니다. 이 WhatsApp 계정은 이 빠른 시작에서 보낸 템플릿, 문자 및 미디어 메시지를 받습니다. 이 빠른 시작에서는 이 전화 번호가 개인 전화 번호일 수 있습니다.
수신자 전화 번호는 WhatsApp 채널 등록과 연결된 회사 전화 번호(발신자 ID)일 수 없습니다. 발신자 ID는 수신자에게 보낸 텍스트 및 미디어 메시지의 발신자로 표시됩니다.
전화 번호에는 국가 번호가 포함되어야 합니다. 전화 번호 형식에 대한 자세한 내용은 전화 번호 형식에 대한 WhatsApp 설명서를 참조하세요.
참고 항목
현재 수신자 목록에서는 전화 번호가 하나만 지원됩니다.
다음과 같이 수신자 목록을 설정합니다.
phone_number = os.getenv("RECIPIENT_WHATSAPP_PHONE_NUMBER")
사용 예제:
    # Example only
    to=[self.phone_number],
기업과 WhatsApp 사용자 간에 메시지 보내기 시작
WhatsApp 비즈니스 계정과 WhatsApp 사용자 간의 대화는 다음 두 가지 방법 중 하나로 시작할 수 있습니다.
- 기업은 WhatsApp 사용자에게 템플릿 메시지를 보냅니다.
- WhatsApp 사용자는 비즈니스 번호로 메시지를 보냅니다.
대화가 시작된 방식에 관계없이 기업은 사용자가 기업에 메시지를 보낼 때까지 템플릿 메시지만 보낼 수 있습니다. 사용자가 기업에 메시지를 보낸 후에만 기업은 활성 대화 중에 사용자에게 문자 또는 미디어 메시지를 보낼 수 있습니다. 24시간 대화 창이 만료되면 대화를 다시 시작해야 합니다. 대화에 대해 자세히 알아보려면 WhatsApp Business Platform의 정의를 참조하세요.
(옵션 1) 비즈니스에서 대화 시작 - 템플릿 메시지 보내기
템플릿 메시지를 보내 대화를 시작합니다.
먼저 템플릿의 값을 사용하여 MessageTemplate을 만듭니다.
기본 템플릿(sample_template)을 사용한 MessageTemplate 생성은 다음과 같습니다.
sample_template을 사용할 수 없는 경우 옵션 2로 건너뜁니다. 고급 사용자의 경우 옵션 1을 사용하여 다른 템플릿을 보내는 방법을 이해하려면 템플릿 페이지를 참조하세요.
메시지 SDK를 사용하면 Contoso는 WhatsApp 사용자에게 템플릿 기반 WhatsApp 메시지를 보낼 수 있습니다. 템플릿 메시지를 보내려면 아래 세부 정보가 필요합니다.
- WhatsApp 채널 ID
- E16 형식의 수신자 전화 번호
- 템플릿 세부 정보
- 'sample_template'과 같은 이름
- 'en_us'와 같은 언어
- 매개 변수(있는 경우)
MessageTemplate을 어셈블하는 방법과 고유한 템플릿을 만드는 방법에 대한 자세한 예제는 다음 리소스를 참조하세요.
템플릿에 대한 추가 WhatsApp 요구 사항은 WhatsApp Business Platform API 참조를 참조하세요.
WhatsApp 템플릿 메시지를 보내려면 send_template_message(자체) 함수에 아래 코드를 추가합니다.
        input_template: MessageTemplate = MessageTemplate(
            name="<<template_name>>",
            language="<<template_language>>")
        template_options = TemplateNotificationContent(
            channel_registration_id=self.channelRegistrationId,
            to=[self.phone_number],
            template=input_template
        )

        # calling send() with whatsapp template details
        message_responses = messaging_client.send(template_options)
        response = message_responses.receipts[0]

        if (response is not None):
            print("WhatsApp Templated Message with message id {} was successfully sent to {}."
            .format(response.message_id, response.to))
        else:
            print("Message failed to send")
주 메서드에 send_template_message() 호출을 추가합니다.
    # Calling send_template_message()
    messages.send_template_message()
이제 사용자는 템플릿 메시지에 응답해야 합니다. WhatsApp 사용자 계정에서 WhatsApp 비즈니스 계정에서 받은 템플릿 메시지에 회신합니다. 메시지의 내용은 이 시나리오와 관련이 없습니다.
Important
텍스트 또는 미디어 메시지가 수신자에게 전달되기 전에 수신자는 템플릿 메시지에 응답하여 대화를 시작해야 합니다.
(옵션 2) 사용자로부터 대화 시작
WhatsApp Business 계정과 WhatsApp 사용자 간에 대화를 시작하는 다른 옵션은 사용자가 대화를 시작하도록 하는 것입니다. 이렇게 하려면 개인 WhatsApp 계정에서 회사 번호(발신자 ID)로 메시지를 보냅니다.
WhatsApp 사용자에게 문자 메시지 보내기
메시지 SDK를 사용하면 Contoso는 WhatsApp 사용자가 시작한 WhatsApp 메시지를 보낼 수 있습니다. 문자 메시지를 보내려면 아래 세부 정보가 필요합니다.
- WhatsApp 채널 ID
- E16 형식의 수신자 전화 번호
- 보낼 메시지 본문/텍스트
Important
WhatsApp에 사용자에게 문자 메시지를 보내려면 WhatsApp 사용자가 먼저 WhatsApp 비즈니스 계정으로 메시지를 보내야 합니다. 자세한 내용은 기업과 WhatsApp 사용자 간에 메시지 보내기 시작을 참조하세요.
이 예제에서는 WhatsApp 사용자에게 "피드백 주셔서 감사합니다.\n 알림 메시징 SDK에서"라는 문자로 회신합니다.
    def send_text_message(self):
        from azure.communication.messages import NotificationMessagesClient
        from azure.communication.messages.models import ( TextNotificationContent)

        # Create NotificationMessagesClient Client
        messaging_client = NotificationMessagesClient.from_connection_string(self.connection_string)
        text_options = TextNotificationContent (
            channel_registration_id=self.channelRegistrationId,
            to= [self.phone_number],
            content="Thanks for your feedback.\n From Notification Messaging SDK",
        )

        # calling send() with whatsapp message details
        message_responses = messaging_client.send(text_options)
        response = message_responses.receipts[0]

        if (response is not None):
            print("WhatsApp Text Message with message id {} was successfully sent to {}."
            .format(response.message_id, response.to))
        else:
            print("Message failed to send")
주 메서드를 업데이트하여 send_text_message() 실행
    #Calling send_text_message()
    messages.send_text_message()
WhatsApp 사용자에게 미디어 메시지 보내기
메시지 SDK를 사용하면 Contoso는 WhatsApp 사용자에게 이미지 WhatsApp 메시지를 보낼 수 있습니다. 이미지가 포함된 메시지를 보내려면 아래 세부 정보가 필요합니다.
- WhatsApp 채널 ID
- E16 형식의 수신자 전화 번호
- 이미지의 MediaUri
Important
WhatsApp에 사용자에게 문자 메시지를 보내려면 WhatsApp 사용자가 먼저 WhatsApp 비즈니스 계정으로 메시지를 보내야 합니다. 자세한 내용은 기업과 WhatsApp 사용자 간에 메시지 보내기 시작을 참조하세요.
미디어 WhatsApp 메시지를 보내는 데 사용되는 media_uri의 예입니다.
input_media_uri: str = "https://aka.ms/acsicon1"
    def send_image_message(self):
        from azure.communication.messages import NotificationMessagesClient
        from azure.communication.messages.models import ( ImageNotificationContent)

        # Create NotificationMessagesClient Client
        messaging_client = NotificationMessagesClient.from_connection_string(self.connection_string)
        input_media_uri: str = "https://aka.ms/acsicon1"
        image_message_options = ImageNotificationContent(
            channel_registration_id=self.channelRegistrationId,
            to=[self.phone_number],
            media_uri=input_media_uri
        )

        # calling send() with whatsapp image message
        message_responses = messaging_client.send(image_message_options)
        response = message_responses.receipts[0]

        if (response is not None):
            print("WhatsApp Image containing Message with message id {} was successfully sent to {}"
            .format(response.message_id, response.to))
        else:
            print("Message failed to send")
주 메서드를 업데이트하여 send_image_message() 실행
    # Calling send_image_message()
    messages.send_image_message()
코드 실행
코드를 실행하려면 messages-quickstart.py 파일이 있는 디렉터리에 있는지 확인합니다.
python messages-quickstart.py
Azure Communication Services - Advanced Messages Quickstart
WhatsApp Templated Message with message id <<GUID>> was successfully sent to <<ToRecipient>>
WhatsApp Text Message with message id <<GUID>> was successfully sent to <<ToRecipient>>
WhatsApp Image containing Message with message id <<GUID>> was successfully sent to <<ToRecipient>>
전체 샘플 코드
import os

class MessagesQuickstart(object):
    print("Azure Communication Services - Advanced Messages SDK Quickstart using connection string.")
    # Advanced Messages SDK implementations goes in this section.

    connection_string = os.getenv("COMMUNICATION_SERVICES_CONNECTION_STRING")
    phone_number = os.getenv("RECIPIENT_PHONE_NUMBER")
    channelRegistrationId = os.getenv("WHATSAPP_CHANNEL_ID")

    def send_template_message(self):
        from azure.communication.messages import NotificationMessagesClient
        from azure.communication.messages.models import ( TemplateNotificationContent , MessageTemplate )

        # client creation
        messaging_client = NotificationMessagesClient.from_connection_string(self.connection_string)
        input_template: MessageTemplate = MessageTemplate(
            name="<<TEMPLATE_NAME>>",
            language="<<LANGUAGE>>")
        template_options = TemplateNotificationContent(
            channel_registration_id=self.channelRegistrationId,
            to=[self.phone_number],
            template=input_template
        )

        # calling send() with WhatsApp template details.
        message_responses = messaging_client.send(template_options)
        response = message_responses.receipts[0]

        if (response is not None):
            print("WhatsApp Templated Message with message id {} was successfully sent to {}"
            .format(response.message_id, response.to))
        else:
            print("Message failed to send")

    def send_text_message(self):
        from azure.communication.messages import NotificationMessagesClient
        from azure.communication.messages.models import ( TextNotificationContent )

        # client creation
        messaging_client = NotificationMessagesClient.from_connection_string(self.connection_string)

        text_options = TextNotificationContent (
            channel_registration_id=self.channelRegistrationId,
            to= [self.phone_number],
            content="Hello World via ACS Advanced Messaging SDK.",
        )

        # calling send() with WhatsApp message details
        message_responses = messaging_client.send(text_options)
        response = message_responses.receipts[0]

        if (response is not None):
            print("WhatsApp Text Message with message id {} was successfully sent to {}"
            .format(response.message_id, response.to))
        else:
            print("Message failed to send")

    def send_image_message(self):
        from azure.communication.messages import NotificationMessagesClient
        from azure.communication.messages.models import ( ImageNotificationContent)

        # Create NotificationMessagesClient Client
        messaging_client = NotificationMessagesClient.from_connection_string(self.connection_string)
        input_media_uri: str = "https://aka.ms/acsicon1"
        image_message_options = ImageNotificationContent(
            channel_registration_id=self.channelRegistrationId,
            to=[self.phone_number],
            media_uri=input_media_uri
        )

        # calling send() with whatsapp image message
        message_responses = messaging_client.send(image_message_options)
        response = message_responses.receipts[0]

        if (response is not None):
            print("WhatsApp Image containing Message with message id {} was successfully sent to {}"
            .format(response.message_id, response.to))
        else:
            print("Message failed to send")

if __name__ == '__main__':
    messages = MessagesQuickstart()
    messages.send_template_message()
    messages.send_text_message()
    messages.send_image_message()
기타 샘플
GitHub에서 Python 메시지 SDK에 대한 다른 샘플 코드를 검토하고 다운로드할 수 있습니다.
다음 단계
이 빠른 시작에서는 WhatsApp SDK용 고급 메시징을 사용해 보았습니다. 다음으로, 다음 문서를 참조할 수도 있습니다.