Microsoft Entra ID 기반 사용자는 Microsoft Entra 개체 ID로 식별됩니다.
관리자 권한이 있는 사용자는 confidential ledger의 사용자를 관리할 수 있습니다. 사용 가능한 역할은 Reader(읽기 전용), Contributor(읽기 및 쓰기), 관리자(읽기, 쓰기 및 사용자 관리)입니다.
Azure에 로그인
Azure CLI az login 명령 또는 Azure PowerShell Connect-AzAccount cmdlet을 사용하여 Azure에 로그인합니다.
az login
CLI 또는 PowerShell이 기본 브라우저를 열 수 있는 경우 기본 브라우저를 열고 Azure 로그인 페이지를 로드합니다. 그렇지 않으면 https://aka.ms/devicelogin을 방문하여 터미널에 표시된 인증 코드를 입력합니다.
메시지가 표시되면 브라우저에서 계정 자격 증명으로 로그인합니다.
Azure Portal에서 confidential ledger의 이름과 ID 서비스 URI를 가져옵니다. 사용자를 관리하기 위해 클라이언트를 만드는 데 필요합니다. 이미지는 Azure Portal의 적절한 속성을 보여줍니다.

다음 코드 조각에서 contoso 및 https://contoso.confidential-ledger.azure.com의 인스턴스를 Azure Portal의 해당 값으로 바꿉니다.
Python 클라이언트 라이브러리
패키지 설치
pip install azure-identity azure-confidentialledger
confidential ledger 클라이언트 만들기
from azure.identity import DefaultAzureCredential
from azure.confidentialledger import ConfidentialLedgerClient
from azure.confidentialledger.identity_service import ConfidentialLedgerIdentityServiceClient
from azure.confidentialledger import LedgerUserRole

identity_client = ConfidentialLedgerCertificateClient()
network_identity = identity_client.get_ledger_identity(
    ledger_id="contoso"
)

ledger_tls_cert_file_name = "ledger_certificate.pem"
with open(ledger_tls_cert_file_name, "w") as cert_file:
    cert_file.write(network_identity["ledgerTlsCertificate"])

# The DefaultAzureCredential will use the current Azure context to authenticate to Azure
credential = DefaultAzureCredential()

ledger_client = ConfidentialLedgerClient(
    endpoint="https://contoso.confidential-ledger.azure.com",
    credential=credential,
    ledger_certificate_path=ledger_tls_cert_file_name
)

# Add a user with the contributor role
# Other supported roles are Contributor and Administrator
user_id = "Azure AD object id of the user"
user = ledger_client.create_or_update_user(
    user_id, {"assignedRole": "Contributor"}
)

# Get the user and check their properties
user = ledger_client.get_user(user_id)
assert user["userId"] == user_id
assert user["assignedRole"] == "Contributor"

# Delete the user
ledger_client.delete_user(user_id)
Azure에 로그인
Azure CLI az login 명령 또는 Azure PowerShell Connect-AzAccount cmdlet을 사용하여 Azure에 로그인합니다.
az login
CLI 또는 PowerShell이 기본 브라우저를 열 수 있는 경우 기본 브라우저를 열고 Azure 로그인 페이지를 로드합니다. 그렇지 않으면 https://aka.ms/devicelogin을 방문하여 터미널에 표시된 인증 코드를 입력합니다.
메시지가 표시되면 브라우저에서 계정 자격 증명으로 로그인합니다.
Azure Portal에서 confidential ledger의 이름과 ID 서비스 URI를 가져옵니다. 사용자를 관리하기 위해 클라이언트를 만드는 데 필요합니다. 이미지는 Azure Portal의 적절한 속성을 보여줍니다.
다음 코드 조각에서 contoso 및 https://contoso.confidential-ledger.azure.com의 인스턴스를 Azure Portal의 해당 값으로 바꿉니다.
.NET 클라이언트 라이브러리
패키지 설치
dotnet add package Azure.Security.ConfidentialLedger
dotnet add package Azure.Identity
dotnet add Azure.Security
클라이언트 만들기 및 사용자 관리
using Azure.Core;
using Azure.Identity;
using Azure.Security.ConfidentialLedger;

internal class ACLUserManagement
{
    static void Main(string[] args)
    {
      // Create a ConfidentialLedgerClient instance
      // The DefaultAzureCredential will use the current Azure context to authenticate to Azure
      var ledgerClient = new ConfidentialLedgerClient(new Uri("https://contoso.confidential-ledger.azure.com"), new DefaultAzureCredential());

      string userId = "Azure AD object id of the user";

      // Add the user with the Reader role
      // Other supported roles are Contributor and Administrator
      ledgerClient.CreateOrUpdateUser(
         userId,
         RequestContent.Create(new { assignedRole = "Reader" }));

      // Get the user and print their properties
      Azure.Response response = ledgerClient.GetUser(userId);
      var aclUser = System.Text.Json.JsonDocument.Parse(response.Content.ToString());

      Console.WriteLine($"Assigned Role is = {aclUser.RootElement.GetProperty("assignedRole").ToString()}");
      Console.WriteLine($"User id is = {aclUser.RootElement.GetProperty("userId").ToString()}");

      // Delete the user
      ledgerClient.DeleteUser(userId);
    }
}
Azure에 로그인
Azure CLI az login 명령 또는 Azure PowerShell Connect-AzAccount cmdlet을 사용하여 Azure에 로그인합니다.
az login
CLI 또는 PowerShell이 기본 브라우저를 열 수 있는 경우 기본 브라우저를 열고 Azure 로그인 페이지를 로드합니다. 그렇지 않으면 https://aka.ms/devicelogin을 방문하여 터미널에 표시된 인증 코드를 입력합니다.
메시지가 표시되면 브라우저에서 계정 자격 증명으로 로그인합니다.
Azure Portal에서 confidential ledger의 이름과 ID 서비스 URI를 가져옵니다. 사용자를 관리하기 위해 클라이언트를 만드는 데 필요합니다. 이미지는 Azure Portal의 적절한 속성을 보여줍니다.
다음 코드 조각에서 contoso 및 https://contoso.confidential-ledger.azure.com의 인스턴스를 Azure Portal의 해당 값으로 바꿉니다.
Java 클라이언트 라이브러리
패키지 설치
<!-- https://mvnrepository.com/artifact/com.azure/azure-security-confidentialledger -->
<dependency>
	<groupId>com.azure</groupId>
	<artifactId>azure-security-confidentialledger</artifactId>
	<version>1.0.6</version>
</dependency>
<!-- https://mvnrepository.com/artifact/com.azure/azure-identity -->
<dependency>
	<groupId>com.azure</groupId>
	<artifactId>azure-identity</artifactId>
	<version>1.8.0</version>
</dependency>
<!-- https://mvnrepository.com/artifact/com.azure/azure-core -->
<dependency>
	<groupId>com.azure</groupId>
	<artifactId>azure-core</artifactId>
	<version>1.36.0</version>
</dependency>
클라이언트 만들기 및 사용자 관리
   import java.io.IOException;
import com.azure.core.http.HttpClient;
import java.io.ByteArrayInputStream;
import java.nio.charset.StandardCharsets;

import com.azure.security.confidentialledger.*;
import com.azure.core.http.rest.RequestOptions;
import com.azure.core.http.netty.NettyAsyncHttpClientBuilder;
import com.azure.core.http.rest.Response;
import com.azure.core.util.BinaryData;
import com.azure.identity.DefaultAzureCredentialBuilder;
import com.fasterxml.jackson.databind.JsonNode;
import com.fasterxml.jackson.databind.ObjectMapper;
import com.azure.security.confidentialledger.certificate.ConfidentialLedgerCertificateClient;
import com.azure.security.confidentialledger.certificate.ConfidentialLedgerCertificateClientBuilder;

import io.netty.handler.ssl.SslContext;
import io.netty.handler.ssl.SslContextBuilder;

public class CreateOrUpdateUserSample {
	public static void main(String[] args) {
		try {
         	// Download the service identity certificate of the ledger from the well-known identity service endpoint.
         	// Do not change the identity endpoint.
			ConfidentialLedgerCertificateClientBuilder confidentialLedgerCertificateClientbuilder = new ConfidentialLedgerCertificateClientBuilder()
					.certificateEndpoint("https://identity.confidential-ledger.core.azure.com")
					.credential(new DefaultAzureCredentialBuilder().build()).httpClient(HttpClient.createDefault());

			ConfidentialLedgerCertificateClient confidentialLedgerCertificateClient = confidentialLedgerCertificateClientbuilder
					.buildClient();

			String ledgerId = "contoso";
			Response<BinaryData> ledgerCertificateWithResponse = confidentialLedgerCertificateClient
					.getLedgerIdentityWithResponse(ledgerId, null);
			BinaryData certificateResponse = ledgerCertificateWithResponse.getValue();
			ObjectMapper mapper = new ObjectMapper();
			JsonNode jsonNode = mapper.readTree(certificateResponse.toBytes());
			String ledgerTlsCertificate = jsonNode.get("ledgerTlsCertificate").asText();

			SslContext sslContext = SslContextBuilder.forClient()
					.trustManager(new ByteArrayInputStream(ledgerTlsCertificate.getBytes(StandardCharsets.UTF_8)))
					.build();
			reactor.netty.http.client.HttpClient reactorClient = reactor.netty.http.client.HttpClient.create()
					.secure(sslContextSpec -> sslContextSpec.sslContext(sslContext));
			HttpClient httpClient = new NettyAsyncHttpClientBuilder(reactorClient).wiretap(true).build();

         	// The DefaultAzureCredentialBuilder will use the current Azure context to authenticate to Azure
			ConfidentialLedgerClient confidentialLedgerClient = new ConfidentialLedgerClientBuilder()
					.credential(new DefaultAzureCredentialBuilder().build()).httpClient(httpClient)
					.ledgerEndpoint("https://contoso.confidential-ledger.azure.com").buildClient();

			// Add a user
			// Other supported roles are Contributor and Administrator
			BinaryData userDetails = BinaryData.fromString("{\"assignedRole\":\"Reader\"}");
			RequestOptions requestOptions = new RequestOptions();
			String userId = "Azure AD object id of the user";
			Response<BinaryData> response = confidentialLedgerClient.createOrUpdateUserWithResponse(userId,
					userDetails, requestOptions);

			BinaryData parsedResponse = response.getValue();

			ObjectMapper objectMapper = new ObjectMapper();
			JsonNode responseBodyJson = null;

			try {
				responseBodyJson = objectMapper.readTree(parsedResponse.toBytes());
			} catch (IOException e) {
				e.printStackTrace();
			}

			System.out.println("Assigned role for user is " + responseBodyJson.get("assignedRole"));

			// Get the user and print the details
			response = confidentialLedgerClient.getUserWithResponse(userId, requestOptions);

			parsedResponse = response.getValue();

			try {
				responseBodyJson = objectMapper.readTree(parsedResponse.toBytes());
			} catch (IOException e) {
				e.printStackTrace();
			}

			System.out.println("Assigned role for user is " + responseBodyJson.get("assignedRole"));

			// Delete the user
			confidentialLedgerClient.deleteUserWithResponse(userId, requestOptions);
		} catch (Exception ex) {
			System.out.println("Caught exception" + ex);
		}
	}
}
Azure에 로그인
Azure CLI az login 명령 또는 Azure PowerShell Connect-AzAccount cmdlet을 사용하여 Azure에 로그인합니다.
az login
CLI 또는 PowerShell이 기본 브라우저를 열 수 있는 경우 기본 브라우저를 열고 Azure 로그인 페이지를 로드합니다. 그렇지 않으면 https://aka.ms/devicelogin을 방문하여 터미널에 표시된 인증 코드를 입력합니다.
메시지가 표시되면 브라우저에서 계정 자격 증명으로 로그인합니다.
Azure Portal에서 confidential ledger의 이름과 ID 서비스 URI를 가져옵니다. 사용자를 관리하기 위해 클라이언트를 만드는 데 필요합니다. 이미지는 Azure Portal의 적절한 속성을 보여줍니다.
다음 코드 조각에서 contoso 및 https://contoso.confidential-ledger.azure.com의 인스턴스를 Azure Portal의 해당 값으로 바꿉니다.
TypeScript 클라이언트 라이브러리
패키지 설치
 "dependencies": {
    "@azure-rest/confidential-ledger": "^1.0.0",
    "@azure/identity": "^3.1.3",
    "typescript": "^4.9.5"
  }
클라이언트 만들기 및 사용자 관리
import ConfidentialLedger, { getLedgerIdentity } from "@azure-rest/confidential-ledger";
import { DefaultAzureCredential } from "@azure/identity";

export async function main() {
  // Get the signing certificate from the confidential ledger Identity Service
  const ledgerIdentity = await getLedgerIdentity("contoso");

  // Create the confidential ledger Client
  const confidentialLedger = ConfidentialLedger(
    "https://contoso.confidential-ledger.azure.com",
    ledgerIdentity.ledgerIdentityCertificate,
    new DefaultAzureCredential()
  );

  // Azure AD object id of the user
  const userId = "Azure AD Object id"

  // Other supported roles are Reader and Contributor
  const createUserParams: CreateOrUpdateUserParameters = {
    contentType: "application/merge-patch+json",
    body: {
        assignedRole: "Contributor",
        userId: `${userId}`
      }
  }

  // Add the user
  var response = await confidentialLedger.path("/app/users/{userId}", userId).patch(createUserParams)

  // Check for a non-success response
  if (response.status !== "200") {
    throw response.body.error;
  }

  // Print the response
  console.log(response.body);

  // Get the user
  response = await confidentialLedger.path("/app/users/{userId}", userId).get()

  // Check for a non-success response
  if (response.status !== "200") {
    throw response.body.error;
  }

  // Print the response
  console.log(response.body);

  // Set the user role to Reader
  const updateUserParams: CreateOrUpdateUserParameters = {
    contentType: "application/merge-patch+json",
    body: {
        assignedRole: "Reader",
        userId: `${userId}`
      }
  }

  // Update the user
  response = await confidentialLedger.path("/app/users/{userId}", userId).patch(updateUserParams)

  // Check for a non-success response
  if (response.status !== "200") {
    throw response.body.error;
  }

  // Print the response
  console.log(response.body);

  // Delete the user
  await confidentialLedger.path("/app/users/{userId}", userId).delete()

  // Get the user to make sure it is deleted
  response = await confidentialLedger.path("/app/users/{userId}", userId).get()

  // Check for a non-success response
  if (response.status !== "200") {
    throw response.body.error;
  }
}

main().catch((err) => {
  console.error(err);
});
Azure Portal
Azure Portal로 이동하여 Manage users 블레이드에 액세스합니다. 이 블레이드에서 사용자를 추가, 업데이트 및 삭제할 수 있습니다.
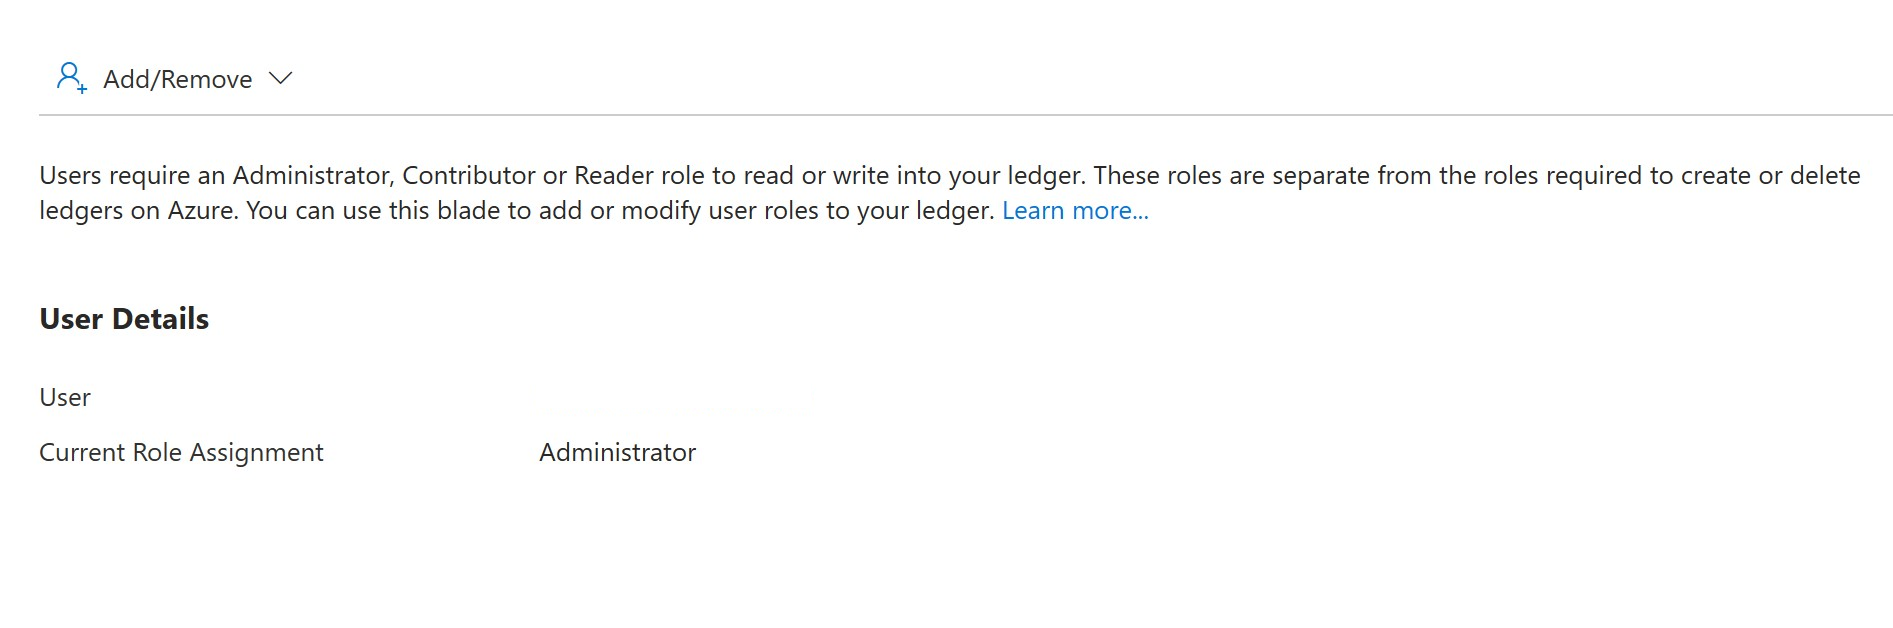
사용자를 추가하려면 Add/Remove 단추를 클릭하고 사용자를 선택하고 사용자의 역할을 선택하고 변경 내용을 Apply합니다. 사용자가 선택한 역할을 가진 사용자 목록에 추가됩니다.
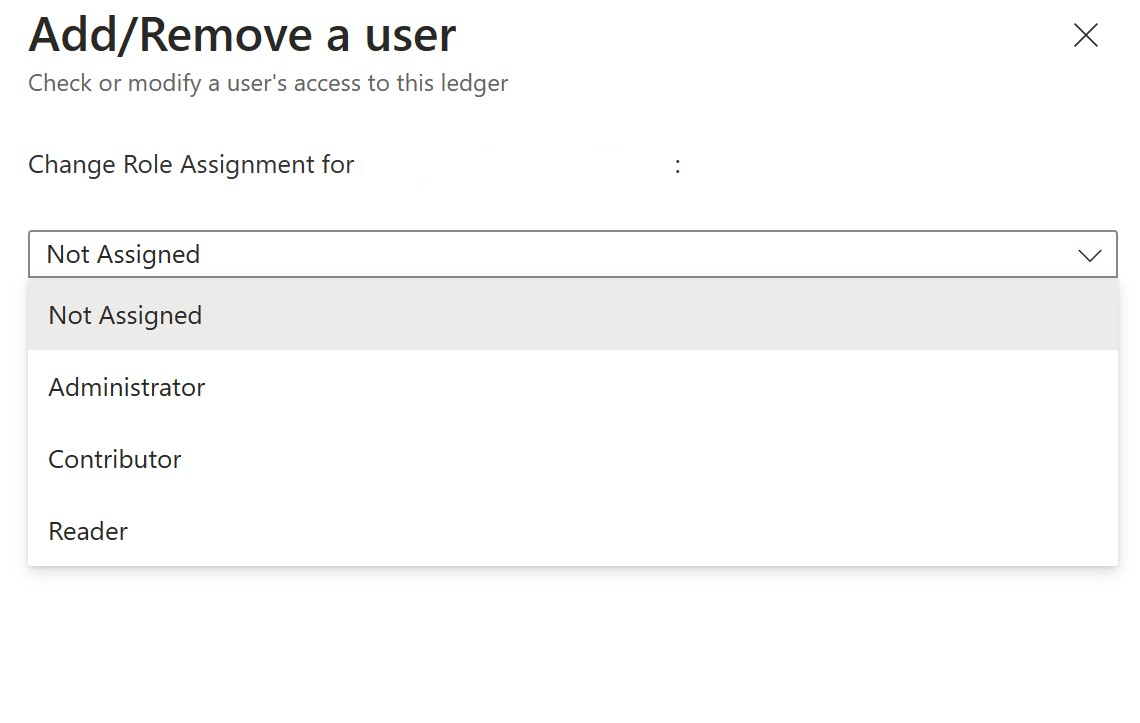
원장에서 사용자를 제거하려면 Not Assigned 역할을 선택하고 Apply 단추를 클릭합니다. 사용자는 사용자 목록에서 제거됩니다.