지속적인 통합 및 배달을 위한 자동화된 게시(CI/CD)
적용 대상: Azure Data Factory
  Azure Synapse Analytics
팁
기업용 올인원 분석 솔루션인 Microsoft Fabric의 Data Factory를 사용해 보세요. Microsoft Fabric은 데이터 이동부터 데이터 과학, 실시간 분석, 비즈니스 인텔리전스 및 보고에 이르기까지 모든 것을 다룹니다. 무료로 새 평가판을 시작하는 방법을 알아봅니다!
참고 항목
Synapse Analytics는 CI/CD도 지원합니다. 자세한 내용은 Synapse Analytics CI/CD 설명서를 참조하세요.
개요
지속적인 통합은 코드 베이스에 자동으로 이루어진 변경 내용을 각각 테스트하는 방법입니다. 지속적인 업데이트는 빠르면 빠를수록 연속 통합 중에 발생하는 테스트를 수행하고, 변경 내용을 준비 또는 프로덕션 시스템에 푸시합니다.
Azure Data Factory에서 CI/CD는 개발, 테스트 및 프로덕션과 같은 한 환경에서 다른 환경으로 Data Factory 파이프라인을 이동하는 것을 의미합니다. Data Factory는 Azure Resource Manager 템플릿(ARM 템플릿)을 사용하여 다양한 Data Factory 엔터티(예: 파이프라인, 데이터 세트, 데이터 흐름)의 구성을 저장합니다.
Data Factory를 다른 환경으로 승격시키는 두 가지 제안된 방법이 있습니다.
- Data Factory와 Azure Pipelines의 통합을 사용한 자동화된 배포입니다.
- Azure Resource Manager와 Data Factory 사용자 환경 통합을 사용하여 ARM 템플릿을 수동으로 업로드합니다.
자세한 내용은 Azure Data Factory의 연속 통합 및 지속적인 업데이트를 참조하세요.
이 문서에서는 CI/CD(연속 통합 및 지속적인 업데이트)에 대한 지속적인 배포 개선 사항 및 자동화된 게시 기능을 중점적으로 다룹니다.
지속적인 배포 개선 사항
자동화된 게시 기능은 Data Factory 사용자 환경에서 모두 유효성 검사 및 ARM 템플릿 내보내기 기능을 사용하며 공개적으로 사용 가능한 npm 패키지 @microsoft/azure-data-factory-utilities를 통해 논리를 사용할 수 있도록 설정합니다. 따라서 Data Factory UI로 이동하여 단추를 수동으로 선택하는 대신 프로그래밍 방식으로 이러한 작업을 트리거할 수 있습니다. 이 기능은 CI/CD 파이프라인에 더욱 신뢰할 수 있는 연속 통합 환경을 제공합니다.
참고 항목
이전 버전과의 패키지 비호환성으로 인해 발생할 수 있는 오류를 방지하려면 노드 버전 18.x 및 해당 호환 버전을 사용해야 합니다.
현재 CI/CD 흐름
- 각 사용자는 비공개 분기를 변경합니다.
- Master로 푸시하기는 허용되지 않습니다. 사용자가 변경하려면 끌어오기 요청을 만들어야 합니다.
- 사용자는 Data Factory UI를 로드하고 게시를 선택하여 Data Factory에 변경 사항을 배포하고 게시 분기에 ARM 템플릿을 생성해야 합니다.
- DevOps 릴리스 파이프라인은 새 변경 사항이 게시 분기로 푸시될 때마다 새 릴리스를 만들고 ARM 템플릿을 배포하도록 구성됩니다.
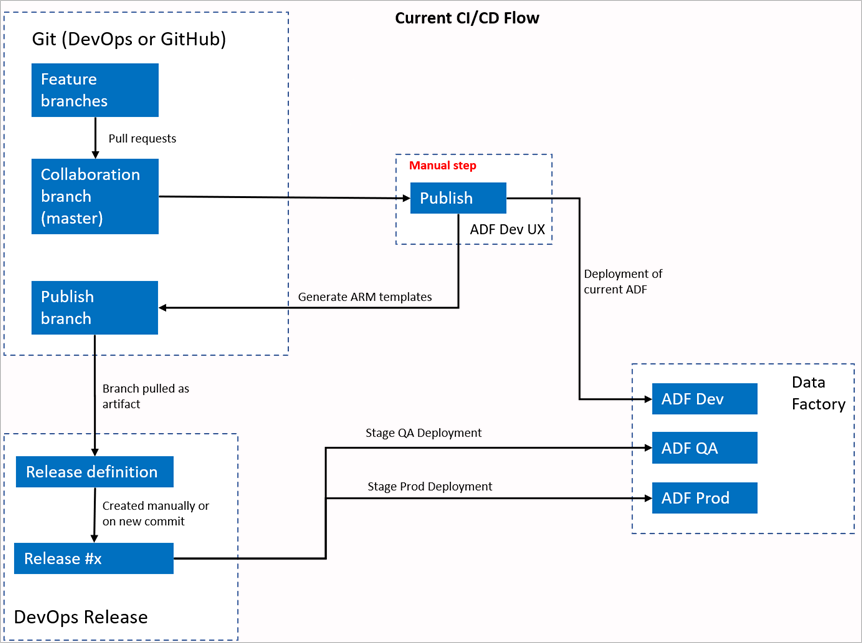
수동 단계
현재 CI/CD 흐름에서 사용자 환경은 ARM 템플릿을 만드는 중개자입니다. 따라서 사용자는 Data Factory UI로 이동하고 수동으로 게시를 선택하여 ARM 템플릿 생성을 시작하고 게시 분기에 드롭해야 합니다.
새 CI/CD 흐름
- 각 사용자는 비공개 분기를 변경합니다.
- Master로 푸시하기는 허용되지 않습니다. 사용자가 변경하려면 끌어오기 요청을 만들어야 합니다.
- Azure DevOps 파이프라인 빌드는 master에 대한 새 커밋이 만들어질 때마다 트리거됩니다. 유효성 검사가 성공하면 리소스의 유효성을 검사하고 ARM 템플릿을 아티팩트로 생성합니다.
- DevOps 릴리스 파이프라인은 새 빌드가 사용 가능할 때마다 새 릴리스를 만들고 ARM 템플릿을 배포하도록 구성됩니다.

변경 내용
- 이제 DevOps 빌드 파이프라인을 사용하는 빌드 프로세스가 있습니다.
- 빌드 파이프라인은 모든 리소스의 유효성을 검사하고 ARM 템플릿을 생성하는 ADFUtilities NPM 패키지를 사용합니다. 이러한 템플릿은 단일이며 연결될 수 있습니다.
- 빌드 파이프라인은 Data Factory UI(게시 단추)를 대신하여 Data Factory 리소스의 유효성을 검사하고 ARM 템플릿을 생성합니다.
- 이제 DevOps 릴리스 정의에서 Git 아티팩트 대신 이 새 빌드 파이프라인을 사용합니다.
참고 항목
adf_publish 분기인 기존 메커니즘을 계속 사용할 수도 있고, 새 흐름을 사용할 수도 있습니다. 둘 다 지원됩니다.
패키지 개요
패키지에서 현재 사용할 수 있는 명령은 다음 두 가지입니다.
- ARM 템플릿 내보내기
- 유효성 검사
ARM 템플릿 내보내기
지정된 폴더의 리소스를 사용하여 ARM 템플릿을 내보내려면 npm run build export <rootFolder> <factoryId> [outputFolder]를 실행합니다. 이 명령은 ARM 템플릿을 생성하기 전에 유효성 검사도 실행합니다. testResourceGroup이라는 리소스 그룹을 사용하는 예제는 다음과 같습니다.
npm run build export C:\DataFactories\DevDataFactory /subscriptions/xxxxxxxx-xxxx-xxxx-xxxx-xxxxxxxxxxxx/resourceGroups/testResourceGroup/providers/Microsoft.DataFactory/factories/DevDataFactory ArmTemplateOutput
RootFolder은 Data Factory 리소스가 있는 위치를 나타내는 필수 필드입니다.FactoryId은 포맷/subscriptions/<subId>/resourceGroups/<rgName>/providers/Microsoft.DataFactory/factories/<dfName>에 있는 Data Factory 리소스 ID를 나타내는 필수 필드입니다.OutputFolder은 생성된 ARM 템플릿을 저장할 상대 경로를 지정하는 선택적 매개 변수입니다.
업데이트된 트리거만 중지/시작하는 기능이 이제 일반적으로 사용 가능하며 위에 표시된 명령에 병합되었습니다.
참고 항목
생성된 ARM 템플릿은 팩터리의 라이브 버전에 게시되지 않습니다. 배포는 CI/CD 파이프라인을 사용하여 수행해야 합니다.
유효성 검사
npm run build validate <rootFolder> <factoryId>을 실행하여 지정된 폴더의 모든 리소스에 대한 유효성을 검사합니다. 예를 들면 다음과 같습니다.
npm run build validate C:\DataFactories\DevDataFactory /subscriptions/xxxxxxxx-xxxx-xxxx-xxxx-xxxxxxxxxxxx/resourceGroups/testResourceGroup/providers/Microsoft.DataFactory/factories/DevDataFactory
RootFolder은 Data Factory 리소스가 있는 위치를 나타내는 필수 필드입니다.FactoryId은 포맷/subscriptions/<subId>/resourceGroups/<rgName>/providers/Microsoft.DataFactory/factories/<dfName>에 있는 Data Factory 리소스 ID를 나타내는 필수 필드입니다.
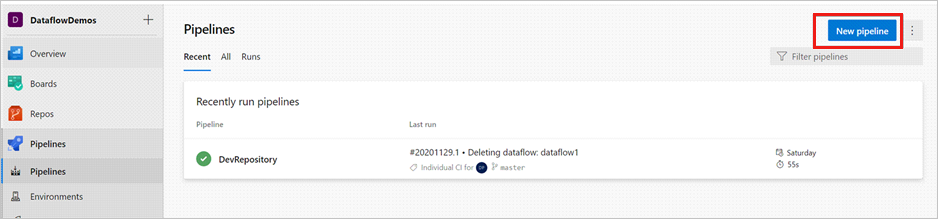
Azure 파이프라인 만들기
npm 패키지는 다양한 방식으로 사용될 수 있지만 Azure 파이프라인을 통해 주요 이점 중 하나가 사용되고 있습니다. 협업 분기에 대한 각 병합에서는 먼저 모든 코드의 유효성을 검사한 다음 릴리스 파이프라인에서 사용될 수 있는 빌드 아티팩트로 ARM 템플릿을 내보내는 파이프라인을 트리거할 수 있습니다. 현재 CI/CD 프로세스와의 차이는 기존 분기adf_publish 대신 이 아티팩트에서 릴리스 파이프라인을 가리킨다는 것입니다.
시작하려면 다음 단계를 수행하세요.
Azure DevOps 프로젝트를 열고 파이프라인으로 이동합니다. 새 파이프라인을 선택합니다.
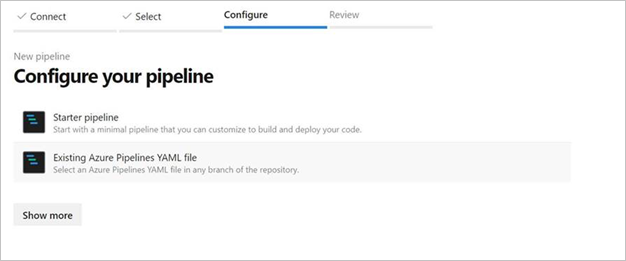
파이프라인 YAML 스크립트를 저장하려는 리포지토리를 선택합니다. Data Factory 리소스의 동일한 리포지토리에 있는 빌드 폴더에 저장하는 것이 좋습니다. 다음 예제와 같이 패키지 이름을 포함하는 package.json 파일이 리포지토리에 있는지 확인합니다.
{
    "scripts":{
        "build":"node node_modules/@microsoft/azure-data-factory-utilities/lib/index"
    },
    "dependencies":{
        "@microsoft/azure-data-factory-utilities":"^1.0.0"
    }
}
시작 파이프라인을 선택합니다. 다음 예제와 같이 YAML 파일을 업로드하거나 병합한 경우에는 해당 파일을 직접 가리키고 편집할 수도 있습니다.
# Sample YAML file to validate and export an ARM template into a build artifact
# Requires a package.json file located in the target repository

trigger:
- main #collaboration branch

pool:
  vmImage: 'ubuntu-latest'

steps:

# Installs Node and the npm packages saved in your package.json file in the build

- task: UseNode@1
  inputs:
    version: '18.x'
  displayName: 'Install Node.js'

- task: Npm@1
  inputs:
    command: 'install'
    workingDir: '$(Build.Repository.LocalPath)/<folder-of-the-package.json-file>' #replace with the package.json folder
    verbose: true
  displayName: 'Install npm package'

# Validates all of the Data Factory resources in the repository. You'll get the same validation errors as when "Validate All" is selected.
# Enter the appropriate subscription and name for the source factory. Either of the "Validate" or "Validate and Generate ARM temmplate" options are required to perform validation. Running both is unnecessary.

- task: Npm@1
  inputs:
    command: 'custom'
    workingDir: '$(Build.Repository.LocalPath)/<folder-of-the-package.json-file>' #replace with the package.json folder
    customCommand: 'run build validate $(Build.Repository.LocalPath)/<Root-folder-from-Git-configuration-settings-in-ADF> /subscriptions/xxxxxxxx-xxxx-xxxx-xxxx-xxxxxxxxxxxx/resourceGroups/<Your-ResourceGroup-Name>/providers/Microsoft.DataFactory/factories/<Your-Factory-Name>'
  displayName: 'Validate'

# Validate and then generate the ARM template into the destination folder, which is the same as selecting "Publish" from the UX.
# The ARM template generated isn't published to the live version of the factory. Deployment should be done by using a CI/CD pipeline.

- task: Npm@1
  inputs:
    command: 'custom'
    workingDir: '$(Build.Repository.LocalPath)/<folder-of-the-package.json-file>' #replace with the package.json folder
    customCommand: 'run build export $(Build.Repository.LocalPath)/<Root-folder-from-Git-configuration-settings-in-ADF> /subscriptions/xxxxxxxx-xxxx-xxxx-xxxx-xxxxxxxxxxxx/resourceGroups/<Your-ResourceGroup-Name>/providers/Microsoft.DataFactory/factories/<Your-Factory-Name> "ArmTemplate"'
#For using preview that allows you to only stop/ start triggers that are modified, please comment out the above line and uncomment the below line. Make sure the package.json contains the build-preview command.
 #customCommand: 'run build-preview export $(Build.Repository.LocalPath) /subscriptions/222f1459-6ebd-4896-82ab-652d5f6883cf/resourceGroups/GartnerMQ2021/providers/Microsoft.DataFactory/factories/Dev-GartnerMQ2021-DataFactory "ArmTemplate"'
  displayName: 'Validate and Generate ARM template'

# Publish the artifact to be used as a source for a release pipeline.

- task: PublishPipelineArtifact@1
  inputs:
    targetPath: '$(Build.Repository.LocalPath)/<folder-of-the-package.json-file>/ArmTemplate' #replace with the package.json folder
    artifact: 'ArmTemplates'
    publishLocation: 'pipeline'
YAML 코드를 입력합니다. YAML 파일을 시작점으로 사용하는 것이 좋습니다.
저장 및 실행합니다. YAML을 사용하는 경우 기본 분기가 업데이트될 때마다 트리거됩니다.
참고 항목
생성된 아티팩트에는 트리거에 대한 사전 및 사후 배포 스크립트가 이미 포함되어 있으므로 수동으로 추가할 필요가 없습니다. 그러나 배포할 때 제공된 스크립트를 실행하려면 트리거 중지 및 시작에 대한 설명서를 참조해야 합니다.
관련 콘텐츠
Azure Data Factory의 지속적인 통합 및 전달에서 Data Factory의 지속적인 통합 및 전달에 대해 자세히 알아봅니다.