적용 대상: Azure Data Factory
  Azure Synapse Analytics
팁
기업용 올인원 분석 솔루션인 Microsoft Fabric의 Data Factory를 사용해 보세요. Microsoft Fabric은 데이터 이동부터 데이터 과학, 실시간 분석, 비즈니스 인텔리전스 및 보고에 이르기까지 모든 것을 다룹니다. 무료로 새 평가판을 시작하는 방법을 알아봅니다!
이 빠른 시작에서는 .NET SDK를 사용하여 Azure Data Factory를 만드는 방법을 설명합니다. 이 데이터 팩터리에서 만든 파이프라인은 Azure Blob Storage의 한 폴더에서 다른 폴더로 데이터를 복사합니다. Azure Data Factory를 사용하여 데이터를 변환하는 방법에 대한 자습서는 자습서: Apache Spark를 사용하여 데이터 변환을 참조하세요.
필수 조건
Azure 구독
Azure 구독이 없는 경우 시작하기 전에 체험 계정을 만듭니다.
Azure 역할
데이터 팩터리 인스턴스를 만들려면 Azure에 로그인하는 데 사용할 사용자 계정이 참여자 또는 소유자 역할의 구성원이거나, Azure 구독의 관리자여야 합니다. 구독에 있는 권한을 보려면 Azure portal로 이동하고, 오른쪽 위 모서리에 있는 사용자 이름을 선택하고, 추가 옵션에 대한 "..." 아이콘을 선택한 다음, 내 권한을 선택합니다. 여러 구독에 액세스할 수 있는 경우 적절한 구독을 선택합니다.
데이터 세트, 연결된 서비스, 파이프라인, 트리거 및 통합 런타임을 포함하여 Data Factory에 대한 자식 리소스를 만들고 관리하려면 다음 요구 사항을 적용해야 합니다.
- Azure Portal에서 자식 리소스를 만들고 관리하려면 리소스 그룹 수준 이상의 Data Factory 기여자 역할에 속해야 합니다.
- PowerShell 또는 SDK를 사용하여 자식 리소스를 만들고 관리하려면 리소스 수준 이상의 기여자 역할만으로도 충분합니다.
사용자를 역할에 추가하는 방법에 대한 지침 샘플은 역할 추가 문서를 참조하세요.
자세한 내용은 다음 문서를 참조하세요.
Azure Storage 계정
이 빠른 시작에서는 범용 Azure Storage 계정(특히 Blob 스토리지)을 원본 및 대상 데이터 저장소로 사용합니다. 범용 Azure Storage 계정이 없는 경우 스토리지 계정 만들기를 참조하여 새로 만듭니다.
스토리지 계정 이름 가져오기
이 빠른 시작에서는 Azure Storage 계정의 이름이 필요합니다. 다음 프로시저에서는 스토리지 계정 이름을 가져오는 단계를 제공합니다.
- 웹 브라우저에서 Azure Portal로 이동하고 Azure 사용자 이름 및 암호를 사용하여 로그인합니다.
- Azure Portal 메뉴에서 모든 서비스를 선택한 다음, 스토리지>스토리지 계정을 선택합니다. 모든 페이지에서 스토리지 계정을 검색하여 선택할 수도 있습니다.
- 스토리지 계정 페이지에서 스토리지 계정(필요한 경우)을 필터링한 다음, 사용자의 스토리지 계정을 선택합니다.
모든 페이지에서 스토리지 계정을 검색하여 선택할 수도 있습니다.
Blob 컨테이너 만들기
이 섹션에서는 Azure Blob Storage에 adftutorial이라는 Blob 컨테이너를 만듭니다.
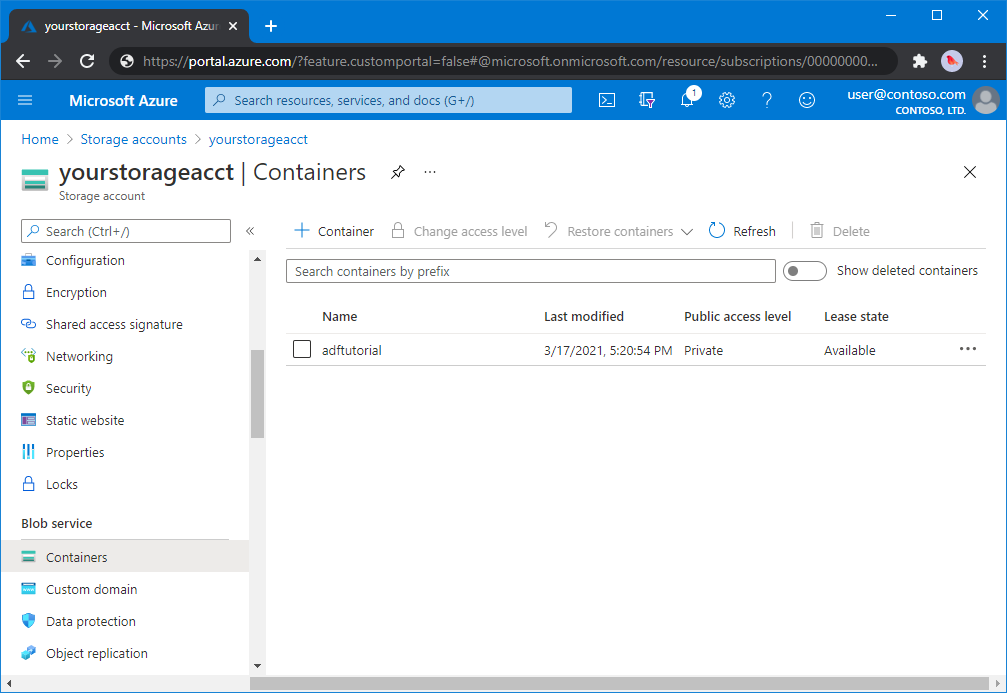
스토리지 계정 페이지에서 개요>컨테이너를 선택합니다.
<계정 이름> - 컨테이너 페이지의 도구 모음에서 컨테이너를 선택합니다.
새 컨테이너 대화 상자에서 adftutorial을 이름으로 입력한 다음 확인을 선택합니다. <계정 이름> - 컨테이너 페이지가 컨테이너 목록에 adftutorial을 포함하도록 업데이트됩니다.
Blob 컨테이너에 대한 입력 폴더 및 파일 추가
이 섹션에서는 방금 만든 컨테이너에 입력이라는 폴더를 만든 다음, 입력 폴더에 샘플 파일을 업로드합니다. 시작하기 전에 메모장과 같은 텍스트 편집기를 열고 다음 내용을 사용하여 emp.txt라는 파일을 만듭니다.
John, Doe
Jane, Doe
C:\ADFv2QuickStartPSH 폴더에 이 파일을 저장합니다. 이 폴더가 아직 없으면 만듭니다. 그런 후 Azure Portal로 돌아가 다음 단계를 따릅니다.
작업을 중단했던 <계정 이름> - 컨테이너 페이지의 업데이트된 컨테이너 목록에서 adftutorial을 선택합니다.
- 창을 닫거나 다른 페이지로 이동한 경우 Azure Portal에 다시 로그인합니다.
- Azure Portal 메뉴에서 모든 서비스를 선택한 다음, 스토리지>스토리지 계정을 선택합니다. 모든 페이지에서 스토리지 계정을 검색하여 선택할 수도 있습니다.
- 스토리지 계정을 선택한 다음, 컨테이너>adftutorial을 선택합니다.
adftutorial 컨테이너 페이지의 도구 모음에서 업로드를 선택합니다.
Blob 업로드 페이지에서 파일 상자를 선택한 다음, emp.txt 파일을 선택합니다.
고급 제목을 펼칩니다. 이제 페이지가 다음과 같이 표시됩니다.
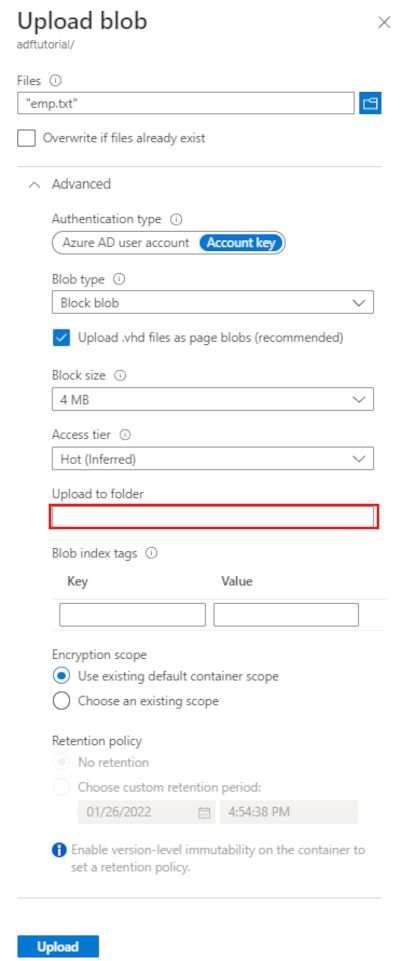
폴더에 업로드 상자에서 입력을 입력합니다.
업로드 버튼을 선택합니다. 목록에서 emp.txt 파일 및 업로드 상태를 참조하세요.
닫기 아이콘(X)을 선택하여 Blob 업로드 페이지를 닫습니다.
adftutorial 컨테이너 페이지를 열린 상태로 둡니다. 이 빠른 시작의 끝부분에서 출력을 확인하는 데 사용합니다.
Visual Studio
이 문서의 연습에서는 Visual Studio 2019를 사용합니다. Visual Studio 2013, 2015 또는 2017에 대한 절차는 약간 다릅니다.
Microsoft Entra ID로 애플리케이션 만들기
방법: 포털을 사용하여 리소스에 액세스할 수 있는 Microsoft Entra 애플리케이션 및 서비스 주체 만들기의 섹션에서 다음 작업을 수행하기 위한 지침을 따릅니다.
-
Microsoft Entra 애플리케이션 만들기에서 이 자습서에서 만드는 .NET 애플리케이션을 나타내는 애플리케이션을 만듭니다. sign-on URL의 경우 (
https://contoso.org/exampleapp)에 보이는 더미 URL을 제공할 수 있습니다. - 로그인을 위한 값 가져오기에서 애플리케이션 ID 및 테넌트 ID를 가져온 후 이 자습서의 뒷부분에서 사용하게 되므로 이러한 값을 적어둡니다.
- 인증서 및 비밀에서 인증 키를 가져오고 이 자습서의 뒷부분에서 사용하게 되므로 이 값을 적어둡니다.
- 역할에 애플리케이션 할당에서 애플리케이션이 구독에 데이터 팩터리를 생성할 수 있도록 구독 수준에서 애플리케이션을 참여자 역할에 할당합니다.
Visual Studio 프로젝트 만들기
다음으로, Visual Studio에서 C# .NET 콘솔 애플리케이션을 만듭니다.
- Visual Studio를 시작합니다.
- 시작 창에서 새 프로젝트 만들기>콘솔 앱(.NET Framework)을 선택합니다. .NET 버전 4.5.2 이상이 필요합니다.
- 프로젝트 이름에 ADFv2QuickStart를 입력합니다.
- 만들기를 선택하여 프로젝트를 만듭니다.
NuGet 패키지 설치
도구>NuGet 패키지 관리자>패키지 관리자 콘솔을 선택합니다.
패키지 관리자 콘솔 페이지에서 다음 명령을 실행하여 패키지를 설치합니다. 자세한 내용은 Azure.ResourceManager.DataFactory NuGet 패키지를 참조하세요.
Install-Package Azure.ResourceManager.DataFactory -IncludePrerelease
Install-Package Azure.Identity
데이터 팩터리 만들기
Program.cs 열고 네임스페이스에 참조를 추가하려면 다음 문을 포함합니다.
using Azure;
using Azure.Core;
using Azure.Core.Expressions.DataFactory;
using Azure.Identity;
using Azure.ResourceManager;
using Azure.ResourceManager.DataFactory;
using Azure.ResourceManager.DataFactory.Models;
using Azure.ResourceManager.Resources;
using System;
using System.Collections.Generic;
변수를 설정하는 Main 메서드에 다음 코드를 추가합니다. 자리 표시자를 고유한 값으로 바꿉니다. Data Factory를 현재 사용할 수 있는 Azure 지역 목록을 보려면 다음 페이지에서 관심 있는 지역을 선택한 다음, Analytics를 펼쳐서 Data Factory: 지역별 사용 가능한 제품을 찾습니다. 데이터 팩터리에서 사용되는 데이터 저장소(Azure Storage, Azure SQL Database 등) 및 컴퓨팅 기능(HDInsight 등)은 다른 지역에 있을 수 있습니다.
// Set variables
string tenantID = "<your tenant ID>";
string applicationId = "<your application ID>";
string authenticationKey = "<your authentication key for the application>";
string subscriptionId = "<your subscription ID where the data factory resides>";
string resourceGroup = "<your resource group where the data factory resides>";
string region = "<the location of your resource group>";
string dataFactoryName =
    "<specify the name of data factory to create. It must be globally unique.>";
string storageAccountName = "<your storage account name to copy data>";
string storageKey = "<your storage account key>";
// specify the container and input folder from which all files
// need to be copied to the output folder.
string inputBlobContainer = "<blob container to copy data from, e.g. containername>";
string inputBlobPath = "<path to existing blob(s) to copy data from, e.g. inputdir/file>";
//specify the contains and output folder where the files are copied
string outputBlobContainer = "<blob container to copy data from, e.g. containername>";
string outputBlobPath = "<the blob path to copy data to, e.g. outputdir/file>";

// name of the Azure Storage linked service, blob dataset, and the pipeline
string storageLinkedServiceName = "AzureStorageLinkedService";
string blobDatasetName = "BlobDataset";
string pipelineName = "Adfv2QuickStartPipeline";
Main 메서드에 데이터 팩터리를 만드는 다음 코드를 추가합니다.
ArmClient armClient = new ArmClient(
    new ClientSecretCredential(tenantID, applicationId, authenticationKey, new TokenCredentialOptions
    {
        AuthorityHost = AzureAuthorityHosts.AzurePublicCloud
    }),
    subscriptionId,
    new ArmClientOptions { Environment = ArmEnvironment.AzurePublicCloud }
);

ResourceIdentifier resourceIdentifier = SubscriptionResource.CreateResourceIdentifier(subscriptionId);
SubscriptionResource subscriptionResource = armClient.GetSubscriptionResource(resourceIdentifier);

Console.WriteLine("Get an existing resource group " + resourceGroupName + "...");
var resourceGroupOperation = subscriptionResource.GetResourceGroups().Get(resourceGroupName);
ResourceGroupResource resourceGroupResource = resourceGroupOperation.Value;

Console.WriteLine("Create a data factory " + dataFactoryName + "...");
DataFactoryData dataFactoryData = new DataFactoryData(AzureLocation.EastUS2);
var dataFactoryOperation = resourceGroupResource.GetDataFactories().CreateOrUpdate(WaitUntil.Completed, dataFactoryName, dataFactoryData);
Console.WriteLine(dataFactoryOperation.WaitForCompletionResponse().Content);

// Get the data factory resource
DataFactoryResource dataFactoryResource = dataFactoryOperation.Value;
연결된 서비스 만들기
Main 메서드에 Azure Storage 연결된 서비스를 만드는 다음 코드를 추가합니다.
데이터 팩터리에서 연결된 서비스를 만들어 데이터 저장소를 연결하고 컴퓨팅 서비스를 데이터 팩터리에 연결합니다. 이 빠른 시작에서는 복사 원본 및 싱크 저장소 모두에 대해 샘플의 “AzureBlobStorageLinkedService”라는 하나의 Azure Blob Storage 연결된 서비스를 만들기만 하면 됩니다.
// Create an Azure Storage linked service
Console.WriteLine("Create a linked service " + storageLinkedServiceName + "...");
AzureBlobStorageLinkedService azureBlobStorage = new AzureBlobStorageLinkedService()
{
    ConnectionString = azureBlobStorageConnectionString
};

DataFactoryLinkedServiceData linkedServiceData = new DataFactoryLinkedServiceData(azureBlobStorage);

var linkedServiceOperation = dataFactoryResource.GetDataFactoryLinkedServices().CreateOrUpdate(WaitUntil.Completed, storageLinkedServiceName, linkedServiceData);
Console.WriteLine(linkedServiceOperation.WaitForCompletionResponse().Content);
데이터 세트 만들기
쉼표로 구분된 텍스트 데이터 세트를 만드는 Main 메서드에 다음 코드를 추가합니다.
원본에서 싱크로 복사할 데이터를 나타내는 데이터 세트를 정의합니다. 이 예에서 이 쉼표로 구분된 텍스트 데이터 세트는 이전 단계에서 만든 Azure Blob Storage 연결된 서비스를 참조합니다. 데이터 세트는 값이 데이터 세트를 사용하는 활동에 설정되어 있는 두 개의 매개 변수를 사용합니다. 매개 변수는 데이터가 상주/저장되는 위치를 가리키는 “container” 및 “folderPath”를 구성하는 데 사용됩니다.
// Create an Azure Blob dataset
DataFactoryLinkedServiceReference linkedServiceReference = new DataFactoryLinkedServiceReference(DataFactoryLinkedServiceReferenceType.LinkedServiceReference, storageLinkedServiceName);
DelimitedTextDataset delimitedTextDataset = new DelimitedTextDataset(linkedServiceReference)
{
    DataLocation = new AzureBlobStorageLocation
    {
        Container = DataFactoryElement<string>.FromExpression("@dataset().container"),
        FileName = DataFactoryElement<string>.FromExpression("@dataset().path")
    },
    Parameters =
    {
        new KeyValuePair<string, EntityParameterSpecification>("container",new EntityParameterSpecification(EntityParameterType.String)),
        new KeyValuePair<string, EntityParameterSpecification>("path",new EntityParameterSpecification(EntityParameterType.String))
    },
    FirstRowAsHeader = false,
    QuoteChar = "\"",
    EscapeChar = "\\",
    ColumnDelimiter = ","
};

DataFactoryDatasetData datasetData = new DataFactoryDatasetData(delimitedTextDataset);

var datasetOperation = dataFactoryResource.GetDataFactoryDatasets().CreateOrUpdate(WaitUntil.Completed, blobDatasetName, datasetData);
Console.WriteLine(datasetOperation.WaitForCompletionResponse().Content);
파이프라인을 만듭니다.
Main 메서드에 복사 작업이 있는 파이프라인을 만드는 다음 코드를 추가합니다.
이 예제에서 이 파이프라인은 하나의 활동을 포함하고 입력 Blob 컨테이너와 경로 및 출력 Blob 컨테이너와 경로의 네 개의 매개 변수를 사용합니다. 이러한 매개 변수의 값은 파이프라인이 트리거/실행될 때 설정됩니다. 복사 활동은 입력 및 출력 시 이전 단계에서 만든 동일한 Blob 데이터 세트를 참조합니다. 데이터 세트가 입력 데이터 세트로 사용되는 경우 입력 컨테이너 및 경로가 지정됩니다. 또한 데이터 세트가 출력 데이터 세트로 사용되는 경우 출력 컨테이너와 경로가 지정됩니다.
// Create a pipeline with a copy activity
Console.WriteLine("Creating pipeline " + pipelineName + "...");
DataFactoryPipelineData pipelineData = new DataFactoryPipelineData()
{
    Parameters =
    {
        new KeyValuePair<string, EntityParameterSpecification>("inputContainer",new EntityParameterSpecification(EntityParameterType.String)),
        new KeyValuePair<string, EntityParameterSpecification>("inputPath",new EntityParameterSpecification(EntityParameterType.String)),
        new KeyValuePair<string, EntityParameterSpecification>("outputContainer",new EntityParameterSpecification(EntityParameterType.String)),
        new KeyValuePair<string, EntityParameterSpecification>("outputPath",new EntityParameterSpecification(EntityParameterType.String))
    },
    Activities =
    {
        new CopyActivity("CopyFromBlobToBlob",new DataFactoryBlobSource(),new DataFactoryBlobSink())
        {
            Inputs =
            {
                new DatasetReference(DatasetReferenceType.DatasetReference,blobDatasetName)
                {
                    Parameters =
                    {
                        new KeyValuePair<string, BinaryData>("container", BinaryData.FromString("\"@pipeline().parameters.inputContainer\"")),
                        new KeyValuePair<string, BinaryData>("path", BinaryData.FromString("\"@pipeline().parameters.inputPath\""))
                    }
                }
            },
            Outputs =
            {
                new DatasetReference(DatasetReferenceType.DatasetReference,blobDatasetName)
                {
                    Parameters =
                    {
                        new KeyValuePair<string, BinaryData>("container", BinaryData.FromString("\"@pipeline().parameters.outputContainer\"")),
                        new KeyValuePair<string, BinaryData>("path", BinaryData.FromString("\"@pipeline().parameters.outputPath\""))
                    }
                }
            }
        }
    }
};

var pipelineOperation = dataFactoryResource.GetDataFactoryPipelines().CreateOrUpdate(WaitUntil.Completed, pipelineName, pipelineData);
Console.WriteLine(pipelineOperation.WaitForCompletionResponse().Content);
파이프라인 실행 만들기
Main 메서드에 파이프라인 실행을 트리거하는 다음 코드를 추가합니다.
이 코드는 파이프라인에 지정된 inputContainer, inputPath, outputContainer 및 outputPath 매개 변수의 값을 원본 및 싱크 Blob 경로의 실제 값으로 설정합니다.
// Create a pipeline run
Console.WriteLine("Creating pipeline run...");
Dictionary<string, BinaryData> parameters = new Dictionary<string, BinaryData>()
{
    { "inputContainer",BinaryData.FromObjectAsJson(inputBlobContainer) },
    { "inputPath",BinaryData.FromObjectAsJson(inputBlobPath) },
    { "outputContainer",BinaryData.FromObjectAsJson(outputBlobContainer) },
    { "outputPath",BinaryData.FromObjectAsJson(outputBlobPath) }
};

var pipelineResource = dataFactoryResource.GetDataFactoryPipeline(pipelineName);
var runResponse = pipelineResource.Value.CreateRun(parameters);
Console.WriteLine("Pipeline run ID: " + runResponse.Value.RunId);
파이프라인 실행 모니터링
Main 메서드에 다음 코드를 추가하여 데이터 복사가 완료될 때까지 지속적으로 상태를 검사합니다.
// Monitor the pipeline run
Console.WriteLine("Checking pipeline run status...");
DataFactoryPipelineRunInfo pipelineRun;
while (true)
{
    pipelineRun = dataFactoryResource.GetPipelineRun(runResponse.Value.RunId.ToString());
    Console.WriteLine("Status: " + pipelineRun.Status);
    if (pipelineRun.Status == "InProgress" || pipelineRun.Status == "Queued")
        System.Threading.Thread.Sleep(15000);
    else
        break;
}
Main 메서드에 복사 작업 실행 세부 정보(예: 읽거나 쓴 데이터의 크기)를 검색하는 다음 코드를 추가합니다.
// Check the copy activity run details
Console.WriteLine("Checking copy activity run details...");

var queryResponse = dataFactoryResource.GetActivityRun(pipelineRun.RunId.ToString(),
    new RunFilterContent(DateTime.UtcNow.AddMinutes(-10), DateTime.UtcNow.AddMinutes(10)));

var enumerator = queryResponse.GetEnumerator();
enumerator.MoveNext();

if (pipelineRun.Status == "Succeeded")
    Console.WriteLine(enumerator.Current.Output);
else
    Console.WriteLine(enumerator.Current.Error);
Console.WriteLine("\nPress any key to exit...");
Console.ReadKey();
코드 실행
애플리케이션을 빌드하고 시작한 다음, 파이프라인 실행을 확인합니다.
콘솔에서 데이터 팩터리, 연결된 서비스, 데이터 세트, 파이프라인 및 파이프라인 실행 만들기에 대한 진행 상황을 출력합니다. 그런 다음 파이프라인 실행 상태를 확인합니다. 데이터 읽기/쓰기 크기를 포함하는 복사 작업 실행 세부 정보가 표시될 때까지 기다립니다. 그런 다음, Azure Storage Explorer와 같은 도구를 사용하여 변수에 지정한 대로 Blob이 "inputBlobPath"에서 "outputBlobPath"로 복사되었는지 확인합니다.
샘플 출력
Create a data factory quickstart-adf...
{
  "name": "quickstart-adf",
  "type": "Microsoft.DataFactory/factories",
  "properties": {
    "provisioningState": "Succeeded",
    "version": "2018-06-01"
  },
  "location": "eastus2"
}
Create a linked service AzureBlobStorage...
{
  "name": "AzureBlobStorage",
  "type": "Microsoft.DataFactory/factories/linkedservices",
  "properties": {
    "type": "AzureBlobStorage",
    "typeProperties": {
      "connectionString": "DefaultEndpointsProtocol=https;AccountName=<storageAccountName>;",
      "encryptedCredential": "<encryptedCredential>"
    }
  }
}
Creating dataset BlobDelimitedDataset...
{
  "name": "BlobDelimitedDataset",
  "type": "Microsoft.DataFactory/factories/datasets",
  "properties": {
    "type": "DelimitedText",
    "linkedServiceName": {
      "type": "LinkedServiceReference",
      "referenceName": "AzureBlobStorage"
    },
    "parameters": {
      "container": {
        "type": "String"
      },
      "path": {
        "type": "String"
      }
    },
    "typeProperties": {
      "location": {
        "container": {
          "type": "Expression",
          "value": "@dataset().container"
        },
        "type": "AzureBlobStorageLocation",
        "fileName": {
          "type": "Expression",
          "value": "@dataset().path"
        }
      },
      "columnDelimiter": ",",
      "quoteChar": "\"",
      "escapeChar": "\\",
      "firstRowAsHeader": false
    }
  }
}
Creating pipeline Adfv2QuickStartPipeline...
{
  "properties": {
    "activities": [
      {
        "inputs": [
          {
            "type": "DatasetReference",
            "referenceName": "BlobDelimitedDataset",
            "parameters": {
              "container": "@pipeline().parameters.inputContainer",
              "path": "@pipeline().parameters.inputPath"
            }
          }
        ],
        "outputs": [
          {
            "type": "DatasetReference",
            "referenceName": "BlobDelimitedDataset",
            "parameters": {
              "container": "@pipeline().parameters.outputContainer",
              "path": "@pipeline().parameters.outputPath"
            }
          }
        ],
        "name": "CopyFromBlobToBlob",
        "type": "Copy",
        "typeProperties": {
          "source": {
            "type": "BlobSource"
          },
          "sink": {
            "type": "BlobSink"
          }
        }
      }
    ],
    "parameters": {
      "inputContainer": {
        "type": "String"
      },
      "inputPath": {
        "type": "String"
      },
      "outputContainer": {
        "type": "String"
      },
      "outputPath": {
        "type": "String"
      }
    }
  }
}
Creating pipeline run...
Pipeline run ID: 3aa26ffc-5bee-4db9-8bac-ccbc2d7b51c1
Checking pipeline run status...
Status: InProgress
Status: Succeeded
Checking copy activity run details...
{
  "dataRead": 1048,
  "dataWritten": 1048,
  "filesRead": 1,
  "filesWritten": 1,
  "sourcePeakConnections": 1,
  "sinkPeakConnections": 1,
  "copyDuration": 8,
  "throughput": 1.048,
  "errors": [],
  "effectiveIntegrationRuntime": "AutoResolveIntegrationRuntime (East US 2)",
  "usedDataIntegrationUnits": 4,
  "billingReference": {
    "activityType": "DataMovement",
    "billableDuration": [
      {
        "meterType": "AzureIR",
        "duration": 0.06666666666666667,
        "unit": "DIUHours"
      }
    ],
    "totalBillableDuration": [
      {
        "meterType": "AzureIR",
        "duration": 0.06666666666666667,
        "unit": "DIUHours"
      }
    ]
  },
  "usedParallelCopies": 1,
  "executionDetails": [
    {
      "source": {
        "type": "AzureBlobStorage"
      },
      "sink": {
        "type": "AzureBlobStorage"
      },
      "status": "Succeeded",
      "start": "2023-12-15T10:25:33.9991558Z",
      "duration": 8,
      "usedDataIntegrationUnits": 4,
      "usedParallelCopies": 1,
      "profile": {
        "queue": {
          "status": "Completed",
          "duration": 5
        },
        "transfer": {
          "status": "Completed",
          "duration": 1,
          "details": {
            "listingSource": {
              "type": "AzureBlobStorage",
              "workingDuration": 0
            },
            "readingFromSource": {
              "type": "AzureBlobStorage",
              "workingDuration": 0
            },
            "writingToSink": {
              "type": "AzureBlobStorage",
              "workingDuration": 0
            }
          }
        }
      },
      "detailedDurations": {
        "queuingDuration": 5,
        "transferDuration": 1
      }
    }
  ],
  "dataConsistencyVerification": {
    "VerificationResult": "NotVerified"
  }
}

Press any key to exit...
출력 확인
파이프라인은 자동으로 adftutorial Blob 컨테이너에서 출력 폴더를 만듭니다. 그런 다음, 입력 폴더에서 출력 폴더로 emp.txt 파일을 복사합니다.
- Azure Portal에서 위의 Blob 컨테이너에 대한 입력 폴더 및 파일 추가 섹션에서 중지했던 adftutorial 컨테이너 페이지에 있는 새로 고침을 선택하여 출력 폴더를 참조하세요.
- 폴더 목록에서 출력을 선택합니다.
- emp.txt가 출력 폴더에 복사되었는지 확인합니다.
리소스 정리
데이터 팩터리를 프로그래밍 방식으로 삭제하려면 프로그램에 다음 코드 줄을 추가합니다.
Console.WriteLine("Deleting the data factory");
dataFactoryResource.Delete(WaitUntil.Completed);
다음 단계
이 샘플의 파이프라인은 Azure Blob Storage의 한 위치에서 다른 위치로 데이터를 복사합니다. 자습서를 통해 더 많은 시나리오에서의 데이터 팩터리 사용에 관해 알아보세요.