이 예제 Notebook에서는 Databricks에서 기계 학습 분류 모델을 학습시키는 방법을 보여 줍니다. Machine Learning Databricks Runtime에는 학습 및 사전 처리 알고리즘에 대한 scikit-learn, 모델 개발 프로세스를 추적하는 MLflow, 하이퍼 매개 변수 튜닝 크기를 조정하는 Optuna를 포함하여 많은 라이브러리가 미리 설치되어 있습니다.
이 Notebook에서는 와인이 "고품질"로 간주되는지 여부를 예측하는 분류 모델을 만듭니다. 데이터 세트는 다양한 와인(예: 알코올 함량, 산도 및 잔류 설탕)의 11가지 기능과 1에서 10 사이의 품질 순위로 구성됩니다.
이 자습서에서는 다음 내용을 다룹니다.
- 1부: MLflow 추적을 사용하여 분류 모델 학습
- 2부: 모델 성능을 개선하기 위한 하이퍼 매개 변수 튜닝
- 3부: Unity 카탈로그에 결과 및 모델 저장
- 4부: 모델 배포
모델 수명 주기 관리 및 모델 유추를 포함하여 Databricks에서 기계 학습을 프로덕션화하는 자세한 내용은 ML 종단 간 예제를 참조하세요.
데이터 세트는 UCI Machine Learning 리포지토리에서 사용할 수 있으며 물리화학 속성 [Cortez et al., 2009]에서 데이터 마이닝에 의해 와인 선호도를 모델링합니다.
요구 사항
- Databricks Runtime 17.3 LTS ML 이상을 실행하는 클러스터입니다. Databricks Runtime 16.4 LTS ML 이하를 실행하는 경우 자습서: Databricks(Hyperopt)에서 첫 번째 기계 학습 모델 빌드를 참조하세요.
설치
이 섹션에서는 다음을 수행합니다.
- Unity 카탈로그를 모델 레지스트리로 사용하도록 MLflow 클라이언트를 구성합니다.
- 모델을 등록할 카탈로그 및 스키마를 설정합니다.
- 데이터를 읽고 Unity 카탈로그의 테이블에 저장합니다.
- 데이터를 전처리합니다.
MLflow 클라이언트 구성
기본적으로 MLflow Python 클라이언트는 Databricks 작업 영역 모델 레지스트리에 모델을 만듭니다. Unity 카탈로그에 모델을 저장하려면 다음 셀과 같이 MLflow 클라이언트를 구성합니다.
import mlflow
mlflow.set_registry_uri("databricks-uc")
다음 셀은 모델을 등록할 카탈로그 및 스키마를 설정합니다. 카탈로그에 대한 권한과 스키마에 대한 USE_SCHEMA, CREATE_TABLE 및 CREATE_MODEL 권한이 있어야 합니다 USE CATALOG . 필요한 경우 다음 셀의 카탈로그 및 스키마 이름을 변경합니다.
자세한 내용은 Unity 카탈로그 설명서를 참조하세요.
# Specify the catalog and schema to use. You must have USE_CATALOG privilege on the catalog and USE_SCHEMA, CREATE_TABLE, and CREATE_MODEL privileges on the schema.
# Change the catalog and schema here if necessary.
CATALOG_NAME = "main"
SCHEMA_NAME = "default"
데이터를 읽고 Unity 카탈로그의 테이블에 저장
데이터 세트는 databricks-datasets에서 사용할 수 있습니다. 다음 셀에서는 사용자가 .csv 파일에서 데이터를 Spark DataFrames로 읽어옵니다. 그런 다음, Unity 카탈로그의 테이블에 DataFrames를 씁니다. 둘 다 데이터를 유지하며 다른 사용자와 공유하는 방법을 제어할 수 있습니다.
white_wine = spark.read.csv("/databricks-datasets/wine-quality/winequality-white.csv", sep=';', header=True)
red_wine = spark.read.csv("/databricks-datasets/wine-quality/winequality-red.csv", sep=';', header=True)

# Remove the spaces from the column names
for c in white_wine.columns:
    white_wine = white_wine.withColumnRenamed(c, c.replace(" ", "_"))
for c in red_wine.columns:
    red_wine = red_wine.withColumnRenamed(c, c.replace(" ", "_"))

# Define table names
red_wine_table = f"{CATALOG_NAME}.{SCHEMA_NAME}.red_wine"
white_wine_table = f"{CATALOG_NAME}.{SCHEMA_NAME}.white_wine"

# Write to tables in Unity Catalog
spark.sql(f"DROP TABLE IF EXISTS {red_wine_table}")
spark.sql(f"DROP TABLE IF EXISTS {white_wine_table}")
white_wine.write.saveAsTable(f"{CATALOG_NAME}.{SCHEMA_NAME}.white_wine")
red_wine.write.saveAsTable(f"{CATALOG_NAME}.{SCHEMA_NAME}.red_wine")
데이터 전처리
# Import required libraries
import numpy as np
import pandas as pd
import sklearn.datasets
import sklearn.metrics
import sklearn.model_selection
import sklearn.ensemble

import matplotlib.pyplot as plt

import optuna
from mlflow.optuna.storage import MlflowStorage
from mlflow.pyspark.optuna.study import MlflowSparkStudy
# Load data from Unity Catalog as Pandas dataframes
white_wine = spark.read.table(f"{CATALOG_NAME}.{SCHEMA_NAME}.white_wine").toPandas()
red_wine = spark.read.table(f"{CATALOG_NAME}.{SCHEMA_NAME}.red_wine").toPandas()

# Add Boolean fields for red and white wine
white_wine['is_red'] = 0.0
red_wine['is_red'] = 1.0
data_df = pd.concat([white_wine, red_wine], axis=0)

# Define classification labels based on the wine quality
data_labels = data_df['quality'].astype('int') >= 7
data_df = data_df.drop(['quality'], axis=1)

# Split 80/20 train-test
X_train, X_test, y_train, y_test = sklearn.model_selection.train_test_split(
  data_df,
  data_labels,
  test_size=0.2,
  random_state=1
)
1부. 분류 모델 학습
# Enable MLflow autologging for scikit-learn
mlflow.sklearn.autolog()
다음으로, 학습된 모델 및 여러 관련 메트릭 및 매개 변수를 자동으로 기록하는 MLflow 실행의 컨텍스트 내에서 분류자를 학습시킵니다.
테스트 데이터 세트에서 모델의 AUC 점수와 같은 추가 메트릭으로 로깅을 보완할 수 있습니다.
with mlflow.start_run(run_name='gradient_boost') as run:
    model = sklearn.ensemble.GradientBoostingClassifier(random_state=0)

    # Models, parameters, and training metrics are tracked automatically
    model.fit(X_train, y_train)

    predicted_probs = model.predict_proba(X_test)
    roc_auc = sklearn.metrics.roc_auc_score(y_test, predicted_probs[:,1])
    roc_curve = sklearn.metrics.RocCurveDisplay.from_estimator(model, X_test, y_test)

    # Save the ROC curve plot to a file
    roc_curve.figure_.savefig("roc_curve.png")

    # The AUC score on test data is not automatically logged, so log it manually
    mlflow.log_metric("test_auc", roc_auc)

    # Log the ROC curve image file as an artifact
    mlflow.log_artifact("roc_curve.png")

    print("Test AUC of: {}".format(roc_auc))
MLflow 실행 보기
기록된 학습 실행을 보려면 Notebook의 오른쪽 위에 있는 실험 을 클릭하여 실험 사이드바를 표시합니다. 필요한 경우 새로 고침 아이콘을 클릭하여 최신 실행을 가져오고 모니터링합니다.
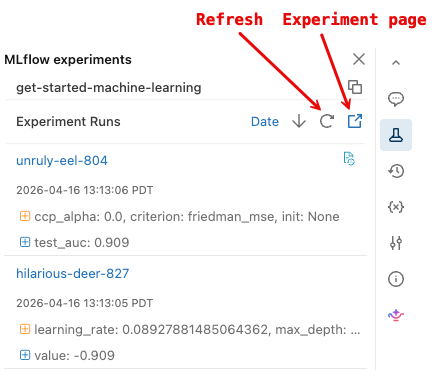
더 자세한 MLflow 실험 페이지를 표시하려면 실험 페이지 아이콘을 클릭합니다. 이 페이지에서는 실행을 비교하고 특정 실행에 대한 세부 정보를 볼 수 있습니다. MLflow를 사용하여 모델 개발 추적을 참조하세요.
모델을 로드하기
MLflow API를 사용하여 특정 실행에 대한 결과에 액세스할 수도 있습니다. 다음 셀의 코드는 지정된 MLflow 실행에서 학습된 모델을 로드하고 이를 사용하여 예측하는 방법을 보여 줍니다. MLflow 실행 페이지에서 특정 모델을 로드하기 위한 코드 조각을 찾을 수도 있습니다.
# After a model has been logged, you can load it in different notebooks or jobs
# mlflow.pyfunc.load_model makes model prediction available under a common API
model_loaded = mlflow.pyfunc.load_model(
  'runs:/{run_id}/model'.format(
    run_id=run.info.run_id
  )
)

predictions_loaded = model_loaded.predict(X_test)
predictions_original = model.predict(X_test)

# The loaded model should match the original
assert(np.array_equal(predictions_loaded, predictions_original))
2부. 하이퍼 매개 변수 조정
이 시점에서 간단한 모델을 학습하고 MLflow 추적 서비스를 사용하여 작업을 구성했습니다. 다음으로 Optuna를 사용하여 보다 정교한 튜닝을 수행할 수 있습니다.
Optuna를 사용한 병렬 학습
Optuna는 여러 컴퓨팅 리소스에서 수평으로 확장할 수 있는 하이퍼 매개 변수 튜닝을 위한 오픈 소스 Python 라이브러리입니다. Databricks에서 Optuna를 사용하는 방법에 대한 자세한 내용은 Optuna를 사용한 하이퍼 매개 변수 튜닝을 참조하세요.
def objective(trial):
  # Enable autologging on each worker
  mlflow.sklearn.autolog()
  with mlflow.start_run(nested=True):
    params = {
      'n_estimators': trial.suggest_int('n_estimators', 20, 1000),
      'learning_rate': trial.suggest_float('learning_rate', 0.05, 1.0, log=True),
      'max_depth': trial.suggest_int('max_depth', 2, 5),
    }
    model_hp = sklearn.ensemble.GradientBoostingClassifier(
      random_state=0,
      **params
    )
    model_hp.fit(X_train, y_train)
    predicted_probs = model_hp.predict_proba(X_test)
    # Tune based on the test AUC
    # In production, you could use a separate validation set instead
    roc_auc = sklearn.metrics.roc_auc_score(y_test, predicted_probs[:,1])
    mlflow.log_metric('test_auc', roc_auc)

    # Negate the AUC because Optuna minimizes the objective by default
    return -roc_auc


with mlflow.start_run(run_name='gb_optuna') as run:
  # Use the MLflow Tracking Server as the Optuna storage backend
  experiment_id = mlflow.active_run().info.experiment_id
  mlflow_storage = MlflowStorage(experiment_id=experiment_id)

  # MlflowSparkStudy distributes the tuning using Spark workers
  mlflow_study = MlflowSparkStudy(
    study_name="gb-optuna-tuning",
    storage=mlflow_storage,
  )

  mlflow_study.optimize(objective, n_trials=32, n_jobs=4)
최상의 모델을 검색하기 위한 검색 실행
모든 실행은 MLflow에서 추적되므로 MLflow 검색 실행 API를 사용하여 최상의 실행에 대한 메트릭 및 매개 변수를 검색하여 가장 높은 테스트 auc를 사용하여 튜닝 실행을 찾을 수 있습니다.
이 튜닝된 모델은 1부에서 학습된 간단한 모델보다 더 나은 성능을 발휘해야 합니다.
# Sort runs by their test auc. In case of ties, use the most recent run.
best_run = mlflow.search_runs(
  order_by=['metrics.test_auc DESC', 'start_time DESC'],
  max_results=10,
).iloc[0]
print('Best Run')
print('AUC: {}'.format(best_run["metrics.test_auc"]))
print('Num Estimators: {}'.format(best_run["params.n_estimators"]))
print('Max Depth: {}'.format(best_run["params.max_depth"]))
print('Learning Rate: {}'.format(best_run["params.learning_rate"]))

best_model_pyfunc = mlflow.pyfunc.load_model(
  'runs:/{run_id}/model'.format(
    run_id=best_run.run_id
  )
)

# Make a dataset with all predictions
best_model_predictions = X_test
best_model_predictions["prediction"] = best_model_pyfunc.predict(X_test)
3부. Unity 카탈로그에 결과 및 모델 저장
predictions_table = f"{CATALOG_NAME}.{SCHEMA_NAME}.predictions"
spark.sql(f"DROP TABLE IF EXISTS {predictions_table}")

results = spark.createDataFrame(best_model_predictions)

# Write results back to Unity Catalog from Python
results.write.saveAsTable(f"{CATALOG_NAME}.{SCHEMA_NAME}.predictions")
model_uri = 'runs:/{run_id}/model'.format(
    run_id=best_run.run_id
  )

mlflow.register_model(model_uri, f"{CATALOG_NAME}.{SCHEMA_NAME}.wine_quality_model")
4부. 모델 배포
Unity 카탈로그에 모델을 저장한 후 서비스 UI를 사용하여 배포할 수 있습니다. 다음 지침에서는 간단한 설명을 제공합니다. 자세한 내용은 엔드포인트를 제공하는 사용자 지정 모델 만들기를 참조하세요.
- 사이드바에서 [서비스] 를 클릭하여 서비스 UI를 표시합니다.
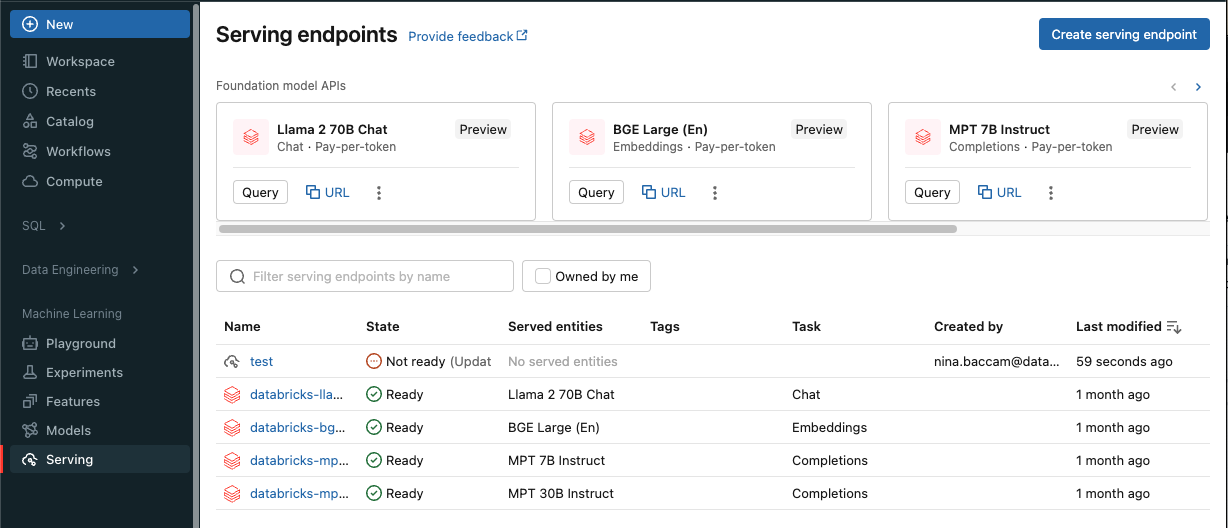
서빙 엔드포인트 생성를 클릭합니다.
이름 필드에서 엔드포인트의 이름을 입력합니다.
서비스된 엔터티 섹션에서
- 엔터티 필드를 클릭하여 제공된 엔터티 선택 양식을 엽니다.
- 내 모델- Unity 카탈로그를 선택합니다. 선택한 항목에 따라 양식이 동적으로 업데이트됩니다.
-
wine_quality_model및 제공하려는 모델 버전을 선택합니다. - 제공된 모델로 라우팅하려는 트래픽의 백분율로 100 을 선택합니다.
- 이 예제의 컴퓨팅 유형으로 CPU 를 선택합니다.
- 컴퓨팅 스케일 아웃에서 컴퓨팅 스케일 아웃 크기로 Small을 선택합니다.
만들기를 클릭합니다. 서빙 엔드포인트 페이지가 나타나며, 서빙 엔드포인트 상태는 준비되지 않음으로 표시됩니다.
엔드포인트가 준비되면 사용을 선택하여 엔드포인트에 유추 요청을 제출합니다.
예제 노트
시작: Databricks에서 첫 번째 기계 학습 모델 빌드
노트북 가져오기