이 빠른 시작에서는 TypeSpec을 사용하여 RESTful TypeScript API 애플리케이션을 디자인, 생성 및 구현하는 방법을 알아봅니다. TypeSpec은 클라우드 서비스 API를 설명하기 위한 오픈 소스 언어이며 여러 플랫폼에 대한 클라이언트 및 서버 코드를 생성합니다. 이 빠른 시작에 따라 API 계약을 한 번 정의하고 일관된 구현을 생성하여 유지 관리가 가능하고 잘 문서화된 API 서비스를 빌드하는 방법을 알아봅니다.
TypeSpec의 코드 생성기를 사용하여 라우팅 및 Swagger UI를 사용하여 Express.js 서버를 스캐폴드하고, 지속성을 위해 Azure Cosmos DB에 연결하고, Azure Container Apps에 배포합니다.
API 개발에서 TypeSpec의 역할에 대한 컨텍스트는 TypeSpec 개요를 참조하세요.
완료 시간: 15~20분
이 빠른 시작에서 당신은 다음을 수행합니다.
- TypeSpec을 사용하여 API 정의
- API 서버 애플리케이션 만들기
- 영구 스토리지에 Azure Cosmos DB 통합
- Azure에 배포
- API 실행 및 테스트
Important
@typespec/http-server-js 이미터는 현재 미리 보기로 제공됩니다.
이 정보는 릴리스되기 전에 상당히 수정될 수 있는 시험판 제품과 관련이 있습니다. Microsoft는 여기에 제공된 정보와 관련하여 명시적이거나 묵시적인 보증을 하지 않습니다.
Prerequisites
- 활성 Azure 계정입니다. 계정이 없는 경우 무료로 계정을 만듭니다.
- Node.js LTS - TypeSpec CLI 및 패키지 관리자에 필요합니다.
- TypeScript 코드를 작성하고 컴파일하기 위한 TypeScript입니다.
- Docker
- Visual Studio Code
- TypeSpec 확장
- 선택 사항: Azure Developer CLI를 사용하여 배포
TypeSpec을 사용하여 개발
TypeSpec은 언어에 구애받지 않은 방식으로 API를 정의하고 여러 플랫폼에 대한 API 서버 및 클라이언트 라이브러리를 생성합니다. 이 기능을 통해 다음을 수행할 수 있습니다.
- API 계약을 한 번 정의
- 일관된 서버 및 클라이언트 코드 생성
- API 인프라가 아닌 비즈니스 논리 구현에 집중
TypeSpec은 API 서비스 관리를 제공합니다.
- API 정의 언어
- API용 서버 쪽 라우팅 미들웨어
- API를 사용하는 클라이언트 라이브러리
클라이언트 요청 및 서버 통합을 제공합니다.
- 데이터베이스, 스토리지 및 메시징에 대한 Azure 서비스와 같은 미들웨어에서 비즈니스 논리 구현
- API용 호스팅 서버(로컬 또는 Azure)
- 반복 가능한 프로비전 및 배포를 위한 배포 스크립트
새 TypeSpec 애플리케이션 만들기
API 서버 및 TypeSpec 파일을 저장할 새 폴더를 만듭니다.
mkdir my_typespec_quickstart
cd my_typespec_quickstart
TypeSpec 컴파일러를 전역적으로 설치합니다.
npm install -g @typespec/compilerTypeSpec이 올바르게 설치되었는지 확인합니다.
tsp --versionTypeSpec 프로젝트를 초기화합니다.
tsp init제공된 답변으로 다음 프롬프트에 응답합니다.
- 여기에서 새 프로젝트를 초기화하시겠습니까? Y
- 프로젝트 템플릿을 선택하시겠습니까? 일반 REST API
- 프로젝트 이름 입력: 위젯
- 어떤 내보내기를 사용하시겠습니까?
- OpenAPI 3.1 문서
- JavaScript 서버 스텁
TypeSpec 발생기는 다양한 TypeSpec 컴파일러 API를 활용하여 TypeSpec 컴파일 프로세스를 고찰하고 아티팩트를 생성하는 라이브러리입니다.
계속하기 전에 초기화가 완료되기를 기다립니다.
프로젝트를 컴파일합니다.
tsp compile .팁 (조언)
반복 개발의 경우 변경 감시 모드를 사용하여 파일 변경 시
tsp compile . --watch자동으로 다시 컴파일합니다. 이렇게 하면 수정main.tsp할 때 생성된 서버와 스키마가 최신 상태로 유지됩니다.TypeSpec은 두 개의 개별 폴더를 만드는 기본
./tsp-output프로젝트를 생성합니다.-
스키마 는 OpenApi 3 사양입니다.
./main.tsp의 몇 줄이 여러분을 위해 200줄이 넘는 OpenApi 사양을 생성한 것을 주목하세요. -
서버 는 생성된 미들웨어입니다. 이 미들웨어는 Node.js 서버 프로젝트에 통합할 수 있습니다.
-
./tsp-output/server/js/src/generated/models/all/demo-service.ts는 위젯 API에 대한 인터페이스를 정의합니다. -
./tsp-output/server/js/src/generated/http/openapi3.ts는 Open API 사양을 TypeScript 파일로 정의하고 TypeSpec 프로젝트를 컴파일할 때마다 다시 생성됩니다.
-
-
스키마 는 OpenApi 3 사양입니다.
TypeSpec 방출기 구성
TypeSpec 파일을 사용하여 전체 Express.js 서버를 스캐폴드하도록 API 서버 생성을 구성합니다.
기존 구성을
./tspconfig.yaml열고 다음 YAML로 바꿉다.emit: - "@typespec/openapi3" - "@typespec/http-server-js" options: "@typespec/openapi3": emitter-output-dir: "{output-dir}/server/schema" openapi-versions: - 3.1.0 "@typespec/http-server-js": emitter-output-dir: "{output-dir}/server" express: true이 구성은 전체 Express.js API 서버를 만듭니다.
-
express: Swagger UI를 포함하여 Express.js API 서버를 생성합니다. -
emitter-output-dir: 모든 항목을./server디렉터리에 생성합니다.
-
기존
./tsp-output를 삭제하십시오. 걱정하지 마세요. 다음 단계에서 서버를 생성합니다.TypeSpec JavaScript 방출기를 사용하여 Express.js 서버를 만듭니다.
npx hsjs-scaffold새
./tsp-output/server디렉터리로 변경합니다.cd ./tsp-output/serverTypeScript를 JavaScript로 컴파일합니다.
tsc프로젝트를 실행합니다.
npm start브라우저에서 알림이 열릴 때까지 기다립니다.
브라우저를 열고
http://localhost:3000/.api-docs웹 사이트로 이동합니다.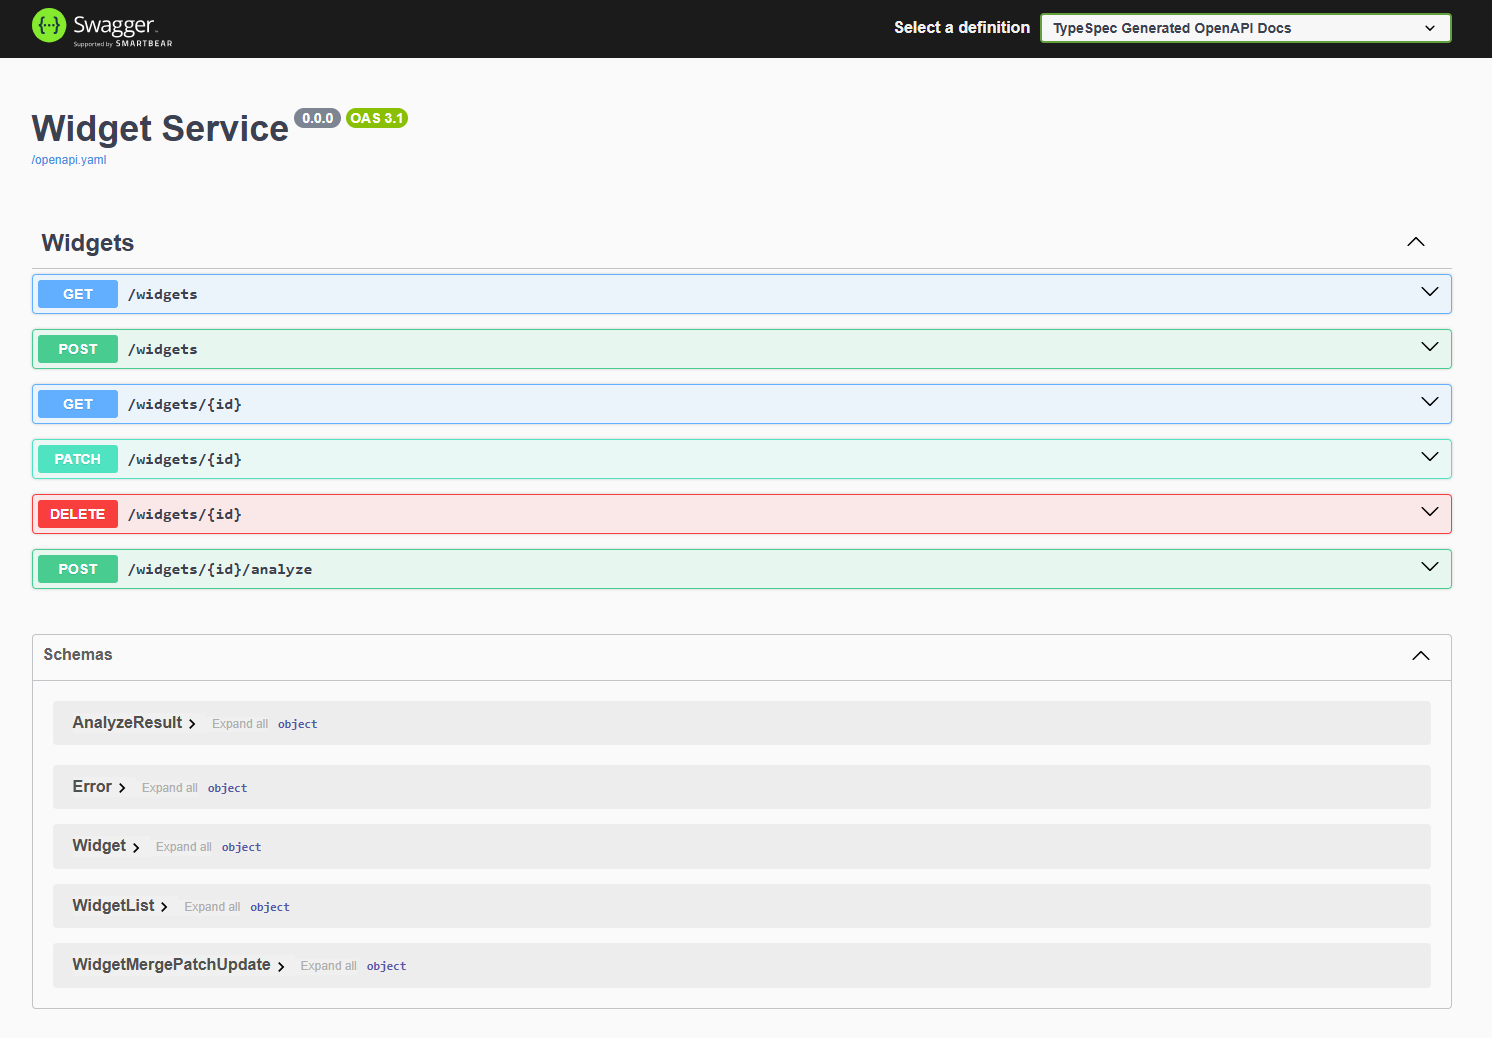
기본 TypeSpec API와 서버가 모두 작동합니다. 이 API 서버를 완성하려면 비즈니스 논리를 추가하여 위젯 API
./tsp-output/server/src/controllers/widgets.ts를 지원해야 합니다. UI는 하드 코딩된 가짜 데이터를 반환하는 API에 연결됩니다.
애플리케이션 파일 구조 이해
Express.js 프로젝트 구조 tsp-output/server/ 에는 생성된 서버, package.json및 Azure 통합을 위한 미들웨어가 포함됩니다.
server
├── package.json
├── package-lock.json
├── src
│   ├── controllers
│   │   └── widgets.ts
│   ├── generated
│   │   ├── helpers
│   │   │   ├── datetime.ts
│   │   │   ├── header.ts
│   │   │   ├── http.ts
│   │   │   ├── multipart.ts
│   │   │   ├── router.ts
│   │   │   └── temporal
│   │   │       ├── native.ts
│   │   │       └── polyfill.ts
│   │   ├── http
│   │   │   ├── openapi3.ts
│   │   │   ├── operations
│   │   │   │   └── server-raw.ts
│   │   │   └── router.ts
│   │   └── models
│   │       └── all
│   │           ├── demo-service.ts
│   │           └── typespec.ts
│   ├── index.ts
│   └── swagger-ui.ts
부모 TypeSpec 프로젝트의 파일 구조에는 다음 Express.js 프로젝트가 포함됩니다.tsp-output
├── tsp-output
├── .gitignore
├── main.tsp
├── package-lock.json
├── package.json
├── tspconfig.yaml
Azure Cosmos DB no-sql로 지속성 변경
이제 기본 Express.js API 서버가 작동하므로 영구 데이터 저장소에 대한 Azure Cosmos DB 와 함께 작동하도록 Express.js 서버를 업데이트합니다. 여기에는 미들웨어에서 index.ts Cosmos DB 통합을 사용하도록 변경된 내용이 포함됩니다. 모든 변경 내용은 ./tsp-output/server/src/generated 디렉터리 외부에서 일어나야 합니다.
./tsp-output/server디렉터리에서 프로젝트에 Azure Cosmos DB를 추가합니다.npm install @azure/cosmosAzure ID 라이브러리를 추가하여 Azure에 인증합니다.
npm install @azure/identityAzure와
./tsp-output/server/src/azure관련된 소스 코드를 저장할 디렉터리를 만듭니다.cosmosClient.ts해당 디렉터리에 파일을 만들어 Cosmos DB 클라이언트 개체를 만들고 다음 코드에 붙여넣습니다.import { CosmosClient, Database, Container } from "@azure/cosmos"; import { DefaultAzureCredential } from "@azure/identity"; /** * Interface for CosmosDB configuration settings */ export interface CosmosConfig { endpoint: string; databaseId: string; containerId: string; partitionKey: string; } /** * Singleton class for managing CosmosDB connections */ export class CosmosClientManager { private static instance: CosmosClientManager; private client: CosmosClient | null = null; private config: CosmosConfig | null = null; private constructor() {} /** * Get the singleton instance of CosmosClientManager */ public static getInstance(): CosmosClientManager { if (!CosmosClientManager.instance) { CosmosClientManager.instance = new CosmosClientManager(); } return CosmosClientManager.instance; } /** * Initialize the CosmosDB client with configuration if not already initialized * @param config CosmosDB configuration */ private ensureInitialized(config: CosmosConfig): void { if (!this.client || !this.config) { this.config = config; this.client = new CosmosClient({ endpoint: config.endpoint, aadCredentials: new DefaultAzureCredential(), }); } } /** * Get a database instance, creating it if it doesn't exist * @param config CosmosDB configuration * @returns Database instance */ private async getDatabase(config: CosmosConfig): Promise<Database> { this.ensureInitialized(config); const { database } = await this.client!.databases.createIfNotExists({ id: config.databaseId }); return database; } /** * Get a container instance, creating it if it doesn't exist * @param config CosmosDB configuration * @returns Container instance */ public async getContainer(config: CosmosConfig): Promise<Container> { const database = await this.getDatabase(config); const { container } = await database.containers.createIfNotExists({ id: config.containerId, partitionKey: { paths: [config.partitionKey] } }); return container; } /** * Clean up resources and close connections */ public dispose(): void { this.client = null; this.config = null; } } export const buildError = (error: any, message: string) => { const statusCode = error?.statusCode || 500; return { code: statusCode, message: `${message}: ${error?.message || 'Unknown error'}` }; };파일은 엔드포인트, 데이터베이스 및 컨테이너를 사용합니다. Azure ID 자격 증명
DefaultAzureCredential을 사용하므로 연결 문자열이나 키가 필요하지 않습니다. 로컬 및 프로덕션 환경 모두에 대해 이 보안 인증 방법에 대해 자세히 알아봅니다.새 위젯 컨트롤러
./tsp-output/server/src/controllers/WidgetsCosmos.ts를 만들고 Azure Cosmos DB에 대한 다음 통합 코드를 붙여넣습니다.import { Widgets, Widget, WidgetList, AnalyzeResult,Error } from "../generated/models/all/demo-service.js"; import { WidgetMergePatchUpdate } from "../generated/models/all/typespec/http.js"; import { CosmosClientManager, CosmosConfig, buildError } from "../azure/cosmosClient.js"; import { HttpContext } from "../generated/helpers/router.js"; import { Container } from "@azure/cosmos"; export interface WidgetDocument extends Widget { _ts?: number; _etag?: string; } /** * Implementation of the Widgets API using Azure Cosmos DB for storage */ export class WidgetsCosmosController implements Widgets<HttpContext> { private readonly cosmosConfig: CosmosConfig; private readonly cosmosManager: CosmosClientManager; private container: Container | null = null; /** * Creates a new instance of WidgetsCosmosController * @param azureCosmosEndpoint Cosmos DB endpoint URL * @param databaseId The Cosmos DB database ID * @param containerId The Cosmos DB container ID * @param partitionKey The partition key path */ constructor(azureCosmosEndpoint: string, databaseId: string, containerId: string, partitionKey: string) { if (!azureCosmosEndpoint) throw new Error("azureCosmosEndpoint is required"); if (!databaseId) throw new Error("databaseId is required"); if (!containerId) throw new Error("containerId is required"); if (!partitionKey) throw new Error("partitionKey is required"); this.cosmosConfig = { endpoint: azureCosmosEndpoint, databaseId: databaseId, containerId: containerId, partitionKey: partitionKey }; this.cosmosManager = CosmosClientManager.getInstance(); } /** * Get the container reference, with caching * @returns The Cosmos container instance */ private async getContainer(): Promise<Container | null> { if (!this.container) { try { this.container = await this.cosmosManager.getContainer(this.cosmosConfig); return this.container; } catch (error: any) { console.error("Container initialization error:", error); throw buildError(error, `Failed to access container ${this.cosmosConfig.containerId}`); } } return this.container; } /** * Create a new widget * @param widget The widget to create * @returns The created widget with assigned ID */ async create(ctx: HttpContext, body: Widget ): Promise<Widget | Error> { const id = body.id; try { const container = await this.getContainer(); if(!container) { return buildError({statusCode:500}, "Container is not initialized"); } if (!body.id) { return buildError({statusCode:400}, "Widget ID is required"); } const response = await container.items.create<Widget>(body, { disableAutomaticIdGeneration: true }); if (!response.resource) { return buildError({statusCode:500}, `Failed to create widget ${body.id}: No resource returned`); } return this.documentToWidget(response.resource); } catch (error: any) { if (error?.statusCode === 409) { return buildError({statusCode:409}, `Widget with id ${id} already exists`); } return buildError(error, `Failed to create widget ${id}`); } } /** * Delete a widget by ID * @param id The ID of the widget to delete */ async delete(ctx: HttpContext, id: string): Promise<void | Error> { try { const container = await this.getContainer(); if(!container) { return buildError({statusCode:500}, "Container is not initialized"); } await container.item(id, id).delete(); } catch (error: any) { if (error?.statusCode === 404) { return buildError({statusCode:404}, `Widget with id ${id} not found`); } return buildError(error, `Failed to delete widget ${id}`); } } /** * Get a widget by ID * @param id The ID of the widget to retrieve * @returns The widget if found */ async read(ctx: HttpContext, id: string): Promise<Widget | Error> { try { const container = await this.getContainer(); if(!container) { return buildError({statusCode:500}, "Container is not initialized"); } const { resource } = await container.item(id, id).read<WidgetDocument>(); if (!resource) { return buildError({statusCode:404}, `Widget with id ${id} not found`); } return this.documentToWidget(resource); } catch (error: any) { return buildError(error, `Failed to read widget ${id}`); } } /** * List all widgets with optional paging * @returns List of widgets */ async list(ctx: HttpContext): Promise<WidgetList | Error> { try { const container = await this.getContainer(); if(!container) { return buildError({statusCode:500}, "Container is not initialized"); } const { resources } = await container.items .query({ query: "SELECT * FROM c" }) .fetchAll(); return { items: resources.map(this.documentToWidget) }; } catch (error: any) { return buildError(error, "Failed to list widgets"); } } /** * Update an existing widget * @param id The ID of the widget to update * @param body The partial widget data to update * @returns The updated widget */ async update( ctx: HttpContext, id: string, body: WidgetMergePatchUpdate, ): Promise<Widget | Error> { try { const container = await this.getContainer(); if(!container) { return buildError({statusCode:500}, "Container is not initialized"); } // First check if the widget exists const { resource: item } = await container.item(id).read<WidgetDocument>(); if (!item) { return buildError({statusCode:404}, `Widget with id ${id} not found`); } // Apply patch updates to the existing widget const updatedWidget: Widget = { ...item, ...body, id }; // Replace the document in Cosmos DB const { resource } = await container.item(id).replace(updatedWidget); if (!resource) { return buildError({statusCode:500}, `Failed to update widget ${id}: No resource returned`); } return this.documentToWidget(resource); } catch (error: any) { return buildError(error, `Failed to update widget ${id}`); } } async analyze(ctx: HttpContext, id: string): Promise<AnalyzeResult | Error> { return { id: "mock-string", analysis: "mock-string", }; } /** * Convert a Cosmos DB document to a Widget */ private documentToWidget(doc: WidgetDocument): Widget { return Object.fromEntries( Object.entries(doc).filter(([key]) => !key.startsWith('_')) ) as Widget; } }./tsp-output/server/src/index.ts새 컨트롤러를 가져오도록 업데이트하고, Azure Cosmos DB 환경 설정을 가져온 다음, WidgetsCosmosController를 만들고 라우터에 전달합니다.// Generated by Microsoft TypeSpec import { WidgetsCosmosController } from "./controllers/WidgetsCosmos.js"; import { createDemoServiceRouter } from "./generated/http/router.js"; import express from "express"; import morgan from "morgan"; import { addSwaggerUi } from "./swagger-ui.js"; const azureCosmosEndpoint = process.env.AZURE_COSMOS_ENDPOINT!; const azureCosmosDatabase = "WidgetDb"; const azureCosmosContainer = "Widgets"; const azureCosmosPartitionKey = "/id"; const router = createDemoServiceRouter( new WidgetsCosmosController( azureCosmosEndpoint, azureCosmosDatabase, azureCosmosContainer, azureCosmosPartitionKey) ); const PORT = process.env.PORT || 3000; const app = express(); app.use(morgan("dev")); const SWAGGER_UI_PATH = process.env.SWAGGER_UI_PATH || "/.api-docs"; addSwaggerUi(SWAGGER_UI_PATH, app); app.use(router.expressMiddleware); app.listen(PORT, () => { console.log(`Server is running at http://localhost:${PORT}`); console.log( `API documentation is available at http://localhost:${PORT}${SWAGGER_UI_PATH}`, ); });사용 중인 터미널에서
./tsp-output/server의 TypeScript를 JavaScript로 컴파일합니다.tsc이제 프로젝트는 Cosmos DB 통합을 사용하여 빌드됩니다. Azure 리소스를 만들고 프로젝트를 배포하는 배포 스크립트를 만들어 보겠습니다.
배포 인프라 만들기
Azure Developer CLI 및 Bicep 템플릿을 사용하여 반복 가능한 배포에 필요한 파일을 만듭니다.
TypeSpec 프로젝트의 루트에서 배포 정의 파일을 만들고
azure.yaml다음 원본에 붙여넣습니다.# yaml-language-server: $schema=https://raw.githubusercontent.com/Azure/azure-dev/main/schemas/v1.0/azure.yaml.json name: azure-typespec-scaffold-js metadata: template: azd-init@1.14.0 services: api: project: ./ host: containerapp language: js docker: path: Dockerfile pipeline: provider: github hooks: postprovision: windows: shell: pwsh run: | # Set environment variables for the Container App azd env set AZURE_COSMOS_ENDPOINT "$env:AZURE_COSMOS_ENDPOINT" continueOnError: false interactive: true posix: shell: sh run: | # Set environment variables for the Container App azd env set AZURE_COSMOS_ENDPOINT "$AZURE_COSMOS_ENDPOINT" continueOnError: false interactive: true이 구성은 전체 TypeSpec 프로젝트를 참조합니다.
TypeSpec 프로젝트의 루트에서 Azure Container Apps에 사용할 컨테이너를 구성하는
./Dockerfile를 만듭니다.# Stage 1: Build stage FROM node:20-alpine AS builder WORKDIR /app # Install TypeScript globally RUN npm install -g typescript # Copy package files first to leverage Docker layer caching COPY package*.json ./ # Create the tsp-output/server directory structure RUN mkdir -p tsp-output/server # Copy server package.json COPY tsp-output/server/package.json ./tsp-output/server/ # Install build and dev dependencies RUN npm i --force --no-package-lock RUN cd tsp-output/server && npm install # Copy the rest of the application code COPY . . # Build the TypeScript code RUN cd tsp-output/server && tsc #--------------------------------------------------------------- # Stage 2: Runtime stage FROM node:20-alpine AS runtime # Set NODE_ENV to production for better performance ENV NODE_ENV=production WORKDIR /app # Copy only the server package files COPY tsp-output/server/package.json ./ # Install only production dependencies RUN npm install # Copy all necessary files from the builder stage # This includes the compiled JavaScript, any static assets, etc. COPY --from=builder /app/tsp-output/server/dist ./dist # Set default port and expose it ENV PORT=3000 EXPOSE 3000 # Run the application CMD ["node", "./dist/src/index.js"]TypeSpec 프로젝트의 루트에서
./infra디렉터리를 만듭니다../infra/main.bicepparam파일을 만들고 다음을 복사하여 배포에 필요한 매개 변수를 정의합니다.using './main.bicep' param environmentName = readEnvironmentVariable('AZURE_ENV_NAME', 'dev') param location = readEnvironmentVariable('AZURE_LOCATION', 'eastus2') param deploymentUserPrincipalId = readEnvironmentVariable('AZURE_PRINCIPAL_ID', '')이 매개 변수 목록은 이 배포에 필요한 최소 매개 변수를 제공합니다.
./infra/main.bicep파일을 만들고 다음을 복사하여 프로비저닝 및 배포를 위한 Azure 리소스를 정의합니다.metadata description = 'Bicep template for deploying a GitHub App using Azure Container Apps and Azure Container Registry.' targetScope = 'resourceGroup' param serviceName string = 'api' var databaseName = 'WidgetDb' var containerName = 'Widgets' var partitionKey = '/id' @minLength(1) @maxLength(64) @description('Name of the environment that can be used as part of naming resource convention') param environmentName string @minLength(1) @description('Primary location for all resources') param location string @description('Id of the principal to assign database and application roles.') param deploymentUserPrincipalId string = '' var resourceToken = toLower(uniqueString(resourceGroup().id, environmentName, location)) var tags = { 'azd-env-name': environmentName repo: 'https://github.com/typespec' } module managedIdentity 'br/public:avm/res/managed-identity/user-assigned-identity:0.4.1' = { name: 'user-assigned-identity' params: { name: 'identity-${resourceToken}' location: location tags: tags } } module cosmosDb 'br/public:avm/res/document-db/database-account:0.8.1' = { name: 'cosmos-db-account' params: { name: 'cosmos-db-nosql-${resourceToken}' location: location locations: [ { failoverPriority: 0 locationName: location isZoneRedundant: false } ] tags: tags disableKeyBasedMetadataWriteAccess: true disableLocalAuth: true networkRestrictions: { publicNetworkAccess: 'Enabled' ipRules: [] virtualNetworkRules: [] } capabilitiesToAdd: [ 'EnableServerless' ] sqlRoleDefinitions: [ { name: 'nosql-data-plane-contributor' dataAction: [ 'Microsoft.DocumentDB/databaseAccounts/readMetadata' 'Microsoft.DocumentDB/databaseAccounts/sqlDatabases/containers/items/*' 'Microsoft.DocumentDB/databaseAccounts/sqlDatabases/containers/*' ] } ] sqlRoleAssignmentsPrincipalIds: union( [ managedIdentity.outputs.principalId ], !empty(deploymentUserPrincipalId) ? [deploymentUserPrincipalId] : [] ) sqlDatabases: [ { name: databaseName containers: [ { name: containerName paths: [ partitionKey ] } ] } ] } } module containerRegistry 'br/public:avm/res/container-registry/registry:0.5.1' = { name: 'container-registry' params: { name: 'containerreg${resourceToken}' location: location tags: tags acrAdminUserEnabled: false anonymousPullEnabled: true publicNetworkAccess: 'Enabled' acrSku: 'Standard' } } var containerRegistryRole = subscriptionResourceId( 'Microsoft.Authorization/roleDefinitions', '8311e382-0749-4cb8-b61a-304f252e45ec' ) module registryUserAssignment 'br/public:avm/ptn/authorization/resource-role-assignment:0.1.1' = if (!empty(deploymentUserPrincipalId)) { name: 'container-registry-role-assignment-push-user' params: { principalId: deploymentUserPrincipalId resourceId: containerRegistry.outputs.resourceId roleDefinitionId: containerRegistryRole } } module logAnalyticsWorkspace 'br/public:avm/res/operational-insights/workspace:0.7.0' = { name: 'log-analytics-workspace' params: { name: 'log-analytics-${resourceToken}' location: location tags: tags } } module containerAppsEnvironment 'br/public:avm/res/app/managed-environment:0.8.0' = { name: 'container-apps-env' params: { name: 'container-env-${resourceToken}' location: location tags: tags logAnalyticsWorkspaceResourceId: logAnalyticsWorkspace.outputs.resourceId zoneRedundant: false } } module containerAppsApp 'br/public:avm/res/app/container-app:0.9.0' = { name: 'container-apps-app' params: { name: 'container-app-${resourceToken}' environmentResourceId: containerAppsEnvironment.outputs.resourceId location: location tags: union(tags, { 'azd-service-name': serviceName }) ingressTargetPort: 3000 ingressExternal: true ingressTransport: 'auto' stickySessionsAffinity: 'sticky' scaleMaxReplicas: 1 scaleMinReplicas: 1 corsPolicy: { allowCredentials: true allowedOrigins: [ '*' ] } managedIdentities: { systemAssigned: false userAssignedResourceIds: [ managedIdentity.outputs.resourceId ] } secrets: { secureList: [ { name: 'azure-cosmos-db-nosql-endpoint' value: cosmosDb.outputs.endpoint } { name: 'user-assigned-managed-identity-client-id' value: managedIdentity.outputs.clientId } ] } containers: [ { image: 'mcr.microsoft.com/devcontainers/typescript-node' name: serviceName resources: { cpu: '0.25' memory: '.5Gi' } env: [ { name: 'AZURE_COSMOS_ENDPOINT' secretRef: 'azure-cosmos-db-nosql-endpoint' } { name: 'AZURE_CLIENT_ID' secretRef: 'user-assigned-managed-identity-client-id' } ] } ] } } output AZURE_COSMOS_ENDPOINT string = cosmosDb.outputs.endpoint output AZURE_COSMOS_DATABASE string = databaseName output AZURE_COSMOS_CONTAINER string = containerName output AZURE_COSMOS_PARTITION_KEY string = partitionKey output AZURE_CONTAINER_REGISTRY_ENDPOINT string = containerRegistry.outputs.loginServer output AZURE_CONTAINER_REGISTRY_NAME string = containerRegistry.outputs.nameOUTPUT 변수를 사용하면 로컬 개발과 함께 프로비전된 클라우드 리소스를 사용할 수 있습니다.
Azure에 애플리케이션 배포
Azure Container Apps를 사용하여 Azure에 이 애플리케이션을 배포할 수 있습니다.
프로젝트의 루트에 있는 터미널에서 Azure 개발자 CLI에 인증합니다.
azd auth loginAzure 개발자 CLI를 사용하여 Azure Container Apps에 배포:
azd up제공된 답변으로 다음 프롬프트에 응답합니다.
- 고유한 환경 이름을 입력합니다.
tsp-server-js - 사용할 Azure 구독 선택: 구독 선택
- 사용할 Azure 위치 선택: 가까운 위치 선택
- 사용할 리소스 그룹 선택: 새 리소스 그룹 만들기 선택
- 새 리소스 그룹의 이름을 입력합니다. 제공된 기본값을 적용합니다.
- 고유한 환경 이름을 입력합니다.
배포가 완료될 때까지 기다립니다. 응답에는 다음과 유사한 정보가 포함됩니다.
Deploying services (azd deploy)

  (✓) Done: Deploying service api
  - Endpoint: https://container-app-123.ambitiouscliff-456.centralus.azurecontainerapps.io/


SUCCESS: Your up workflow to provision and deploy to Azure completed in 6 minutes 32 seconds.
브라우저에서 애플리케이션 사용
배포되면 다음을 수행할 수 있습니다.
- 콘솔에서 URL을
Endpoint선택하여 브라우저에서 엽니다. - Swagger UI를 사용하기 위해 엔드포인트에 경로를
/.api-docs추가합니다. - 이제 각 메서드에서 Try it 기능을 사용하여 API를 통해 위젯을 만들고, 읽고, 업데이트하고, 삭제합니다.
애플리케이션 확장
이제 전체 엔드-엔드 프로세스가 작동했으므로 API를 계속 빌드합니다.
- 에 API 및 API 계층 기능을 더 추가하려면 TypeSpec 언어 에 대해 자세히 알아봅니다
./main.tsp. -
방출기를 더 추가하고 해당 매개변수를
./tspconfig.yaml에서 구성합니다. - TypeSpec 파일에 추가 기능을 추가하면 서버 프로젝트의 소스 코드를 사용하여 이러한 변경 내용을 지원합니다.
- Azure ID에서 암호 없는 인증 을 계속 사용합니다.
자원을 정리하세요
이 빠른 시작을 완료하면 Azure 리소스를 제거할 수 있습니다.
azd down
또는 Azure Portal에서 직접 리소스 그룹을 삭제합니다.
Troubleshooting
포트 3000이 이미 사용 중입니다.
오류:listen EADDRINUSE: address already in use :::3000
Solution:
- 포트 3000
netstat -tulpn | grep 3000(macOS/Linux) 또는netstat -ano | findstr :3000(Windows)를 사용하여 프로세스를 식별합니다. - 해당 프로세스를 중지하거나 PORT 환경 변수
PORT=3001 npm start를 변경합니다.
Node.js 버전 불일치
오류:tsp: command not found 또는 npm ERR! The engine "node" is incompatible
Solution:
- Node.js 버전을
node --version확인합니다. - LTS 버전인지 확인합니다. nodejs.org 또는 패키지 관리자에서 업데이트합니다.
- npm 캐시 지우기:
npm cache clean --force다음을 다시 설치합니다npm install -g @typespec/compiler.
@typespec/http-server-js 방출기를 찾을 수 없음
오류:Error: Cannot find module '@typespec/http-server-js'
Solution:
- 이미터가
tspconfig.yaml안에emit:나열되어 있는지 확인합니다. - 다시 컴파일:
tsp compile .. - 오류가 지속되면 종속성을 다시 설치합니다.
cd ./tsp-output/server && npm install
생성된 서버의 TypeScript 컴파일 오류
오류:error TS2322: Type 'X' is not assignable to type 'Y' 생성된 파일에서
Solution:
-
main.tsptsp compile .을 수정한 후cd ./tsp-output/server && tsc에 따라 서버를 다시 생성하십시오. - 사용자 지정 컨트롤러 코드가 디렉터리 외부 에
./generated있는지 확인합니다. 생성된 파일을 직접 편집하지 마세요.
시작 시 Express.js 서버 크래시
오류:listen EADDRINUSE 또는 Error: Cannot find module '@azure/cosmos'
Solution:
- 누락된 종속성 설치:
cd ./tsp-output/server && npm install @azure/cosmos @azure/identity. - 포트 충돌의 경우 PORT를
index.ts변경하거나 사용합니다PORT=3001 npm start.
다음 단계
- TypeSpec 설명서
- Azure Cosmos DB 설명서
- Azure에 Node.js 앱 배포
- Azure Container Apps 설명서