랩에 아티팩트 리포지토리 추가
이 문서에서는 Azure DevTest Labs의 랩에 아티팩트 리포지토리를 추가하는 방법을 설명합니다. 아티팩트는 VM(가상 머신)에 설치할 도구 또는 애플리케이션입니다. GitHub 또는 Azure Repos Git 리포지토리에서 로드하는 JSON 파일에서 아티팩트를 정의합니다.
퍼블릭 DevTest Labs GitHub 아티팩트 리포지토리는 Windows 및 Linux에 대한 많은 일반적인 아티팩트를 제공합니다. 이 퍼블릭 리포지토리의 아티팩트는 DevTest Labs에서 기본적으로 사용할 수 있습니다. 아티팩트를 VM에 추가하는 방법에 관한 내용은 DevTest Labs VM에 아티팩트 추가를 참조하세요.
퍼블릭 아티팩트 리포지토리에서 사용할 수 없는 사용자 지정 아티팩트를 만들 수도 있습니다. 사용자 지정 아티팩트를 만드는 방법에 대한 자세한 내용은 사용자 지정 아티팩트 만들기를 참조하세요. 사용자 지정 아티팩트를 고유한 아티팩트 리포지토리에 추가하고, 모든 랩 사용자가 아티팩트를 사용할 수 있도록 리포지토리를 랩에 추가할 수 있습니다.
이 문서에서는 Azure Portal, ARM(Azure Resource Management) 템플릿 또는 Azure PowerShell을 사용하여 아티팩트 리포지토리를 랩에 추가하는 방법을 보여 줍니다. Azure PowerShell 또는 Azure CLI 스크립트를 사용하여 아티팩트 리포지토리를 랩에 추가하는 작업을 자동화할 수도 있습니다.
참고 항목
Azure Az PowerShell 모듈을 사용하여 Azure와 상호 작용하는 것이 좋습니다. 시작하려면 Azure PowerShell 설치를 참조하세요. Az PowerShell 모듈로 마이그레이션하는 방법에 대한 자세한 내용은 Azure PowerShell을 AzureRM에서 Azure로 마이그레이션을 참조하세요.
필수 조건
아티팩트 리포지토리를 랩에 추가하려면 아티팩트 파일이 있는 GitHub 또는 Azure Repos 리포지토리에 대한 Git HTTPS 복제 URL과 개인용 액세스 토큰을 알고 있어야 합니다.
GitHub에 대한 복제 URL 및 개인용 액세스 토큰 가져오기
- 아티팩트가 있는 GitHub 리포지토리의 홈페이지에서 코드를 선택하고 복제에서 HTTPS URL을 복사합니다.
- GitHub의 오른쪽 위에서 프로필 이미지를 선택한 다음, 설정을 선택합니다.
- 프로필 페이지 왼쪽 메뉴에서 개발자 설정을 선택한 다음, 개인용 액세스 토큰을 선택합니다.
- Generate new token(새 토큰 생성)을 탭합니다.
- 새 개인용 액세스 토큰 페이지의 참고에서 토큰에 대한 선택적 설명을 입력합니다. 모든 기본값을 그대로 사용하고 토큰 생성을 선택합니다.
- 생성된 토큰을 저장합니다.
Azure Repos에 대한 복제 URL 및 개인용 액세스 토큰 가져오기
- 아티팩트가 있는 리포지토리의 기본 페이지에서 복제를 선택합니다. 리포지토리 복제 페이지에서 복제 URL을 복사합니다.
- Azure DevOps 페이지의 오른쪽 위에서 사용자 설정>개인용 액세스 토큰을 선택합니다.
- 개인용 액세스 토큰 페이지에서 새 토큰을 선택합니다.
- 토큰에 대한 정보를 입력하여 범위로 읽기를 선택한 다음, 만들기를 선택합니다.
- Azure Repos는 토큰을 저장하거나 다시 표시하지 않기 때문에 성공 페이지에서 토큰을 복사해야 합니다.
Azure Portal에서 랩에 아티팩트 리포지토리 추가
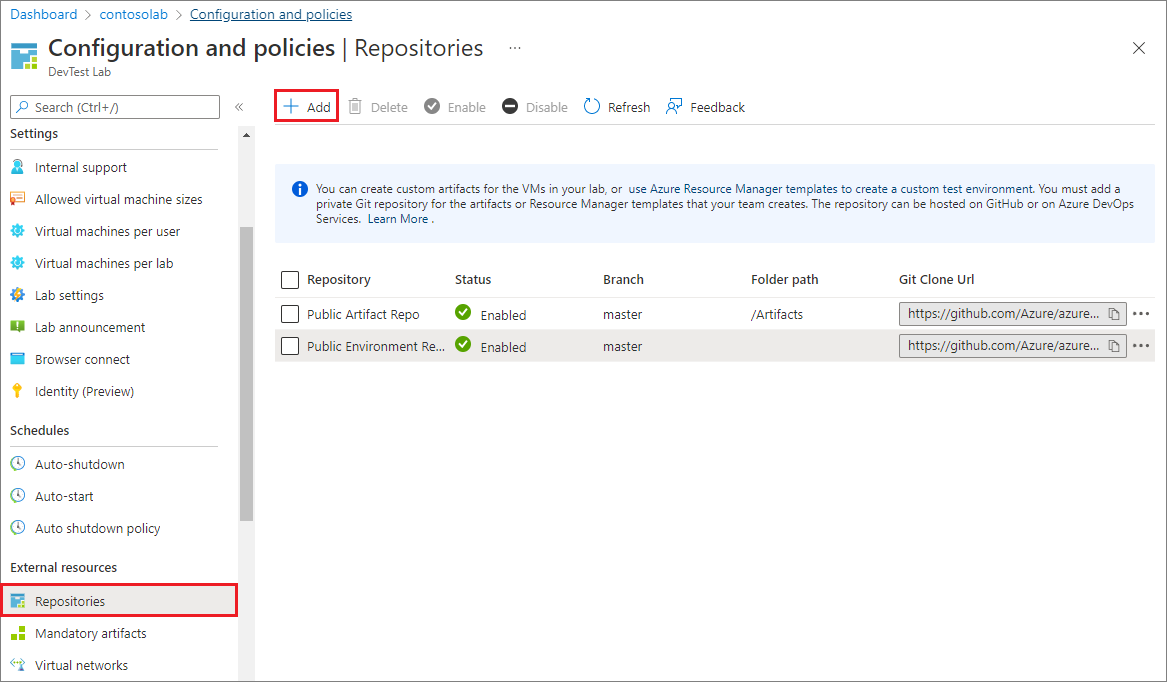
랩의 개요 페이지에 있는 왼쪽 탐색 영역에서 구성 및 정책을 선택합니다.
구성 및 정책 페이지 왼쪽 탐색 영역의 외부 리소스에서 리포지토리를 선택합니다.
리포지토리 페이지에서 퍼블릭 아티팩트 리포지토리가 자동으로 표시되고 DevTest Labs 퍼블릭 GitHub 리포지토리에 연결됩니다. 이 리포지토리가 랩에서 사용되지 않는 경우 퍼블릭 아티팩트 리포지토리 옆의 확인란을 선택한 다음, 위쪽 메뉴 모음에서 사용을 선택하여 사용하도록 설정할 수 있습니다.
아티팩트 리포지토리를 랩에 추가하려면 위쪽 메뉴 모음에서 추가를 선택합니다.
리포지토리 창에서 다음 정보를 입력합니다.
- 이름: 랩에서 사용할 리포지토리 이름입니다.
- Git 복제 URL: GitHub 또는 Azure Repos의 Git HTTPS 복제 URL입니다.
- 분기(선택 사항): 아티팩트 정의가 있는 분기입니다.
- 개인용 액세스 토큰: GitHub 또는 Azure Repos의 개인용 액세스 토큰입니다.
- 폴더 경로: Git 복제 URL을 기준으로 한 ARM 템플릿 정의 폴더입니다. 폴더 경로의 첫 부분에 슬래시를 포함해야 합니다.
저장을 선택합니다.
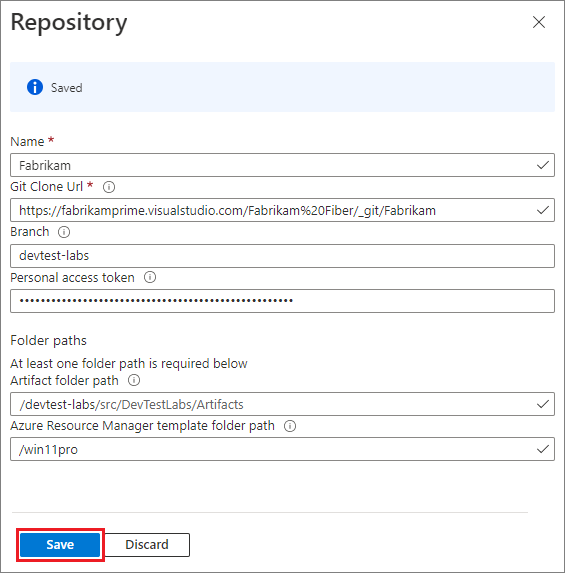
이제 리포지토리가 랩의 리포지토리 목록에 표시됩니다.
ARM 템플릿을 사용하여 아티팩트 리포지토리 추가
ARM 템플릿은 만들 Azure 리소스를 설명하는 JSON 파일입니다. ARM 템플릿에 관한 자세한 내용은 ARM 템플릿의 구조 및 구문 이해를 참조하세요.
다음 ARM 템플릿은 아티팩트 리포지토리를 랩에 추가합니다. 랩이 아직 없으면 템플릿이 랩을 만듭니다.
ARM 템플릿 검토
샘플 템플릿은 매개 변수에서 다음 정보를 수집합니다. 일부 매개 변수에는 기본값이 있지만 배포 명령은 랩 이름, 아티팩트 리포지토리 URI, 리포지토리 유형, 리포지토리 개인용 액세스 토큰을 지정해야 합니다.
- 랩 이름
- DevTest Labs에서 아티팩트 리포지토리의 표시 이름입니다. 기본값은
Team Repository입니다. - 이전에 복사한 아티팩트 리포지토리의 URI입니다.
- 아티팩트가 포함된 리포지토리 분기입니다. 기본값은
main입니다. - 아티팩트를 포함하는 폴더의 이름입니다. 기본값은
/Artifacts입니다. - 리포지토리 유형입니다. 허용되는 값은
VsoGit(Azure Repos) 또는GitHub입니다. - 이전에 복사한 리포지토리의 개인용 액세스 토큰입니다.
{

    "$schema": "https://schema.management.azure.com/schemas/2015-01-01/deploymentTemplate.json#",
    "contentVersion": "1.0.0.0",
    "parameters": {
        "labName": {
            "type": "string"
        },
        "artifactRepositoryDisplayName": {
            "type": "string",
            "defaultValue": "Team Repository"
        },
        "artifactRepoUri": {
            "type": "string"
        },
        "artifactRepoBranch": {
            "type": "string",
            "defaultValue": "main"
        },
        "artifactRepoFolder": {
            "type": "string",
            "defaultValue": "/Artifacts"
        },
        "artifactRepoType": {
            "type": "string",
            "allowedValues": ["VsoGit", "GitHub"]
        },
        "artifactRepoSecurityToken": {
            "type": "securestring"
        }
    },
    "variables": {
        "artifactRepositoryName": "[concat('Repo-', uniqueString(subscription().subscriptionId))]"
    },
    "resources": [{
            "apiVersion": "2016-05-15",
            "type": "Microsoft.DevTestLab/labs",
            "name": "[parameters('labName')]",
            "location": "[resourceGroup().location]",
            "resources": [
                {
                    "apiVersion": "2016-05-15",
                    "name": "[variables('artifactRepositoryName')]",
                    "type": "artifactSources",
                    "dependsOn": [
                        "[resourceId('Microsoft.DevTestLab/labs', parameters('labName'))]"
                    ],
                    "properties": {
                        "uri": "[parameters('artifactRepoUri')]",
                        "folderPath": "[parameters('artifactRepoFolder')]",
                        "branchRef": "[parameters('artifactRepoBranch')]",
                        "displayName": "[parameters('artifactRepositoryDisplayName')]",
                        "securityToken": "[parameters('artifactRepoSecurityToken')]",
                        "sourceType": "[parameters('artifactRepoType')]",
                        "status": "Enabled"
                    }
                }
            ]
        }
    ]
}
템플릿 배포
ARM 템플릿을 배포하여 Azure 리소스를 만들거나 업데이트하는 방법에는 여러 가지가 있습니다. 정보와 지침은 다음 문서를 참조하세요.
- ARM 템플릿 및 Azure PowerShell을 사용하여 리소스 배포
- ARM 템플릿 및 Azure CLI를 사용하여 리소스 배포
- Azure Portal에서 ARM 템플릿을 사용하여 리소스 배포
- ARM 템플릿 및 Resource Manager REST API를 사용하여 리소스 배포
이 예제에서는 Azure PowerShell을 사용하여 템플릿을 배포합니다.
참고 항목
템플릿을 배포하는 cmdlet은 컨텍스트에 따라 다르므로 현재 테넌트와 구독을 사용합니다. 컨텍스트를 변경해야 하는 경우 템플릿을 배포하기 전에 Set-AzContext를 사용합니다.
New-AzResourceGroup을 사용하여 리소스 그룹을 만듭니다. 사용하려는 리소스 그룹이 이미 있는 경우 이 단계를 건너뜁니다.
New-AzResourceGroup -Name MyLabResourceGroup1 -Location westusNew-AzResourceGroupDeployment를 사용하여 리소스 그룹에 대한 배포를 만듭니다. 동일한 리소스 그룹에 대한 여러 리소스 배포를 만들 수 있습니다. 동일한 리소스 그룹에 여러 번 배포하는 경우 각 배포 이름이 고유해야 합니다.
New-AzResourceGroupDeployment `
    -Name MyLabResourceGroup-Deployment1 `
    -ResourceGroupName MyLabResourceGroup1 `
    -TemplateFile azuredeploy.json `
    -TemplateParameterFile azuredeploy.parameters.json
New-AzResourceGroupDeployment가 성공적으로 실행된 후 출력에는 프로비저닝 상태(succeeded이어야 함), 템플릿의 모든 출력 등의 중요한 정보가 표시됩니다.
Azure PowerShell을 사용하여 아티팩트 리포지토리 추가
다음 샘플 PowerShell 스크립트 New-DevTestLabArtifactRepository.ps1은 아티팩트 리포지토리를 랩에 추가합니다. 전체 스크립트에는 몇 가지 자세한 메시지와 설명이 포함됩니다.
<#

.SYNOPSIS
This script creates a new custom repository and adds it to an existing DevTest Lab.

.PARAMETER LabName
The name of the lab.

.PARAMETER LabResourceGroupName
The name of the resource group that contains the lab.

.PARAMETER ArtifactRepositoryName
Name for the new artifact repository. The script creates a random name for the repository if not specified.

.PARAMETER ArtifactRepositoryDisplayName
Display name for the artifact repository.
This name appears in the list of artifact repositories for a lab.

.PARAMETER RepositoryUri
Uri to the artifact repository.

.PARAMETER RepositoryBranch
Branch that contains the artifact files. Defaults to 'main'.

.PARAMETER FolderPath
Folder that contains the artifact files. Defaults to '/Artifacts'

.PARAMETER PersonalAccessToken
Personal access token for the GitHub or Azure Repos repository.

.PARAMETER SourceType
Whether the artifact repository is a VSOGit (Azure Repos) or GitHub repository.

.EXAMPLE
Set-AzContext -SubscriptionId 11111111-1111-1111-1111-111111111111
.\New-DevTestLabArtifactRepository.ps1 -LabName "mydevtestlab" -LabResourceGroupName "mydtlrg" -ArtifactRepositoryName "MyTeam Repository" -RepositoryUri "https://github.com/<myteam>/<nameofrepo>.git" -PersonalAccessToken "1111...." -SourceType "GitHub"

.NOTES
The script uses the current Azure context. To set the context, use Set-AzContext.

#>


[CmdletBinding()]
Param(

    [Parameter(Mandatory=$true)]
    $LabName,

    [Parameter(Mandatory=$true)]
    $LabResourceGroupName,
    $ArtifactRepositoryName,
    $ArtifactRepositoryDisplayName  = 'Team Artifact Repository',

    [Parameter(Mandatory=$true)]
    $RepositoryUri,
    $RepositoryBranch = 'main',
    $FolderPath = '/Artifacts',

    [Parameter(Mandatory=$true)]
    $PersonalAccessToken ,

    [Parameter(Mandatory=$true)]
    [ValidateSet('VsoGit', 'GitHub')]
    $SourceType
)

# Set artifact repository internal name if not specified.

if ($ArtifactRepositoryName -eq $null){
    $ArtifactRepositoryName = "PrivateRepo" + (Get-Random -Maximum 999)
}

# Sign in to Azure.
Connect-AzAccount


#Get Lab Resource.
$LabResource = Get-AzResource -ResourceType 'Microsoft.DevTestLab/labs' -ResourceName $LabName -ResourceGroupName $LabResourceGroupName

Write-Verbose "Lab Name: $($LabResource.Name)"
Write-Verbose "Lab Resource Group Name: $($LabResource.ResourceGroupName)"
Write-Verbose "Lab Resource Location: $($LabResource.Location)"

Write-Verbose "Artifact Repository Internal Name: $ArtifactRepositoryName"

#Prepare properties object for the call to New-AzResource.
$propertiesObject = @{
    uri = $RepositoryUri;
    folderPath = $FolderPath;
    branchRef = $RepositoryBranch;
    displayName = $ArtifactRepositoryDisplayName;
    securityToken = $PersonalAccessToken;
    sourceType = $SourceType;
    status = 'Enabled'
}

Write-Verbose "Properties to be passed to New-AzResource:$($propertiesObject | Out-String)"

#Add resource to the current subscription.
$resourcetype = 'Microsoft.DevTestLab/labs/artifactSources'
$resourceName = $LabName + '/' + $ArtifactRepositoryName
Write-Verbose "Az ResourceType: $resourcetype"
Write-Verbose "Az ResourceName: $resourceName"

Write-Verbose "Creating artifact repository '$ArtifactRepositoryDisplayName'..."
$result = New-AzResource -Location $LabResource.Location -ResourceGroupName $LabResource.ResourceGroupName -properties $propertiesObject -ResourceType $resourcetype -ResourceName $resourceName -ApiVersion 2016-05-15 -Force

#Alternate implementation:
# Use resourceId rather than resourcetype and resourcename parameters.
# Using resourceId lets you specify the $SubscriptionId rather than using the
# subscription id of Get-AzContext.
#$resourceId = "/subscriptions/$SubscriptionId/resourceGroups/$($LabResource.ResourceGroupName)/providers/Microsoft.DevTestLab/labs/$LabName/artifactSources/$ArtifactRepositoryName"
#$result = New-AzResource -properties $propertiesObject -ResourceId $resourceId -ApiVersion 2016-05-15 -Force


# Check the result.
if ($result.Properties.ProvisioningState -eq "Succeeded") {
    Write-Verbose ("Successfully added artifact repository source '$ArtifactRepositoryDisplayName'")
}
else {
    Write-Error ("Error adding artifact repository source '$ArtifactRepositoryDisplayName'")
}

#Return the newly created resource to use in later scripts.
return $result
매개 변수
PowerShell 스크립트는 다음 매개 변수를 사용합니다.
| 매개 변수 | 설명 |
|---|---|
LabName |
랩의 이름입니다. |
ArtifactRepositoryName |
새 아티팩트 리포지토리의 이름입니다. 지정되지 않은 경우 스크립트는 리포지토리의 임의 이름을 만듭니다. |
ArtifactRepositoryDisplayName |
랩의 아티팩트 리포지토리 목록에 표시되는 표시 이름입니다. |
RepositoryUri |
이전에 복사한 아티팩트 리포지토리의 URI입니다. |
RepositoryBranch |
아티팩트가 포함된 리포지토리 분기입니다. 기본값은 main입니다. |
FolderPath |
아티팩트가 포함된 폴더입니다. 기본값은 /Artifacts입니다. |
PersonalAccessToken |
이전에 복사한 리포지토리에 액세스하기 위한 보안 토큰입니다. |
SourceType |
아티팩트 리포지토리가 VSOGit(Azure Repos) 또는 GitHub 리포지토리인지 여부입니다. |
리포지토리에는 식별을 위한 내부 이름이 필요하며, 이는 Azure Portal의 표시 이름과 다릅니다. 내부 이름은 Azure Portal을 사용할 때는 표시되지 않으며 Azure REST API 또는 Azure PowerShell을 사용할 때 표시됩니다. 배포 명령이 이름을 지정하지 않는 경우 스크립트는 임의 이름을 만듭니다.
#Set artifact repository name, if not set by user
if ($ArtifactRepositoryName -eq $null){
    $ArtifactRepositoryName = "PrivateRepo" + (Get-Random -Maximum 999)
}
PowerShell 명령
스크립트는 다음 PowerShell 명령을 사용합니다.
| 명령 | 주의 |
|---|---|
| Get-AzResource | 랩에 관한 세부 정보(예: 해당 위치)를 가져옵니다. 랩과 동일한 위치 및 동일한 리소스 그룹에 아티팩트 리포지토리 원본을 만듭니다. |
| New-AzResource | Azure 리소스를 추가합니다. 아티팩트 리포지토리를 추가하기 위한 특정 명령은 없습니다. 이 cmdlet은 만들 리소스 종류를 알기 위해 ResourceId 또는 ResourceName/ResourceType 쌍이 필요합니다. 현재 스크립트는 ResourceType 및 ResourceName 쌍을 사용합니다. |
리소스 이름 및 리소스 종류 정보를 검색하는 좋은 방법은 Azure REST API Browser 웹 사이트를 사용하는 것입니다. DevTest Labs 아티팩트 원본은 DevTest Labs 아티팩트 원본을 만들고 관리하기 위한 REST API를 보여 줍니다. 현재 스크립트는 다음 리소스 ID를 사용합니다.
https://management.azure.com/subscriptions/{subscriptionId}/resourceGroups/{resourceGroupName}/providers/Microsoft.DevTestLab/labs/{labName}/artifactsources/{name}
리소스 종류는 URI의 providers 뒤에 나열되는 모든 항목입니다(중괄호 안의 항목 제외). 리소스 이름은 중괄호 안에 있는 모든 항목입니다. 리소스 이름에 대한 항목을 두 개 이상 사용하는 경우 다음과 같이 각 항목을 슬래시로 구분합니다.
$resourcetype = 'Microsoft.DevTestLab/labs/artifactSources'
$resourceName = $LabName + '/' + $ArtifactRepositoryName
PowerShell 스크립트 실행
PowerShell 스크립트를 실행하여 LabName, LabResourceGroupName, ArtifactRepositoryName, RepositoryUri, PersonalAccessToken, SourceType의 예제 값을 고유한 값으로 대체합니다.
Set-AzContext -SubscriptionId <Your Azure subscription ID>

.\New-DevTestLabArtifactRepository.ps1 -LabName "mydevtestlab" -LabResourceGroupName "mydtlrg" -ArtifactRepositoryName "myteamrepository" -RepositoryUri "https://github.com/myteam/myteamrepository.git" - "1111...." -SourceType "GitHub"
다음 단계
피드백
출시 예정: 2024년 내내 콘텐츠에 대한 피드백 메커니즘으로 GitHub 문제를 단계적으로 폐지하고 이를 새로운 피드백 시스템으로 바꿀 예정입니다. 자세한 내용은 다음을 참조하세요. https://aka.ms/ContentUserFeedback
다음에 대한 사용자 의견 제출 및 보기