이 문서에서는 사용자 지정 테마를 적용하고, 텍스트를 변경하며, 고유의 사용자 지정 도움말 리소스를 가리키도록 도움말 링크를 수정하여 애플리케이션 UI를 사용자 지정하는 방법에 대해 설명합니다.
다음 스크린샷은 표준 테마를 사용하는 페이지를 보여 줍니다.

다음 스크린샷은 사용자 지정 UI 요소가 강조 표시된 사용자 지정 스크린샷을 사용하는 페이지를 보여줍니다.

팁
브라우저의 주소 표시줄과 즐겨찾기 목록에 표시된 이미지도 사용자 지정할 수 있습니다.
테마 만들기
사용자 지정 테마를 만들려면 사용자 지정 페이지의 모양 섹션으로 이동합니다.

이 페이지에서 애플리케이션의 다음 측면을 사용자 지정할 수 있습니다.
애플리케이션 로고
투명한 배경이 있는 PNG 이미지(1MB 이하)입니다. 이 로고는 IoT Central 애플리케이션 제목 표시줄에 표시됩니다.
로고 이미지에 애플리케이션 이름이 포함된 경우 애플리케이션 이름 텍스트를 숨길 수 있습니다. 자세한 내용은 애플리케이션 관리를 참조하세요.
브라우저 아이콘(favicon)
투명한 배경이 있는 32 x 32 픽셀 이하의 PNG 이미지입니다. 웹 브라우저는 주소 표시줄, 기록, 책갈피 및 브라우저 탭에서 이 이미지를 사용할 수 있습니다.
브라우저 색
페이지 머리글의 색과 강조 단추 및 기타 강조 표시에 사용되는 색을 변경할 수 있습니다. 형식 ##ff6347으로 6자 16진수 색 값을 사용합니다. 16진수 값 색상 표기법에 대한 자세한 내용은 HTML 색을 참조하세요.
참고 항목
언제든지 모양 섹션의 기본 옵션으로 되돌릴 수 있습니다.
연산자 변경 내용
관리자가 사용자 지정 테마를 만들면 애플리케이션의 운영자와 다른 사용자가 더 이상 모양에서 테마를 선택할 수 없습니다.
도움말 링크 바꾸기
운영자 및 다른 사용자에게 사용자 지정 도움말 정보를 제공하기 위해 애플리케이션 도움말 메뉴에서 링크를 수정할 수 있습니다.
도움말 링크를 수정하려면 사용자 지정 페이지의 도움말 링크 섹션으로 이동합니다.

도움말 메뉴에 새 항목을 추가하고 기본 항목을 제거할 수도 있습니다.

참고 항목
언제든지 사용자 지정 페이지의 기본 도움말 링크로 되돌릴 수 있습니다.
애플리케이션 텍스트 변경
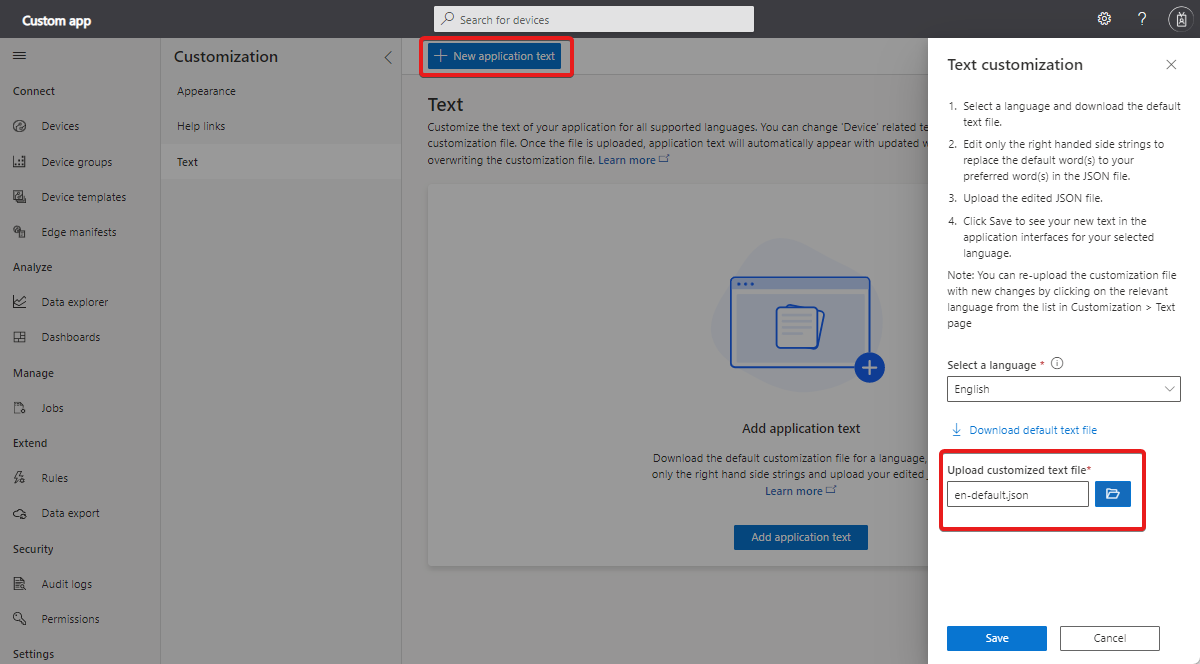
애플리케이션에서 텍스트 레이블을 변경하려면 사용자 지정 페이지의 텍스트 섹션으로 이동합니다.
이 페이지에서 지원되는 모든 언어의 애플리케이션 텍스트를 사용자 지정할 수 있습니다. 사용자 지정 텍스트 파일을 업로드하면 애플리케이션 텍스트가 업데이트된 텍스트와 함께 자동으로 표시됩니다. 사용자 지정 파일을 편집하고 덮어쓰면 추가로 사용자 지정할 수 있습니다. IoT Central UI에서 지원하는 모든 언어에 대해 프로세스를 반복할 수 있습니다.
다음 예제는 애플리케이션을 영어로 볼 때 단어 Device를 Asset으로 변경하는 방법을 보여 줍니다.
애플리케이션 텍스트 추가를 선택한 후 드롭다운에서 영어를 선택합니다.
기본 텍스트 파일을 다운로드합니다. 파일에는 변경할 수 있는 텍스트 문자열의 JSON 정의가 포함되어 있습니다.
단어를
device바꾸려면 다음 예제와asset같이 텍스트 편집기에서 파일을 열고 값 문자열을 편집합니다.{ "Device": { "AllEntities": "All assets", "Approve": { "Confirmation": "Are you sure you want to approve this asset?", "Confirmation_plural": "Are you sure you want to approve these assets?" }, "Block": { "Confirmation": "Are you sure you want to block this asset?", "Confirmation_plural": "Are you sure you want to block these assets?" }, "ConnectionStatus": { "Connected": "Connected", "ConnectedAt": "Connected {{lastReportedTime}}", "Disconnected": "Disconnected", "DisconnectedAt": "Disconnected {{lastReportedTime}}" }, "Create": { "Description": "Create a new asset with the given settings", "ID_HelpText": "Enter a unique identifier this asset will use to connect.", "Instructions": "To create a new asset, select an asset template, a name, and a unique ID. <1>Learn more <1></1></1>", "Name_HelpText": "Enter a user friendly name for this asset. If not specified, this will be the same as the asset ID.", "Simulated_Label": "Simulate this asset?", "Simulated_HelpText": "A simulated asset generates telemetry that enables you to test the behavior of your application before you connect a real asset.", "Title": "Create a new asset", "Unassigned_HelpText": "Choosing this will not assign the new asset to any asset template.", "HardwareId_Label": "Hardware type", "HardwareId_HelpText": "Optionally specify the manufacturer of the asset", "MiddlewareId_Label": "Connectivity solution", "MiddlewareId_HelpText": "Optionally choose what type of connectivity solution is installed on the asset" }, "Delete": { "Confirmation": "Are you sure you want to delete this asset?", "Confirmation_plural": "Are you sure you want to delete these assets?", "Title": "Delete asset permanently?", "Title_plural": "Delete assets permanently?" }, "Entity": "Asset", "Entity_plural": "Assets", "Import": { "Title": "Import assets from a file", "HelpText": "Choose the organization that can access the assets you’re importing, and then choose the file you’ll use to import. <1>Learn more <1></1></1>", "Action": "Import assets with an org assignment from a chosen file.", "Upload_Action": "Upload a .csv file", "Browse_HelpText": "You’ll use a CSV file to import assets. Click “Learn more” for samples and formatting guidelines." }, "JoinToGateway": "Attach to gateway", "List": { "Description": "Grid displaying list of assets", "Empty": { "Text": "Assets will send data to IoT Central for you to monitor, store, and analyze. <1>Learn more <1></1></1>", "Title": "Create an Asset" } }, "Migrate": { "Confirmation": "Migrating selected asset to another template. Select migration target.", "Confirmation_plural": "Migrating selected assets to another template. Select migration target." }, "Properties": { "Definition": "Asset template", "DefinitionId": "Asset template ID", "Id": "Asset ID", "Name": "Asset name", "Scope": "Organization", "Simulated": "Simulated", "Status": "Asset status" }, "Rename": "Rename asset", "Status": { "Blocked": "Blocked", "Provisioned": "Provisioned", "Registered": "Registered", "Unassociated": "Unassociated", "WaitingForApproval": "Waiting for approval" }, "SystemAreas": { "Downstreamassets": "Downstream assets", "Module_plural": "Modules", "Properties": "Properties", "RawData": "Raw data" }, "TemplateList": { "Empty": "No definitions found.", "FilterInstructions": "Filter templates" }, "Unassigned": "Unassigned", "Unblock": { "Confirmation": "Are you sure you want to unblock this asset?", "Confirmation_plural": "Are you sure you want to unblock these assets?" } } }편집된 사용자 지정 파일을 업로드하고 저장을 선택하여 애플리케이션에서 새 텍스트를 확인합니다.
이제 UI에서 새 텍스트 값을 사용합니다.


사용자 지정 페이지의 텍스트 섹션에 있는 목록에서 관련 언어를 선택하여 내용이 추가로 변경된 사용자 지정 파일을 다시 업로드할 수 있습니다.
다음 단계
이제 IoT Central 애플리케이션에서 UI를 사용자 지정하는 방법에 대해 알아보았으므로 몇 가지 다음 단계를 제안합니다.