Python 스크립트 실행 구성 요소
이 문서에서는 Azure Machine Learning 디자이너의 Python 스크립트 실행 구성 요소를 설명합니다.
이 구성 요소를 사용하여 Python 코드를 실행합니다. Python의 아키텍처 및 디자인 원칙에 대한 자세한 내용은 Azure Machine Learning 디자이너에서 Python 코드를 실행하는 방법을 참조하세요.
Python을 사용하면 다음과 같이 기존 구성 요소가 지원하지 않는 작업을 수행할 수 있습니다.
matplotlib를 사용하여 데이터 시각화- Python 라이브러리를 사용하여 작업 영역에서 데이터 세트 및 모델 열거
- 데이터 가져오기 구성 요소가 지원하지 않는 원본의 데이터 읽기, 로드 및 조작
- 자체 딥 러닝 코드 실행
지원되는 Python 패키지
Azure Machine Learning은 데이터 처리를 위한 여러 일반적인 유틸리티를 포함하는 Python의 Anaconda 배포를 사용합니다. Anaconda 버전은 자동으로 업데이트됩니다. 현재 버전은 다음과 같습니다.
- Python 3.6용 Anaconda 4.5+ 배포
전체 목록은 사전 설치된 Python 패키지 섹션을 참조하세요.
사전 설치된 패키지 목록에 없는 패키지(예: scikit-misc)를 설치하려면 스크립트에 다음 코드를 추가합니다.
import os
os.system(f"pip install scikit-misc")
특히 유추 성능을 높이기 위해 다음 코드를 사용하여 패키지를 설치합니다.
import importlib.util
package_name = 'scikit-misc'
spec = importlib.util.find_spec(package_name)
if spec is None:
    import os
    os.system(f"pip install scikit-misc")
참고
파이프라인에 사전 설치된 목록에 없는 패키지를 필요로 하는 Python 스크립트 실행 구성 요소가 여러 개 있는 경우 각 구성 요소에 해당 패키지를 설치합니다.
경고
Python 스크립트 실행 구성 요소는 “apt-get” 같은 명령을 사용하는 추가 네이티브 라이브러리에 종속된 Java, PyODBC 등의 패키지를 설치하는 것을 지원하지 않습니다. 이 구성 요소는 Python만 사전 설치되어 있고 비관리자 권한이 있는 간단한 환경에서 실행되기 때문입니다.
현재 작업 영역 및 등록된 데이터 세트에 액세스
다음 샘플 코드를 참조하여 작업 영역에 등록된 데이터 세트에 액세스할 수 있습니다.
def azureml_main(dataframe1 = None, dataframe2 = None):

    # Execution logic goes here
    print(f'Input pandas.DataFrame #1: {dataframe1}')
    from azureml.core import Run
    run = Run.get_context(allow_offline=True)
    #access to current workspace
    ws = run.experiment.workspace

    #access to registered dataset of current workspace
    from azureml.core import Dataset
    dataset = Dataset.get_by_name(ws, name='test-register-tabular-in-designer')
    dataframe1 = dataset.to_pandas_dataframe()

    # If a zip file is connected to the third input port,
    # it is unzipped under "./Script Bundle". This directory is added
    # to sys.path. Therefore, if your zip file contains a Python file
    # mymodule.py you can import it using:
    # import mymodule

    # Return value must be of a sequence of pandas.DataFrame
    # E.g.
    #   -  Single return value: return dataframe1,
    #   -  Two return values: return dataframe1, dataframe2
    return dataframe1,
파일 업로드
Python 스크립트 실행 구성 요소는 Azure Machine Learning Python SDK를 사용한 파일 업로드를 지원합니다.
다음 예제는 Python 스크립트 실행 구성 요소에서 이미지 파일을 업로드하는 방법을 보여 줍니다.
# The script MUST contain a function named azureml_main,
# which is the entry point for this component.

# Imports up here can be used to
import pandas as pd

# The entry point function must have two input arguments:
#   Param<dataframe1>: a pandas.DataFrame
#   Param<dataframe2>: a pandas.DataFrame
def azureml_main(dataframe1 = None, dataframe2 = None):

    # Execution logic goes here
    print(f'Input pandas.DataFrame #1: {dataframe1}')

    from matplotlib import pyplot as plt
    plt.plot([1, 2, 3, 4])
    plt.ylabel('some numbers')
    img_file = "line.png"
    plt.savefig(img_file)

    from azureml.core import Run
    run = Run.get_context(allow_offline=True)
    run.upload_file(f"graphics/{img_file}", img_file)

    # Return value must be of a sequence of pandas.DataFrame
    # For example:
    #   -  Single return value: return dataframe1,
    #   -  Two return values: return dataframe1, dataframe2
    return dataframe1,
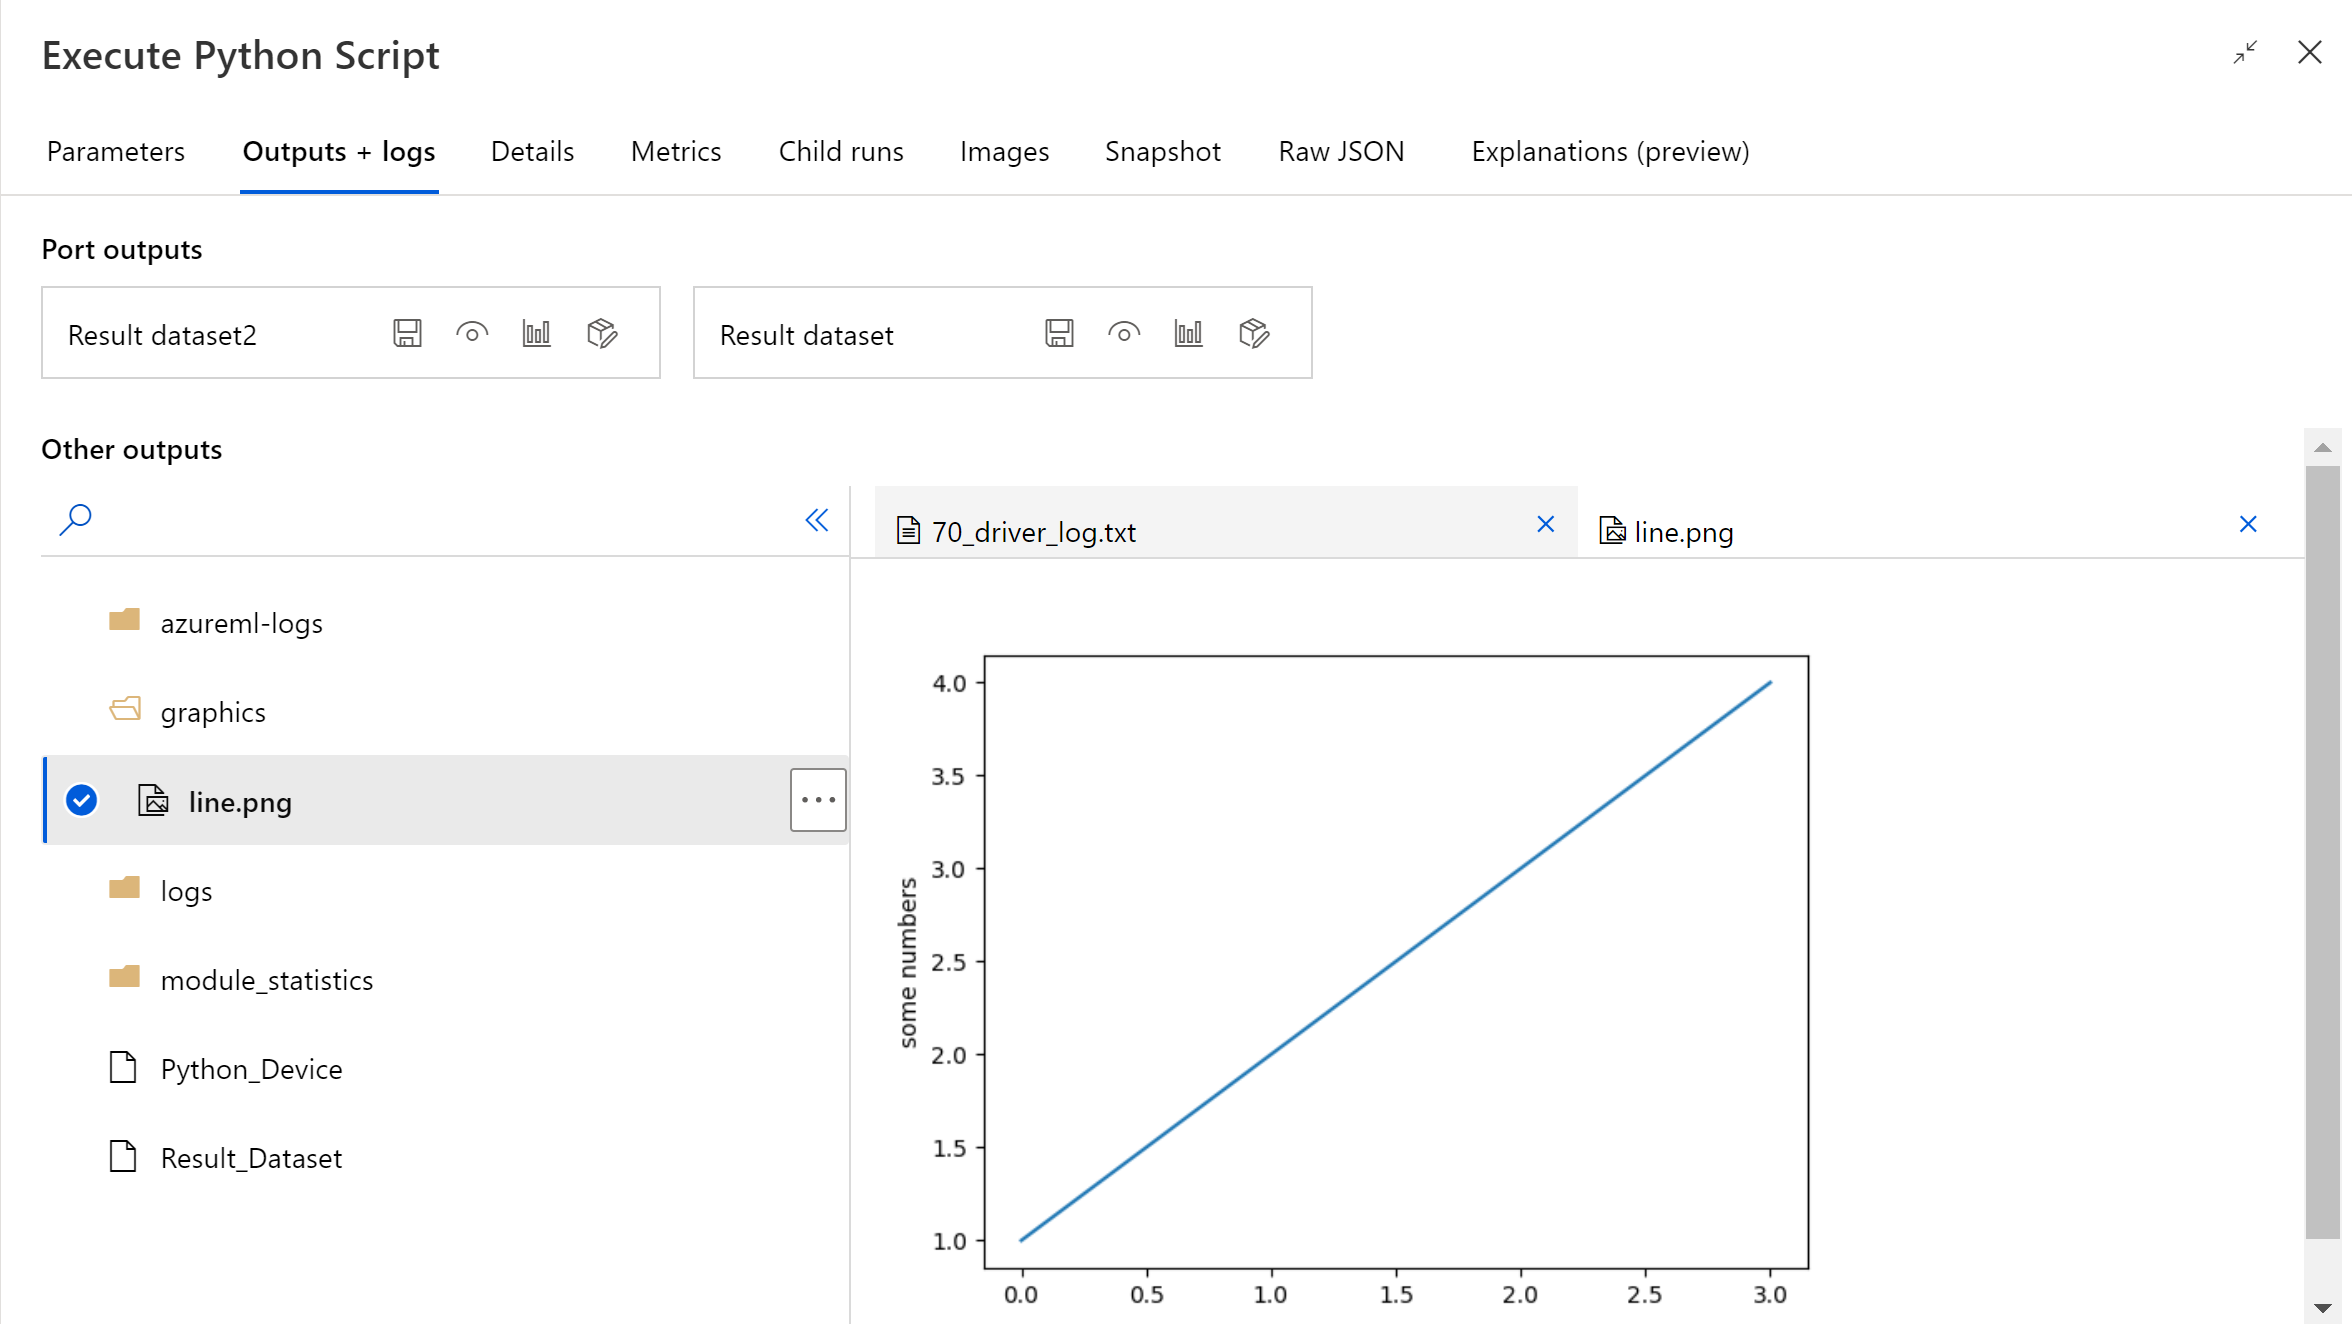
파이프라인 실행이 완료되면 구성 요소의 오른쪽 패널에서 이미지를 미리 볼 수 있습니다.
다음 코드를 사용하여 모든 데이터 저장소에 파일을 업로드할 수도 있습니다. 스토리지 계정에서만 파일을 미리 볼 수 있습니다.
import pandas as pd

# The entry point function MUST have two input arguments.
# If the input port is not connected, the corresponding
# dataframe argument will be None.
#   Param<dataframe1>: a pandas.DataFrame
#   Param<dataframe2>: a pandas.DataFrame
def azureml_main(dataframe1 = None, dataframe2 = None):

    # Execution logic goes here
    print(f'Input pandas.DataFrame #1: {dataframe1}')

    from matplotlib import pyplot as plt
    import os

    plt.plot([1, 2, 3, 4])
    plt.ylabel('some numbers')
    img_file = "line.png"

    # Set path
    path = "./img_folder"
    os.mkdir(path)
    plt.savefig(os.path.join(path,img_file))

    # Get current workspace
    from azureml.core import Run
    run = Run.get_context(allow_offline=True)
    ws = run.experiment.workspace

    # Get a named datastore from the current workspace and upload to specified path
    from azureml.core import Datastore
    datastore = Datastore.get(ws, datastore_name='workspacefilestore')
    datastore.upload(path)

    return dataframe1,
Python 스크립트 실행을 구성하는 방법
Python 스크립트 실행 구성 요소에는 시작점으로 사용할 수 있는 샘플 Python 코드가 포함되어 있습니다. Python 스크립트 실행 구성 요소를 구성하려면 입력 세트 및 실행할 Python 코드를 Python 스크립트 텍스트 상자에 제공하세요.
파이프라인에 Python 스크립트 실행 구성 요소를 추가하세요.
Dataset1에서 입력에 사용할 디자이너의 모든 데이터 세트를 추가하고 연결하세요. Python 스크립트에서 이 데이터 세트를 DataFrame1로 참조하세요.
데이터 세트 사용은 선택 사항입니다. Python을 사용하여 데이터를 생성하려는 경우 또는 Python 코드를 사용하여 데이터를 구성 요소로 직접 가져오려는 경우에 사용하세요.
이 구성 요소는 Dataset2에서 두 번째 데이터 세트 추가를 지원합니다. Python 스크립트에서 두 번째 데이터 세트를 DataFrame2로 참조하세요.
Azure Machine Learning에 저장된 데이터 세트를 이 구성 요소를 사용하여 로드하면 pandas 데이터 프레임으로 자동 변환됩니다.
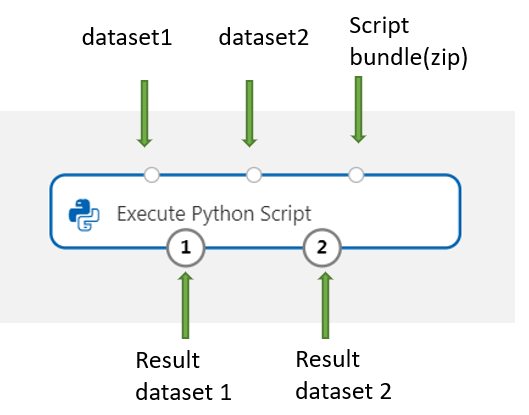
새 Python 패키지 또는 코드를 포함하려면 이러한 사용자 지정 리소스가 포함된 압축 파일을 스크립트 번들 포트에 연결하세요. 또는 스크립트가 16kb보다 큰 경우에는 스크립트 번들 포트를 사용하여 명령줄에서 16597자 제한 초과 같은 오류를 방지하세요.
- 스크립트 및 기타 사용자 지정 리소스를 Zip 파일에 번들로 묶으세요.
- 이 Zip 파일을 File Dataset로 스튜디오에 업로드하세요.
- 디자이너 제작 페이지의 왼쪽 구성 요소 창에 있는 데이터 세트 목록에서 데이터 세트 구성 요소를 끌어옵니다.
- 데이터 세트 구성 요소를 스크립트 실행 구성 요소의 스크립트 번들 포트에 연결합니다.
업로드된 압축 보관 계층에 포함된 모든 파일은 파이프라인 실행 중에 사용할 수 있습니다. 보관 계층에 디렉터리 구조가 포함되어 있으면 구조가 유지됩니다.
중요
일부 일반적인 단어(예:
test,app등)는 기본 제공 서비스용으로 예약되어 있으므로 스크립트 번들에서 파일에 대해 고유하고 의미 있는 이름을 사용하세요.다음은 Python 스크립트 파일 및 txt 파일이 포함된 스크립트 번들 예제입니다.
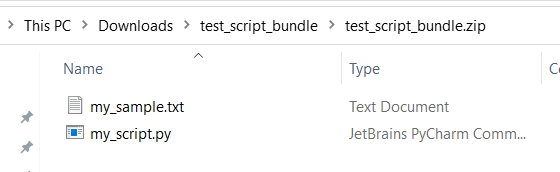
다음은
my_script.py의 내용입니다.def my_func(dataframe1): return dataframe1다음은 스크립트 번들의 파일을 사용하는 방법을 보여 주는 샘플 코드입니다.
import pandas as pd
from my_script import my_func

def azureml_main(dataframe1 = None, dataframe2 = None):

    # Execution logic goes here
    print(f'Input pandas.DataFrame #1: {dataframe1}')

    # Test the custom defined Python function
    dataframe1 = my_func(dataframe1)

    # Test to read custom uploaded files by relative path
    with open('./Script Bundle/my_sample.txt', 'r') as text_file:
        sample = text_file.read()

    return dataframe1, pd.DataFrame(columns=["Sample"], data=[[sample]])
Python 스크립트 텍스트 상자에 올바른 Python 스크립트를 입력하거나 붙여넣으세요.
참고
스크립트를 작성할 때는 주의해야 합니다. 선언되지 않은 변수 또는 가져오지 않은 구성 요소나 함수를 사용하는 것과 같은 구문 오류가 없는지 확인하세요. 사전 설치된 구성 요소 목록에 특히 주의하세요. 목록에 없는 구성 요소를 가져오려면 다음과 같이 스크립트에 해당 패키지를 설치하세요.
import os
os.system(f"pip install scikit-misc")
Python 스크립트 텍스트 상자는 주석의 몇 가지 지침과 데이터 액세스 및 출력에 대한 샘플 코드를 사용하여 미리 채워져 있습니다. 이 코드를 편집하거나 바꾸어야 합니다. 들여쓰기 및 대/소문자 구분에 대한 Python 규칙을 따르세요.
- 이 스크립트는 이 구성 요소의 진입점으로
azureml_main이라는 함수를 포함해야 합니다. - 진입점 함수에는
Param<dataframe1>및Param<dataframe2>라는 두 개의 입력 인수가 있어야 합니다. 스크립트에 이러한 인수가 사용되지 않는 경우에도 마찬가지입니다. - 세 번째 입력 포트에 연결된 압축 파일은 압축이 풀리고
.\Script Bundle디렉터리에 저장됩니다. 이 파일은 Pythonsys.path에도 추가됩니다.
.zip 파일에
mymodule.py가 포함되어 있으면import mymodule을 사용하여 가져오세요.두 데이터 세트는 디자이너로 반환될 수 있으며,
pandas.DataFrame형식의 시퀀스여야 합니다. Python 코드에서 다른 출력을 만들고 Azure Storage에 직접 기록할 수 있습니다.경고
Python 스크립트 실행 구성 요소에서 데이터베이스나 다른 외부 스토리지에 연결하지 않는 것이 좋습니다. 데이터 가져오기 구성 요소 및 데이터 내보내기 구성 요소를 사용할 수 있습니다.
- 이 스크립트는 이 구성 요소의 진입점으로
파이프라인을 제출합니다.
구성 요소가 완료되면 출력이 올바른지 확인하세요.
구성 요소가 실패한 경우 몇 가지 문제 해결 작업을 수행해야 합니다. 구성 요소를 선택하고 오른쪽 창에서 출력+로그를 엽니다. 70_driver_log.txt를 열고 in azureml_main을 검색하면 오류가 발생한 줄을 찾을 수 있습니다. 예를 들어 “File “/tmp/tmp01_ID/user_script.py”, line 17, in azureml_main”은 Python 스크립트의 17번째 줄에서 오류가 발생했음을 나타냅니다.
결과
포함된 Python 코드의 모든 계산 결과는 pandas.DataFrame으로 제공되어야 하며, 이는 Azure Machine Learning 데이터 세트 형식으로 자동 변환됩니다. 그런 다음, 파이프라인의 다른 구성 요소에서 결과를 사용할 수 있습니다.
구성 요소는 다음 두 가지 데이터 세트를 반환합니다.
결과 데이터 세트 1 - Python 스크립트에서 첫 번째로 반환된 pandas 데이터 프레임에 의해 정의됩니다.
결과 데이터 세트 2 - Python 스크립트에서 두 번째로 반환된 pandas 데이터 프레임에 의해 정의됩니다.
사전 설치된 Python 패키지
사전 설치된 패키지는 다음과 같습니다.
- adal==1.2.2
- applicationinsights==0.11.9
- attrs==19.3.0
- azure-common==1.1.25
- azure-core==1.3.0
- azure-graphrbac==0.61.1
- azure-identity==1.3.0
- azure-mgmt-authorization==0.60.0
- azure-mgmt-containerregistry==2.8.0
- azure-mgmt-keyvault==2.2.0
- azure-mgmt-resource==8.0.1
- azure-mgmt-storage==8.0.0
- azure-storage-blob==1.5.0
- azure-storage-common==1.4.2
- azureml-core==1.1.5.5
- azureml-dataprep-native==14.1.0
- azureml-dataprep==1.3.5
- azureml-defaults==1.1.5.1
- azureml-designer-classic-modules==0.0.118
- azureml-designer-core==0.0.31
- azureml-designer-internal==0.0.18
- azureml-model-management-sdk==1.0.1b6.post1
- azureml-pipeline-core==1.1.5
- azureml-telemetry==1.1.5.3
- backports.tempfile==1.0
- backports.weakref==1.0.post1
- boto3==1.12.29
- botocore==1.15.29
- cachetools==4.0.0
- certifi==2019.11.28
- cffi==1.12.3
- chardet==3.0.4
- click==7.1.1
- cloudpickle==1.3.0
- configparser==3.7.4
- contextlib2==0.6.0.post1
- cryptography==2.8
- cycler==0.10.0
- dill==0.3.1.1
- distro==1.4.0
- docker==4.2.0
- docutils==0.15.2
- dotnetcore2==2.1.13
- flask==1.0.3
- fusepy==3.0.1
- gensim==3.8.1
- google-api-core==1.16.0
- google-auth==1.12.0
- google-cloud-core==1.3.0
- google-cloud-storage==1.26.0
- google-resumable-media==0.5.0
- googleapis-common-protos==1.51.0
- gunicorn==19.9.0
- idna==2.9
- imbalanced-learn==0.4.3
- isodate==0.6.0
- itsdangerous==1.1.0
- jeepney==0.4.3
- jinja2==2.11.1
- jmespath==0.9.5
- joblib==0.14.0
- json-logging-py==0.2
- jsonpickle==1.3
- jsonschema==3.0.1
- kiwisolver==1.1.0
- liac-arff==2.4.0
- lightgbm==2.2.3
- markupsafe==1.1.1
- matplotlib==3.1.3
- more-itertools==6.0.0
- msal-extensions==0.1.3
- msal==1.1.0
- msrest==0.6.11
- msrestazure==0.6.3
- ndg-httpsclient==0.5.1
- nimbusml==1.6.1
- numpy==1.18.2
- oauthlib==3.1.0
- pandas==0.25.3
- pathspec==0.7.0
- pip==20.0.2
- portalocker==1.6.0
- protobuf==3.11.3
- pyarrow==0.16.0
- pyasn1-modules==0.2.8
- pyasn1==0.4.8
- pycparser==2.20
- pycryptodomex==3.7.3
- pyjwt==1.7.1
- pyopenssl==19.1.0
- pyparsing==2.4.6
- pyrsistent==0.16.0
- python-dateutil==2.8.1
- pytz==2019.3
- requests-oauthlib==1.3.0
- requests==2.23.0
- rsa==4.0
- ruamel.yaml==0.15.89
- s3transfer==0.3.3
- scikit-learn==0.22.2
- scipy==1.4.1
- secretstorage==3.1.2
- setuptools==46.1.1.post20200323
- six==1.14.0
- smart-open==1.10.0
- urllib3==1.25.8
- websocket-client==0.57.0
- werkzeug==0.16.1
- wheel==0.34.2
다음 단계
Azure Machine Learning에서 사용 가능한 구성 요소 집합을 참조하세요.