빠른 시작: ARM 템플릿을 사용하여 Ubuntu Data Science Virtual Machine 만들기
이 빠른 시작에서는 ARM 템플릿(Azure Resource Manager 템플릿)을 사용하여 Ubuntu DSVM(Data Science Virtual Machine)을 만드는 방법을 보여 줍니다. Data Science Virtual Machines는 데이터 과학 및 기계 학습 프레임워크 및 도구 제품군으로 미리 로드된 클라우드 기반 리소스입니다. GPU 기반 컴퓨팅 리소스에 배포되는 경우 모든 도구와 라이브러리는 GPU를 사용하도록 구성됩니다.
Azure Resource Manager 템플릿은 프로젝트에 대한 인프라 및 구성을 정의하는 JSON(JavaScript Object Notation) 파일입니다. 이 템플릿은 선언적 구문을 사용합니다. 배포를 만들기 위한 프로그래밍 명령의 시퀀스를 작성하지 않고 의도하는 배포를 설명합니다.
환경이 필수 조건을 충족하고 ARM 템플릿을 사용하는 방법을 알고 있는 경우 Azure에 배포 단추를 선택합니다. 그러면 Azure Portal에서 템플릿이 열립니다.

필수 구성 요소
템플릿 검토
이 빠른 시작에 사용된 템플릿은 Azure 빠른 시작 템플릿 리소스에서 찾을 수 있습니다.
{
  "$schema": "https://schema.management.azure.com/schemas/2019-04-01/deploymentTemplate.json#",
  "contentVersion": "1.0.0.0",
  "metadata": {
    "_generator": {
      "name": "bicep",
      "version": "0.8.9.13224",
      "templateHash": "4895680407304578048"
    }
  },
  "parameters": {
    "adminUsername": {
      "type": "string",
      "metadata": {
        "description": "Username for Administrator Account"
      }
    },
    "vmName": {
      "type": "string",
      "defaultValue": "vmName",
      "metadata": {
        "description": "The name of you Virtual Machine."
      }
    },
    "location": {
      "type": "string",
      "defaultValue": "[resourceGroup().location]",
      "metadata": {
        "description": "Location for all resources."
      }
    },
    "cpu_gpu": {
      "type": "string",
      "defaultValue": "CPU-4GB",
      "allowedValues": [
        "CPU-4GB",
        "CPU-7GB",
        "CPU-8GB",
        "CPU-14GB",
        "CPU-16GB",
        "GPU-56GB"
      ],
      "metadata": {
        "description": "Choose between CPU or GPU processing"
      }
    },
    "virtualNetworkName": {
      "type": "string",
      "defaultValue": "vNet",
      "metadata": {
        "description": "Name of the VNET"
      }
    },
    "subnetName": {
      "type": "string",
      "defaultValue": "subnet",
      "metadata": {
        "description": "Name of the subnet in the virtual network"
      }
    },
    "networkSecurityGroupName": {
      "type": "string",
      "defaultValue": "SecGroupNet",
      "metadata": {
        "description": "Name of the Network Security Group"
      }
    },
    "authenticationType": {
      "type": "string",
      "defaultValue": "sshPublicKey",
      "allowedValues": [
        "sshPublicKey",
        "password"
      ],
      "metadata": {
        "description": "Type of authentication to use on the Virtual Machine. SSH key is recommended."
      }
    },
    "adminPasswordOrKey": {
      "type": "secureString",
      "metadata": {
        "description": "SSH Key or password for the Virtual Machine. SSH key is recommended."
      }
    }
  },
  "variables": {
    "networkInterfaceName": "[format('{0}NetInt', parameters('vmName'))]",
    "virtualMachineName": "[parameters('vmName')]",
    "publicIpAddressName": "[format('{0}PublicIP', parameters('vmName'))]",
    "subnetRef": "[resourceId('Microsoft.Network/virtualNetworks/subnets', parameters('virtualNetworkName'), parameters('subnetName'))]",
    "nsgId": "[resourceId('Microsoft.Network/networkSecurityGroups', parameters('networkSecurityGroupName'))]",
    "osDiskType": "StandardSSD_LRS",
    "storageAccountName": "[format('storage{0}', uniqueString(resourceGroup().id))]",
    "storageAccountType": "Standard_LRS",
    "storageAccountKind": "Storage",
    "vmSize": {
      "CPU-4GB": "Standard_B2s",
      "CPU-7GB": "Standard_D2s_v3",
      "CPU-8GB": "Standard_D2s_v3",
      "CPU-14GB": "Standard_D4s_v3",
      "CPU-16GB": "Standard_D4s_v3",
      "GPU-56GB": "Standard_NC6_Promo"
    },
    "linuxConfiguration": {
      "disablePasswordAuthentication": true,
      "ssh": {
        "publicKeys": [
          {
            "path": "[format('/home/{0}/.ssh/authorized_keys', parameters('adminUsername'))]",
            "keyData": "[parameters('adminPasswordOrKey')]"
          }
        ]
      }
    }
  },
  "resources": [
    {
      "type": "Microsoft.Network/networkInterfaces",
      "apiVersion": "2021-05-01",
      "name": "[variables('networkInterfaceName')]",
      "location": "[parameters('location')]",
      "properties": {
        "ipConfigurations": [
          {
            "name": "ipconfig1",
            "properties": {
              "subnet": {
                "id": "[variables('subnetRef')]"
              },
              "privateIPAllocationMethod": "Dynamic",
              "publicIPAddress": {
                "id": "[resourceId('Microsoft.Network/publicIPAddresses', variables('publicIpAddressName'))]"
              }
            }
          }
        ],
        "networkSecurityGroup": {
          "id": "[variables('nsgId')]"
        }
      },
      "dependsOn": [
        "[resourceId('Microsoft.Network/networkSecurityGroups', parameters('networkSecurityGroupName'))]",
        "[resourceId('Microsoft.Network/publicIPAddresses', variables('publicIpAddressName'))]",
        "[resourceId('Microsoft.Network/virtualNetworks', parameters('virtualNetworkName'))]"
      ]
    },
    {
      "type": "Microsoft.Network/networkSecurityGroups",
      "apiVersion": "2021-05-01",
      "name": "[parameters('networkSecurityGroupName')]",
      "location": "[parameters('location')]",
      "properties": {
        "securityRules": [
          {
            "name": "JupyterHub",
            "properties": {
              "priority": 1010,
              "protocol": "Tcp",
              "access": "Allow",
              "direction": "Inbound",
              "sourceAddressPrefix": "*",
              "sourcePortRange": "*",
              "destinationAddressPrefix": "*",
              "destinationPortRange": "8000"
            }
          },
          {
            "name": "RStudioServer",
            "properties": {
              "priority": 1020,
              "protocol": "Tcp",
              "access": "Allow",
              "direction": "Inbound",
              "sourceAddressPrefix": "*",
              "sourcePortRange": "*",
              "destinationAddressPrefix": "*",
              "destinationPortRange": "8787"
            }
          },
          {
            "name": "SSH",
            "properties": {
              "priority": 1030,
              "protocol": "Tcp",
              "access": "Allow",
              "direction": "Inbound",
              "sourceAddressPrefix": "*",
              "sourcePortRange": "*",
              "destinationAddressPrefix": "*",
              "destinationPortRange": "22"
            }
          }
        ]
      }
    },
    {
      "type": "Microsoft.Network/virtualNetworks",
      "apiVersion": "2021-05-01",
      "name": "[parameters('virtualNetworkName')]",
      "location": "[parameters('location')]",
      "properties": {
        "addressSpace": {
          "addressPrefixes": [
            "10.0.0.0/24"
          ]
        },
        "subnets": [
          {
            "name": "[parameters('subnetName')]",
            "properties": {
              "addressPrefix": "10.0.0.0/24",
              "privateEndpointNetworkPolicies": "Enabled",
              "privateLinkServiceNetworkPolicies": "Enabled"
            }
          }
        ]
      }
    },
    {
      "type": "Microsoft.Network/publicIPAddresses",
      "apiVersion": "2021-05-01",
      "name": "[variables('publicIpAddressName')]",
      "location": "[parameters('location')]",
      "sku": {
        "name": "Basic",
        "tier": "Regional"
      },
      "properties": {
        "publicIPAllocationMethod": "Dynamic"
      }
    },
    {
      "type": "Microsoft.Storage/storageAccounts",
      "apiVersion": "2021-08-01",
      "name": "[variables('storageAccountName')]",
      "location": "[parameters('location')]",
      "sku": {
        "name": "[variables('storageAccountType')]"
      },
      "kind": "[variables('storageAccountKind')]"
    },
    {
      "type": "Microsoft.Compute/virtualMachines",
      "apiVersion": "2021-11-01",
      "name": "[format('{0}-{1}', variables('virtualMachineName'), parameters('cpu_gpu'))]",
      "location": "[parameters('location')]",
      "properties": {
        "hardwareProfile": {
          "vmSize": "[variables('vmSize')[parameters('cpu_gpu')]]"
        },
        "storageProfile": {
          "osDisk": {
            "createOption": "FromImage",
            "managedDisk": {
              "storageAccountType": "[variables('osDiskType')]"
            }
          },
          "imageReference": {
            "publisher": "microsoft-dsvm",
            "offer": "ubuntu-1804",
            "sku": "1804-gen2",
            "version": "latest"
          }
        },
        "networkProfile": {
          "networkInterfaces": [
            {
              "id": "[resourceId('Microsoft.Network/networkInterfaces', variables('networkInterfaceName'))]"
            }
          ]
        },
        "osProfile": {
          "computerName": "[variables('virtualMachineName')]",
          "adminUsername": "[parameters('adminUsername')]",
          "adminPassword": "[parameters('adminPasswordOrKey')]",
          "linuxConfiguration": "[if(equals(parameters('authenticationType'), 'password'), json('null'), variables('linuxConfiguration'))]"
        }
      },
      "dependsOn": [
        "[resourceId('Microsoft.Network/networkInterfaces', variables('networkInterfaceName'))]"
      ]
    }
  ],
  "outputs": {
    "adminUsername": {
      "type": "string",
      "value": "[parameters('adminUsername')]"
    }
  }
}
템플릿은 다음 리소스를 정의합니다.
- Microsoft.Network/networkInterfaces
- Microsoft.Network/networkSecurityGroups
- Microsoft.Network/virtualNetworks
- Microsoft.Network/publicIPAddresses
- Microsoft.Storage/storageAccounts
- Microsoft.Compute/virtualMachines: 클라우드 기반 가상 머신을 만듭니다. 이 템플릿에서 가상 머신은 Ubuntu를 실행하는 Data Science Virtual Machine으로 구성됩니다.
템플릿 배포
Azure CLI에서 템플릿을 사용하려면 로그인하고 구독을 선택합니다(Azure CLI를 사용하여 로그인 참조). 다음을 실행합니다.
read -p "Enter the name of the resource group to create:" resourceGroupName &&
read -p "Enter the Azure location (e.g., centralus):" location &&
read -p "Enter the authentication type (must be 'password' or 'sshPublicKey') :" authenticationType &&
read -p "Enter the login name for the administrator account (may not be 'admin'):" adminUsername &&
read -p "Enter administrator account secure string (value of password or ssh public key):" adminPasswordOrKey &&
templateUri="https://raw.githubusercontent.com/Azure/azure-quickstart-templates/master/application-workloads/datascience/vm-ubuntu-DSVM-GPU-or-CPU/azuredeploy.json" &&
az group create --name $resourceGroupName --location "$location" &&
az deployment group create --resource-group $resourceGroupName --template-uri $templateUri --parameters adminUsername=$adminUsername authenticationType=$authenticationType adminPasswordOrKey=$adminPasswordOrKey &&
echo "Press [ENTER] to continue ..." &&
read
이 코드를 실행하면 다음을 입력합니다.
- 만들려는 DSVM 및 관련 리소스를 포함할 리소스 그룹의 이름
- 배포하려는 Azure 위치
- 사용할 인증 유형(
password또는sshPublicKey문자열 입력) - 관리자 계정의 로그인 이름(이 값은
admin이 될 수 없음)입니다. - 계정에 대한 암호 또는 SSH 공개 키의 값
배포된 리소스 검토
Data Science Virtual Machine을 표시하려면 다음을 수행합니다.
- Azure Portal로 이동
- 로그인
- 방금 만든 리소스 그룹을 선택합니다.
그러면 리소스 그룹 정보가 표시됩니다.
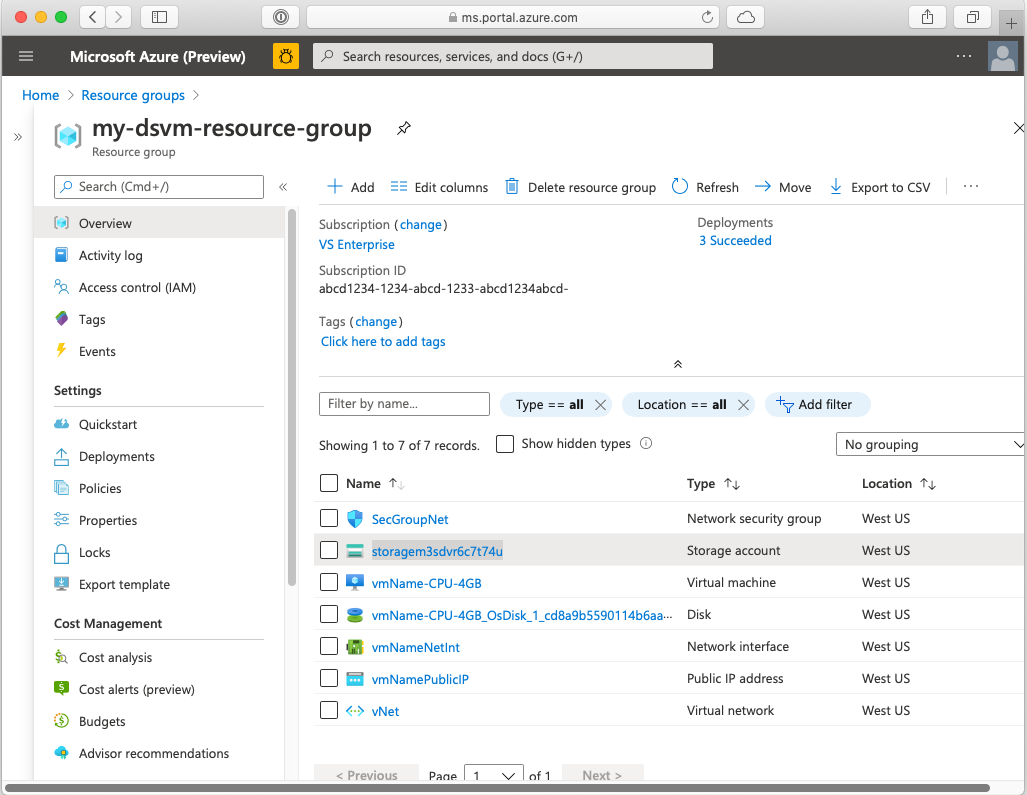
Virtual Machine 리소스를 선택하여 해당 정보 페이지로 이동합니다. 여기에서 연결 세부 정보를 포함하여 VM에 대한 정보를 찾을 수 있습니다.
리소스 정리
이 가상 머신을 사용하지 않으려면 삭제해야 합니다. DSVM이 다른 리소스(예: 스토리지 계정)와 연결되어 있으므로 생성된 전체 리소스 그룹을 삭제하는 것이 좋습니다. 포털을 사용하여 리소스 그룹을 삭제할 수 있습니다. 삭제 단추를 선택한 다음 선택 사항을 확인합니다. 다음과 같이 CLI에서 리소스 그룹을 삭제할 수도 있습니다.
echo "Enter the Resource Group name:" &&
read resourceGroupName &&
az group delete --name $resourceGroupName &&
echo "Press [ENTER] to continue ..."
다음 단계
이 빠른 시작에서는 ARM 템플릿에서 Data Science Virtual Machine을 만듭니다.