적용 대상:  Python SDK azure-ai-ml v2(현재)
참고
SDK v1을 사용하여 파이프라인을 빌드하는 자습서는 자습서: 이미지 분류를 위한 Azure Machine Learning 파이프라인 빌드를 참조하세요.
기계 학습 파이프라인의 핵심은 전체 기계 학습 작업을 다단계 워크플로로 분할하는 것입니다. 각 단계는 개별적으로 개발, 최적화, 구성 및 자동화할 수 있는 관리 가능한 구성 요소입니다. 단계는 잘 정의된 인터페이스를 통해 연결됩니다. Azure Machine Learning 파이프라인 서비스는 파이프라인 단계 간의 모든 종속성을 자동으로 오케스트레이션합니다. 파이프라인 사용의 이점은 표준화된 MLOps 실천, 확장 가능한 팀 협업, 교육 효율성 및 비용 절감입니다. 파이프라인의 이점에 대해 자세히 알아보려면 Azure Machine Learning 파이프라인이란을 참조하세요.
이 자습서에서는 Azure Machine Learning을 사용하여 Azure Machine Learning Python SDK v2를 사용하여 프로덕션 준비 기계 학습 프로젝트를 만듭니다. 즉, Azure Machine Learning Python SDK를 사용하여 다음을 수행할 수 있습니다.
- Azure Machine Learning 작업 영역에 대한 핸들 가져오기
- Azure Machine Learning 데이터 자산 만들기
- 재사용 가능한 Azure Machine Learning 구성 요소 만들기
- Azure Machine Learning 파이프라인 만들기, 유효성 검사 및 실행
이 자습서에서는 Azure Machine Learning 파이프라인을 만들어 크레딧 기본 예측을 위해 모델을 학습시킵니다. 파이프라인은 다음 두 단계를 처리합니다.
- 데이터 준비
- 학습된 모델 학습 및 등록
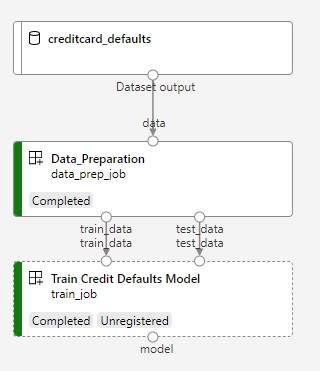
다음 이미지는 제출된 후 Azure 스튜디오에서 볼 수 있는 간단한 파이프라인을 보여 줍니다.
두 단계는 첫 번째 데이터 준비와 두 번째 학습입니다.
이 동영상에서는 자습서의 단계를 따를 수 있도록 Azure Machine Learning 스튜디오를 시작하는 방법을 보여 줍니다. 동영상에서는 Notebook을 만들고, 컴퓨팅 인스턴스를 만들고, Notebook을 복제하는 방법을 보여 줍니다. 해당 단계는 다음 섹션에서도 설명됩니다.
필수 구성 요소
-
Azure Machine Learning을 사용하려면 작업 영역이 필요합니다. 작업 영역이 없으면 시작하는 데 필요한 리소스 만들기를 완료하여 작업 영역을 만들고 사용 방법에 대해 자세히 알아봅니다.
중요합니다
Azure Machine Learning 작업 영역이 관리형 가상 네트워크로 구성된 경우 공용 Python 패키지 리포지토리에 대한 액세스를 허용하는 아웃바운드 규칙을 추가해야 할 수 있습니다. 자세한 내용은 시나리오: 공용 기계 학습 패키지에 액세스를 참조합니다.
-
아직 열려 있지 않은 경우 스튜디오에 로그인하고 작업 영역을 선택합니다.
이 자습서에 필요한 데이터 자산을 만들려면 데이터 업로드, 액세스 및 탐색 자습서를 완료합니다. 초기 데이터 자산을 만들려면 모든 코드를 실행해야 합니다. 원하는 경우 데이터를 탐색하고 수정하지만 이 자습서의 초기 데이터만 필요합니다.
-
작업 영역에서 Notebook을 열거나 만듭니다.
- 코드를 복사하여 셀에 붙여 넣으려면 새 Notebook을 만듭니다.
- 또는 스튜디오의 샘플 섹션에서 tutorials/get-started-notebooks/pipeline.ipynb를 엽니다. 그런 다음 복제를 선택하여 Notebook을 파일에 추가합니다. 샘플 Notebook을 찾으려면 샘플 Notebook에서 학습을 참조하세요.
커널을 설정하고 VS Code(Visual Studio Code)에서 엽니다.
아직 컴퓨팅 인스턴스가 없는 경우 열린 Notebook 위 상단 표시줄에서 컴퓨팅 인스턴스를 만듭니다.

컴퓨팅 인스턴스가 중지된 경우 컴퓨팅 시작을 선택하고 실행될 때까지 기다립니다.

컴퓨팅 인스턴스가 실행 중이 될 때까지 기다리세요. 그런 다음 오른쪽 위에 있는 커널이
Python 3.10 - SDK v2인지 확인합니다. 그렇지 않은 경우 드롭다운 목록을 사용하여 이 커널을 선택합니다.
이 커널이 표시되지 않으면 컴퓨팅 인스턴스가 실행 중인지 확인합니다. 이 경우 전자 필기장 오른쪽 위에 있는 새로 고침 단추를 선택합니다.
인증이 필요하다는 배너가 표시되면 인증을 선택합니다.
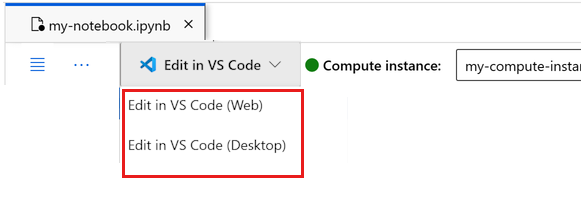
여기서 Notebook을 실행하거나 Azure Machine Learning 리소스의 기능을 갖춘 전체 IDE(통합 개발 환경)를 위해 VS Code에서 열 수 있습니다. VS Code에서 열기를 선택한 다음 웹 또는 데스크톱 옵션을 선택합니다. 이러한 방식으로 시작하면 VS Code가 컴퓨팅 인스턴스, 커널 및 작업 영역 파일 시스템에 연결됩니다.


중요합니다
이 자습서의 나머지 부분에는 자습서 Notebook의 셀이 포함되어 있습니다. 새 전자 필기장을 복사하여 붙여넣거나 복제한 경우 지금 전자 필기장으로 전환합니다.
파이프라인 리소스 설정
Azure Machine Learning 프레임워크는 CLI, Python SDK 또는 스튜디오 인터페이스에서 사용할 수 있습니다. 이 예에서는 Azure Machine Learning Python SDK v2를 사용하여 파이프라인을 만듭니다.
파이프라인을 만들기 전에 다음 리소스가 필요합니다.
- 학습을 위한 데이터 자산
- 파이프라인을 실행하기 위한 소프트웨어 환경
- 작업이 실행되는 컴퓨팅 리소스
작업 영역에 대한 핸들 만들기
코드를 살펴보기 전에 작업 영역을 참조할 수 있는 방법이 필요합니다. 작업 영역에 대한 핸들 ml_client를 만듭니다. 그런 다음 리소스 및 작업을 관리하는 데 사용합니다 ml_client .
다음 셀에서 구독 ID, 리소스 그룹 이름 및 작업 영역 이름을 입력합니다. 이러한 값을 찾으려면 다음을 수행합니다.
- 오른쪽 위 Azure Machine Learning 스튜디오 도구 모음에서 작업 영역 이름을 선택합니다.
- 작업 영역, 리소스 그룹 및 구독 ID의 값을 코드에 복사합니다.
- 하나의 값을 복사하고 영역을 닫은 다음 붙여넣은 다음 다음 값으로 돌아와야 합니다.
from azure.ai.ml import MLClient
from azure.identity import DefaultAzureCredential

# authenticate
credential = DefaultAzureCredential()

SUBSCRIPTION = "<SUBSCRIPTION_ID>"
RESOURCE_GROUP = "<RESOURCE_GROUP>"
WS_NAME = "<AML_WORKSPACE_NAME>"
# Get a handle to the workspace
ml_client = MLClient(
    credential=credential,
    subscription_id=SUBSCRIPTION,
    resource_group_name=RESOURCE_GROUP,
    workspace_name=WS_NAME,
)
SDK 참조:
참고
MLClient를 만들면 작업 영역에 연결되지 않습니다. 클라이언트 초기화는 지연되어 처음 호출이 필요할 때까지 기다립니다(이는 다음 코드 셀에서 발생합니다).
ml_client를 호출하여 연결을 확인합니다. 작업 영역을 처음 호출하는 경우이므로 인증하라는 메시지가 표시될 수 있습니다.
# Verify that the handle works correctly.
# If you get an error here, modify your SUBSCRIPTION, RESOURCE_GROUP, and WS_NAME in the previous cell.
ws = ml_client.workspaces.get(WS_NAME)
print(ws.location, ":", ws.resource_group)
SDK 참조:
등록된 데이터 자산에 액세스
이전에 자습서: Azure Machine Learning에서 데이터 업로드, 액세스 및 탐색에서 등록한 데이터를 가져오는 것부터 시작합니다.
- Azure Machine Learning은
Data개체를 사용하여 재사용 가능한 데이터 정의를 등록하고 파이프라인 내에서 데이터를 사용합니다.
# get a handle of the data asset and print the URI
credit_data = ml_client.data.get(name="credit-card", version="initial")
print(f"Data asset URI: {credit_data.path}")
SDK 참조:
파이프라인 단계를 위한 작업 환경 만들기
지금까지 개발 컴퓨터인 컴퓨팅 인스턴스에 개발 환경을 만들었습니다. 파이프라인의 각 단계에 사용할 환경도 필요합니다. 각 단계에는 고유한 환경이 있거나 여러 단계에 대해 몇 가지 공통 환경을 사용할 수 있습니다.
이 예에서는 conda yaml 파일을 사용하여 작업에 대한 conda 환경을 만듭니다. 먼저 파일을 저장할 디렉터리를 만듭니다.
import os

dependencies_dir = "./dependencies"
os.makedirs(dependencies_dir, exist_ok=True)
이제 종속성 디렉터리에 파일을 만듭니다.
%%writefile {dependencies_dir}/conda.yaml
name: model-env
channels:
  - conda-forge
dependencies:
  - python=3.8
  - numpy=1.21.2
  - pip=21.2.4
  - scikit-learn=0.24.2
  - scipy=1.7.1
  - pandas>=1.1,<1.2
  - pip:
    - inference-schema[numpy-support]==1.3.0
    - xlrd==2.0.1
    - mlflow== 2.4.1
    - azureml-mlflow==1.51.0
사양에는 Azure Machine Learning 관련 패키지(azureml-mlflow)와 함께 파이프라인에서 사용하는 몇 가지 일반적인 패키지(numpy, pip)가 포함되어 있습니다.
Azure Machine Learning 패키지는 Azure Machine Learning 작업을 실행하는 데 필수가 아닙니다. 그러나 이러한 패키지를 추가하면 Azure Machine Learning 작업 내에서 메트릭을 로깅하고 모델을 등록하기 위해 Azure Machine Learning과 상호 작용할 수 있습니다. 이 자습서의 뒷부분에 나오는 학습 스크립트에서 사용합니다.
yaml 파일을 사용하여 이 사용자 지정 환경을 만들고 작업 영역에 등록합니다.
from azure.ai.ml.entities import Environment

custom_env_name = "aml-scikit-learn"

pipeline_job_env = Environment(
    name=custom_env_name,
    description="Custom environment for Credit Card Defaults pipeline",
    tags={"scikit-learn": "0.24.2"},
    conda_file=os.path.join(dependencies_dir, "conda.yaml"),
    image="mcr.microsoft.com/azureml/openmpi4.1.0-ubuntu20.04:latest",
    version="0.2.0",
)
pipeline_job_env = ml_client.environments.create_or_update(pipeline_job_env)

print(
    f"Environment with name {pipeline_job_env.name} is registered to workspace, the environment version is {pipeline_job_env.version}"
)
SDK 참조:
학습 파이프라인 빌드
이제 파이프라인을 실행하는 데 필요한 모든 자산이 준비되었으므로 파이프라인 자체를 빌드할 차례입니다.
Azure Machine Learning 파이프라인은 일반적으로 여러 구성 요소로 구성된 재사용 가능한 ML 워크플로입니다. 구성 요소의 일반적인 수명은 다음과 같습니다.
- 구성 요소의 yaml 사양을 작성하거나
ComponentMethod를 사용하여 프로그래밍 방식으로 만듭니다. - 선택적으로 구성 요소를 작업 영역에 이름과 버전으로 등록하여 재사용 및 공유 가능하게 만듭니다.
- 파이프라인 코드에서 해당 구성 요소를 로드합니다.
- 구성 요소의 입력, 출력 및 매개 변수를 사용하여 파이프라인을 구현합니다.
- 파이프라인을 제출합니다.
프로그래밍 방식과 yaml 정의의 두 가지 방법으로 구성 요소를 만들 수 있습니다. 다음 두 섹션에서는 두 가지 방법으로 구성 요소를 만드는 과정을 안내합니다. 두 가지 옵션을 모두 시도하여 두 구성 요소를 만들거나 기본 설정하는 방법을 선택할 수 있습니다.
참고
편의를 위해 이 자습서에서는 모든 구성 요소에 대해 동일한 컴퓨팅을 사용합니다. 그러나 예를 들어, train_step.compute = "cpu-cluster"와(과) 같은 줄을 추가하여 각 구성 요소에 대해 서로 다른 컴퓨팅을 설정할 수 있습니다. 각 구성 요소에 대해 서로 다른 컴퓨팅을 사용하여 파이프라인을 빌드하는 예를 보려면 cifar-10 파이프라인 자습서의 기본 파이프라인 작업 섹션을 참조하세요.
구성 요소 1 만들기: 데이터 준비(프로그래밍 방식 정의 사용)
먼저 첫 번째 구성 요소를 만듭니다. 이 구성 요소는 데이터의 전처리를 처리합니다. 미리 처리 작업은 data_prep.py Python 파일에서 수행됩니다.
먼저 data_prep 구성 요소의 원본 폴더를 만듭니다.
import os

data_prep_src_dir = "./components/data_prep"
os.makedirs(data_prep_src_dir, exist_ok=True)
이 스크립트는 데이터를 학습 및 테스트 데이터 세트로 분할하는 간단한 작업을 수행합니다. Azure Machine Learning은 데이터 세트를 폴더로 컴퓨팅에 탑재하므로 탑재된 입력 폴더 내의 데이터 파일에 액세스하는 보조 select_first_file 함수를 만들었습니다.
MLFlow는 파이프라인 실행 중에 매개 변수와 메트릭을 기록하는 데 사용됩니다.
%%writefile {data_prep_src_dir}/data_prep.py
import os
import argparse
import pandas as pd
from sklearn.model_selection import train_test_split
import logging
import mlflow


def main():
    """Main function of the script."""

    # input and output arguments
    parser = argparse.ArgumentParser()
    parser.add_argument("--data", type=str, help="path to input data")
    parser.add_argument("--test_train_ratio", type=float, required=False, default=0.25)
    parser.add_argument("--train_data", type=str, help="path to train data")
    parser.add_argument("--test_data", type=str, help="path to test data")
    args = parser.parse_args()

    # Start Logging
    mlflow.start_run()

    print(" ".join(f"{k}={v}" for k, v in vars(args).items()))

    print("input data:", args.data)

    credit_df = pd.read_csv(args.data, header=1, index_col=0)

    mlflow.log_metric("num_samples", credit_df.shape[0])
    mlflow.log_metric("num_features", credit_df.shape[1] - 1)

    credit_train_df, credit_test_df = train_test_split(
        credit_df,
        test_size=args.test_train_ratio,
    )

    # output paths are mounted as folder, therefore, we are adding a filename to the path
    credit_train_df.to_csv(os.path.join(args.train_data, "data.csv"), index=False)

    credit_test_df.to_csv(os.path.join(args.test_data, "data.csv"), index=False)

    # Stop Logging
    mlflow.end_run()


if __name__ == "__main__":
    main()
이제 원하는 작업을 수행할 수 있는 스크립트가 있으므로 여기에서 Azure Machine Learning 구성 요소를 만듭니다.
명령줄 작업을 실행할 수 있는 범용 CommandComponent을(를) 사용합니다. 이 명령줄 작업은 시스템 명령을 직접 호출하거나 스크립트를 실행할 수 있습니다. 입력/출력은 ${{ ... }} 표기법을 통해 명령줄에 지정됩니다.
from azure.ai.ml import command
from azure.ai.ml import Input, Output

data_prep_component = command(
    name="data_prep_credit_defaults",
    display_name="Data preparation for training",
    description="reads a .xl input, split the input to train and test",
    inputs={
        "data": Input(type="uri_folder"),
        "test_train_ratio": Input(type="number"),
    },
    outputs=dict(
        train_data=Output(type="uri_folder", mode="rw_mount"),
        test_data=Output(type="uri_folder", mode="rw_mount"),
    ),
    # The source folder of the component
    code=data_prep_src_dir,
    command="""python data_prep.py \
            --data ${{inputs.data}} --test_train_ratio ${{inputs.test_train_ratio}} \
            --train_data ${{outputs.train_data}} --test_data ${{outputs.test_data}} \
            """,
    environment=f"{pipeline_job_env.name}:{pipeline_job_env.version}",
)
SDK 참조:
필요에 따라 나중에 다시 사용할 수 있도록 작업 영역에 구성 요소를 등록합니다.
# Now register the component to the workspace
data_prep_component = ml_client.create_or_update(data_prep_component.component)

# Create and register the component in your workspace
print(
    f"Component {data_prep_component.name} with Version {data_prep_component.version} is registered"
)
SDK 참조:
구성 요소 2 만들기: 학습(yaml 정의 사용)
만들 두 번째 구성 요소는 학습 및 테스트 데이터를 사용하고 트리 기반 모델을 학습한 후 출력 모델을 반환합니다. Azure Machine Learning 로깅 기능을 사용하여 학습 진행 상황을 로그하고 시각화합니다.
CommandComponent 클래스를 사용하여 첫 번째 구성 요소를 만들었습니다. 이번에는 yaml 정의를 사용하여 두 번째 구성 요소를 정의합니다. 각 방법에는 고유한 장점이 있습니다. yaml 정의는 실제로 코드를 따라 체크 인할 수 있으며 읽기 가능한 기록 추적을 제공합니다.
CommandComponent를 사용하는 프로그래밍 방식은 클래스 설명서 및 코드 완성 기능이 기본 제공되어 있어 더 쉬울 수 있습니다.
이 구성 요소에 대한 디렉터리를 만듭니다.
import os

train_src_dir = "./components/train"
os.makedirs(train_src_dir, exist_ok=True)
디렉터리에 학습 스크립트를 만듭니다.
%%writefile {train_src_dir}/train.py
import argparse
from sklearn.ensemble import GradientBoostingClassifier
from sklearn.metrics import classification_report
import os
import pandas as pd
import mlflow


def select_first_file(path):
    """Selects first file in folder, use under assumption there is only one file in folder
    Args:
        path (str): path to directory or file to choose
    Returns:
        str: full path of selected file
    """
    files = os.listdir(path)
    return os.path.join(path, files[0])


# Start Logging
mlflow.start_run()

# enable autologging
mlflow.sklearn.autolog()

os.makedirs("./outputs", exist_ok=True)


def main():
    """Main function of the script."""

    # input and output arguments
    parser = argparse.ArgumentParser()
    parser.add_argument("--train_data", type=str, help="path to train data")
    parser.add_argument("--test_data", type=str, help="path to test data")
    parser.add_argument("--n_estimators", required=False, default=100, type=int)
    parser.add_argument("--learning_rate", required=False, default=0.1, type=float)
    parser.add_argument("--registered_model_name", type=str, help="model name")
    parser.add_argument("--model", type=str, help="path to model file")
    args = parser.parse_args()

    # paths are mounted as folder, therefore, we are selecting the file from folder
    train_df = pd.read_csv(select_first_file(args.train_data))

    # Extracting the label column
    y_train = train_df.pop("default payment next month")

    # convert the dataframe values to array
    X_train = train_df.values

    # paths are mounted as folder, therefore, we are selecting the file from folder
    test_df = pd.read_csv(select_first_file(args.test_data))

    # Extracting the label column
    y_test = test_df.pop("default payment next month")

    # convert the dataframe values to array
    X_test = test_df.values

    print(f"Training with data of shape {X_train.shape}")

    clf = GradientBoostingClassifier(
        n_estimators=args.n_estimators, learning_rate=args.learning_rate
    )
    clf.fit(X_train, y_train)

    y_pred = clf.predict(X_test)

    print(classification_report(y_test, y_pred))

    # Registering the model to the workspace
    print("Registering the model via MLFlow")
    mlflow.sklearn.log_model(
        sk_model=clf,
        registered_model_name=args.registered_model_name,
        artifact_path=args.registered_model_name,
    )

    # Saving the model to a file
    mlflow.sklearn.save_model(
        sk_model=clf,
        path=os.path.join(args.model, "trained_model"),
    )

    # Stop Logging
    mlflow.end_run()


if __name__ == "__main__":
    main()
이 학습 스크립트에서 볼 수 있듯이 모델이 학습되면 모델 파일이 저장되고 작업 영역에 등록됩니다. 이제 엔드포인트를 유추할 때 등록된 모델을 사용할 수 있습니다.
이 단계의 환경에서는 기본 제공(큐레이팅된) Azure Machine Learning 환경 중 하나를 사용합니다.
azureml 태그는 시스템이 큐레이팅된 환경에서 이름 찾기를 사용하도록 지시합니다.
먼저 구성 요소를 설명하는 yaml 파일을 만듭니다.
%%writefile {train_src_dir}/train.yml
# <component>
name: train_credit_defaults_model
display_name: Train Credit Defaults Model
# version: 1 # Not specifying a version will automatically update the version
type: command
inputs:
  train_data:
    type: uri_folder
  test_data:
    type: uri_folder
  learning_rate:
    type: number
  registered_model_name:
    type: string
outputs:
  model:
    type: uri_folder
code: .
environment:
  # for this step, we'll use an AzureML curate environment
  azureml://registries/azureml/environments/sklearn-1.0/labels/latest
command: >-
  python train.py
  --train_data ${{inputs.train_data}}
  --test_data ${{inputs.test_data}}
  --learning_rate ${{inputs.learning_rate}}
  --registered_model_name ${{inputs.registered_model_name}}
  --model ${{outputs.model}}
# </component>
이제 구성 요소를 만들고 등록합니다. 등록하면 다른 파이프라인에서 다시 사용할 수 있습니다. 또한 사용자의 작업 영역에 액세스할 수 있는 다른 사용자는 누구나 등록된 구성 요소를 사용할 수 있습니다.
# importing the Component Package
from azure.ai.ml import load_component

# Loading the component from the yml file
train_component = load_component(source=os.path.join(train_src_dir, "train.yml"))

# Now register the component to the workspace
train_component = ml_client.create_or_update(train_component)

# Create and register the component in your workspace
print(
    f"Component {train_component.name} with Version {train_component.version} is registered"
)
SDK 참조:
구성 요소에서 파이프라인 만들기
이제 두 구성 요소가 모두 정의되고 등록되었으므로 파이프라인 구현을 시작할 수 있습니다.
여기서는 입력 데이터, 분할 비율 및 등록된 모델 이름을 입력 변수로 사용합니다. 그런 다음 구성 요소를 호출하고 입력/출력 식별자를 통해 연결합니다. 각 단계의 출력은 .outputs 속성을 통해 액세스할 수 있습니다.
작업에서 반환되는 load_component() Python 함수는 파이프라인 내에서 각 단계를 호출하는 데 사용하는 일반 Python 함수입니다.
파이프라인을 코딩하려면 Azure Machine Learning 파이프라인을 식별하는 특정 @dsl.pipeline 데코레이터를 사용합니다. 데코레이터에서 파이프라인 설명 및 컴퓨팅 및 스토리지와 같은 기본 리소스를 지정할 수 있습니다. Python 함수와 마찬가지로 파이프라인에는 입력이 있을 수 있습니다. 그런 다음 입력이 서로 다른 단일 파이프라인의 여러 인스턴스를 만들 수 있습니다.
여기서는 입력 데이터, 분할 비율 및 등록된 모델 이름을 입력 변수로 사용합니다. 그런 다음, 구성 요소를 호출하고 해당 입력/출력 식별자를 통해 연결합니다. 각 단계의 출력은 .outputs 속성을 통해 액세스할 수 있습니다.
# the dsl decorator tells the sdk that we are defining an Azure Machine Learning pipeline
from azure.ai.ml import dsl, Input, Output


@dsl.pipeline(
    compute="serverless",  # "serverless" value runs pipeline on serverless compute
    description="E2E data_perp-train pipeline",
)
def credit_defaults_pipeline(
    pipeline_job_data_input,
    pipeline_job_test_train_ratio,
    pipeline_job_learning_rate,
    pipeline_job_registered_model_name,
):
    # using data_prep_function like a python call with its own inputs
    data_prep_job = data_prep_component(
        data=pipeline_job_data_input,
        test_train_ratio=pipeline_job_test_train_ratio,
    )

    # using train_func like a python call with its own inputs
    train_job = train_component(
        train_data=data_prep_job.outputs.train_data,  # note: using outputs from previous step
        test_data=data_prep_job.outputs.test_data,  # note: using outputs from previous step
        learning_rate=pipeline_job_learning_rate,  # note: using a pipeline input as parameter
        registered_model_name=pipeline_job_registered_model_name,
    )

    # a pipeline returns a dictionary of outputs
    # keys will code for the pipeline output identifier
    return {
        "pipeline_job_train_data": data_prep_job.outputs.train_data,
        "pipeline_job_test_data": data_prep_job.outputs.test_data,
    }
SDK 참조:
이제 파이프라인 정의를 사용하여 데이터 세트, 선택한 분할 비율 및 모델에 대해 선택한 이름으로 파이프라인을 인스턴스화합니다.
registered_model_name = "credit_defaults_model"

# Let's instantiate the pipeline with the parameters of our choice
pipeline = credit_defaults_pipeline(
    pipeline_job_data_input=Input(type="uri_file", path=credit_data.path),
    pipeline_job_test_train_ratio=0.25,
    pipeline_job_learning_rate=0.05,
    pipeline_job_registered_model_name=registered_model_name,
)
SDK 참조:
작업 제출
이제 Azure Machine Learning에서 실행할 작업을 제출할 차례입니다. 이번에는 create_or_update에서 ml_client.jobs을(를) 사용합니다.
여기서는 실험 이름도 전달합니다. 실험은 특정 프로젝트에서 수행하는 모든 반복을 위한 컨테이너입니다. 동일한 실험 이름으로 제출된 모든 작업은 Azure Machine Learning 스튜디오에서 나란히 나열됩니다.
완료되면 파이프라인은 학습 결과에 따라 작업 영역에 모델을 등록합니다.
# submit the pipeline job
pipeline_job = ml_client.jobs.create_or_update(
    pipeline,
    # Project's name
    experiment_name="e2e_registered_components",
)
ml_client.jobs.stream(pipeline_job.name)
SDK 참조:
- JobOperations.create_or_update (잡오퍼레이션스.크리에이트_또는_업데이트)
- JobOperations.stream
이전 셀에서 생성된 링크를 사용하여 파이프라인의 진행 상황을 추적할 수 있습니다. 이 링크를 처음 선택하면 파이프라인이 여전히 실행 중임을 알 수 있습니다. 완료되면 각 구성 요소의 결과를 검사할 수 있습니다.
학습 크레딧 기본값 모델 구성 요소를 두 번 클릭합니다.
학습에 대해 보고 싶은 두 가지 중요한 결과가 있습니다.
로그 보기:
- 출력+로그 탭을 선택합니다.
-
user_logs>std_log.txt에 폴더를 엽니다. 이 섹션에서는 stdout을 실행하는 스크립트를 보여 줍니다.
메트릭 보기: 메트릭 탭을 선택합니다. 이 섹션에는 다양한 기록된 메트릭이 표시됩니다. 이 예제에서 mlflow
autologging는 학습 메트릭을 자동으로 기록합니다.


모델을 온라인 엔드포인트로 배포
모델을 온라인 엔드포인트에 배포하는 방법을 알아보려면 모델을 온라인 엔드포인트로 배포 자습서를 참조하세요.
리소스 정리
지금 다른 자습서를 계속 진행하려면 다음 단계로 건너뛰세요.
컴퓨팅 인스턴스 중지
지금 사용하지 않으면 컴퓨팅 인스턴스를 중지합니다.
- 스튜디오의 왼쪽 창에서 컴퓨팅을 선택합니다.
- 맨 위 탭에서 컴퓨팅 인스턴스를 선택합니다.
- 목록에서 컴퓨팅 인스턴스를 선택합니다.
- 맨 위의 도구 모음에서 중지를 선택합니다.
모든 리소스 삭제
중요합니다
사용자가 만든 리소스는 다른 Azure Machine Learning 자습서 및 방법 문서의 필수 구성 요소로 사용할 수 있습니다.
사용자가 만든 리소스를 사용하지 않으려면 요금이 발생하지 않도록 해당 리소스를 삭제합니다.
Azure Portal의 검색 상자에 리소스 그룹을 입력하고 결과에서 선택합니다.
목록에서 만든 리소스 그룹을 선택합니다.
개요 페이지에서 리소스 그룹 삭제를 선택합니다.
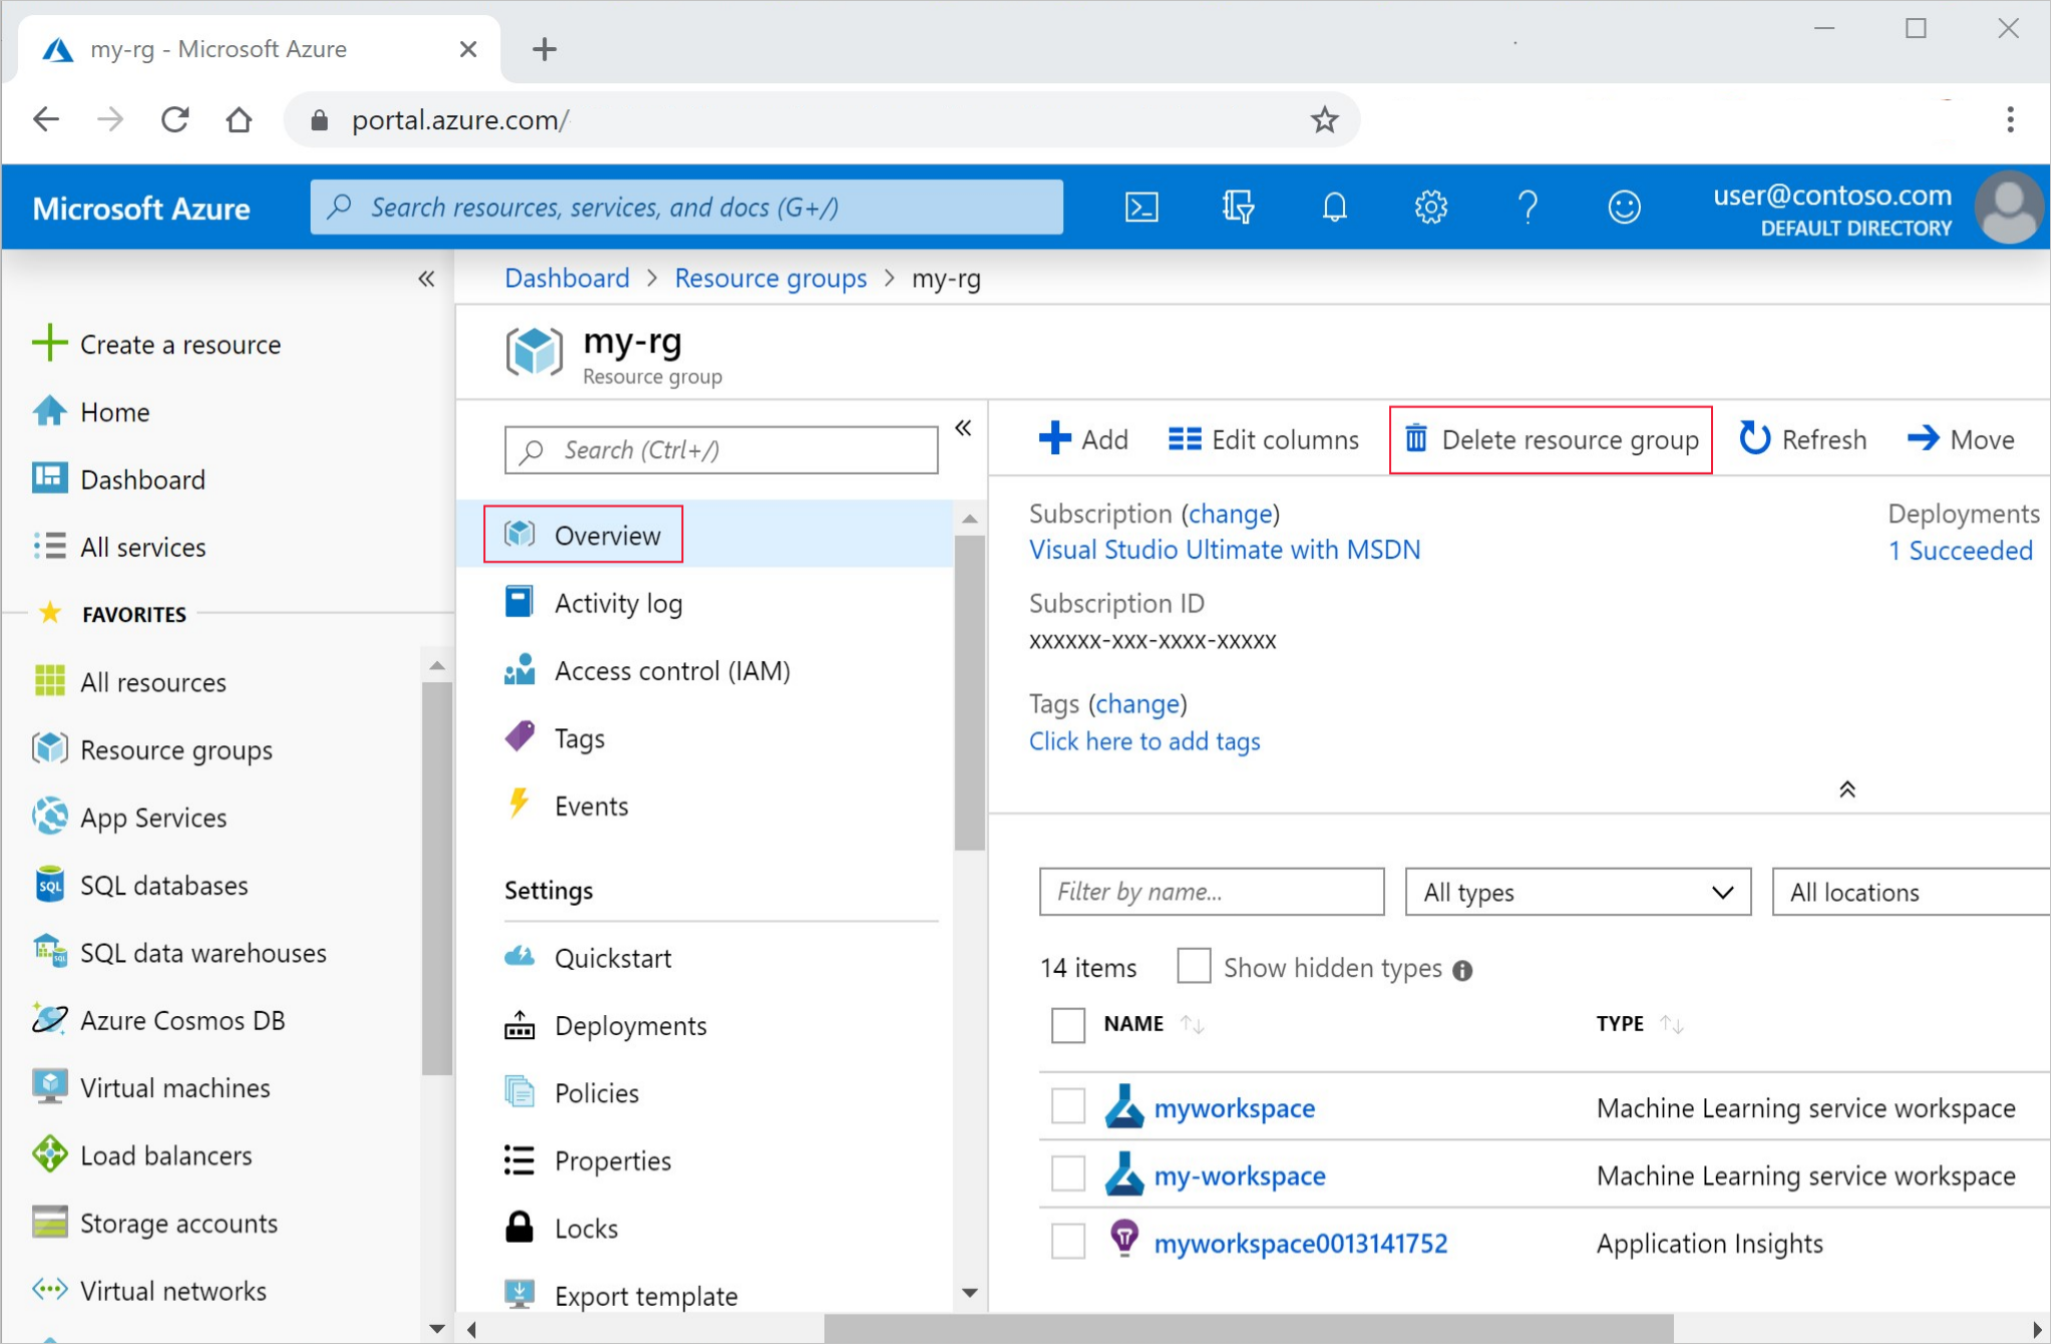
리소스 그룹 이름을 입력합니다. 그런 다음, 삭제를 선택합니다.
다음 단계
기계 학습 파이프라인 작업 예약 방법 알아보기