Azure Notification Hubs 다양한 푸시
개요
사용자에게 즉각적인 풍부한 콘텐츠를 제공하기 위해 애플리케이션은 일반 텍스트 이상을 푸시할 수 있습니다. 이러한 알림은 사용자 조작을 촉진하고 URL, 소리, 이미지/쿠폰 등의 콘텐츠를 제공합니다. 이 자습서는 사용자에게 알림 자습서를 기반으로 하며 페이로드(예: 이미지)를 통합하는 푸시 알림을 보내는 방법을 보여줍니다.
이 자습서는 iOS 7 및 8과 호환됩니다.
개요:
- 앱 백 엔드:
- 백 엔드 데이터베이스/로컬 스토리지에 풍부한 페이로드(이 경우 이미지)를 저장합니다.
- 이 풍부한 알림의 ID를 디바이스에 보냅니다.
- 디바이스의 앱:
- 받은 ID로 풍부한 페이로드를 요청하는 백 엔드에 연결합니다.
- 데이터 검색이 완료되면 디바이스에서 사용자에게 알림을 보내고 사용자가 자세한 내용을 보기 위해 탭하면 즉시 페이로드를 표시합니다.
WebAPI 프로젝트
Visual Studio에서 사용자에게 알림 자습서에서 만든 AppBackend 프로젝트를 엽니다.
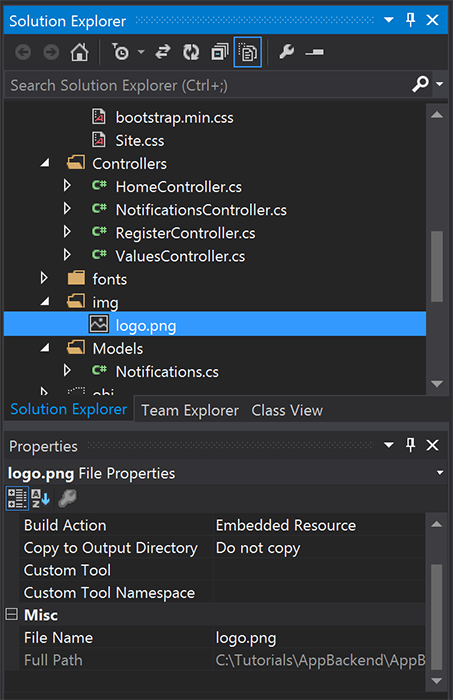
사용자에게 알릴 이미지를 얻어 프로젝트 디렉터리의 img 폴더에 배치합니다.
솔루션 탐색기에서 모든 파일 표시를 클릭하고 프로젝트에 포함할 폴더를 마우스 오른쪽 단추로 클릭합니다.
이미지를 선택한 상태로 속성 창에서 해당 빌드 작업을 포함 리소스로 변경합니다.
Notifications.cs에서 다음using문을 추가합니다.using System.Reflection;Notifications클래스를 다음 코드로 바꿉니다. 자리 표시자를 알림 허브 자격 증명 및 이미지 파일 이름으로 바꿔야 합니다.public class Notification { public int Id { get; set; } // Initial notification message to display to users public string Message { get; set; } // Type of rich payload (developer-defined) public string RichType { get; set; } public string Payload { get; set; } public bool Read { get; set; } } public class Notifications { public static Notifications Instance = new Notifications(); private List<Notification> notifications = new List<Notification>(); public NotificationHubClient Hub { get; set; } private Notifications() { // Placeholders: replace with the connection string (with full access) for your notification hub and the hub name from the Azure Classics Portal Hub = NotificationHubClient.CreateClientFromConnectionString("{conn string with full access}", "{hub name}"); } public Notification CreateNotification(string message, string richType, string payload) { var notification = new Notification() { Id = notifications.Count, Message = message, RichType = richType, Payload = payload, Read = false }; notifications.Add(notification); return notification; } public Stream ReadImage(int id) { var assembly = Assembly.GetExecutingAssembly(); // Placeholder: image file name (for example, logo.png). return assembly.GetManifestResourceStream("AppBackend.img.{logo.png}"); } }NotificationsController.cs에서 다음 코드를 사용하여NotificationsController를 재정의합니다. 그러면 초기 자동 풍부한 알림 ID가 디바이스에 전송되고 클라이언트 쪽에서 이미지를 검색할 수 있습니다.// Return http response with image binary public HttpResponseMessage Get(int id) { var stream = Notifications.Instance.ReadImage(id); var result = new HttpResponseMessage(HttpStatusCode.OK); result.Content = new StreamContent(stream); // Switch in your image extension for "png" result.Content.Headers.ContentType = new System.Net.Http.Headers.MediaTypeHeaderValue("image/{png}"); return result; } // Create rich notification and send initial silent notification (containing id) to client public async Task<HttpResponseMessage> Post() { // Replace the placeholder with image file name var richNotificationInTheBackend = Notifications.Instance.CreateNotification("Check this image out!", "img", "{logo.png}"); var usernameTag = "username:" + HttpContext.Current.User.Identity.Name; // Silent notification with content available var aboutUser = "{\"aps\": {\"content-available\": 1, \"sound\":\"\"}, \"richId\": \"" + richNotificationInTheBackend.Id.ToString() + "\", \"richMessage\": \"" + richNotificationInTheBackend.Message + "\", \"richType\": \"" + richNotificationInTheBackend.RichType + "\"}"; // Send notification to apns await Notifications.Instance.Hub.SendAppleNativeNotificationAsync(aboutUser, usernameTag); return Request.CreateResponse(HttpStatusCode.OK); }이제 모든 디바이스에서 액세스할 수 있도록 이 앱을 Azure 웹 사이트에 다시 배포합니다. AppBackend 프로젝트를 마우스 오른쪽 단추로 클릭하고 게시를 선택합니다.
Azure 웹 사이트를 게시 대상으로 선택합니다. Azure 계정으로 로그인하고 기존 웹 사이트 또는 새로운 웹 사이트를 선택한 다음, 연결 탭의 대상 URL 속성을 적어 둡니다. 이 자습서의 뒷부분에서 이 URL을 백 엔드 엔드포인트라고 합니다. 게시를 선택합니다.
iOS 프로젝트 수정
알림의 ID만 보내도록 앱 백 엔드를 수정했으므로 해당 ID를 처리하도록 iOS 앱을 변경하고 백 엔드에서 풍부한 메시지를 검색합니다.
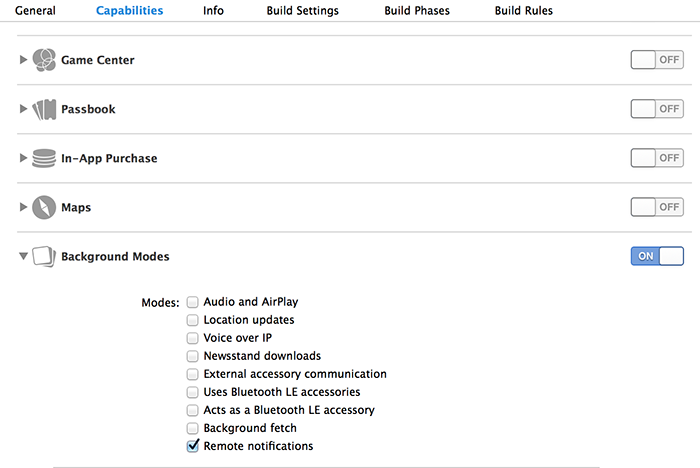
iOS 프로젝트를 열고 대상 섹션에서 기본 앱 대상으로 이동하여 원격 알림을 사용하도록 설정합니다.
기능을 선택하고 백그라운드 모드를 켠 후 원격 알림 확인란을 선택합니다.
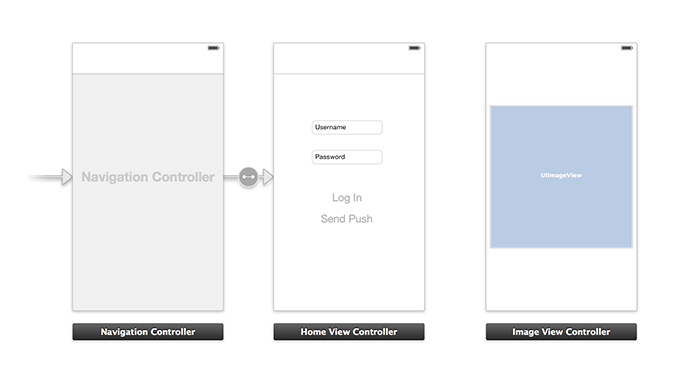
Main.storyboard를 열고 사용자에게 알림 자습서의 보기 컨트롤러(이 자습서에서는 홈 보기 컨트롤러라고 함)가 있는지 확인합니다.스토리보드에 탐색 컨트롤러를 추가하고 Ctrl 키를 누른 상태에서 홈 보기 컨트롤러로 끌어 탐색의 루트 보기로 만듭니다. 특성 검사기에서 Is Initial View Controller가 탐색 컨트롤러에 대해서만 선택되어 있어야 합니다.
스토리보드에 보기 컨트롤러를 추가하고 이미지 보기를 추가합니다. 이 페이지는 사용자가 자세한 내용을 보기 위해 알림을 클릭하면 표시되는 페이지입니다. 스토리보드는 다음과 같이 표시됩니다.
스토리보드에서 홈 보기 컨트롤러를 클릭하고 특성 검사기에서 homeViewController가 해당 사용자 지정 클래스 및 스토리보드 ID로 포함되어 있는지 확인합니다.
이미지 보기 컨트롤러에 대해서도 imageViewController와 동일하게 수행합니다.
그런 다음 방금 만든 UI를 처리하기 위한 imageViewController라는 새 보기 컨트롤러 클래스를 만듭니다.
imageViewController.h에서 컨트롤러의 인터페이스 선언에 다음 코드를 추가합니다. 스토리보드 이미지 보기에서 Ctrl 키를 누른 상태에서 이러한 속성으로 끌어 다음 두 항목을 연결해야 합니다.
@property (weak, nonatomic) IBOutlet UIImageView *myImage; @property (strong) UIImage* imagePayload;imageViewController.m에서 다음을viewDidload마지막에 추가합니다.// Display the UI Image in UI Image View [self.myImage setImage:self.imagePayload];AppDelegate.m에서 사용자가 만든 이미지 컨트롤러를 가져옵니다.#import "imageViewController.h"다음 선언을 포함하여 인터페이스 섹션을 추가합니다.
@interface AppDelegate () @property UIImage* imagePayload; @property NSDictionary* userInfo; @property BOOL iOS8; // Obtain content from backend with notification id - (void)retrieveRichImageWithId:(int)richId completion: (void(^)(NSError*)) completion; // Redirect to Image View Controller after notification interaction - (void)redirectToImageViewWithImage: (UIImage *)img; @endAppDelegate에서 앱이application: didFinishLaunchingWithOptions에서 자동 알림을 등록하는지 확인합니다.// Software version self.iOS8 = [[UIApplication sharedApplication] respondsToSelector:@selector(registerUserNotificationSettings:)] && [[UIApplication sharedApplication] respondsToSelector:@selector(registerForRemoteNotifications)]; // Register for remote notifications for iOS8 and previous versions if (self.iOS8) { NSLog(@"This device is running with iOS8."); // Action UIMutableUserNotificationAction *richPushAction = [[UIMutableUserNotificationAction alloc] init]; richPushAction.identifier = @"richPushMore"; richPushAction.activationMode = UIUserNotificationActivationModeForeground; richPushAction.authenticationRequired = NO; richPushAction.title = @"More"; // Notification category UIMutableUserNotificationCategory* richPushCategory = [[UIMutableUserNotificationCategory alloc] init]; richPushCategory.identifier = @"richPush"; [richPushCategory setActions:@[richPushAction] forContext:UIUserNotificationActionContextDefault]; // Notification categories NSSet* richPushCategories = [NSSet setWithObjects:richPushCategory, nil]; UIUserNotificationSettings *settings = [UIUserNotificationSettings settingsForTypes:UIUserNotificationTypeSound | UIUserNotificationTypeAlert | UIUserNotificationTypeBadge categories:richPushCategories]; [[UIApplication sharedApplication] registerUserNotificationSettings:settings]; [[UIApplication sharedApplication] registerForRemoteNotifications]; } else { // Previous iOS versions NSLog(@"This device is running with iOS7 or earlier versions."); [[UIApplication sharedApplication] registerForRemoteNotificationTypes: UIRemoteNotificationTypeAlert | UIRemoteNotificationTypeBadge | UIRemoteNotificationTypeSound | UIRemoteNotificationTypeNewsstandContentAvailability]; } return YES;스토리보드 UI 변경을 고려하려면 다음 구현을
application:didRegisterForRemoteNotificationsWithDeviceToken으로 대체합니다.// Access navigation controller which is at the root of window UINavigationController *nc = (UINavigationController *)self.window.rootViewController; // Get home view controller from stack on navigation controller homeViewController *hvc = (homeViewController *)[nc.viewControllers objectAtIndex:0]; hvc.deviceToken = deviceToken;그런 다음,
AppDelegate.m에 다음 메서드를 추가하여 엔드포인트에서 이미지를 검색하고 검색이 완료되면 로컬 알림을 보냅니다. 자리 표시자{backend endpoint}를 해당 백 엔드 엔드포인트로 대체해야 합니다.NSString *const GetNotificationEndpoint = @"{backend endpoint}/api/notifications"; // Helper: retrieve notification content from backend with rich notification id - (void)retrieveRichImageWithId:(int)richId completion: (void(^)(NSError*)) completion { UINavigationController *nc = (UINavigationController *)self.window.rootViewController; homeViewController *hvc = (homeViewController *)[nc.viewControllers objectAtIndex:0]; NSString* authenticationHeader = hvc.registerClient.authenticationHeader; // Check if authenticated if (!authenticationHeader) return; NSURLSession* session = [NSURLSession sessionWithConfiguration:[NSURLSessionConfiguration defaultSessionConfiguration] delegate:nil delegateQueue:nil]; NSURL* requestURL = [NSURL URLWithString:[NSString stringWithFormat:@"%@/%d", GetNotificationEndpoint, richId]]; NSMutableURLRequest* request = [NSMutableURLRequest requestWithURL:requestURL]; [request setHTTPMethod:@"GET"]; NSString* authorizationHeaderValue = [NSString stringWithFormat:@"Basic %@", authenticationHeader]; [request setValue:authorizationHeaderValue forHTTPHeaderField:@"Authorization"]; NSURLSessionDataTask* dataTask = [session dataTaskWithRequest:request completionHandler:^(NSData *data, NSURLResponse *response, NSError *error) { NSHTTPURLResponse* httpResponse = (NSHTTPURLResponse*) response; if (!error && httpResponse.statusCode == 200) { // From NSData to UIImage self.imagePayload = [UIImage imageWithData:data]; completion(nil); } else { NSLog(@"Error status: %ld, request: %@", (long)httpResponse.statusCode, error); if (error) completion(error); else { completion([NSError errorWithDomain:@"APICall" code:httpResponse.statusCode userInfo:nil]); } } }]; [dataTask resume]; } // Handle silent push notifications when id is sent from backend - (void)application:(UIApplication *)application didReceiveRemoteNotification:(NSDictionary *)userInfo fetchCompletionHandler:(void (^)(UIBackgroundFetchResult result))handler { self.userInfo = userInfo; int richId = [[self.userInfo objectForKey:@"richId"] intValue]; NSString* richType = [self.userInfo objectForKey:@"richType"]; // Retrieve image data if ([richType isEqualToString:@"img"]) { [self retrieveRichImageWithId:richId completion:^(NSError* error) { if (!error){ // Send local notification UILocalNotification* localNotification = [[UILocalNotification alloc] init]; // "5" is arbitrary here to give you enough time to quit out of the app and receive push notifications localNotification.fireDate = [NSDate dateWithTimeIntervalSinceNow:5]; localNotification.userInfo = self.userInfo; localNotification.alertBody = [self.userInfo objectForKey:@"richMessage"]; localNotification.timeZone = [NSTimeZone defaultTimeZone]; // iOS8 categories if (self.iOS8) { localNotification.category = @"richPush"; } [[UIApplication sharedApplication] scheduleLocalNotification:localNotification]; handler(UIBackgroundFetchResultNewData); } else{ handler(UIBackgroundFetchResultFailed); } }]; } // Add "else if" here to handle more types of rich content such as url, sound files, etc. }다음 메서드를 사용하여
AppDelegate.m에서 이미지 보기 컨트롤러를 열어 위의 로컬 알림을 처리합니다.// Helper: redirect users to image view controller - (void)redirectToImageViewWithImage: (UIImage *)img { UINavigationController *navigationController = (UINavigationController*) self.window.rootViewController; UIStoryboard *mainStoryboard = [UIStoryboard storyboardWithName:@"Main" bundle: nil]; imageViewController *imgViewController = [mainStoryboard instantiateViewControllerWithIdentifier: @"imageViewController"]; // Pass data/image to image view controller imgViewController.imagePayload = img; // Redirect [navigationController pushViewController:imgViewController animated:YES]; } // Handle local notification sent above in didReceiveRemoteNotification - (void)application:(UIApplication *)application didReceiveLocalNotification:(UILocalNotification *)notification { if (application.applicationState == UIApplicationStateActive) { // Show in-app alert with an extra "more" button UIAlertView *alert = [[UIAlertView alloc] initWithTitle:@"Notification" message:notification.alertBody delegate:self cancelButtonTitle:@"OK" otherButtonTitles:@"More", nil]; [alert show]; } // App becomes active from user's tap on notification else { [self redirectToImageViewWithImage:self.imagePayload]; } } // Handle buttons in in-app alerts and redirect with data/image - (void)alertView:(UIAlertView *)alertView clickedButtonAtIndex:(NSInteger)buttonIndex { // Handle "more" button if (buttonIndex == 1) { [self redirectToImageViewWithImage:self.imagePayload]; } // Add "else if" here to handle more buttons } // Handle notification setting actions in iOS8 - (void)application:(UIApplication *)application handleActionWithIdentifier:(NSString *)identifier forLocalNotification:(UILocalNotification *)notification completionHandler:(void (^)())completionHandler { // Handle richPush related buttons if ([identifier isEqualToString:@"richPushMore"]) { [self redirectToImageViewWithImage:self.imagePayload]; } completionHandler(); }
애플리케이션 실행
- XCode에서는 실제 iOS 디바이스에서 앱을 실행합니다(푸시 알림은 시뮬레이터에서 작동하지 않음).
- iOS 앱 UI에서 인증에 대해 동일한 값의 사용자 이름과 암호를 입력하고 로그인을 클릭합니다.
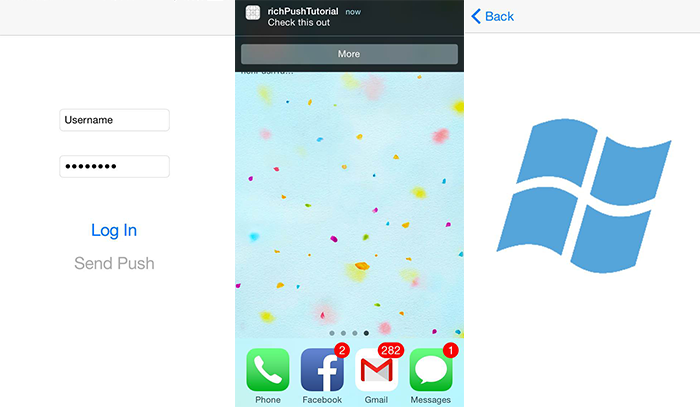
- 푸시 보내기 를 클릭하면 앱 내 경고가 표시됩니다. 더 보기를 클릭하면 앱 백 엔드에 포함되도록 선택한 이미지가 표시됩니다.
- 푸시 보내기를 클릭하고 즉시 디바이스의 홈 단추를 누를 수도 있습니다. 곧 푸시 알림을 받게 됩니다. 푸시 알림을 탭하거나 More를 클릭하면 앱과 풍부한 이미지 콘텐츠가 표시됩니다.
피드백
출시 예정: 2024년 내내 콘텐츠에 대한 피드백 메커니즘으로 GitHub 문제를 단계적으로 폐지하고 이를 새로운 피드백 시스템으로 바꿀 예정입니다. 자세한 내용은 다음을 참조하세요. https://aka.ms/ContentUserFeedback
다음에 대한 사용자 의견 제출 및 보기