자습서: Microsoft Purview Python SDK 사용
이 자습서에서는 Microsoft Purview Python SDK를 사용하는 방법을 소개합니다. SDK를 사용하여 Microsoft Purview 거버넌스 포털이 아닌 프로그래밍 방식으로 가장 일반적인 모든 Microsoft Purview 작업을 수행할 수 있습니다.
이 자습서에서는 SDK에서 다음을 수행할 방법을 알아봅니다.
- Microsoft Purview에서 프로그래밍 방식으로 작업하는 데 필요한 권한 부여
- Microsoft Purview에서 Blob Storage 컨테이너를 데이터 원본으로 등록
- 검사 정의 및 실행
- 카탈로그 검색
- 데이터 원본 삭제
필수 구성 요소
이 자습서에서는 다음이 필요합니다.
- Python 3.6 이상
- 활성 Azure 구독. 없는 경우 무료로 만들 수 있습니다.
- 구독과 연결된 Azure Active Directory 테넌트입니다.
- Azure Storage 계정. 아직 없는 경우 빠른 시작 가이드에 따라 만들 수 있습니다.
- Microsoft Purview 계정. 아직 없는 경우 빠른 시작 가이드에 따라 만들 수 있습니다.
- 클라이언트 암호가 있는 서비스 주체입니다.
중요
이러한 스크립트의 경우 사용 중인 Microsoft Purview 포털에 따라 엔드포인트 값이 달라집니다. 클래식 Microsoft Purview 거버넌스 포털의 엔드포인트: 새 Microsoft Purview 포털용 엔드포인트 purview.azure.com/: purview.microsoft.com/
따라서 새 포털을 사용하는 경우 엔드포인트 값은 다음과 같습니다. "https://consotopurview.scan.purview.microsoft.com"
스토리지 계정에 대한 Microsoft Purview 액세스 권한 부여
Storage 계정의 콘텐츠를 검사하려면 Microsoft Purview에 올바른 역할을 부여해야 합니다.
Azure Portal 통해 스토리지 계정으로 이동합니다.
Access Control(IAM)를 선택합니다.
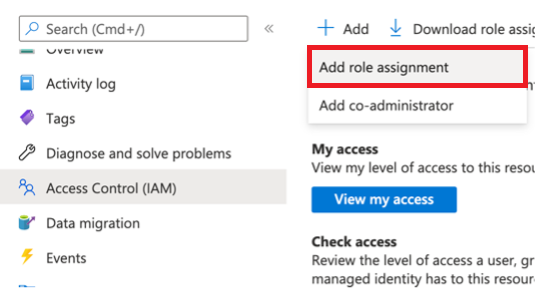
추가 단추를 선택하고 역할 할당 추가를 선택합니다.
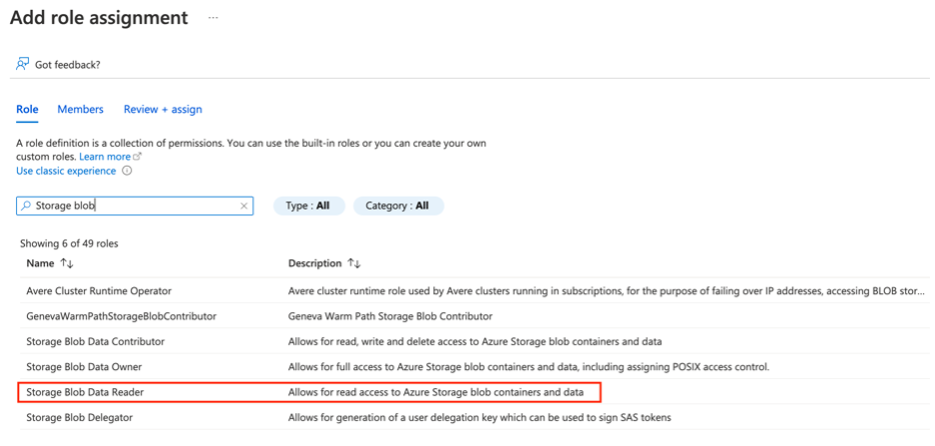
다음 창에서 Storage Blob 읽기 권한자 역할을 검색하고 선택합니다.
그런 다음 멤버 탭으로 이동하여 멤버 선택을 선택합니다.
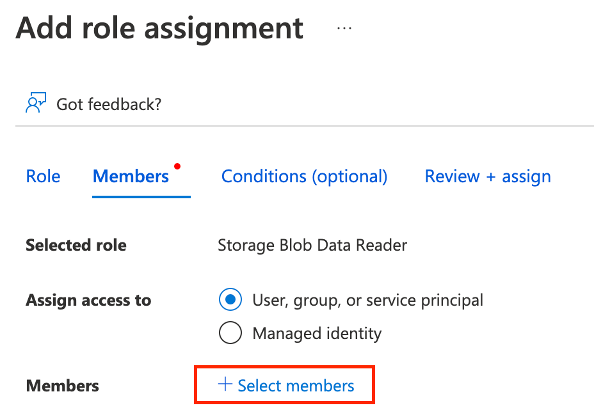
오른쪽에 새 창이 나타납니다. 기존 Microsoft Purview instance 이름을 검색하고 선택합니다.
그런 다음 검토 + 할당을 선택할 수 있습니다.
이제 Microsoft Purview에는 Blob Storage를 검사하는 데 필요한 읽기 권한이 있습니다.
애플리케이션에 Microsoft Purview 계정에 대한 액세스 권한 부여
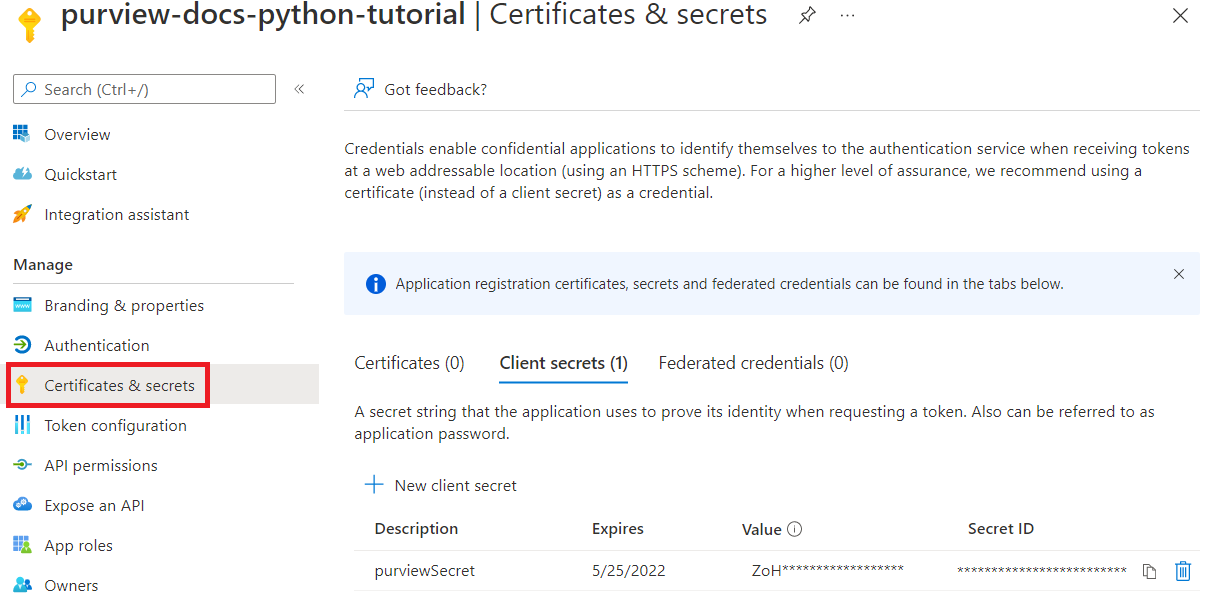
먼저 서비스 주체의 클라이언트 ID, 테넌트 ID 및 클라이언트 암호가 필요합니다. 이 정보를 찾으려면 Azure Active Directory를 선택합니다.
그런 다음, 앱 등록 선택합니다.
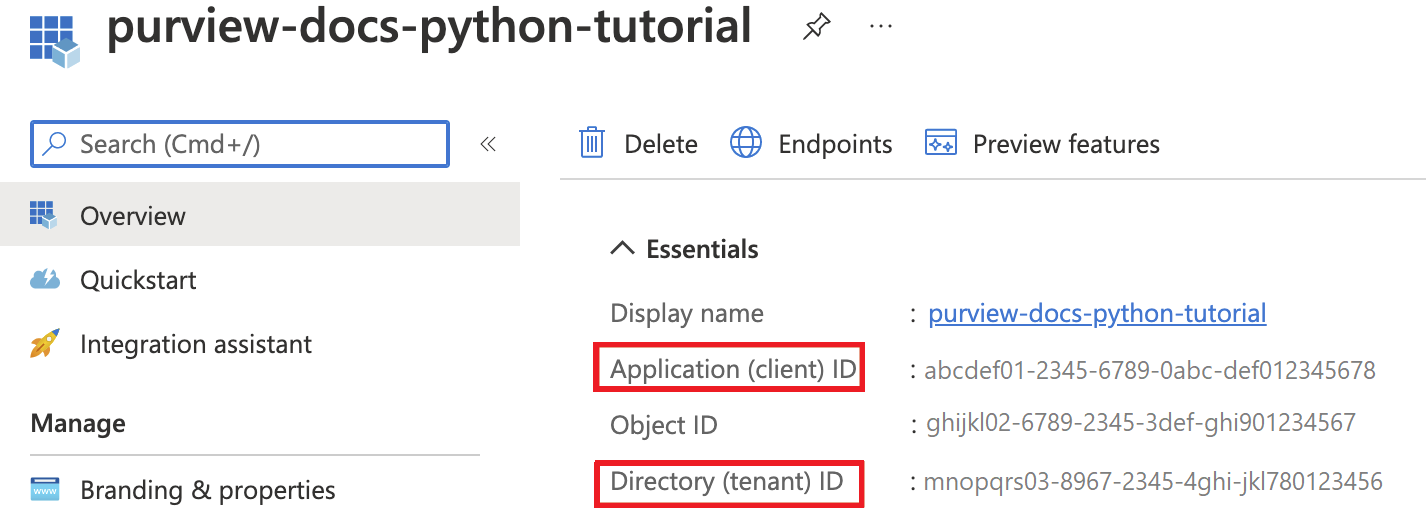
애플리케이션을 선택하고 필요한 정보를 찾습니다.
이름
클라이언트 ID(또는 애플리케이션 ID)
테넌트 ID(또는 디렉터리 ID)
-
이제 관련 Microsoft Purview 역할을 서비스 주체에게 제공해야 합니다. 이렇게 하려면 Microsoft Purview instance 액세스합니다. Microsoft Purview 거버넌스 포털 열기를 선택하거나 Microsoft Purview의 거버넌스 포털을 직접 열고 배포한 instance 선택합니다.
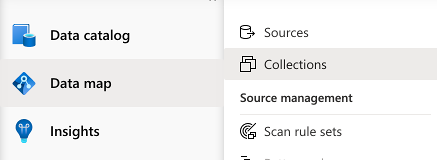
Microsoft Purview 거버넌스 포털 내에서 데이터 맵, 컬렉션을 차례로 선택합니다.
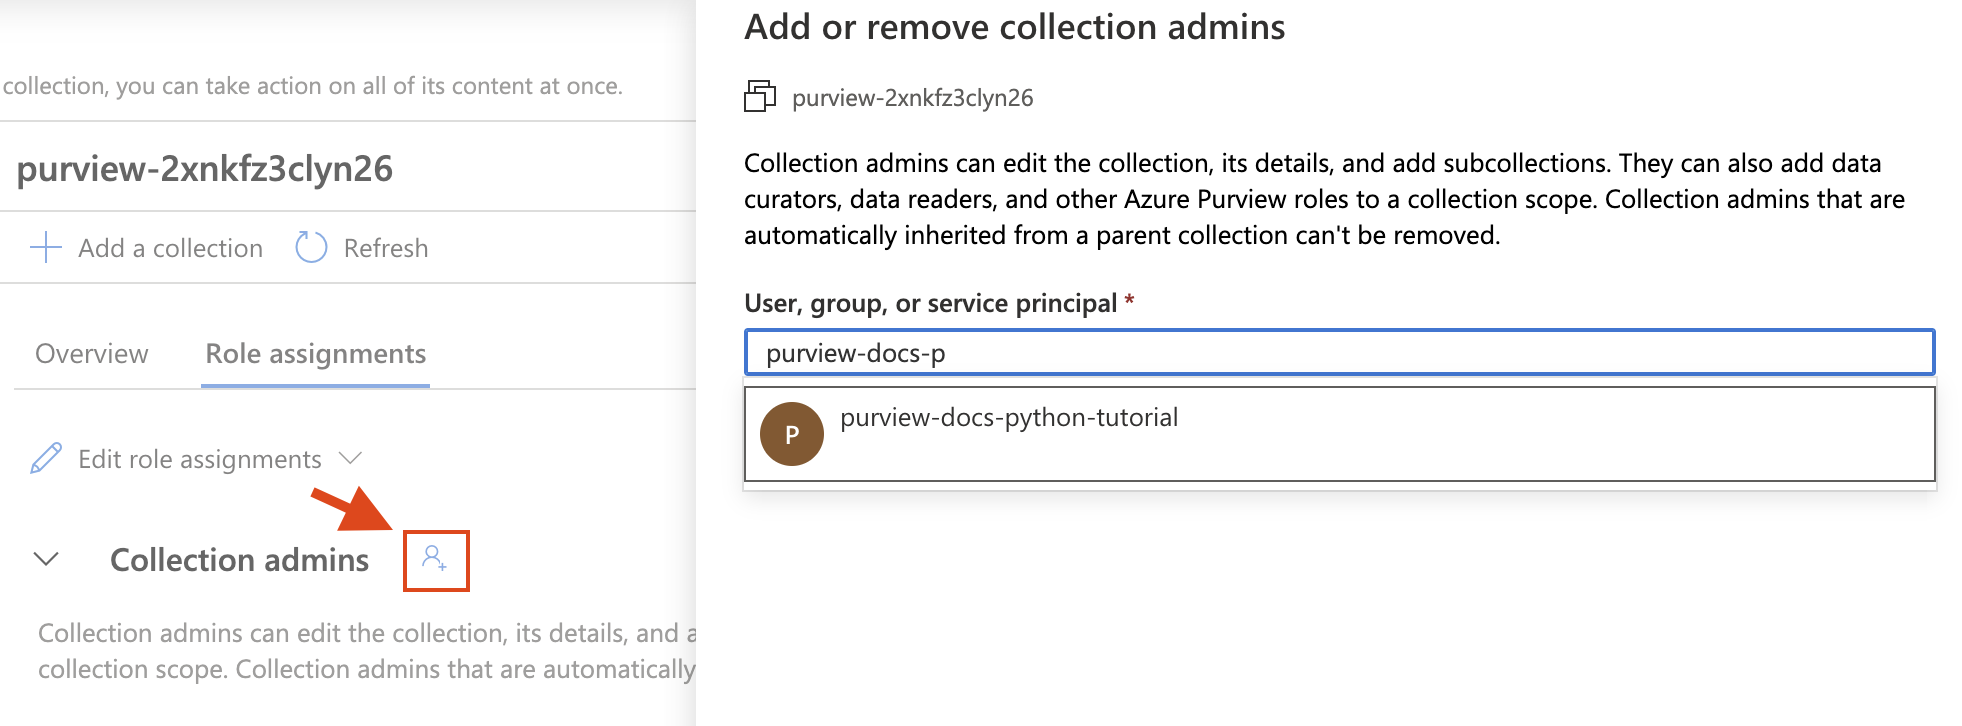
작업할 컬렉션을 선택하고 역할 할당 탭으로 이동합니다. 다음 역할에 서비스 주체를 추가합니다.
- 컬렉션 관리자
- 데이터 원본 관리자
- 데이터 큐레이터
- 데이터 판독기
각 역할에 대해 역할 할당 편집 단추를 선택하고 서비스 주체를 추가할 역할을 선택합니다. 또는 각 역할 옆에 있는 추가 단추를 선택하고 아래와 같이 이름 또는 클라이언트 ID를 검색하여 서비스 주체를 추가합니다.
Python 패키지 설치
- 새 명령 프롬프트 또는 터미널 열기
- 인증을 위해 Azure ID 패키지를 설치합니다.
pip install azure-identity - Microsoft Purview 검사 클라이언트 패키지를 설치합니다.
pip install azure-purview-scanning - Microsoft Purview 관리 클라이언트 패키지를 설치합니다.
pip install azure-purview-administration - Microsoft Purview 클라이언트 패키지를 설치합니다.
pip install azure-purview-catalog - Microsoft Purview 계정 패키지를 설치합니다.
pip install azure-purview-account - Azure Core 패키지를 설치합니다.
pip install azure-core
Python 스크립트 파일 만들기
일반 텍스트 파일을 만들고 접미사가 .py인 Python 스크립트로 저장합니다. 예: tutorial.py.
검사, 카탈로그 및 관리 클라이언트 인스턴스화
이 섹션에서는 다음을 인스턴스화하는 방법을 알아봅니다.
- 데이터 원본 등록, 검사 규칙 만들기 및 관리, 검사 트리거 등에 유용한 검사 클라이언트입니다.
- 검색, 검색된 자산 검색, 데이터의 민감도 식별 등을 통해 카탈로그와 상호 작용하는 데 유용한 카탈로그 클라이언트입니다.
- 관리 클라이언트는 컬렉션 나열과 같은 작업에 Microsoft Purview 데이터 맵 자체와 상호 작용하는 데 유용합니다.
먼저 Azure Active Directory에 인증해야 합니다. 이를 위해 만든 클라이언트 암호를 사용합니다.
필수 가져오기 문으로 시작합니다. 세 개의 클라이언트, 자격 증명 문 및 Azure 예외 문.
from azure.purview.scanning import PurviewScanningClient
from azure.purview.catalog import PurviewCatalogClient
from azure.purview.administration.account import PurviewAccountClient
from azure.identity import ClientSecretCredential
from azure.core.exceptions import HttpResponseError
코드에서 다음 정보를 지정합니다.
- 클라이언트 ID(또는 애플리케이션 ID)
- 테넌트 ID(또는 디렉터리 ID)
- 클라이언트 암호
client_id = "<your client id>"
client_secret = "<your client secret>"
tenant_id = "<your tenant id>"
엔드포인트를 지정합니다.
중요
사용 중인 Microsoft Purview 포털에 따라 엔드포인트 값이 달라집니다. 클래식 Microsoft Purview 거버넌스 포털의 엔드포인트:
https://{your_purview_account_name}.purview.azure.com/새 Microsoft Purview 포털용 엔드포인트:https://api.purview-service.microsoft.com클래식 Microsoft Purview 거버넌스 포털에 대한 엔드포인트 검사:
https://{your_purview_account_name}.scan.purview.azure.com/새 Microsoft Purview 포털에 대한 엔드포인트:https://api.scan.purview-service.microsoft.compurview_endpoint = "<endpoint>" purview_scan_endpoint = "<scan endpoint>"이제 세 개의 클라이언트를 인스턴스화할 수 있습니다.
def get_credentials(): credentials = ClientSecretCredential(client_id=client_id, client_secret=client_secret, tenant_id=tenant_id) return credentials def get_purview_client(): credentials = get_credentials() client = PurviewScanningClient(endpoint=purview_scan_endpoint, credential=credentials, logging_enable=True) return client def get_catalog_client(): credentials = get_credentials() client = PurviewCatalogClient(endpoint=purview_endpoint, credential=credentials, logging_enable=True) return client def get_admin_client(): credentials = get_credentials() client = PurviewAccountClient(endpoint=purview_endpoint, credential=credentials, logging_enable=True) return client
이러한 클라이언트가 계정과 상호 작용해야 하므로 대부분의 스크립트는 동일한 단계로 시작됩니다.
데이터 원본 등록
이 섹션에서는 Blob Storage를 등록합니다.
이전 섹션에서 설명한 것처럼 먼저 Microsoft Purview 계정에 액세스해야 하는 클라이언트를 가져옵니다. 또한 문제를 해결할 수 있도록 Azure 오류 응답 패키지를 가져오고 ClientSecretCredential을 사용하여 Azure 자격 증명을 생성합니다.
from azure.purview.administration.account import PurviewAccountClient from azure.purview.scanning import PurviewScanningClient from azure.core.exceptions import HttpResponseError from azure.identity import ClientSecretCredential스토리지 계정에 대한 리소스 ID 가져오기 가이드에 따라 스토리지 계정에 대한 리소스 ID를 수집합니다.
그런 다음 Python 파일에서 다음 정보를 정의하여 Blob Storage를 프로그래밍 방식으로 등록할 수 있습니다.
storage_name = "<name of your Storage Account>" storage_id = "<id of your Storage Account>" rg_name = "<name of your resource group>" rg_location = "<location of your resource group>" reference_name_purview = "<name of your Microsoft Purview account>"Blob Storage를 등록할 컬렉션의 이름을 제공합니다. (이전에 사용 권한을 적용한 컬렉션과 동일해야 합니다. 그렇지 않은 경우 먼저 이 컬렉션에 권한을 적용합니다.) 루트 컬렉션인 경우 Microsoft Purview instance 동일한 이름을 사용합니다.
collection_name = "<name of your collection>"Microsoft Purview 계정에 액세스하기 위해 자격 증명을 생성하는 함수를 만듭니다.
client_id = "<your client id>" client_secret = "<your client secret>" tenant_id = "<your tenant id>" def get_credentials(): credentials = ClientSecretCredential(client_id=client_id, client_secret=client_secret, tenant_id=tenant_id) return credentialsMicrosoft Purview 데이터 맵 모든 컬렉션에는 이름 및 이름이 있습니다.
- 이름 이름은 컬렉션에 표시되는 이름입니다. 예: Sales.
- 루트 컬렉션을 제외한 모든 컬렉션의 이름은 데이터 맵에서 할당한 6자 이름입니다.
Python은 모든 하위 컬렉션을 참조하기 위해 이 6자 이름이 필요합니다. 식별 이름을 스크립트에 필요한 6자 컬렉션 이름으로 자동으로 변환하려면 다음 코드 블록을 추가합니다.
중요
사용 중인 Microsoft Purview 포털에 따라 엔드포인트 값이 달라집니다. 클래식 Microsoft Purview 거버넌스 포털의 엔드포인트: 새 Microsoft Purview 포털용 엔드포인트 purview.azure.com/: purview.microsoft.com/
따라서 새 포털을 사용하는 경우 엔드포인트 값은 다음과 같습니다. "https://consotopurview.scan.purview.microsoft.com"
def get_admin_client(): credentials = get_credentials() client = PurviewAccountClient(endpoint=purview_endpoint, credential=credentials, logging_enable=True) return client try: admin_client = get_admin_client() except ValueError as e: print(e) collection_list = client.collections.list_collections() for collection in collection_list: if collection["friendlyName"].lower() == collection_name.lower(): collection_name = collection["name"]클라이언트와 작업에 따라 두 클라이언트 모두에 대해 입력 본문을 제공해야 합니다. 원본을 등록하려면 데이터 원본 등록을 위한 입력 본문을 제공해야 합니다.
ds_name = "<friendly name for your data source>" body_input = { "kind": "AzureStorage", "properties": { "endpoint": f"https://{storage_name}.blob.core.windows.net/", "resourceGroup": rg_name, "location": rg_location, "resourceName": storage_name, "resourceId": storage_id, "collection": { "type": "CollectionReference", "referenceName": collection_name }, "dataUseGovernance": "Disabled" } }이제 Microsoft Purview 클라이언트를 호출하고 데이터 원본을 등록할 수 있습니다.
중요
사용 중인 Microsoft Purview 포털에 따라 엔드포인트 값이 달라집니다. 클래식 Microsoft Purview 거버넌스 포털의 엔드포인트:
https://{your_purview_account_name}.purview.azure.com/새 Microsoft Purview 포털용 엔드포인트:https://api.purview-service.microsoft.com클래식 포털을 사용하는 경우 엔드포인트 값은 다음과
https://{your_purview_account_name}.scan.purview.azure.com같습니다. 새 포털을 사용하는 경우 엔드포인트 값은 다음과 같습니다.https://scan.api.purview-service.microsoft.comdef get_purview_client(): credentials = get_credentials() client = PurviewScanningClient(endpoint={{ENDPOINT}}, credential=credentials, logging_enable=True) return client try: client = get_purview_client() except ValueError as e: print(e) try: response = client.data_sources.create_or_update(ds_name, body=body_input) print(response) print(f"Data source {ds_name} successfully created or updated") except HttpResponseError as e: print(e)
등록 프로세스가 성공하면 클라이언트에서 보강된 본문 응답을 볼 수 있습니다.
다음 섹션에서는 등록한 데이터 원본을 검색하고 카탈로그를 검색합니다. 이러한 각 스크립트는 이 등록 스크립트와 유사하게 구조화됩니다.
전체 코드
from azure.purview.scanning import PurviewScanningClient
from azure.identity import ClientSecretCredential
from azure.core.exceptions import HttpResponseError
from azure.purview.administration.account import PurviewAccountClient
client_id = "<your client id>"
client_secret = "<your client secret>"
tenant_id = "<your tenant id>"
purview_endpoint = "<endpoint>"

purview_scan_endpoint = "<scan endpoint>"
storage_name = "<name of your Storage Account>"
storage_id = "<id of your Storage Account>"
rg_name = "<name of your resource group>"
rg_location = "<location of your resource group>"
collection_name = "<name of your collection>"
ds_name = "<friendly data source name>"
def get_credentials():
credentials = ClientSecretCredential(client_id=client_id, client_secret=client_secret, tenant_id=tenant_id)
return credentials
def get_purview_client():
credentials = get_credentials()
client = PurviewScanningClient(endpoint=purview_scan_endpoint, credential=credentials, logging_enable=True)
return client
def get_admin_client():
credentials = get_credentials()
client = PurviewAccountClient(endpoint=purview_endpoint, credential=credentials, logging_enable=True)
return client
try:
admin_client = get_admin_client()
except ValueError as e:
print(e)
collection_list = admin_client.collections.list_collections()
for collection in collection_list:
if collection["friendlyName"].lower() == collection_name.lower():
collection_name = collection["name"]
body_input = {
"kind": "AzureStorage",
"properties": {
"endpoint": f"https://{storage_name}.blob.core.windows.net/",
"resourceGroup": rg_name,
"location": rg_location,
"resourceName": storage_name,
"resourceId": storage_id,
"collection": {
"type": "CollectionReference",
"referenceName": collection_name
},
"dataUseGovernance": "Disabled"
}
}
try:
client = get_purview_client()
except ValueError as e:
print(e)
try:
response = client.data_sources.create_or_update(ds_name, body=body_input)
print(response)
print(f"Data source {ds_name} successfully created or updated")
except HttpResponseError as e:
print(e)
데이터 원본 검사
데이터 원본 검사는 다음 두 단계로 수행할 수 있습니다.
- 검사 정의 만들기
- 검사 실행 트리거
이 자습서에서는 Blob Storage 컨테이너에 대한 기본 검사 규칙을 사용합니다. 그러나 Microsoft Purview 검사 클라이언트를 사용하여 프로그래밍 방식으로 사용자 지정 검사 규칙을 만들 수도 있습니다.
이제 위에서 등록한 데이터 원본을 검사해 보겠습니다.
고유 식별자를 생성하는 가져오기 문을 추가하고, Microsoft Purview 검사 클라이언트, Microsoft Purview 관리 클라이언트, 문제를 해결할 수 있는 Azure 오류 응답 패키지 및 Azure 자격 증명을 수집하기 위한 클라이언트 비밀 자격 증명을 호출합니다.
import uuid from azure.purview.scanning import PurviewScanningClient from azure.purview.administration.account import PurviewAccountClient from azure.core.exceptions import HttpResponseError from azure.identity import ClientSecretCredential자격 증명을 사용하여 검사 클라이언트를 만듭니다.
client_id = "<your client id>" client_secret = "<your client secret>" tenant_id = "<your tenant id>" def get_credentials(): credentials = ClientSecretCredential(client_id=client_id, client_secret=client_secret, tenant_id=tenant_id) return credentials def get_purview_client(): credentials = get_credentials() client = PurviewScanningClient(endpoint=f"https://{reference_name_purview}.scan.purview.azure.com", credential=credentials, logging_enable=True) return client try: client = get_purview_client() except ValueError as e: print(e)코드를 추가하여 컬렉션의 내부 이름을 수집합니다. 자세한 내용은 이전 섹션을 참조하세요.
collection_name = "<name of the collection where you will be creating the scan>"

def get_admin_client():
     credentials = get_credentials()
     client = PurviewAccountClient(endpoint=purview_endpoint, credential=credentials, logging_enable=True)
     return client

try:
    admin_client = get_admin_client()
except ValueError as e:
    print(e)

collection_list = client.collections.list_collections()
 for collection in collection_list:
  if collection["friendlyName"].lower() == collection_name.lower():
      collection_name = collection["name"]
그런 다음, 검사 정의를 만듭니다.
ds_name = "<name of your registered data source>"
scan_name = "<name of the scan you want to define>"
reference_name_purview = "<name of your Microsoft Purview account>"

body_input = {
        "kind":"AzureStorageMsi",
        "properties": {
            "scanRulesetName": "AzureStorage",
            "scanRulesetType": "System", #We use the default scan rule set
            "collection":
                {
                    "referenceName": collection_name,
                    "type": "CollectionReference"
                }
        }
}

try:
    response = client.scans.create_or_update(data_source_name=ds_name, scan_name=scan_name, body=body_input)
    print(response)
    print(f"Scan {scan_name} successfully created or updated")
except HttpResponseError as e:
    print(e)
이제 검사가 정의되었으므로 고유한 ID로 검사 실행을 트리거할 수 있습니다.
run_id = uuid.uuid4() #unique id of the new scan

try:
    response = client.scan_result.run_scan(data_source_name=ds_name, scan_name=scan_name, run_id=run_id)
    print(response)
    print(f"Scan {scan_name} successfully started")
except HttpResponseError as e:
    print(e)
전체 코드
import uuid
from azure.purview.scanning import PurviewScanningClient
from azure.purview.administration.account import PurviewAccountClient
from azure.identity import ClientSecretCredential

ds_name = "<name of your registered data source>"
scan_name = "<name of the scan you want to define>"
reference_name_purview = "<name of your Microsoft Purview account>"
client_id = "<your client id>"
client_secret = "<your client secret>"
tenant_id = "<your tenant id>"
collection_name = "<name of the collection where you will be creating the scan>"

def get_credentials():
	credentials = ClientSecretCredential(client_id=client_id, client_secret=client_secret, tenant_id=tenant_id)
	return credentials

def get_purview_client():
	credentials = get_credentials()
	client = PurviewScanningClient(endpoint=purview_scan_endpoint, credential=credentials, logging_enable=True)
	return client

def get_admin_client():
	credentials = get_credentials()
	client = PurviewAccountClient(endpoint=purview_endpoint, credential=credentials, logging_enable=True)
	return client

try:
	admin_client = get_admin_client()
except ValueError as e:
        print(e)

collection_list = admin_client.collections.list_collections()
for collection in collection_list:
	if collection["friendlyName"].lower() == collection_name.lower():
		collection_name = collection["name"]


try:
	client = get_purview_client()
except AzureError as e:
	print(e)

body_input = {
	"kind":"AzureStorageMsi",
	"properties": {
		"scanRulesetName": "AzureStorage",
		"scanRulesetType": "System",
		"collection": {
			"type": "CollectionReference",
			"referenceName": collection_name
		}
	}
}

try:
	response = client.scans.create_or_update(data_source_name=ds_name, scan_name=scan_name, body=body_input)
	print(response)
	print(f"Scan {scan_name} successfully created or updated")
except HttpResponseError as e:
	print(e)

run_id = uuid.uuid4() #unique id of the new scan

try:
	response = client.scan_result.run_scan(data_source_name=ds_name, scan_name=scan_name, run_id=run_id)
	print(response)
	print(f"Scan {scan_name} successfully started")
except HttpResponseError as e:
	print(e)
검색 카탈로그
검사가 완료되면 자산이 검색되고 분류되었을 수 있습니다. 이 프로세스는 검사 후 완료하는 데 다소 시간이 걸릴 수 있으므로 코드의 다음 부분을 실행하기 전에 기다려야 할 수 있습니다. 검사가 완료되고 자산이 Microsoft Purview 데이터 카탈로그 표시되기를 기다립니다.
자산이 준비되면 Microsoft Purview 카탈로그 클라이언트를 사용하여 전체 카탈로그를 검색할 수 있습니다.
이번에는 검색 클라이언트 대신 카탈로그 클라이언트를 가져와야 합니다. HTTPResponse 오류 및 ClientSecretCredential도 포함됩니다.
from azure.purview.catalog import PurviewCatalogClient
from azure.identity import ClientSecretCredential
from azure.core.exceptions import HttpResponseError
Microsoft Purview 계정에 액세스하기 위한 자격 증명을 가져오는 함수를 만들고 카탈로그 클라이언트를 인스턴스화합니다.
client_id = "<your client id>"
client_secret = "<your client secret>"
tenant_id = "<your tenant id>"
reference_name_purview = "<name of your Microsoft Purview account>"

def get_credentials():
     credentials = ClientSecretCredential(client_id=client_id, client_secret=client_secret, tenant_id=tenant_id)
     return credentials

def get_catalog_client():
    credentials = get_credentials()
    client = PurviewCatalogClient(endpoint=purview_endpoint, credential=credentials, logging_enable=True)
    return client

try:
    client_catalog = get_catalog_client()
except ValueError as e:
    print(e)
입력 본문에서 검색 조건 및 키워드를 구성합니다.
keywords = "keywords you want to search"

body_input={
    "keywords": keywords
}
여기서는 키워드만 지정하지만 다른 많은 필드를 추가하여 쿼리를 추가로 지정할 수 있습니다.
카탈로그를 검색합니다.
try:
    response = client_catalog.discovery.query(search_request=body_input)
    print(response)
except HttpResponseError as e:
    print(e)
전체 코드
from azure.purview.catalog import PurviewCatalogClient
from azure.identity import ClientSecretCredential
from azure.core.exceptions import HttpResponseError

client_id = "<your client id>"
client_secret = "<your client secret>"
tenant_id = "<your tenant id>"
reference_name_purview = "<name of your Microsoft Purview account>"
keywords = "<keywords you want to search for>"

def get_credentials():
	credentials = ClientSecretCredential(client_id=client_id, client_secret=client_secret, tenant_id=tenant_id)
	return credentials

def get_catalog_client():
	credentials = get_credentials()
	client = PurviewCatalogClient(endpoint=purview_endpoint, credential=credentials, logging_enable=True)
	return client

body_input={
	"keywords": keywords
}

try:
	catalog_client = get_catalog_client()
except ValueError as e:
	print(e)

try:
	response = catalog_client.discovery.query(search_request=body_input)
	print(response)
except HttpResponseError as e:
	print(e)
데이터 원본 삭제
이 섹션에서는 이전에 등록한 데이터 원본을 삭제하는 방법을 알아봅니다. 이 작업은 매우 간단하며 검사 클라이언트를 사용하여 수행됩니다.
검사 클라이언트 를 가져옵니다. HTTPResponse 오류 및 ClientSecretCredential도 포함됩니다.
from azure.purview.scanning import PurviewScanningClient
from azure.identity import ClientSecretCredential
from azure.core.exceptions import HttpResponseError
Microsoft Purview 계정에 액세스하기 위한 자격 증명을 가져오는 함수를 만들고 검사 클라이언트를 인스턴스화합니다.
client_id = "<your client id>"
client_secret = "<your client secret>"
tenant_id = "<your tenant id>"
reference_name_purview = "<name of your Microsoft Purview account>"

def get_credentials():
     credentials = ClientSecretCredential(client_id=client_id, client_secret=client_secret, tenant_id=tenant_id)
     return credentials

def get_scanning_client():
    credentials = get_credentials()
    PurviewScanningClient(endpoint=f"https://{reference_name_purview}.scan.purview.azure.com", credential=credentials, logging_enable=True)
    return client

try:
    client_scanning = get_scanning_client()
except ValueError as e:
    print(e)
데이터 원본을 삭제합니다.
    ds_name = "<name of the registered data source you want to delete>"
    try:
        response = client_scanning.data_sources.delete(ds_name)
        print(response)
        print(f"Data source {ds_name} successfully deleted")
    except HttpResponseError as e:
        print(e)
전체 코드
from azure.purview.scanning import PurviewScanningClient
from azure.identity import ClientSecretCredential
from azure.core.exceptions import HttpResponseError


client_id = "<your client id>"
client_secret = "<your client secret>"
tenant_id = "<your tenant id>"
reference_name_purview = "<name of your Microsoft Purview account>"
ds_name = "<name of the registered data source you want to delete>"

def get_credentials():
	credentials = ClientSecretCredential(client_id=client_id, client_secret=client_secret, tenant_id=tenant_id)
	return credentials

def get_scanning_client():
	credentials = get_credentials()
	client = PurviewScanningClient(endpoint=f"https://{reference_name_purview}.scan.purview.azure.com", credential=credentials, logging_enable=True)
	return client

try:
	client_scanning = get_scanning_client()
except ValueError as e:
	print(e)

try:
	response = client_scanning.data_sources.delete(ds_name)
	print(response)
	print(f"Data source {ds_name} successfully deleted")
except HttpResponseError as e:
	print(e)
다음 단계
피드백
출시 예정: 2024년 내내 콘텐츠에 대한 피드백 메커니즘으로 GitHub 문제를 단계적으로 폐지하고 이를 새로운 피드백 시스템으로 바꿀 예정입니다. 자세한 내용은 다음을 참조하세요. https://aka.ms/ContentUserFeedback
다음에 대한 사용자 의견 제출 및 보기