qdk.azure
Python 모듈을 사용하여 특정 형식의 회로를 Azure Quantum 서비스에 제출하는 방법을 알아봅니다. 이 문서에서는 다음 형식으로 회로를 제출하는 방법을 보여 줍니다.
자세한 내용은 Quantum 회로를 참조 하세요.
필수 조건
VISUAL STUDIO CODE(VS Code)에서 회로를 개발하고 실행하려면 다음이 있어야 합니다.
활성 구독이 있는 Azure 계정입니다. Azure 계정이 없는 경우 무료로 등록하고 pay-as-you-go 구독 등록합니다.
Azure Quantum 작업 영역입니다. 자세한 내용은 Azure Quantum 작업 영역 만들기 참조하세요.
Python 환경에 Python 및 Pip가 설치되어 있습니다.
Microsoft 퀀텀 개발 키트(QDK), Python 및 Jupyter 확장이 설치된 VS Code입니다.
qdk추가 기능이 있는 Pythonazure라이브러리와ipykernel패키지.python -m pip install --upgrade "qdk[azure]" ipykernel
새 Jupyter Notebook을 만들고 Quantum 작업 영역에 연결
VS Code의 Jupyter Notebook에서 작업 영역에 연결하려면 다음 단계를 수행합니다.
VS Code에서 보기 메뉴를 열고 명령 팔레트를 선택합니다.
Create: New Jupyter Notebook 입력합니다. 빈 Jupyter Notebook 파일이 새 탭에서 열립니다.
Notebook의 첫 번째 셀에서 다음 코드를 실행합니다. Azure 포털의 작업 영역에 대한 Overview 창에서 리소스 ID를 찾을 수 있습니다.
from qdk.azure import Workspace

workspace = Workspace (resource_id="") # Add your resource ID
QIR 형식 회로 제출
QIR(양자 중간 표현)은 양자 프로그래밍 언어와 대상 양자 계산 플랫폼 간의 공통 인터페이스 역할을 하는 중간 표현입니다. 자세한 내용은 양자 중간 표현을 참조하세요.
QIR 형식 회로를 제출하려면 다음 단계를 수행합니다.
QIR 회로를 만듭니다. 예를 들어 새 셀에서 다음 코드를 실행하여 간단한 얽힘 회로를 만듭니다.
QIR_routine = """%Result = type opaque %Qubit = type opaque define void @ENTRYPOINT__main() #0 { call void @__quantum__qis__h__body(%Qubit* inttoptr (i64 0 to %Qubit*)) call void @__quantum__qis__cx__body(%Qubit* inttoptr (i64 0 to %Qubit*), %Qubit* inttoptr (i64 1 to %Qubit*)) call void @__quantum__qis__h__body(%Qubit* inttoptr (i64 2 to %Qubit*)) call void @__quantum__qis__cz__body(%Qubit* inttoptr (i64 2 to %Qubit*), %Qubit* inttoptr (i64 0 to %Qubit*)) call void @__quantum__qis__h__body(%Qubit* inttoptr (i64 2 to %Qubit*)) call void @__quantum__qis__h__body(%Qubit* inttoptr (i64 3 to %Qubit*)) call void @__quantum__qis__cz__body(%Qubit* inttoptr (i64 3 to %Qubit*), %Qubit* inttoptr (i64 1 to %Qubit*)) call void @__quantum__qis__h__body(%Qubit* inttoptr (i64 3 to %Qubit*)) call void @__quantum__qis__mz__body(%Qubit* inttoptr (i64 2 to %Qubit*), %Result* inttoptr (i64 0 to %Result*)) #1 call void @__quantum__qis__mz__body(%Qubit* inttoptr (i64 3 to %Qubit*), %Result* inttoptr (i64 1 to %Result*)) #1 call void @__quantum__rt__tuple_record_output(i64 2, i8* null) call void @__quantum__rt__result_record_output(%Result* inttoptr (i64 0 to %Result*), i8* null) call void @__quantum__rt__result_record_output(%Result* inttoptr (i64 1 to %Result*), i8* null) ret void } declare void @__quantum__qis__ccx__body(%Qubit*, %Qubit*, %Qubit*) declare void @__quantum__qis__cx__body(%Qubit*, %Qubit*) declare void @__quantum__qis__cy__body(%Qubit*, %Qubit*) declare void @__quantum__qis__cz__body(%Qubit*, %Qubit*) declare void @__quantum__qis__rx__body(double, %Qubit*) declare void @__quantum__qis__rxx__body(double, %Qubit*, %Qubit*) declare void @__quantum__qis__ry__body(double, %Qubit*) declare void @__quantum__qis__ryy__body(double, %Qubit*, %Qubit*) declare void @__quantum__qis__rz__body(double, %Qubit*) declare void @__quantum__qis__rzz__body(double, %Qubit*, %Qubit*) declare void @__quantum__qis__h__body(%Qubit*) declare void @__quantum__qis__s__body(%Qubit*) declare void @__quantum__qis__s__adj(%Qubit*) declare void @__quantum__qis__t__body(%Qubit*) declare void @__quantum__qis__t__adj(%Qubit*) declare void @__quantum__qis__x__body(%Qubit*) declare void @__quantum__qis__y__body(%Qubit*) declare void @__quantum__qis__z__body(%Qubit*) declare void @__quantum__qis__swap__body(%Qubit*, %Qubit*) declare void @__quantum__qis__mz__body(%Qubit*, %Result* writeonly) #1 declare void @__quantum__rt__result_record_output(%Result*, i8*) declare void @__quantum__rt__array_record_output(i64, i8*) declare void @__quantum__rt__tuple_record_output(i64, i8*) attributes #0 = { "entry_point" "output_labeling_schema" "qir_profiles"="base_profile" "required_num_qubits"="4" "required_num_results"="2" } attributes #1 = { "irreversible" } ; module flags !llvm.module.flags = !{!0, !1, !2, !3} !0 = !{i32 1, !"qir_major_version", i32 1} !1 = !{i32 7, !"qir_minor_version", i32 0} !2 = !{i32 1, !"dynamic_qubit_management", i1 false} !3 = !{i32 1, !"dynamic_result_management", i1 false} """submit_qir_job에 QIR 회로를 제출할 수 있는 도우미 함수를 만드십시오 target. 이 예제에서 입력 및 출력 데이터 형식은qir.v1각각과microsoft.quantum-results.v1같습니다.# Submit the job with proper input and output data formats def submit_qir_job(target, input, name, count=100): job = target.submit( input_data=input, input_data_format="qir.v1", output_data_format="microsoft.quantum-results.v1", name=name, input_params = { "entryPoint": "ENTRYPOINT__main", "arguments": [], "count": count } ) print(f"Queued job: {job.id}") job.wait_until_completed() print(f"Job completed with state: {job.details.status}") #if job.details.status == "Succeeded": result = job.get_results() return result특정 Azure Quantum target QIR 회로를 제출합니다. 예를 들어 QIR 회로를 IonQ 시뮬레이터 target에 제출하려면 다음 코드를 실행합니다.
target = workspace.get_targets(name="ionq.simulator")
result = submit_qir_job(target, QIR_routine, "QIR routine")
result
Azure Quantum에 공급자별 형식의 회로를 제출하십시오
각 Azure Quantum 공급자에는 양자 회로를 나타내는 고유한 형식이 있습니다. Q# 또는 Qiskit와 같은 QIR 언어 대신 공급자별 형식으로 Azure Quantum 회로를 제출할 수 있습니다.
JSON 형식으로 IonQ에 회로 제출
IonQ는 JSON 형식을 사용하여 해당 targets회로에서 회로를 실행합니다. 자세한 내용은 IonQ 및 IonQ targetsAPI 설명서를 참조하세요.
다음 샘플에서는 JSON 형식의 세 큐비트 간에 중첩을 만듭니다.
새 셀에서 JSON 형식의 양자 회로를 만듭니다.
circuit = {
    "qubits": 3,
    "circuit": [
        {
        "gate": "h",
        "target": 0
        },
        {
        "gate": "cnot",
        "control": 0,
        "target": 1
        },
        {
        "gate": "cnot",
        "control": 0,
        "target": 2
        },
    ]
}
회로를 IonQ target에 제출합니다. 다음 예제에서는 개체를 반환하는 IonQ 시뮬레이터를
Job사용합니다.target = workspace.get_targets(name="ionq.simulator") job = target.submit(circuit)작업이 완료되면 결과를 가져옵니다.
results = job.get_results()
print(results)
Pulser SDK 형식으로 Pasqal에 회로 제출
Pulser SDK를 사용하여 펄스 시퀀스를 만들고 Pasqal targets에 제출할 수 있습니다.
Pulser SDK 설치
Pulser 는 중립 원자 양자 디바이스에 대한 펄스 시퀀스를 만들고, 시뮬레이션하고, 실행할 수 있는 프레임워크입니다. Pulser는 PASQAL에서 양자 실험을 양자 프로세서에 제출하기 위한 통과로 설계되었습니다. 자세한 내용은 Pulser 설명서를 참조하세요.
펄스 시퀀스를 제출하려면 먼저 Pulser SDK 패키지를 설치합니다.
try:
    import pulser
    import pulser_pasqal
except ImportError:
    !pip -q install pulser pulser-pasqal --index-url https://pypi.org/simple
양자 레지스터 만들기
레지스터와 레이아웃을 모두 정의합니다. 레지스터는 원자를 정렬할 위치를 지정하고 레이아웃은 레지스터 내에서 원자를 캡처하고 구성하는 트랩의 위치를 지정합니다.
레이아웃에 대한 자세한 내용은 Pulser 설명서를 참조 하세요.
devices 객체를 만들어 Pasqal 양자 컴퓨터target, FRESNEL_CAN1를 가져옵니다.
from pulser_pasqal import PasqalCloud

devices = PasqalCloud().fetch_available_devices()
QPU = devices["FRESNEL_CAN1"]
레이아웃 설정
미리 보정된 레이아웃이 실험의 요구 사항을 충족하지 않는 경우 사용자 지정 레이아웃을 사용합니다.
지정된 임의 레지스터의 경우 중립 원자 QPU는 레이아웃에 따라 트랩을 배치한 다음, 이를 보정해야 합니다. 각 보정에는 시간이 걸리기 때문에 가능한 경우 기존 보정된 레이아웃을 다시 사용하는 것이 가장 좋습니다.
임의의 레이아웃을 만들려면 다음 옵션 중 하나를 선택합니다.
지정된 레지스터에 따라 레이아웃을 자동으로 생성합니다. 대규모 레지스터의 경우 이 프로세스는 최적이하의 솔루션을 생성할 수 있습니다. 예시:
from pulser import Register
qubits = {
    "q0": (0, 0),
    "q1": (0, 10),
    "q2": (8, 2),
    "q3": (1, 15),
    "q4": (-10, -3),
    "q5": (-8, 5),
}

reg = Register(qubits).with_automatic_layout(device)
레지스터를 만드는 레이아웃을 수동으로 정의하려면 Pulser 설명서를 참조하세요.
펄스 시퀀스 작성
중립 원자는 레이저 펄스로 제어됩니다. Pulser SDK를 사용하면 양자 레지스터에 적용할 펄스 시퀀스를 만들 수 있습니다.
원자를 제어하는 채널을 선언하여 펄스 시퀀스 특성을 정의합니다.
Sequence를 생성하려면, 시퀀스가 실행될 디바이스와 함께Register인스턴스를 제공하십시오. 예를 들어 다음 코드는 하나의 채널을ch0선언합니다.from pulser import Sequence seq = Sequence(reg, QPU) # Print the available channels for your sequence print(seq.available_channels) # Declare a channel. For example, `rydberg_global` seq.declare_channel("ch0", "rydberg_global")참고
더 많은 유연성을 위해 디바이스를
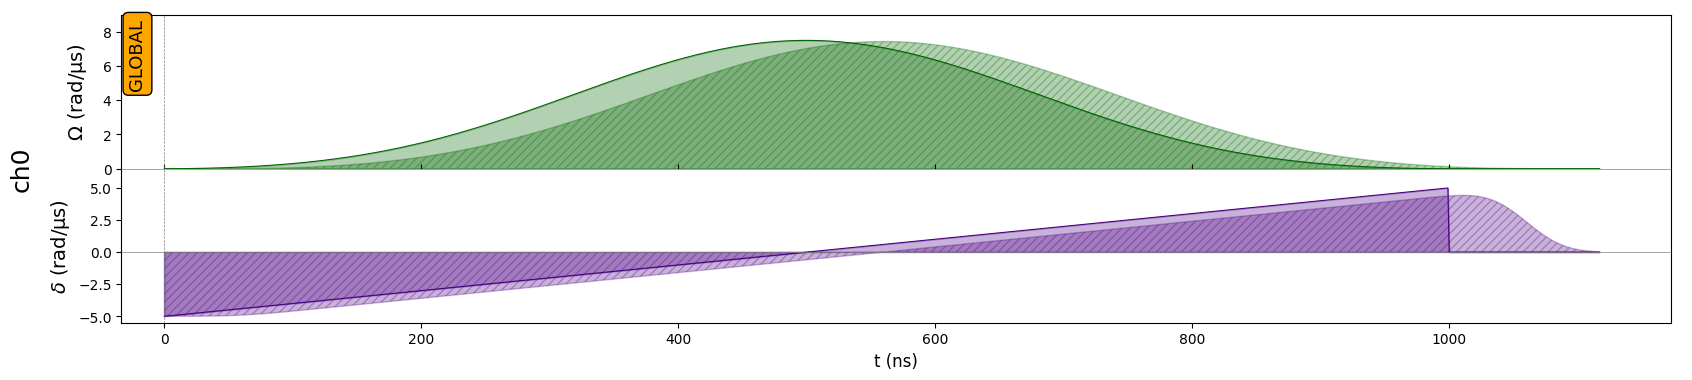
QPU = devices["FRESNEL_CAN1"]사용하거나 Pulser에서 가상 디바이스를 가져올 수 있습니다. 디바이스 사양에 대한 제약 없이 시퀀스를 생성할 수 있도록VirtualDevice을(를) 사용하면 에뮬레이터에서 실행할 수 있습니다. 자세한 내용은 Pulser 설명서를 참조 하세요.시퀀스에 펄스를 추가합니다. 이렇게 하려면 선언한 채널에 펄스를 만들고 추가합니다. 예를 들어 다음 코드는 펄스를 만들고 채널
ch0에 추가합니다.from pulser import Pulse from pulser.waveforms import RampWaveform, BlackmanWaveform import numpy as np amp_wf = BlackmanWaveform(1000, np.pi) det_wf = RampWaveform(1000, -5, 5) pulse = Pulse(amp_wf, det_wf, 0) seq.add(pulse, "ch0") seq.draw()다음 이미지는 펄스 시퀀스를 보여줍니다.
시퀀스를 JSON 문자열로 변환
펄스 시퀀스를 제출하려면 Pulser 개체를 입력 데이터로 사용할 수 있는 JSON 문자열로 변환합니다.
import json

# Convert the sequence to a JSON string
def prepare_input_data(seq):
    input_data = {}
    input_data["sequence_builder"] = json.loads(seq.to_abstract_repr())
    to_send = json.dumps(input_data)
    return to_send
Pasqal에 펄스 시퀀스 제출 target
적절한 입력 및 출력 데이터 형식을 설정합니다. 예를 들어 다음 코드는 입력 데이터 형식을
pasqal.pulser.v1로 설정하고 출력 데이터 형식을 .로pasqal.pulser-results.v1설정합니다.# Submit the job with proper input and output data formats def submit_job(target, seq, shots): job = target.submit( input_data=prepare_input_data(seq), # Take the JSON string previously defined as input data input_data_format="pasqal.pulser.v1", output_data_format="pasqal.pulser-results.v1", name="Pasqal sequence", shots=shots # Number of shots ) print(f"Queued job: {job.id}") return job참고
QPU에서 작업을 실행하는 데 필요한 시간은 현재 큐 시간에 따라 달라집니다. 작업 영역의 target 창에서 을 볼 수 있습니다.
프로그램을 Pasqal에 제출합니다. 실제 양자 하드웨어에 코드를 제출하기 전에 에뮬레이터
pasqal.sim.emu-mpstarget에서 코드를 테스트하는 것이 좋습니다.target = workspace.get_targets(name="pasqal.sim.emu-mps") # Change to "pasqal.qpu.fresnel-can1" to use FRESNEL_CAN1 QPU job = submit_job(target, seq, 10) job.wait_until_completed() print(f"Job completed with state: {job.details.status}") result = job.get_results() print(result){ "1000000": 3, "0010000": 1, "0010101": 1 }
Quantinuum에 OpenQASM 회로 제출
OpenQASM 표현에서 양자 회로를 만듭니다. 예를 들어 다음 코드는 Teleportation 회로를 만듭니다.
circuit = """OPENQASM 2.0;
include "qelib1.inc";
qreg q[3];
creg c0[3];
h q[0];
cx q[0], q[1];
cx q[1], q[2];
measure q[0] -> c0[0];
measure q[1] -> c0[1];
measure q[2] -> c0[2];
"""
또는 OpenQASM 파일에서 회로를 로드합니다.
with open("my_teleport.qasm", "r") as f:
    circuit = f.read()
회로를 Quantinuum target에 제출합니다. 다음 예제에서는 Quantinuum 시뮬레이터 중 하나에 작업을 제출합니다 targets.
target = workspace.get_targets(name="quantinuum.sim.h2-1sc")
job = target.submit(circuit, shots=500)
작업이 완료될 때까지 기다린 다음, 결과를 가져옵니다.
results = job.get_results()
print(results)
참고
이러한 결과는 임의가 아닌 모든 샷에 대해 000을 반환합니다. API 유효성 검사기는 코드가 Quantinuum 하드웨어에서 실행할 수 있는지 여부만 확인하지만 모든 양자 측정에 대해 0을 반환하기 때문입니다. 실제 난수 생성기의 경우 양자 하드웨어에서 회로를 실행해야 합니다.
Quil 회로를 리게티에 제출
Rigetti target에 Quil 작업을 제출하려면, qdk.azurePython 모듈을 사용합니다.
필요한 임포트를 로드합니다.
from azure.quantum import Workspace
from azure.quantum.target.rigetti import Result, Rigetti, RigettiTarget, InputParams
개체를
target만들고 작업을 제출하려는 Rigetti target 의 이름을 전달합니다. 예를 들어 다음 코드에서QVMtarget를 선택합니다.target = Rigetti(workspace=workspace, name=RigettiTarget.QVM)Quil 프로그램을 만듭니다. 프로그램이 수락되려면 읽기 프로그램을
"ro".로 설정해야 합니다.readout = "ro" bell_state_quil = f""" DECLARE {readout} BIT[2] H 0 CNOT 0 1 MEASURE 0 {readout}[0] MEASURE 1 {readout}[1] """ num_shots = 5 job = target.submit( input_data=bell_state_quil, name="bell state", shots=100, input_params=InputParams(skip_quilc=False) ) print(f"Job completed with state: {job.details.status}") result = Result(job) # This throws an exception if the job failed읽기 출력의 이름으로 결과를 인덱싱할 수 있습니다. 다음 코드
data_per_shot에서는 길이가num_shots인 목록이고, 목록의 각 항목은 해당 샷에서 레지스터에 대한 데이터를 포함하는 또 다른 목록입니다.data_per_shot = result[readout] ro_data_first_shot = data_per_shot[0]이 경우 레지스터의 형식이 BIT이므로 형식은 정수이고 값은 0 또는 1입니다.
assert isinstance(ro_data_first_shot[0], int)
assert ro_data_first_shot[0] == 1 or ro_data_first_shot[0] == 0
모든 데이터를 출력합니다.
print(f"Data from '{readout}' register:")
for i, shot in enumerate(data_per_shot):
    print(f"Shot {i}: {shot}")
중요
단일 작업에서는 여러 회로를 제출할 수 없습니다. 해결 방법으로 메서드를 backend.run 호출하여 각 회로를 비동기적으로 제출한 다음 각 작업의 결과를 가져올 수 있습니다. 예시:
jobs = []
for circuit in circuits:
    jobs.append(backend.run(circuit, shots=N))

results = []
for job in jobs:
    results.append(job.result())