자습서: 원격으로 렌더링된 모델 보기
이 자습서에서는 다음을 하는 방법을 알아볼 수 있습니다.
- ARR(Azure Remote Rendering) 인스턴스 프로비저닝
- 렌더링 세션 만들기 및 중지
- 기존 렌더링 세션 다시 사용
- 세션에서 연결 및 연결 끊기
- 렌더링 세션에 모델 로드
필수 조건
이 자습서에는 다음이 필요합니다.
- 활성 종량제 Azure 구독(계정 만들기)
- Windows SDK 10.0.18362.0(다운로드)
- 최신 버전의 Visual Studio 2022 (다운로드)
- Git (다운로드)
- Git LFS 플러그 인(다운로드)
- Unity(지원되는 버전은 시스템 요구 사항 참조)
- Unity 및 C# 언어에 대한 중급 수준의 지식(예: 스크립트 및 개체 만들기, prefab 사용, Unity 이벤트 구성 등)
ARR(Azure Remote Rendering) 인스턴스 프로비저닝
Azure Remote Rendering 서비스에 액세스하려면 먼저 계정을 만들어야 합니다.
새 Unity 프로젝트 만들기
팁
ARR 샘플 리포지토리에는 모든 자습서가 완료된 프로젝트가 포함되어 있으며 참조로 사용할 수 있습니다. 전체 Unity 프로젝트는 Unity\Tutorial-Complete에서 확인하세요.
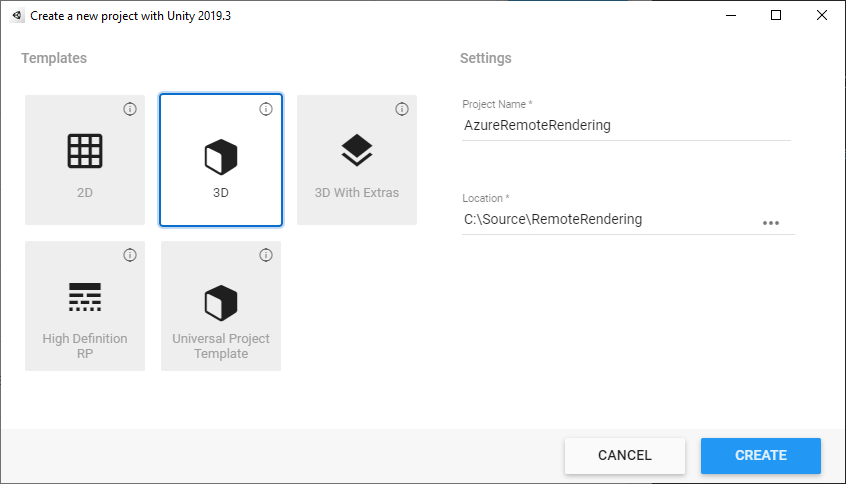
Unity Hub에서 새 프로젝트를 만듭니다. 다음 예에서는 프로젝트가 RemoteRendering이라는 폴더에 만들어진다고 가정합니다.
Azure Remote Rendering 및 OpenXR 패키지 포함
Unity 프로젝트에 Azure Remote Rendering 및 OpenXR 패키지를 추가하는 방법에 대한 지침을 따릅니다.
참고 항목
Unity가 OpenXR 패키지를 가져온 후 새 입력 시스템에 대해 네이티브 플랫폼 백 엔드를 사용하도록 설정할지 묻는 경고 대화 상자를 표시하면 지금은 아니요를 클릭합니다. 이후 단계에서 사용하도록 설정합니다.
카메라 구성
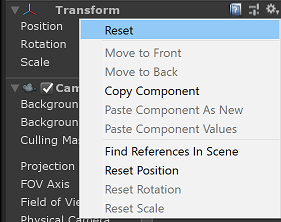
Main Camera(기본 카메라) 노드를 선택합니다.
마우스 오른쪽 단추로 Transform(변환) 구성 요소를 클릭하여 바로 가기 메뉴를 열고, Reset(다시 설정) 옵션을 선택합니다.
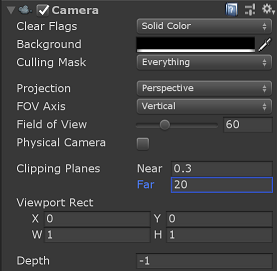
Clear flags(플래그 지우기)를 Solid Color(단색)로 설정합니다.
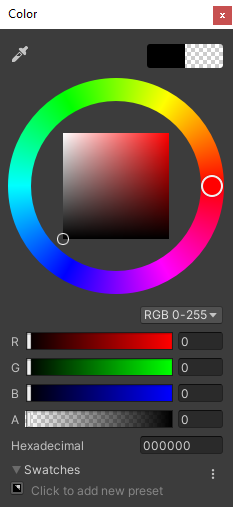
완전 투명(0) 알파(A)를 사용하여 Background(배경)를 Black(검은색)(#000000)으로 설정합니다.
Clipping Planes(클리핑 거리)를 Near(근거리) = 0.1 및 Far(원거리) = 20으로 설정합니다. 이 설정은 10cm보다 가깝거나 20미터보다 먼 클립 형상을 렌더링하는 것을 의미합니다.
프로젝트 설정 조정
Edit(편집) > 프로젝트 설정...을 엽니다.
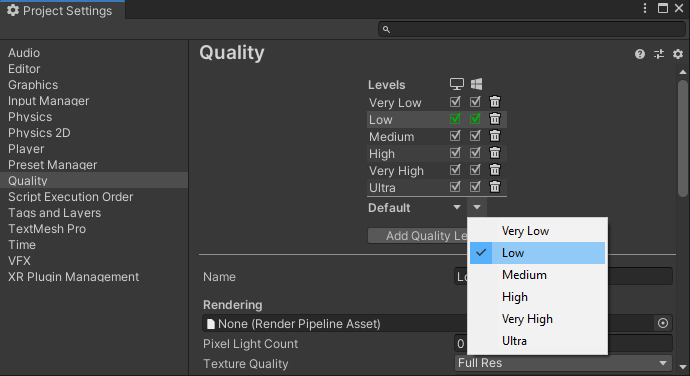
왼쪽 목록 메뉴에서 Quality(품질)를 선택합니다.
모든 플랫폼의 Default Quality Level(기본 품질 수준)을 Low(낮음)로 변경합니다. 이 설정을 사용하면 로컬 콘텐츠를 더욱 효율적으로 렌더링할 수 있으며 원격으로 렌더링된 콘텐츠의 품질에는 영향을 주지 않습니다.
참고 항목
이 자습서의 범위에서는 Unity 빌트인 렌더 파이프라인을 고수합니다. 유니버설 렌더 파이프라인을 사용하려면 Unity 렌더 파이프라인에서 추가 설정 단계를 참조하세요.
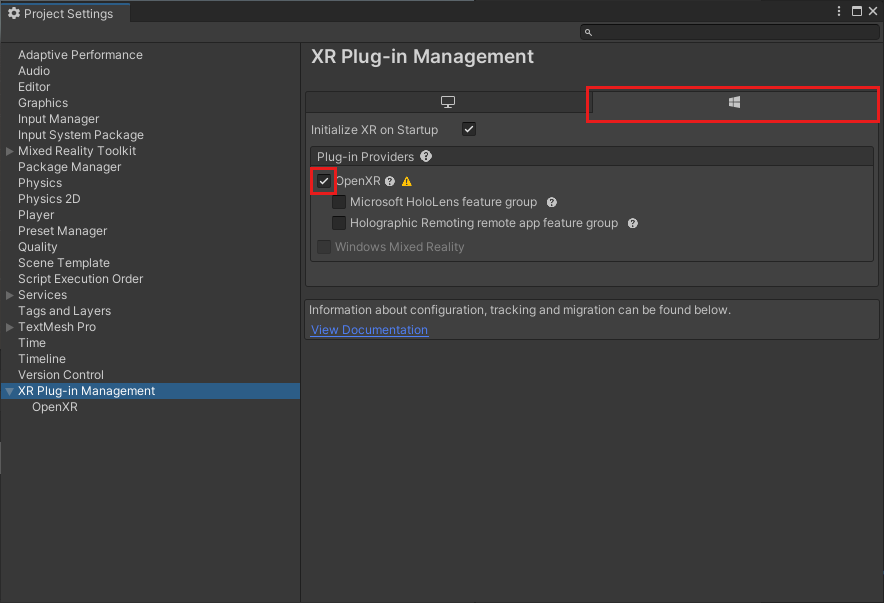
왼쪽 목록 메뉴에서 XR 플러그 인 관리를 선택합니다.
- XR 플러그 인 관리 설치 단추를 클릭합니다.
- Windows 아이콘으로 표시되는 Universal Windows Platform settings(유니버설 Windows 플랫폼 설정) 탭을 선택합니다.
- 플러그 인 공급자 아래에서 Open XR 확인란을 선택합니다.
- 새 입력 시스템에 대해 네이티브 플랫폼 백 엔드를 사용하도록 설정하라는 대화 상자가 열리면 아니요를 선택합니다.
참고 항목
Microsoft HoloLens 기능 그룹이 사용하지 않도록 설정된 경우 프로젝트에서 Windows Mixed Reality OpenXR 플러그 인이 누락된 것입니다. Azure Remote Rendering 및 OpenXR 패키지를 추가하여 설치하는 방법에 대한 지침을 따릅니다.
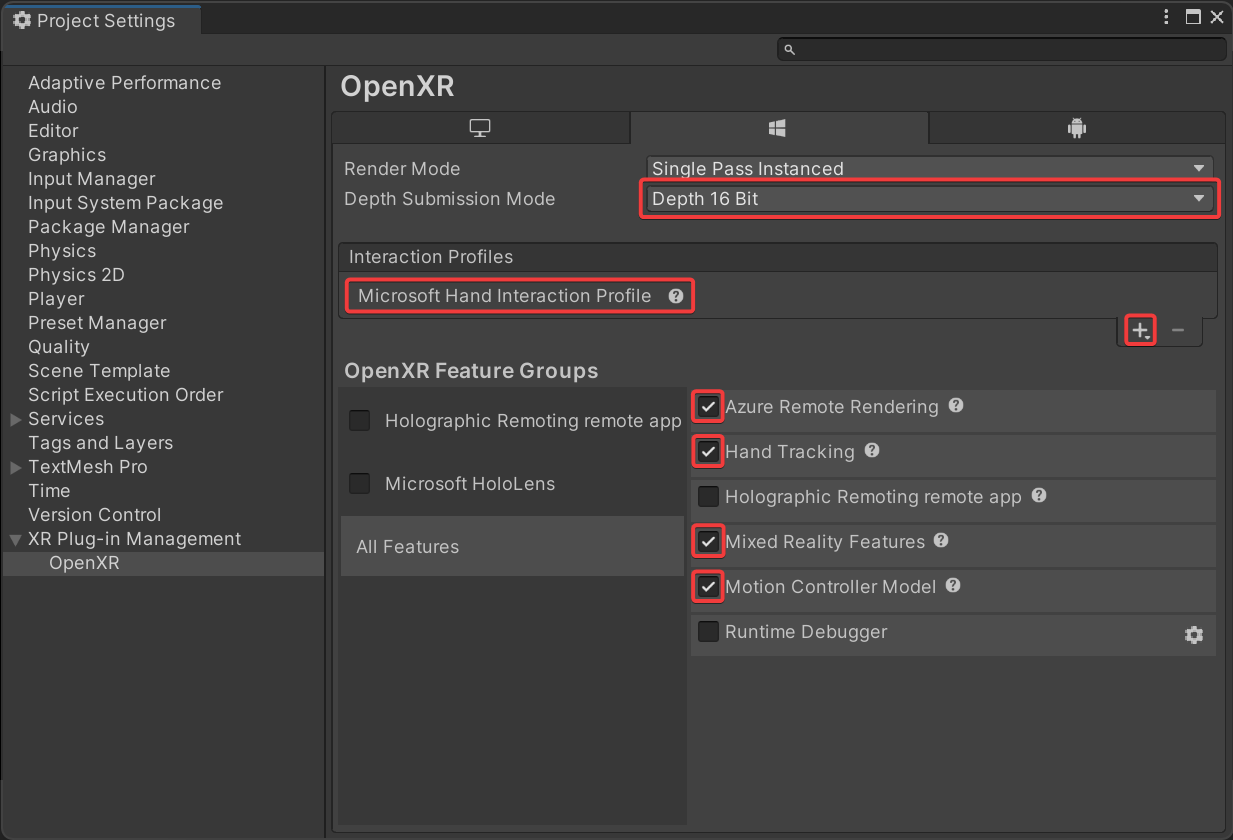
왼쪽 목록 메뉴에서 OpenXR을 선택합니다.
- 깊이 제출 모드를 깊이 16비트로 설정합니다.
- Microsoft Hand 상호 작용 프로필을 상호 작용 프로필s에 추가합니다.
- 다음 OpenXR 기능을 사용하도록 설정합니다.
- Azure Remote Rendering
- 손 추적
- Mixed Reality 기능
- 모션 컨트롤러 모델
참고 항목
필요한 OpenXR 기능이 나열되지 않으면 프로젝트에서 Windows Mixed Reality OpenXR 플러그 인이 누락된 것입니다. Azure Remote Rendering 및 OpenXR 패키지를 추가하여 설치하는 방법에 대한 지침을 따릅니다.
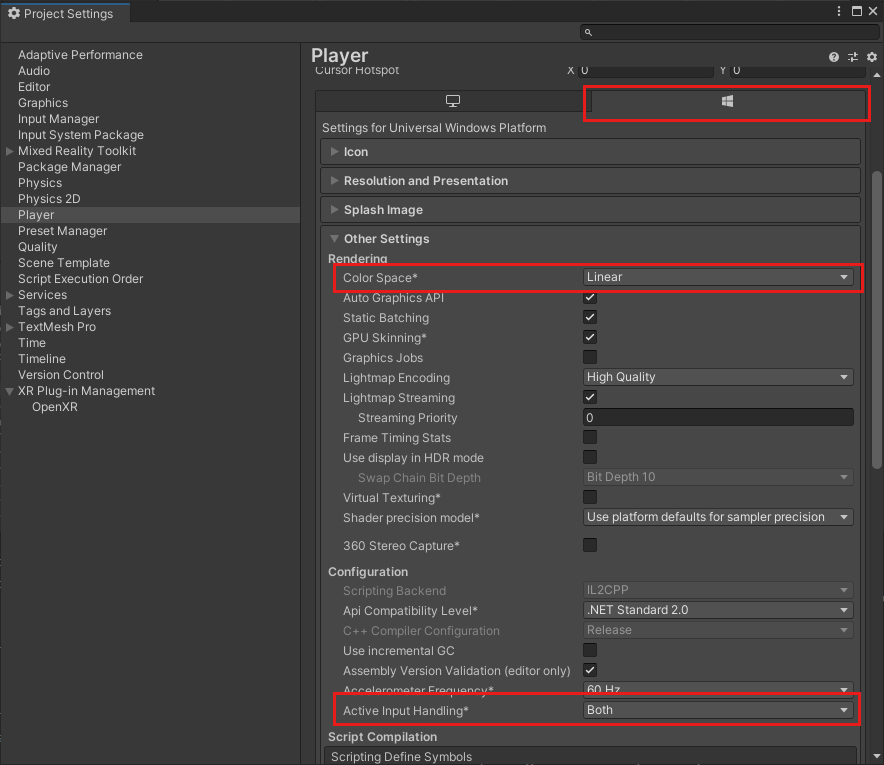
왼쪽 목록 메뉴에서 Player(플레이어)를 선택합니다.
- Windows 아이콘으로 표시되는 Universal Windows Platform settings(유니버설 Windows 플랫폼 설정) 탭을 선택합니다.
- 기타 설정을 확장합니다.
- 렌더링에서 색 공간을 선형으로 변경하고 요청 시 Unity를 다시 시작합니다.
- 구성에서 활성 입력 처리를 둘 다로 변경하고 요청 시 Unity를 다시 시작합니다.
- 게시 설정을 펼칩니다.
- Capabilities(기능)까지 아래로 스크롤하여 다음을 선택합니다.
- InternetClient
- InternetClientServer
- SpatialPerception
- PrivateNetworkClientServer(선택 사항). Unity 원격 디버거를 디바이스에 연결하려면 이 옵션을 선택합니다.
- Supported Device Families(지원되는 디바이스 제품군) 아래에서 Holographic(홀로그램) 및 Desktop(데스크톱)
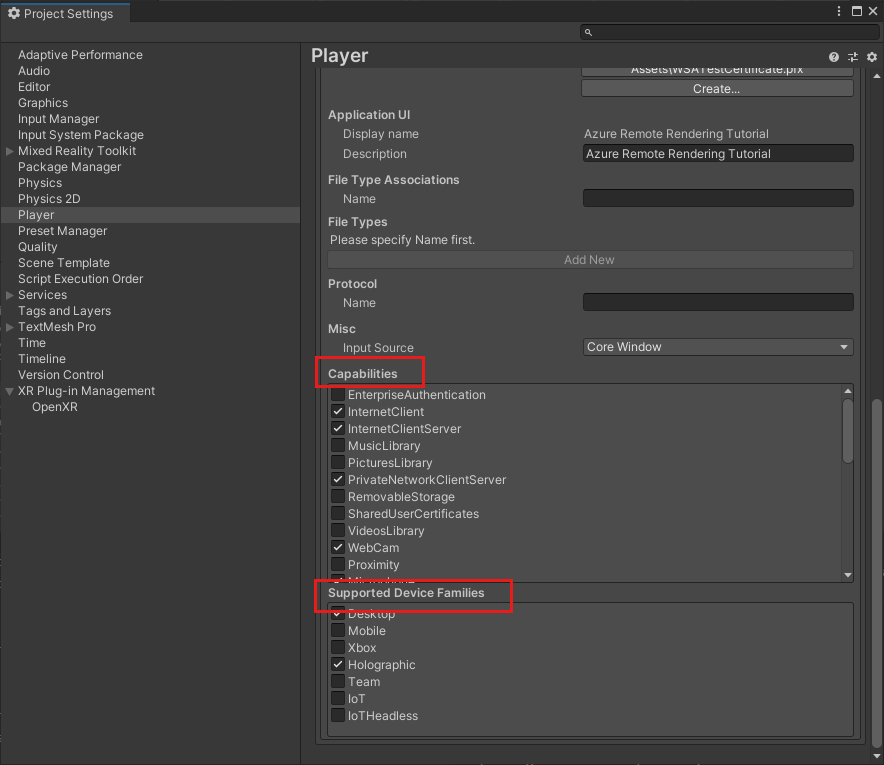 을 사용하도록 설정합니다.
Project Settings(프로젝트 설정) 패널을 닫거나 도킹합니다.
파일->빌드 설정를 차례로 엽니다.
- Universal Windows Platform(유니버설 Windows 플랫폼)을 선택합니다.
- 아래에 있는 설정과 일치하도록 설정을 구성합니다.
- 플랫폼 전환 단추를 누릅니다.
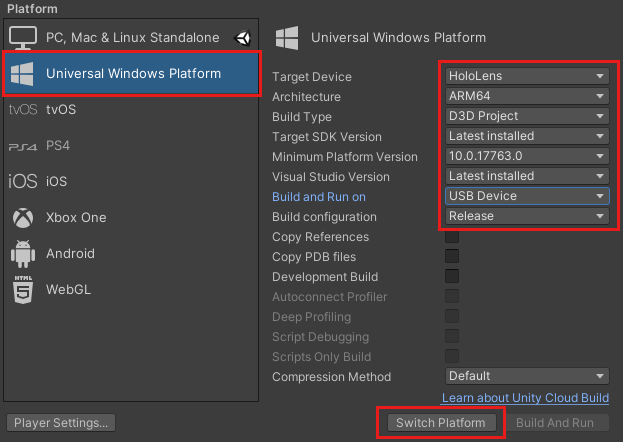
Unity에서 플랫폼이 변경되면 빌드 패널을 닫습니다.
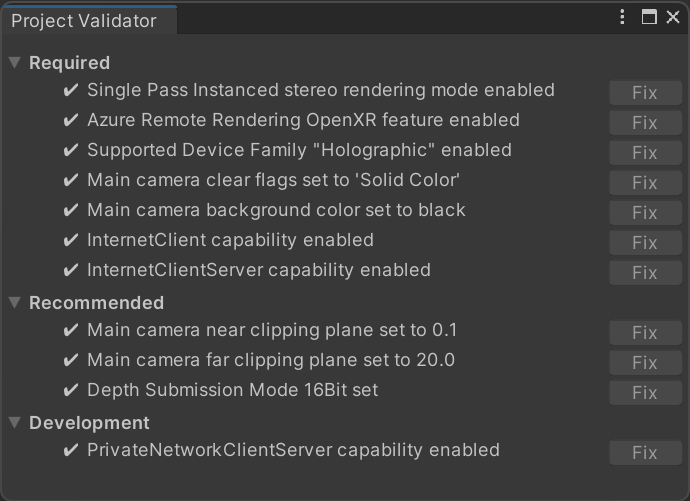
프로젝트 설정 유효성 검사
프로젝트 설정이 올바른지 확인하려면 다음 단계를 수행합니다.
Unity 편집기 도구 모음의 RemoteRendering 메뉴에서 ValidateProject 항목을 선택합니다.
프로젝트 검사기 창에서 오류를 검토하고 필요한 경우 프로젝트 설정을 수정합니다.
참고 항목
프로젝트에서 MRTK를 사용하고 카메라 하위 시스템을 활성화하면 MRTK가 카메라에 적용하는 수동 변경 사항을 재정의합니다. 여기에는 ValidateProject 도구의 수정 사항이 포함됩니다.
Azure Remote Rendering 연결 및 상태를 조정하는 스크립트 만들기
원격으로 렌더링된 모델을 표시하는 4가지 기본 단계가 있으며, 아래 순서도에서 설명하고 있습니다. 각 단계는 순서대로 수행해야 합니다. 다음 단계는 애플리케이션 상태를 관리하고 필요한 각 단계를 진행하는 스크립트를 만드는 것입니다.

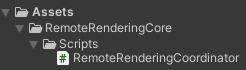
Project(프로젝트) 창의 Assets(자산) 아래에서 RemoteRenderingCore라는 새 폴더를 만듭니다. 그런 다음, RemoteRenderingCore 내에서 Scripts라는 다른 폴더를 만듭니다.
RemoteRenderingCoordinator라는 새 C# 스크립트를 만듭니다. 프로젝트는 다음과 같습니다.
이 코디네이터 스크립트는 Remote Rendering 상태를 추적하고 관리합니다. 참고로, 이 코드 중 일부는 상태를 유지 관리하고, 기능을 다른 구성 요소에 공개하며, 이벤트를 트리거하고, Azure Remote Rendering과 직접 관련되지 않은 애플리케이션 특정 데이터를 저장하는 데 사용됩니다. 아래 코드를 시작 지점으로 사용하며, 자습서의 뒷부분에서는 특정 Azure Remote Rendering 코드를 처리하고 구현합니다.
코드 편집기에서 RemoteRenderingCoordinator를 열고, 전체 내용을 아래 코드로 바꿉니다.
// Copyright (c) Microsoft Corporation. All rights reserved.
// Licensed under the MIT License. See LICENSE in the project root for license information.

using Microsoft.Azure.RemoteRendering;
using Microsoft.Azure.RemoteRendering.Unity;
using System;
using System.Linq;
using System.Threading.Tasks;
using UnityEngine;
using UnityEngine.Events;

#if UNITY_WSA
using UnityEngine.XR.WSA;
#endif

/// <summary>
/// Remote Rendering Coordinator is the controller for all Remote Rendering operations.
/// </summary>

// Require the GameObject with a RemoteRenderingCoordinator to also have the ARRServiceUnity component
[RequireComponent(typeof(ARRServiceUnity))]
public class RemoteRenderingCoordinator : MonoBehaviour
{
    public enum RemoteRenderingState
    {
        NotSet,
        NotInitialized,
        NotAuthorized,
        NoSession,
        ConnectingToExistingRemoteSession,
        ConnectingToNewRemoteSession,
        RemoteSessionReady,
        ConnectingToRuntime,
        RuntimeConnected
    }

    public static RemoteRenderingCoordinator instance;

    // Account
    // RemoteRenderingDomain must be '<region>.mixedreality.azure.com' - if no '<region>' is specified, connections will fail
    // For most people '<region>' is either 'westus2' or 'westeurope'
    [SerializeField]
    private string remoteRenderingDomain = "westus2.mixedreality.azure.com";
    public string RemoteRenderingDomain
    {
        get => remoteRenderingDomain.Trim();
        set => remoteRenderingDomain = value;
    }

    [Header("Development Account Credentials")]
    [SerializeField]
    private string accountDomain = "<enter your account domain here>";
    public string AccountDomain
    {
        get => accountDomain.Trim();
        set => accountDomain = value;
    }

    [SerializeField]
    private string accountId = "<enter your account id here>";
    public string AccountId {
        get => accountId.Trim();
        set => accountId = value;
    }

    [SerializeField]
    private string accountKey = "<enter your account key here>";
    public string AccountKey {
        get => accountKey.Trim();
        set => accountKey = value;
    }

    // These settings are important. All three should be set as low as possible, while maintaining a good user experience
    // See the documentation around session management and the technical differences in session VM size
    [Header("New Session Defaults")]

    public RenderingSessionVmSize renderingSessionVmSize = RenderingSessionVmSize.Standard;
    public uint maxLeaseHours = 0;
    public uint maxLeaseMinutes = 20;

    [Header("Other Configuration")]

    [Tooltip("If you have a known active SessionID, you can fill it in here before connecting")]
    [SerializeField]
    private string sessionIDOverride;
    public string SessionIDOverride {
        get => sessionIDOverride.Trim();
        set => sessionIDOverride = value;
    }

    // When Automatic Mode is true, the coordinator will attempt to automatically proceed through the process of connecting and loading a model
    public bool automaticMode = true;

    public event Action RequestingAuthorization;
    public UnityEvent OnRequestingAuthorization = new UnityEvent();

    public event Action AuthorizedChanged;
    public UnityEvent OnAuthorizationChanged = new UnityEvent();
    private bool authorized;
    public bool Authorized
    {
        get => authorized;
        set
        {
            if (value == true) //This is a one-way value, once we're authorized it lasts until the app is shutdown.
            {
                authorized = value;
                AuthorizedChanged?.Invoke();
            }
        }
    }

    public delegate Task<SessionConfiguration> AccountInfoGetter();

    public static AccountInfoGetter ARRCredentialGetter
    {
        private get;
        set;
    }

    private RemoteRenderingState currentCoordinatorState = RemoteRenderingState.NotSet;
    public RemoteRenderingState CurrentCoordinatorState
    {
        get => currentCoordinatorState;
        private set
        {
            if (currentCoordinatorState != value)
            {
                currentCoordinatorState = value;
                Debug.LogFormat(LogType.Log, LogOption.NoStacktrace, null, "{0}", $"State changed to: {currentCoordinatorState}");
                CoordinatorStateChange?.Invoke(currentCoordinatorState);
            }
        }
    }

    public static event Action<RemoteRenderingState> CoordinatorStateChange;

    public static RenderingSession CurrentSession => instance?.ARRSessionService?.CurrentActiveSession;

    private ARRServiceUnity arrSessionService;

    private ARRServiceUnity ARRSessionService
    {
        get
        {
            if (arrSessionService == null)
                arrSessionService = GetComponent<ARRServiceUnity>();
            return arrSessionService;
        }
    }

    private async Task<SessionConfiguration> GetDevelopmentCredentials()
    {
        Debug.LogWarning("Using development credentials! Not recommended for production.");
        return await Task.FromResult(new SessionConfiguration(AccountDomain, RemoteRenderingDomain, AccountId, AccountKey));
    }

    /// <summary>
    /// Keep the last used SessionID, when launching, connect to this session if its available
    /// </summary>
    private string LastUsedSessionID
    {
        get
        {
            if (!string.IsNullOrEmpty(SessionIDOverride))
                return SessionIDOverride;

            if (PlayerPrefs.HasKey("LastUsedSessionID"))
                return PlayerPrefs.GetString("LastUsedSessionID");
            else
                return null;
        }
        set
        {
            PlayerPrefs.SetString("LastUsedSessionID", value);
        }
    }

    public void Awake()
    {
        //Forward events to Unity events
        RequestingAuthorization += () => OnRequestingAuthorization?.Invoke();
        AuthorizedChanged += () => OnAuthorizationChanged?.Invoke();

        //Attach to event
        AuthorizedChanged += RemoteRenderingCoordinator_AuthorizedChanged;

        if (instance == null)
            instance = this;
        else
            Destroy(this);

        CoordinatorStateChange += AutomaticMode;

        CurrentCoordinatorState = RemoteRenderingState.NotInitialized;
    }

    private void RemoteRenderingCoordinator_AuthorizedChanged()
    {
        if (CurrentCoordinatorState != RemoteRenderingState.NotAuthorized)
            return; //This isn't valid from any other state than NotAuthorized


        //We just became authorized to connect to Azure
        InitializeSessionService();
    }

    /// <summary>
    /// Automatic mode attempts to automatically progress through the connection and loading steps. Doesn't handle error states.
    /// </summary>
    /// <param name="currentState">The current state</param>
    private async void AutomaticMode(RemoteRenderingState currentState)
    {
        if (!automaticMode)
            return;

        //Add a small delay for visual effect
        await Task.Delay(1500);
        switch (currentState)
        {
            case RemoteRenderingState.NotInitialized:
                InitializeARR();
                break;
            case RemoteRenderingState.NotAuthorized:
                RequestAuthorization();
                break;
            case RemoteRenderingState.NoSession:
                JoinRemoteSession();
                break;
            case RemoteRenderingState.RemoteSessionReady:
                ConnectRuntimeToRemoteSession();
                break;
        }
    }

    /// <summary>
    /// Initializes ARR, associating the main camera
    /// Note: This must be called on the main Unity thread
    /// </summary>
    public void InitializeARR()
    {
        //Implement me
    }

    /// <summary>
    /// Create a new remote session manager
    /// If the ARRCredentialGetter is set, use it as it, otherwise use the development credentials
    /// </summary>
    public async void InitializeSessionService()
    {
        //Implement me
    }

    /// <summary>
    /// Trigger the event for checking authorization, respond to this event by prompting the user for authentication
    /// If authorized, set Authorized = true
    /// </summary>
    public void RequestAuthorization()
    {
        RequestingAuthorization?.Invoke();
    }

    public void BypassAuthorization()
    {
        Authorized = true;
    }

    /// <summary>
    /// Attempts to join an existing session or start a new session
    /// </summary>
    public async void JoinRemoteSession()
    {
        //Implement me
    }

    public async void StopRemoteSession()
    {
        //Implement me
    }

    private async Task<bool> IsSessionAvailable(string sessionID)
    {
        bool sessionAvailable = false;
        try
        {
            RenderingSessionPropertiesArrayResult result = await ARRSessionService.Client.GetCurrentRenderingSessionsAsync();
            if (result.ErrorCode == Result.Success)
            {
                RenderingSessionProperties[] properties = result.SessionProperties;
                if (properties != null)
                {
                    sessionAvailable = properties.Any(x => x.Id == sessionID && (x.Status == RenderingSessionStatus.Ready || x.Status == RenderingSessionStatus.Starting));
                }
            }
            else
            {
                Debug.LogError($"Failed to get current rendering sessions. Error: {result.Context.ErrorMessage}");
            }
        }
        catch (RRException ex)
        {
            Debug.LogError($"Failed to get current rendering sessions. Error: {ex.Message}");
        }
        return sessionAvailable;
    }

    /// <summary>
    /// Connects the local runtime to the current active session, if there's a session available
    /// </summary>
    public async void ConnectRuntimeToRemoteSession()
    {
        //Implement me
    }

    public void DisconnectRuntimeFromRemoteSession()
    {
        //Implement me
    }

    /// <summary>
    /// The session must have its runtime pump updated.
    /// The Connection.Update() will push messages to the server, receive messages, and update the frame-buffer with the remotely rendered content.
    /// </summary>
    private void LateUpdate()
    {
        ARRSessionService?.CurrentActiveSession?.Connection?.Update();
    }

    /// <summary>
    /// Loads a model into the remote session for rendering
    /// </summary>
    /// <param name="modelPath">The model's path</param>
    /// <param name="progress">A call back method that accepts a float progress value [0->1]</param>
    /// <param name="parent">The parent Transform for this remote entity</param>
    /// <returns>An awaitable Remote Rendering Entity</returns>
    public async Task<Entity> LoadModel(string modelPath, UnityEngine.Transform parent = null, Action<float> progress = null)
    {
        //Implement me
        return null;
    }

    private async void OnRemoteSessionStatusChanged(ARRServiceUnity caller, RenderingSession session)
    {
        var properties = await session.GetPropertiesAsync();

        switch (properties.SessionProperties.Status)
        {
            case RenderingSessionStatus.Error:
            case RenderingSessionStatus.Expired:
            case RenderingSessionStatus.Stopped:
            case RenderingSessionStatus.Unknown:
                CurrentCoordinatorState = RemoteRenderingState.NoSession;
                break;
            case RenderingSessionStatus.Starting:
                CurrentCoordinatorState = RemoteRenderingState.ConnectingToNewRemoteSession;
                break;
            case RenderingSessionStatus.Ready:
                CurrentCoordinatorState = RemoteRenderingState.RemoteSessionReady;
                break;
        }
    }

    private void OnLocalRuntimeStatusChanged(ConnectionStatus status, Result error)
    {
        switch (status)
        {
            case ConnectionStatus.Connected:
                CurrentCoordinatorState = RemoteRenderingState.RuntimeConnected;
                break;
            case ConnectionStatus.Connecting:
                CurrentCoordinatorState = RemoteRenderingState.ConnectingToRuntime;
                break;
            case ConnectionStatus.Disconnected:
                CurrentCoordinatorState = RemoteRenderingState.RemoteSessionReady;
                break;
        }
    }
}
Azure Remote Rendering GameObject 만들기
원격 렌더링 코디네이터 및 해당 필수 스크립트(ARRServiceUnity)는 모두 장면에서 GameObject에 연결해야 하는 MonoBehaviour입니다. 원격 세션에 연결하고 관리하는 ARR의 많은 기능을 공개하기 위해 ARR에서 ARRServiceUnity 스크립트를 제공합니다.
- 장면에서 새 GameObject를 만들고(Ctrl+Shift+N 또는 GameObject -> 빈 항목 만들기), 이름을 RemoteRenderingCoordinator로 지정합니다.
- RemoteRenderingCoordinator 스크립트를 RemoteRenderingCoordinator GameObject에 추가합니다.

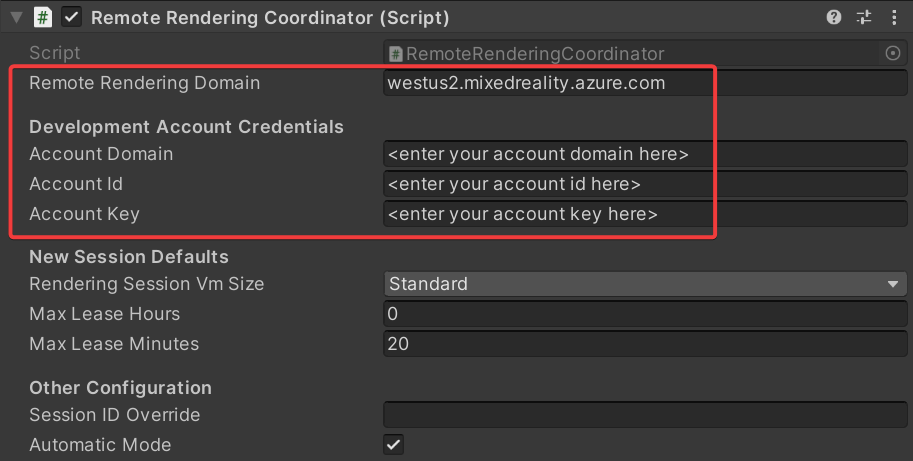
- 검사기에서 Service(서비스)로 표시되는 ARRServiceUnity 스크립트가 GameObject에 자동으로 추가되는지 확인합니다. 이는 RemoteRenderingCoordinator 스크립트의 위쪽에
[RequireComponent(typeof(ARRServiceUnity))]가 있는 결과입니다. - Azure Remote Rendering 자격 증명, 계정 도메인 및 Remote Rendering 도메인을 코디네이터 스크립트에 추가합니다.
Azure Remote Rendering 초기화
이제 코디네이터에 대한 프레임워크가 있으므로 Remote Rendering 초기화를 시작하는 4가지 단계를 각각 구현합니다.

초기화는 렌더링에 사용할 카메라 개체를 Azure Remote Rendering에 알리고 상태 시스템을 NotAuthorized로 진행합니다. 이 상태는 초기화되었지만 아직 세션에 연결할 권한이 없음을 의미합니다. ARR 세션을 시작하면 비용이 발생하므로 사용자에게 계속 진행할지를 확인해야 합니다.
NotAuthorized 상태가 되면 CheckAuthorization이 호출됩니다. 이 경우 RequestingAuthorization 이벤트를 호출하고 사용할 계정 자격 증명을 결정합니다(AccountInfo는 클래스의 위쪽 근처에 정의되어 있으며, 위의 단계에서 Unity 검사기를 통해 정의한 자격 증명을 사용함).
참고 항목
런타임 재컴파일은 ARR에서 지원하지 않습니다. 재생 모드가 활성화된 상태에서 스크립트를 수정하고 저장하면 Unity가 중지되고 작업 관리자를 통해 강제로 종료해야 할 수 있습니다. 스크립트를 편집하기 전에 항상 재생 모드를 중지했는지 확인하세요.
InitializeARR 및 InitializeSessionService의 내용을 아래의 완성된 코드로 바꿉니다.
/// <summary>
/// Initializes ARR, associating the main camera
/// Note: This must be called on the main Unity thread
/// </summary>
public void InitializeARR()
{
    RemoteManagerUnity.InitializeManager(new RemoteUnityClientInit  (Camera.main));

    CurrentCoordinatorState = RemoteRenderingState.NotAuthorized;
}

/// <summary>
/// Create a new remote session manager
/// If the ARRCredentialGetter is set, use it as it, otherwise use  the development credentials
/// </summary>
public async void InitializeSessionService()
{
    if (ARRCredentialGetter == null)
        ARRCredentialGetter = GetDevelopmentCredentials;

    var sessionConfiguration = await ARRCredentialGetter.Invoke();

    ARRSessionService.OnSessionStatusChanged +=     OnRemoteSessionStatusChanged;

    try
    {
        ARRSessionService.Initialize(sessionConfiguration);
    }
    catch (ArgumentException argumentException)
    {
        Debug.LogError(argumentException.Message);
        CurrentCoordinatorState = RemoteRenderingState. NotAuthorized;
        return;
    }

    CurrentCoordinatorState = RemoteRenderingState.NoSession;
}
NotAuthorized에서 NoSession으로 진행하기 위해 일반적으로 사용자가 선택할 수 있도록 모달 대화 상자가 제공됩니다(다른 챕터에서만 수행할 수 있음). 지금은 RequestingAuthorization 이벤트가 트리거되는 즉시 ByPassAuthentication을 호출하여 권한 부여 확인을 자동으로 무시합니다.
RemoteRenderingCoordinator GameObject를 선택하고, RemoteRenderingCoordinator 구성 요소의 검사기에 공개되는 OnRequestingAuthorization Unity 이벤트를 찾습니다.
오른쪽 아래에서 '+'를 눌러 새 이벤트를 추가합니다.
직접 참조할 수 있도록 구성 요소를 자체 이벤트로 끕니다.
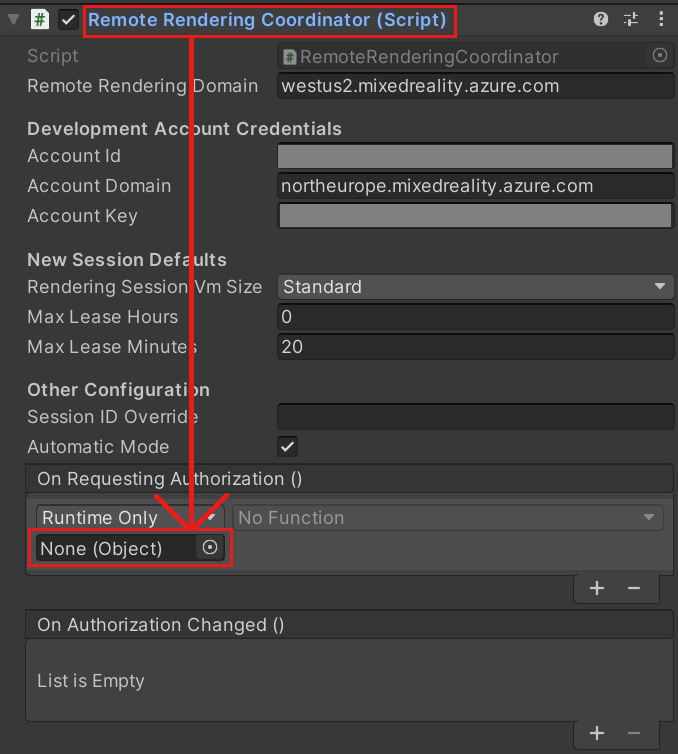
드롭다운에서 RemoteRenderingCoordinator -> BypassAuthorization을 차례로 선택합니다.\

원격 세션 만들기 또는 조인
두 번째 단계는 Remote Rendering 세션을 만들거나 참여하는 것입니다(렌더링 세션에 대한 자세한 내용은 Remote Rendering 세션 참조).

원격 세션은 모델을 렌더링하는 위치입니다. JoinRemoteSession( ) 메서드는 LastUsedSessionID 속성으로 추적되거나 SessionIDOverride에 할당된 활성 세션 ID가 있는 경우 기존 세션에 참여하려고 시도합니다. SessionIDOverride는 디버깅 목적으로만 사용되며, 세션이 있음을 알고 있고 명시적으로 연결하려는 경우에만 사용해야 합니다.
사용 가능한 세션이 없으면 새 세션이 만들어집니다. 그러나 새 세션을 만드는 경우 시간이 많이 걸립니다. 따라서 필요할 때만 세션을 만들고 가능할 때마다 재사용해야 합니다(세션 관리에 대한 자세한 내용은 상용: 세션 풀링, 예약 및 모범 사례 참조).
팁
StopRemoteSession()은 활성 세션을 종료합니다. 불필요한 요금이 청구되지 않도록 방지하려면 더 이상 필요하지 않은 세션을 항상 중지해야 합니다.
이제 상태 시스템에서 사용 가능한 세션에 따라 ConnectingToNewRemoteSession 또는 ConnectingToExistingRemoteSession으로 진행합니다. 기존 세션을 열거나 새 세션을 만드는 경우 모두 ARRSessionService.OnSessionStatusChanged 이벤트가 트리거되어 OnRemoteSessionStatusChanged 메서드를 실행합니다. 이상적으로는 상태 시스템이 RemoteSessionReady로 향상됩니다.
- 새 세션에 조인하려면 코드를 수정하여 JoinRemoteSession( ) 및 StopRemoteSession( ) 메서드를 아래의 완성된 예제로 바꿉니다.
/// <summary>
/// Attempts to join an existing session or start a new session
/// </summary>
public async void JoinRemoteSession()
{
    //If there's a session available that previously belonged to us, and it's ready, use it. Otherwise start a new session.
    RenderingSessionProperties joinResult;
    if (await IsSessionAvailable(LastUsedSessionID))
    {
        CurrentCoordinatorState = RemoteRenderingState.ConnectingToExistingRemoteSession;
        joinResult = await ARRSessionService.OpenSession(LastUsedSessionID);
    }
    else
    {
        CurrentCoordinatorState = RemoteRenderingState.ConnectingToNewRemoteSession;
        joinResult = await ARRSessionService.StartSession(new RenderingSessionCreationOptions(renderingSessionVmSize, (int)maxLeaseHours, (int)maxLeaseMinutes));
    }

    if (joinResult.Status == RenderingSessionStatus.Ready || joinResult.Status == RenderingSessionStatus.Starting)
    {
        LastUsedSessionID = joinResult.Id;
    }
    else
    {
        //The session should be ready or starting, if it's not, something went wrong
        await ARRSessionService.StopSession();
        if(LastUsedSessionID == SessionIDOverride)
            SessionIDOverride = "";
        CurrentCoordinatorState = RemoteRenderingState.NoSession;
    }
}

public async void StopRemoteSession()
{
    if (ARRSessionService.CurrentActiveSession != null)
    {
        await ARRSessionService.CurrentActiveSession.StopAsync();
    }
}
세션을 다시 사용하여 시간을 절약하려면 ARRServiceUnity 구성 요소에서 Auto-Stop Session(세션 자동 중지) 옵션을 비활성화해야 합니다. 이렇게 하면 세션이 연결되지 않은 경우에도 계속 실행됩니다. 세션은 서버에서 종료되기 전에 MaxLeaseTime만큼 오래 실행될 수 있습니다(MaxLeaseTime 값은 원격 렌더링 코디네이터의 New Session Defaults(새 세션 기본값) 아래에서 수정할 수 있음). 반면에 연결을 끊을 때 모든 세션을 자동으로 종료하면 매번 새 세션이 시작될 때까지 기다려야 하므로 시간이 오래 걸릴 수 있습니다.
참고 항목
세션 중지는 즉시 적용되며, 실행 취소할 수 없습니다. 중지되면 동일한 시작 오버헤드를 사용하여 새 세션을 만들어야 합니다.
원격 세션에 로컬 런타임 연결
다음으로, 애플리케이션에서 로컬 런타임을 원격 세션에 연결해야 합니다.

또한 애플리케이션에서 런타임과 현재 세션 간의 연결에 대한 이벤트를 수신 대기해야 합니다. 이러한 상태 변경은 OnLocalRuntimeStatusChanged에서 처리됩니다. 이 코드는 상태를 ConnectingToRuntime으로 향상시킵니다. OnLocalRuntimeStatusChanged에 연결되면 상태가 RuntimeConnected로 전환됩니다. 런타임에 연결하는 것은 코디네이터에서 관심을 갖는 마지막 상태입니다. 즉, 애플리케이션이 모든 공통 구성을 통해 수행되고, 모델을 로드하고 렌더링하는 세션 관련 작업을 시작할 준비가 되었다는 것입니다.
- ConnectRuntimeToRemoteSession( ) 및 DisconnectRuntimeFromRemoteSession( ) 메서드를 아래의 완성된 버전으로 바꿉니다.
- LateUpdate Unity 메서드를 적어 두고, 현재 활성 세션을 업데이트해야 합니다. 이렇게 하면 현재 세션에서 메시지를 보내거나 받고, 프레임 버퍼를 원격 세션에서 받은 프레임으로 업데이트할 수 있습니다. 이는 ARR이 제대로 작동하는 데 매우 중요합니다.
/// <summary>
/// Connects the local runtime to the current active session, if there's a session available
/// </summary>
public async void ConnectRuntimeToRemoteSession()
{
    if (ARRSessionService == null || ARRSessionService.CurrentActiveSession == null)
    {
        Debug.LogError("Not ready to connect runtime");
        return;
    }

    // Connect the local runtime to the currently connected session
    // This session is set when connecting to a new or existing session

    ARRSessionService.CurrentActiveSession.ConnectionStatusChanged += OnLocalRuntimeStatusChanged;
    await ARRSessionService.CurrentActiveSession.ConnectAsync(new RendererInitOptions());
}

public void DisconnectRuntimeFromRemoteSession()
{
    if (ARRSessionService == null || ARRSessionService.CurrentActiveSession == null || ARRSessionService.CurrentActiveSession.ConnectionStatus != ConnectionStatus.Connected)
    {
        Debug.LogError("Runtime not connected!");
        return;
    }

    ARRSessionService.CurrentActiveSession.Disconnect();
    ARRSessionService.CurrentActiveSession.ConnectionStatusChanged -= OnLocalRuntimeStatusChanged;
    CurrentCoordinatorState = RemoteRenderingState.RemoteSessionReady;
}
참고 항목
로컬 런타임을 원격 세션에 연결하는 것은 현재 활성 세션에서 호출되는 Update(업데이트)에 따라 달라집니다. 애플리케이션이 ConnectingToRuntime 상태 이후로 진행되지 않는 경우 활성 세션에서 정기적으로 Update를 호출하고 있는지 확인하세요.
모델 로드
필수 기본 요소가 제대로 갖추어지면 모델을 원격 세션에 로드하고 프레임 수신을 시작할 준비가 되었습니다.

LoadModel 메서드는 모델 경로, 진행률 처리기 및 부모 변환을 허용하도록 설계되었습니다. 이러한 인수는 모델을 원격 세션에 로드하고, 로드 진행 시 사용자를 업데이트하며, 부모 변환에 따라 원격으로 렌더링된 모델의 방향을 지정하는 데 사용됩니다.
LoadModel 메서드를 아래 코드로 완전히 바꿉니다.
/// <summary>
/// Loads a model into the remote session for rendering
/// </summary>
/// <param name="modelName">The model's path</param>
/// <param name="parent">The parent Transform for this remote entity</param>
/// <param name="progress">A call back method that accepts a float progress value [0->1]</param>
/// <returns>An awaitable Remote Rendering Entity</returns>
public async Task<Entity> LoadModel(string modelPath, UnityEngine.Transform parent = null, Action<float> progress = null)
{
    //Create a root object to parent a loaded model to
    var modelEntity = ARRSessionService.CurrentActiveSession.Connection.CreateEntity();

    //Get the game object representation of this entity
    var modelGameObject = modelEntity.GetOrCreateGameObject(UnityCreationMode.DoNotCreateUnityComponents);

    //Ensure the entity will sync its transform with the server
    var sync = modelGameObject.GetComponent<RemoteEntitySyncObject>();
    sync.SyncEveryFrame = true;

    //Parent the new object under the defined parent
    if (parent != null)
    {
        modelGameObject.transform.SetParent(parent, false);
        modelGameObject.name = parent.name + "_Entity";
    }

    //Load a model that will be parented to the entity
    var loadModelParams = new LoadModelFromSasOptions(modelPath, modelEntity);
    var loadModelAsync = ARRSessionService.CurrentActiveSession.Connection.LoadModelFromSasAsync(loadModelParams, progress);
    var result = await loadModelAsync;
    return modelEntity;
}
위의 코드에서 수행하는 단계는 다음과 같습니다.
- 원격 엔터티를 만듭니다.
- 원격 엔터티를 나타낼 로컬 GameObject를 만듭니다.
- 매 프레임마다 해당 상태(즉, 변환)를 원격 엔터티와 동기화하도록 로컬 GameObject를 구성합니다.
- 모델 데이터를 Blob Storage에서 원격 엔터티로 로드합니다.
- 나중에 참조할 수 있도록 부모 Entity를 반환합니다.
테스트 모델 보기
이제 원격으로 렌더링된 모델을 보는 데 필요한 모든 코드가 준비되었으며, 원격 렌더링에 필요한 4가지 단계가 모두 완료되었습니다. 이제는 모델 로드 프로세스를 시작하는 약간의 코드를 추가해야 합니다.

다음 코드를 LoadModel 메서드 바로 아래의 RemoteRenderingCoordinator 클래스에 추가합니다.
private bool loadingTestModel = false;
[ContextMenu("Load Test Model")]
public async void LoadTestModel()
{
    if(CurrentCoordinatorState != RemoteRenderingState.RuntimeConnected)
    {
        Debug.LogError("Please wait for the runtime to connect before loading the test model. Try again later.");
        return;
    }
    if(loadingTestModel)
    {
        Debug.Log("Test model already loading or loaded!");
        return;
    }
    loadingTestModel = true;

    // Create a parent object to use for positioning
    GameObject testParent = new GameObject("TestModelParent");
    testParent.transform.position = new Vector3(0f, 0f, 3f);

    // The 'built in engine path' is a special path that references a test model built into Azure Remote Rendering.
    await LoadModel("builtin://Engine", testParent.transform, (progressValue) => Debug.Log($"Loading Test Model progress: {Math.Round(progressValue * 100, 2)}%"));
}
이 코드는 테스트 모델의 부모로 작동하는 GameObject를 만듭니다. 그런 다음, LoadModel 메서드를 호출하여 렌더링 테스트를 위해 Azure Remote Rendering에 기본 제공되는 자산인 "builtin://Engine" 모델을 로드합니다.
코드를 저장합니다.
Unity 편집기에서 Play(재생) 단추를 눌러 Azure Remote Rendering에 연결하고 새 세션을 만드는 프로세스를 시작합니다.
게임 보기에는 많은 내용이 표시되지 않지만 콘솔에는 애플리케이션 변경 상태가 표시됩니다.
ConnectingToNewRemoteSession으로 진행되며 최대 5분 정도 지속될 수 있습니다.RemoteRenderingCoordinator GameObject를 선택하여 검사기에서 연결된 해당 스크립트를 확인합니다. 초기화 및 연결 단계를 진행하면서 Service(서비스) 구성 요소 업데이트를 확인합니다.
콘솔 출력 모니터링 - 상태가 RuntimeConnected로 변경될 때까지 기다립니다.
런타임이 연결되면 검사기에서 마우스 오른쪽 단추로 RemoteRenderingCoordinator를 클릭하여 상황에 맞는 메뉴를 표시합니다. 그런 다음 위 코드의
[ContextMenu("Load Test Model")]부분에 의해 추가된 바로 가기 메뉴에서 테스트 모델 로드 옵션을 선택합니다.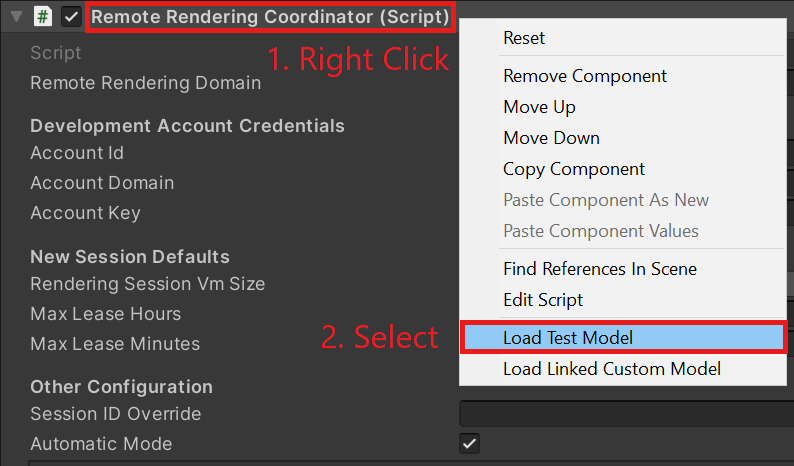
콘솔에서 LoadModel 메서드에 전달된 ProgressHandler의 출력을 확인합니다.
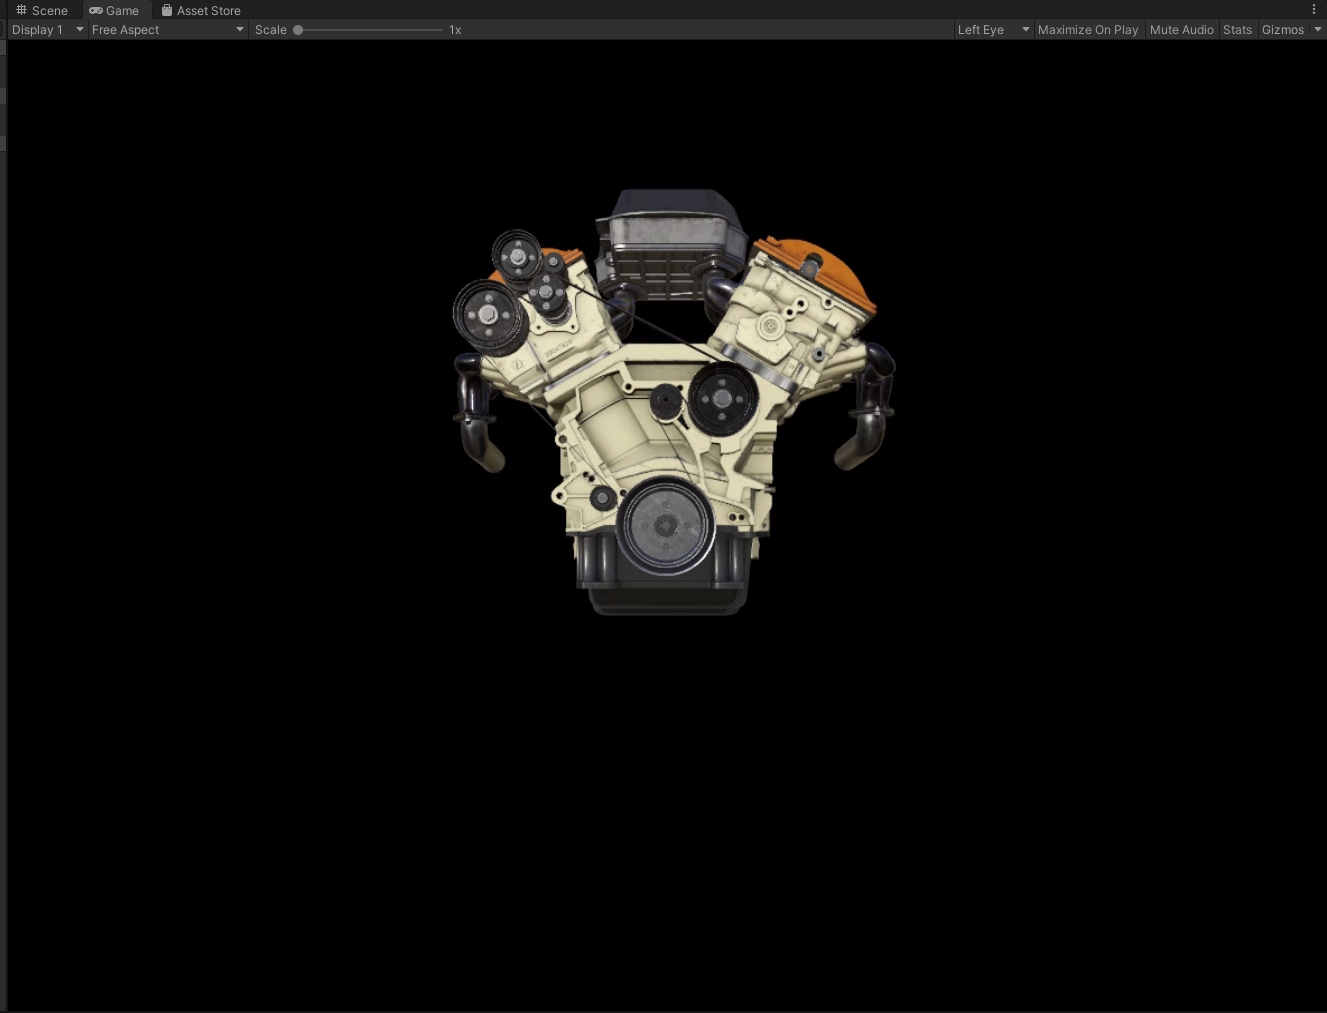
원격으로 렌더링된 모델이 표시됩니다!
참고 항목
원격 모델은 장면 보기에 표시되지 않고 게임 보기에만 표시됩니다. 이는 ARR에서 특히 게임 보기 카메라의 관점에서 프레임을 원격으로 렌더링하며 편집기 카메라를 인식하지 못하기 때문입니다(장면 보기를 렌더링하는 데 사용됨).
다음 단계
축하합니다! Azure Remote Rendering을 사용하여 원격으로 렌더링된 모델을 볼 수 있는 기본 애플리케이션을 만들었습니다. 다음 자습서에서는 MRTK를 통합하고 자체 모델을 가져옵니다.