ARM 템플릿을 사용하여 Azure 사용자 지정 역할 만들기 또는 업데이트
Azure 기본 제공 역할이 조직의 특정 요구 사항을 충족하지 않는 경우 사용자 지정 역할을 만들 수 있습니다. 이 문서에서는 ARM 템플릿(Azure Resource Manager 템플릿)을 사용하여 사용자 지정 역할을 만들거나 업데이트하는 방법을 설명합니다.
Azure Resource Manager 템플릿은 프로젝트에 대한 인프라 및 구성을 정의하는 JSON(JavaScript Object Notation) 파일입니다. 이 템플릿은 선언적 구문을 사용합니다. 배포를 만들기 위한 프로그래밍 명령의 시퀀스를 작성하지 않고 의도하는 배포를 설명합니다.
사용자 지정 역할을 만들려면 역할 이름, 권한 및 역할을 사용할 수 있는 위치를 지정합니다. 이 문서에서는 구독 범위 이하에서 할당될 수 있는 리소스 권한이 있는 Custom Role - RG Reader라는 역할을 만듭니다.
환경이 필수 구성 요소를 충족하고 ARM 템플릿 사용에 익숙한 경우 Azure에 배포 단추를 선택합니다. 그러면 Azure Portal에서 템플릿이 열립니다.

필수 조건
사용자 지정 역할을 만들려면 다음이 있어야 합니다.
- 사용자 액세스 관리자와 같은 사용자 지정 역할을 만들 수 있는 권한입니다.
다음 버전을 사용해야 합니다.
2018-07-01이상
자세한 내용은 Azure RBAC REST API의 API 버전을 참조하세요.
템플릿 검토
이 문서에서 사용되는 템플릿은 Azure 빠른 시작 템플릿에서 가져온 것입니다. 이 템플릿에는 4개의 매개 변수와 1개의 리소스 섹션이 있습니다. 매개 변수는 다음과 같습니다.
- 기본값
["Microsoft.Resources/subscriptions/resourceGroups/read"]를 사용하는 작업의 배열입니다. - 빈 기본값을 사용하는
notActions의 배열입니다. - 기본값이
Custom Role - RG Reader인 역할 이름입니다. - 기본값이
Subscription Level Deployment of a Role Definition인 역할 설명입니다.
이 사용자 지정 역할을 할당할 수 있는 범위는 현재 구독으로 설정되어 있습니다.
{
  "$schema": "https://schema.management.azure.com/schemas/2018-05-01/subscriptionDeploymentTemplate.json#",
  "contentVersion": "1.0.0.0",
  "metadata": {
    "_generator": {
      "name": "bicep",
      "version": "0.25.53.49325",
      "templateHash": "16704138909949665309"
    }
  },
  "parameters": {
    "actions": {
      "type": "array",
      "defaultValue": [
        "Microsoft.Resources/subscriptions/resourceGroups/read"
      ],
      "metadata": {
        "description": "Array of actions for the roleDefinition"
      }
    },
    "notActions": {
      "type": "array",
      "defaultValue": [],
      "metadata": {
        "description": "Array of notActions for the roleDefinition"
      }
    },
    "roleName": {
      "type": "string",
      "defaultValue": "Custom Role - RG Reader",
      "metadata": {
        "description": "Friendly name of the role definition"
      }
    },
    "roleDescription": {
      "type": "string",
      "defaultValue": "Subscription Level Deployment of a Role Definition",
      "metadata": {
        "description": "Detailed description of the role definition"
      }
    }
  },
  "variables": {
    "roleDefName": "[guid(parameters('roleName'))]"
  },
  "resources": [
    {
      "type": "Microsoft.Authorization/roleDefinitions",
      "apiVersion": "2022-04-01",
      "name": "[variables('roleDefName')]",
      "properties": {
        "roleName": "[parameters('roleName')]",
        "description": "[parameters('roleDescription')]",
        "type": "customRole",
        "permissions": [
          {
            "actions": "[parameters('actions')]",
            "notActions": "[parameters('notActions')]"
          }
        ],
        "assignableScopes": [
          "[subscription().id]"
        ]
      }
    }
  ]
}
템플릿에 정의된 리소스는 다음과 같습니다.
템플릿 배포
다음 단계를 따라 위의 템플릿을 배포합니다.
Azure Portal에 로그인합니다.
PowerShell을 위한 Azure Cloud Shell을 엽니다.
다음 스크립트를 복사하여 Cloud Shell에 붙여넣습니다.
$location = Read-Host -Prompt "Enter a location (i.e. centralus)"
[string[]]$actions = Read-Host -Prompt "Enter actions as a comma-separated list (i.e. action1,action2)"
$actions = $actions.Split(',')
$templateUri = "https://raw.githubusercontent.com/Azure/azure-quickstart-templates/master/subscription-deployments/create-role-def/azuredeploy.json"
New-AzDeployment -Location $location -TemplateUri $templateUri -actions $actions
배포 위치를 지정합니다(예:
centralus).사용자 지정 역할의 작업 목록을
Microsoft.Resources/resources/read,Microsoft.Resources/subscriptions/resourceGroups/read와 같이 쉼표로 구분된 목록으로 입력합니다.Enter 키를 눌러
New-AzDeployment명령을 실행합니다.New-AzDeployment 명령은 템플릿을 배포하여 사용자 지정 역할을 만듭니다.
다음과 비슷한 결과가 나타나야 합니다.
PS> New-AzDeployment -Location $location -TemplateUri $templateUri -actions $actions

Id                      : /subscriptions/{subscriptionId}/providers/Microsoft.Resources/deployments/azuredeploy
DeploymentName          : azuredeploy
Location                : centralus
ProvisioningState       : Succeeded
Timestamp               : 6/25/2020 8:08:32 PM
Mode                    : Incremental
TemplateLink            :
                          Uri            : https://raw.githubusercontent.com/Azure/azure-quickstart-templates/master/subscription-deployments/create-role-def/azuredeploy.json
                          ContentVersion : 1.0.0.0

Parameters              :
                          Name               Type                       Value
                          =================  =========================  ==========
                          actions            Array                      [
                            "Microsoft.Resources/resources/read",
                            "Microsoft.Resources/subscriptions/resourceGroups/read"
                          ]
                          notActions         Array                      []
                          roleName           String                     Custom Role - RG Reader
                          roleDescription    String                     Subscription Level Deployment of a Role Definition

Outputs                 :
DeploymentDebugLogLevel :
배포된 리소스 검토
사용자 지정 역할이 생성되었는지 확인하려면 다음 단계를 수행합니다.
Get-AzRoleDefinition 명령을 실행하여 사용자 지정 역할 목록을 가져옵니다.
Get-AzRoleDefinition "Custom Role - RG Reader" | ConvertTo-Json다음과 비슷한 결과가 나타나야 합니다.
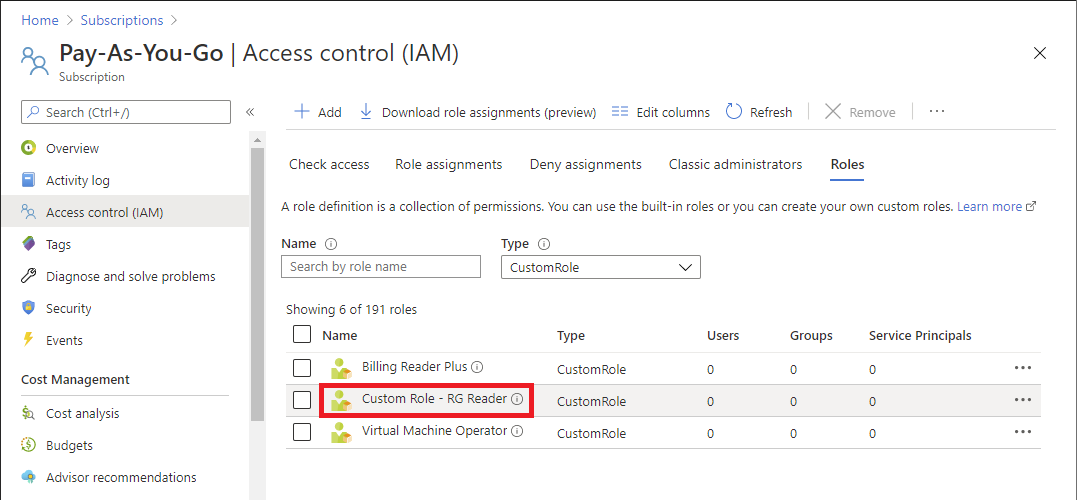
{
  "Name": "Custom Role - RG Reader",
  "Id": "11111111-1111-1111-1111-111111111111",
  "IsCustom": true,
  "Description": "Subscription Level Deployment of a Role Definition",
  "Actions": [
    "Microsoft.Resources/resources/read",
    "Microsoft.Resources/subscriptions/resourceGroups/read"
  ],
  "NotActions": [],
  "DataActions": [],
  "NotDataActions": [],
  "AssignableScopes": [
    "/subscriptions/{subscriptionId}"
  ]
}
Azure Portal에서 구독을 엽니다.
왼쪽 메뉴에서 액세스 제어(IAM)를 선택합니다.
역할 탭을 선택합니다.
유형 목록을 CustomRole로 설정합니다.
Custom Role - RG Reader 역할이 나열되는지 확인합니다.
사용자 지정 역할 업데이트
사용자 지정 역할을 만들 때와 비슷하게 템플릿을 사용하여 기존 사용자 지정 역할을 수정할 수 있습니다. 사용자 지정 역할을 업데이트하려면 업데이트하려는 역할을 지정해야 합니다.
사용자 지정 역할을 업데이트하려면 위의 빠른 시작 템플릿을 다음과 같이 변경해야 합니다.
역할 ID를 매개 변수로 포함합니다.
    ...
    "roleDefName": {
      "type": "string",
      "metadata": {
        "description": "ID of the role definition"
      }
    ...
역할 ID 매개 변수를 역할 정의에 포함합니다.
  ...
  "resources": [
    {
      "type": "Microsoft.Authorization/roleDefinitions",
      "apiVersion": "2022-04-01",
      "name": "[parameters('roleDefName')]",
      "properties": {
        ...
다음은 템플릿을 배포하는 방법의 예입니다.
$location = Read-Host -Prompt "Enter a location (i.e. centralus)"
[string[]]$actions = Read-Host -Prompt "Enter actions as a comma-separated list (i.e. action1,action2)"
$actions = $actions.Split(',')
$roleDefName = Read-Host -Prompt "Enter the role ID to update"
$templateFile = "rg-reader-update.json"
New-AzDeployment -Location $location -TemplateFile $templateFile -actions $actions -roleDefName $roleDefName
리소스 정리
사용자 지정 역할을 제거하려면 다음 단계를 수행합니다.
다음 명령을 실행하여 사용자 지정 역할을 제거합니다.
Get-AzRoleDefinition -Name "Custom Role - RG Reader" | Remove-AzRoleDefinitionY를 입력하여 사용자 지정 역할을 제거하도록 확인합니다.
다음 단계
피드백
출시 예정: 2024년 내내 콘텐츠에 대한 피드백 메커니즘으로 GitHub 문제를 단계적으로 폐지하고 이를 새로운 피드백 시스템으로 바꿀 예정입니다. 자세한 내용은 다음을 참조하세요. https://aka.ms/ContentUserFeedback
다음에 대한 사용자 의견 제출 및 보기