자습서: .NET Service Fabric 애플리케이션 빌드
이 자습서는 시리즈의 1부입니다. 이 자습서에서는 ASP.NET Core Web API 프런트 엔드 및 상태 저장 백 엔드 서비스가 있는 Azure Service Fabric 애플리케이션을 만들어 데이터를 저장하는 방법을 알아봅니다. 완료하면 투표 결과를 클러스터의 상태 저장 백 엔드 서비스에 저장하는 ASP.NET Core 웹 프런트 엔드가 있는 투표 애플리케이션이 생깁니다.
이 자습서 시리즈에는 Windows 개발자 컴퓨터가 필요합니다. 수동으로 투표 애플리케이션을 만들지 않으려면 완성된 애플리케이션에서 소스 코드를 다운로드하고 투표 샘플 애플리케이션을 설명하기 위해 바로 건너뛸 수 있습니다. 이 자습서의 비디오 연습을 볼 수도 있습니다.

이 자습서에서는 다음을 하는 방법을 알아볼 수 있습니다.
- ASP.NET Core Web API 서비스를 상태 저장 Reliable Service로 만들기
- ASP.NET Core Web 애플리케이션 서비스를 상태 비저장 웹 서비스로 만들기
- 역방향 프록시를 사용하여 상태 저장 서비스와 통신
이 자습서 시리즈에서는 다음을 수행하는 방법을 보여 줍니다.
- .NET Service Fabric 애플리케이션 빌드(이 자습서)
- 애플리케이션을 원격 클러스터에 배포
- ASP.NET Core 프런트 엔드 서비스에 HTTPS 엔드포인트 추가
- Azure Pipelines를 사용하여 CI/CD 구성
- 애플리케이션에 대한 모니터링 및 진단 설정
필수 조건
이 자습서를 시작하기 전에:
- Azure 구독이 없는 경우 무료 계정을 만드세요.
- Azure 개발 워크로드 및 ASP.NET 및 웹 개발 워크로드를 포함하여 Visual Studio 2019 버전 15.5 이상을 설치합니다.
- Service Fabric SDK를 설치합니다.
ASP.NET Web API 서비스를 신뢰할 수 있는 서비스로 만들기
먼저 ASP.NET Core를 사용하여 투표 애플리케이션의 웹 프런트 엔드를 만듭니다. ASP.NET Core는 최신 웹 UI 및 Web API를 만드는 데 사용할 수 있는 가벼운 크로스 플랫폼 웹 개발 프레임워크입니다.
ASP.NET Core가 Service Fabric과 통합되는 방식을 완전히 이해하려면 Service Fabric Reliable Services의 ASP.NET Core를 검토하는 것이 좋습니다. 지금은 이 가이드를 따라 작업하여 빠르게 시작할 수 있습니다. ASP.NET Core에 대한 자세한 내용은 ASP.NET Core 설명서를 참조하세요.
서비스를 만들려면 다음을 수행합니다.
관리자 권한으로 실행 옵션을 사용하여 Visual Studio를 엽니다.
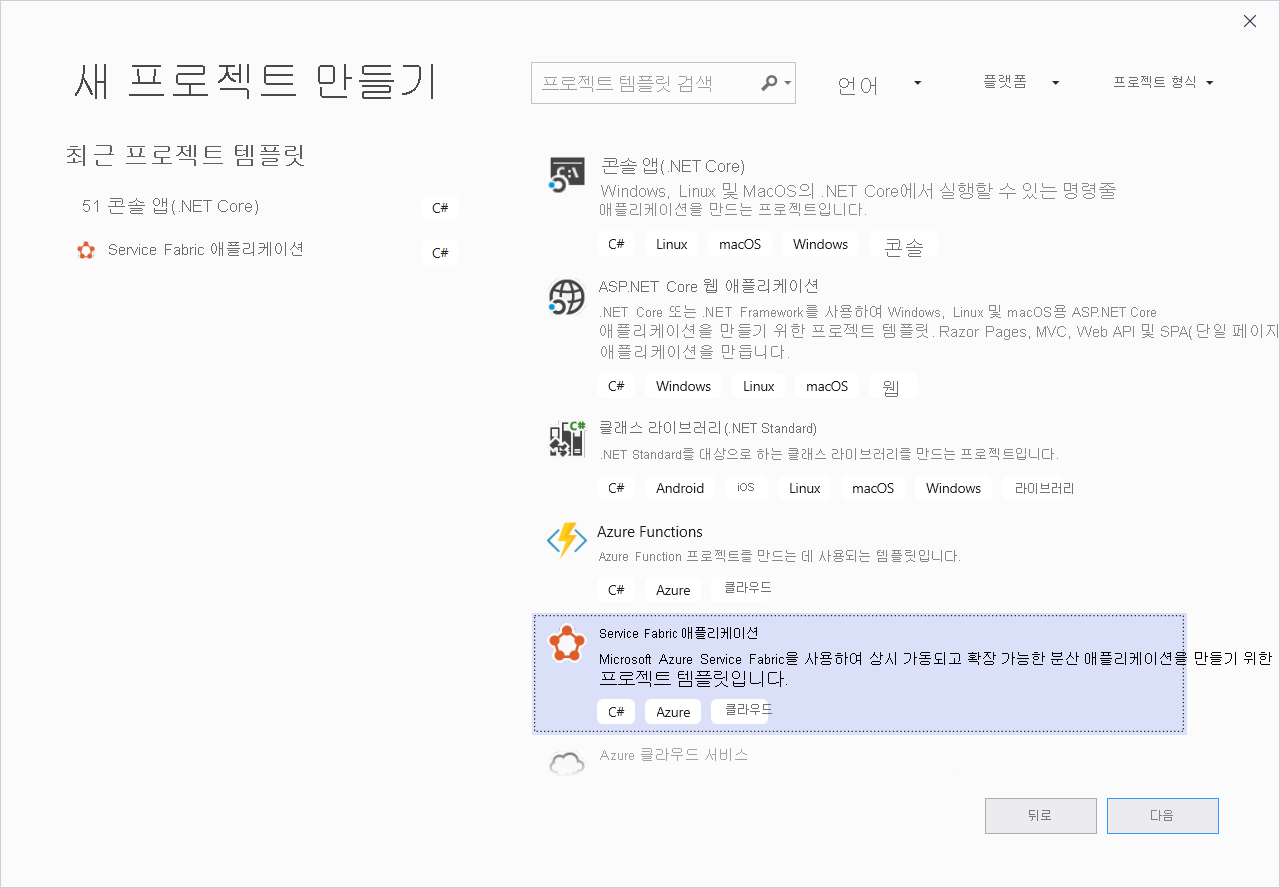
파일>새로 만들기>프로젝트를 선택하여 새 프로젝트를 만듭니다.
새 프로젝트 만들기에서 Cloud>Service Fabric 애플리케이션을 선택합니다. 다음을 선택합니다.
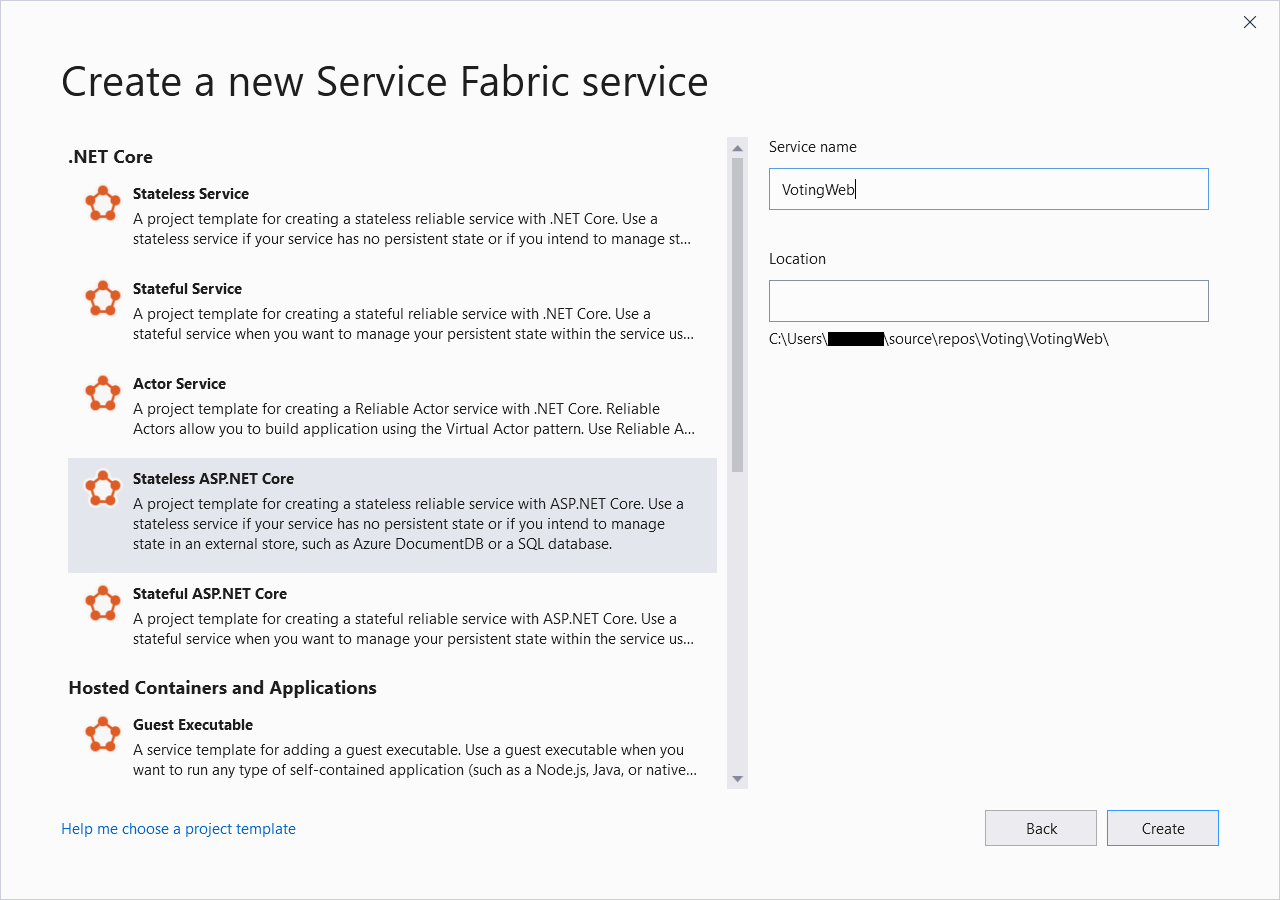
새 프로젝트 형식에 상태 비저장 ASP.NET Core를 선택하고 서비스 이름을 VotingWeb이라고 지정한 다음 만들기를 선택합니다.
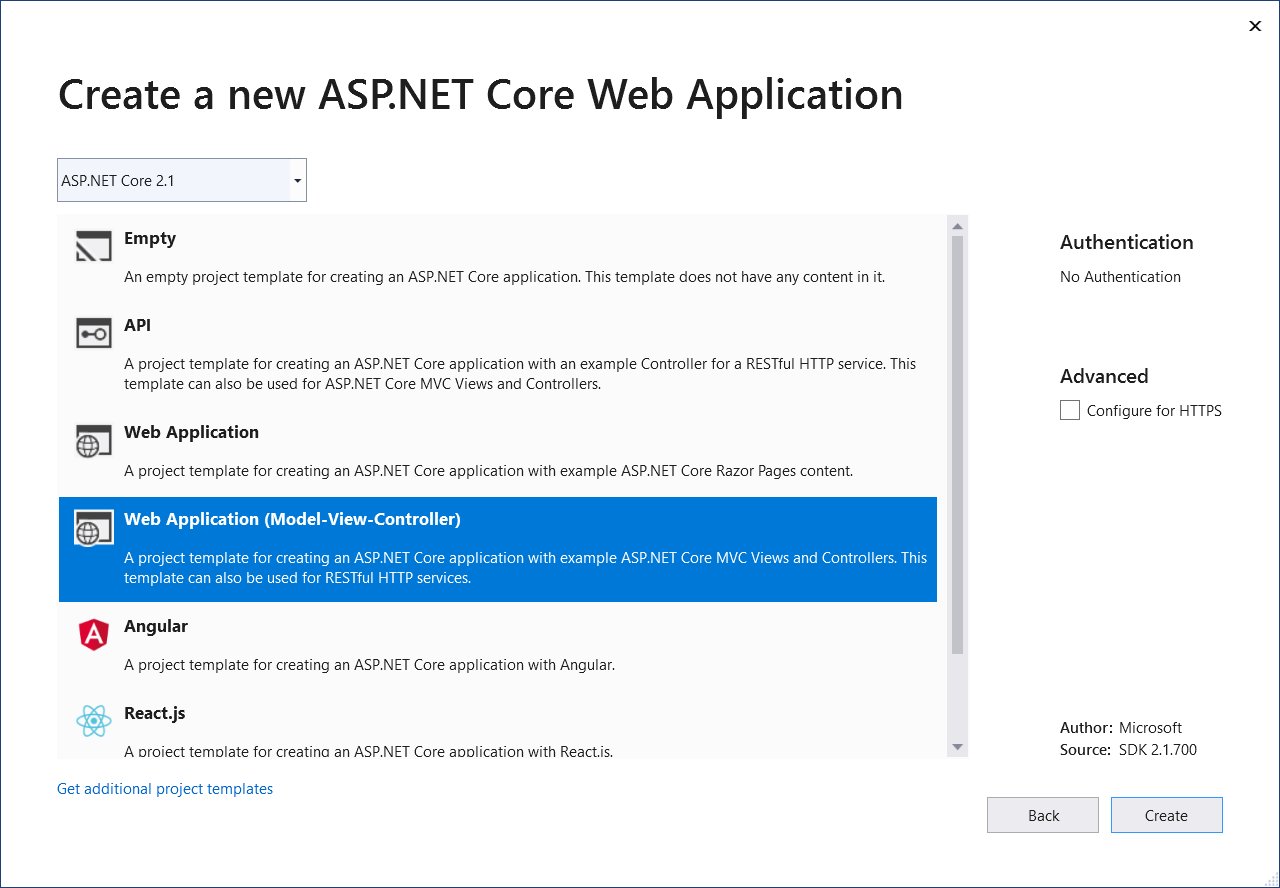
다음 창에서는 ASP.NET Core 프로젝트 템플릿 집합을 보여 줍니다. 이 자습서에서는 웹 애플리케이션(모델-뷰-컨트롤러)을 선택한 다음, 확인을 선택합니다.
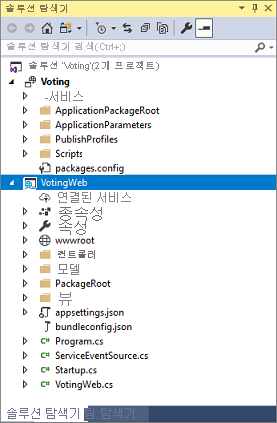
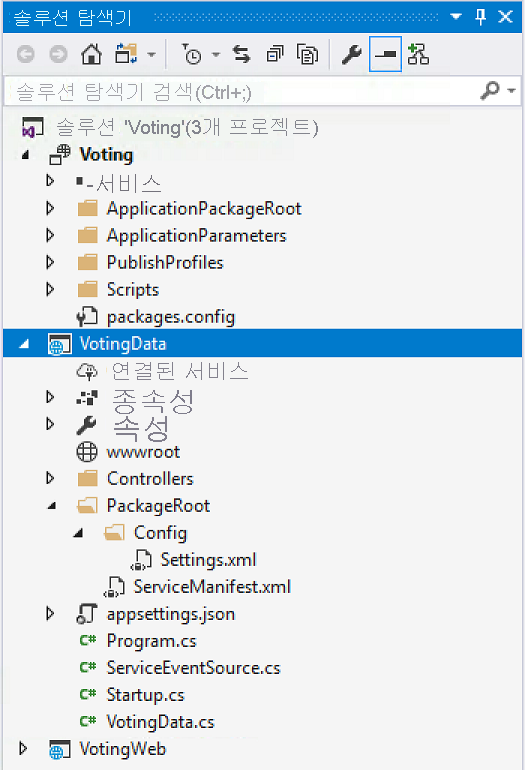
Visual Studio는 애플리케이션 및 서비스 프로젝트를 만든 다음 Visual Studio 솔루션 탐색기에 표시합니다.
site.js 파일 업데이트
wwwroot/js/site.js로 이동하여 파일을 엽니다. 파일 내용을 홈 보기에서 사용하는 다음 JavaScript로 바꾼 다음 변경 내용을 저장합니다.
var app = angular.module('VotingApp', ['ui.bootstrap']);
app.run(function () { });

app.controller('VotingAppController', ['$rootScope', '$scope', '$http', '$timeout', function ($rootScope, $scope, $http, $timeout) {

    $scope.refresh = function () {
        $http.get('api/Votes?c=' + new Date().getTime())
            .then(function (data, status) {
                $scope.votes = data;
            }, function (data, status) {
                $scope.votes = undefined;
            });
    };

    $scope.remove = function (item) {
        $http.delete('api/Votes/' + item)
            .then(function (data, status) {
                $scope.refresh();
            })
    };

    $scope.add = function (item) {
        var fd = new FormData();
        fd.append('item', item);
        $http.put('api/Votes/' + item, fd, {
            transformRequest: angular.identity,
            headers: { 'Content-Type': undefined }
        })
            .then(function (data, status) {
                $scope.refresh();
                $scope.item = undefined;
            })
    };
}]);
Index.cshtml 파일 업데이트
Views/Home/Index.cshtml로 이동하여 파일을 엽니다. 이 파일에는 홈 컨트롤러와 관련된 보기가 있습니다. 내용을 다음 코드로 바꾼 다음 변경 내용을 저장합니다.
@{
    ViewData["Title"] = "Service Fabric Voting Sample";
}

<div ng-controller="VotingAppController" ng-init="refresh()">
    <div class="container-fluid">
        <div class="row">
            <div class="col-xs-8 col-xs-offset-2 text-center">
                <h2>Service Fabric Voting Sample</h2>
            </div>
        </div>

        <div class="row">
            <div class="col-xs-8 col-xs-offset-2">
                <form class="col-xs-12 center-block">
                    <div class="col-xs-6 form-group">
                        <input id="txtAdd" type="text" class="form-control" placeholder="Add voting option" ng-model="item"/>
                    </div>
                    <button id="btnAdd" class="btn btn-default" ng-click="add(item)">
                        <span class="glyphicon glyphicon-plus" aria-hidden="true"></span>
                        Add
                    </button>
                </form>
            </div>
        </div>

        <hr/>

        <div class="row">
            <div class="col-xs-8 col-xs-offset-2">
                <div class="row">
                    <div class="col-xs-4">
                        Click to vote
                    </div>
                </div>
                <div class="row top-buffer" ng-repeat="vote in votes.data">
                    <div class="col-xs-8">
                        <button class="btn btn-success text-left btn-block" ng-click="add(vote.Key)">
                            <span class="pull-left">
                                {{vote.key}}
                            </span>
                            <span class="badge pull-right">
                                {{vote.value}} Votes
                            </span>
                        </button>
                    </div>
                    <div class="col-xs-4">
                        <button class="btn btn-danger pull-right btn-block" ng-click="remove(vote.Key)">
                            <span class="glyphicon glyphicon-remove" aria-hidden="true"></span>
                            Remove
                        </button>
                    </div>
                </div>
            </div>
        </div>
    </div>
</div>
_Layout.cshtml 파일 업데이트
Views/Shared/_Layout.cshtml로 이동하여 파일을 엽니다. 이 파일에는 ASP.NET 앱의 기본 레이아웃이 있습니다. 내용을 다음 코드로 바꾼 다음 변경 내용을 저장합니다.
<!DOCTYPE html>
<html ng-app="VotingApp" xmlns:ng="https://angularjs.org">
<head>
    <meta charset="utf-8"/>
    <meta name="viewport" content="width=device-width, initial-scale=1.0"/>
    <title>@ViewData["Title"]</title>

    <link href="~/lib/bootstrap/dist/css/bootstrap.css" rel="stylesheet"/>
    <link href="~/css/site.css" rel="stylesheet"/>

</head>
<body>
<div class="container body-content">
    @RenderBody()
</div>

<script src="~/lib/jquery/dist/jquery.js"></script>
<script src="~/lib/bootstrap/dist/js/bootstrap.js"></script>
<script src="https://cdnjs.cloudflare.com/ajax/libs/angular.js/1.7.2/angular.min.js"></script>
<script src="https://cdnjs.cloudflare.com/ajax/libs/angular-ui-bootstrap/2.5.0/ui-bootstrap-tpls.js"></script>
<script src="~/js/site.js"></script>

@RenderSection("Scripts", required: false)
</body>
</html>
VotingWeb.cs 파일 업데이트
VotingWeb.cs 파일을 엽니다. 이 파일은 WebListener 웹 서버를 사용하여 상태 비저장 서비스 내에 ASP.NET Core WebHost를 만듭니다.
파일의 시작 부분에 using System.Net.Http; 지시문을 추가합니다.
CreateServiceInstanceListeners() 함수를 다음 코드로 바꾼 다음 변경 내용을 저장합니다.
protected override IEnumerable<ServiceInstanceListener> CreateServiceInstanceListeners()
{
    return new ServiceInstanceListener[]
    {
        new ServiceInstanceListener(
            serviceContext =>
                new KestrelCommunicationListener(
                    serviceContext,
                    "ServiceEndpoint",
                    (url, listener) =>
                    {
                        ServiceEventSource.Current.ServiceMessage(serviceContext, $"Starting Kestrel on {url}");

                        return new WebHostBuilder()
                            .UseKestrel()
                            .ConfigureServices(
                                services => services
                                    .AddSingleton<HttpClient>(new HttpClient())
                                    .AddSingleton<FabricClient>(new FabricClient())
                                    .AddSingleton<StatelessServiceContext>(serviceContext))
                            .UseContentRoot(Directory.GetCurrentDirectory())
                            .UseStartup<Startup>()
                            .UseServiceFabricIntegration(listener, ServiceFabricIntegrationOptions.None)
                            .UseUrls(url)
                            .Build();
                    }))
    };
}
그런 다음, 다음 GetVotingDataServiceName 메서드를 CreateServiceInstanceListeners() 다음에 추가하고 변경 내용을 저장합니다. GetVotingDataServiceName은 폴링될 때 서비스 이름을 반환합니다.
internal static Uri GetVotingDataServiceName(ServiceContext context)
{
    return new Uri($"{context.CodePackageActivationContext.ApplicationName}/VotingData");
}
VotesController.cs 파일 추가
투표 작업을 정의하는 컨트롤러를 추가합니다. 컨트롤러 폴더를 마우스 오른쪽 단추로 클릭한 다음 추가>새 항목>Visual C#>ASP.NET Core>클래스를 선택합니다. 파일 이름을 VotesController.cs로 지정하고 추가를 클릭합니다.
VotesController.cs 파일 내용을 다음 코드로 바꾼 다음 변경 내용을 저장합니다. 이 파일은 뒷부분의 VotesController.cs 파일 업데이트에서 백 엔드 서비스의 투표 데이터를 읽고 쓰도록 수정됩니다. 지금은 컨트롤러가 보기에 고정 문자열 데이터를 반환합니다.
namespace VotingWeb.Controllers
{
    using System;
    using System.Collections.Generic;
    using System.Fabric;
    using System.Fabric.Query;
    using System.Linq;
    using System.Net.Http;
    using System.Net.Http.Headers;
    using System.Text;
    using System.Threading.Tasks;
    using Microsoft.AspNetCore.Mvc;
    using Newtonsoft.Json;

    [Produces("application/json")]
    [Route("api/Votes")]
    public class VotesController : Controller
    {
        private readonly HttpClient httpClient;

        public VotesController(HttpClient httpClient)
        {
            this.httpClient = httpClient;
        }

        // GET: api/Votes
        [HttpGet]
        public async Task<IActionResult> Get()
        {
            List<KeyValuePair<string, int>> votes= new List<KeyValuePair<string, int>>();
            votes.Add(new KeyValuePair<string, int>("Pizza", 3));
            votes.Add(new KeyValuePair<string, int>("Ice cream", 4));

            return Json(votes);
        }
     }
}
수신 대기 포트 구성
VotingWeb 프런트 엔드 서비스를 만들면 Visual Studio에서는 수신할 서비스에 대한 포트를 임의로 선택합니다. VotingWeb 서비스는 이 애플리케이션의 프런트 엔드 역할을 하며 외부 트래픽을 허용합니다. 이 섹션에서는 해당 서비스를 잘 알려진 고정 포트에 바인딩합니다. 서비스 매니페스트가 서비스 엔드포인트를 선언합니다.
솔루션 탐색기에서 VotingWeb/PackageRoot/ServiceManifest.xml을 엽니다. Resources 섹션에서 Endpoint 요소를 찾은 다음 Port 값을 8080으로 변경합니다.
애플리케이션을 로컬로 배포하고 실행하려면 애플리케이션 수신 대기 포트가 열려 있고 컴퓨터에서 사용할 수 있어야 합니다.
<Resources>
    <Endpoints>
      <!-- This endpoint is used by the communication listener to obtain the port on which to
           listen. Please note that if your service is partitioned, this port is shared with
           replicas of different partitions that are placed in your code. -->
      <Endpoint Protocol="http" Name="ServiceEndpoint" Type="Input" Port="8080" />
    </Endpoints>
  </Resources>
그런 다음 애플리케이션을 디버그할 때 올바른 포트에 웹 브라우저가 열리도록 투표 프로젝트에서 Application URL 속성 값을 업데이트합니다. 솔루션 탐색기에서 투표 프로젝트를 선택한 다음 Application URL 속성을 8080으로 업데이트합니다.
Voting 애플리케이션을 로컬로 배포하고 실행
이제 투표 애플리케이션을 실행하여 디버그할 수 있습니다. Visual Studio에서 F5 키를 선택하여 디버그 모드에서 애플리케이션을 로컬 Service Fabric 클러스터에 배포합니다. 이전에 관리자 권한으로 실행 옵션을 사용하여 Visual Studio를 열지 않은 경우 애플리케이션이 실패합니다.
참고 항목
로컬에서 처음으로 애플리케이션을 배포하고 실행할 때 Visual Studio는 디버깅에 사용할 로컬 Service Fabric 클러스터를 만듭니다. 클러스터를 만드는 프로세스에는 다소 시간이 걸릴 수 있습니다. Visual Studio 출력 창에 클러스터 생성 상태가 표시됩니다.
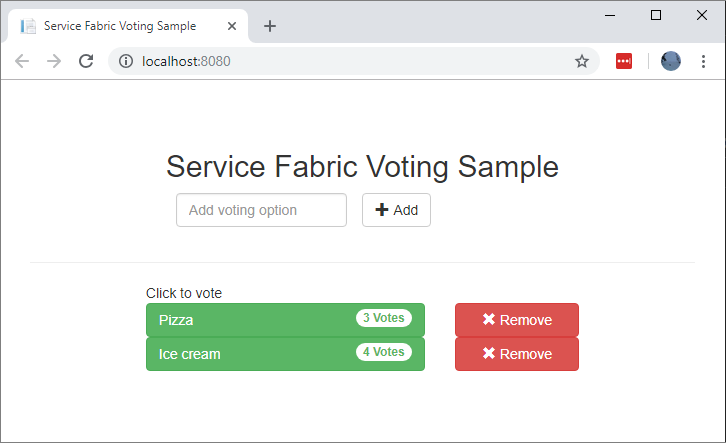
투표 애플리케이션이 로컬 Service Fabric 클러스터에 배포되면 웹앱이 브라우저 탭에서 자동으로 열립니다. 이 예제와 유사합니다.
애플리케이션 디버깅을 중지하려면 Visual Studio로 돌아가 Shift+F5 키를 선택합니다.
상태 저장 백 엔드 서비스를 애플리케이션에 추가
이제 애플리케이션에서 ASP.NET Web API 서비스가 실행되므로, 애플리케이션에 일부 데이터를 저장하는 상태 저장 신뢰할 수 있는 서비스를 추가합니다.
Service Fabric을 사용하여 신뢰할 수 있는 컬렉션을 사용하여 서비스 내에 데이터를 일관되고 안정적으로 저장할 수 있습니다. 신뢰할 수 있는 컬렉션은 C# 컬렉션을 사용해본 적이 있는 사람에게 친숙한 신뢰할 수 있는 고가용성 컬렉션 클래스의 집합입니다.
신뢰할 수 있는 컬렉션에 카운터 값을 저장하는 서비스를 만들려면:
솔루션 탐색기에서 투표 애플리케이션 프로젝트에서 서비스를 마우스 오른쪽 단추로 클릭하고 추가>새 Service Fabric 서비스를 선택합니다.
새 Service Fabric 서비스 대화 상자에서 상태 저장 ASP.NET Core를 선택하고, 서비스 이름을 VotingData로 지정한 다음, 확인을 선택합니다.
서비스 프로젝트를 만든 후에 애플리케이션에 두 개의 서비스가 있을 것입니다. 계속해서 애플리케이션을 빌드하는 동안 같은 방법으로 더 많은 서비스를 추가할 수 있습니다. 각 서비스는 독립적으로 버전을 지정하고 업그레이드할 수 있습니다.
다음 창에서는 ASP.NET Core 프로젝트 템플릿 집합을 보여 줍니다. 이 자습서에서는 API를 선택합니다.
Visual Studio는 VotingData 서비스 프로젝트를 만들고 솔루션 탐색기에 표시합니다.
VoteDataController.cs 파일 추가
VotingData 프로젝트에서 컨트롤러 폴더를 마우스 오른쪽 단추로 클릭한 다음 클래스 추가>새 항목>클래스를 선택합니다. 파일 이름을 VoteDataController.cs로 지정하고 추가를 선택합니다. 파일 내용을 다음 코드로 바꾼 다음 변경 내용을 저장합니다.
namespace VotingData.Controllers
{
    using System.Collections.Generic;
    using System.Threading;
    using System.Threading.Tasks;
    using Microsoft.AspNetCore.Mvc;
    using Microsoft.ServiceFabric.Data;
    using Microsoft.ServiceFabric.Data.Collections;

    [Route("api/[controller]")]
    public class VoteDataController : Controller
    {
        private readonly IReliableStateManager stateManager;

        public VoteDataController(IReliableStateManager stateManager)
        {
            this.stateManager = stateManager;
        }

        // GET api/VoteData
        [HttpGet]
        public async Task<IActionResult> Get()
        {
            CancellationToken ct = new CancellationToken();

            IReliableDictionary<string, int> votesDictionary = await this.stateManager.GetOrAddAsync<IReliableDictionary<string, int>>("counts");

            using (ITransaction tx = this.stateManager.CreateTransaction())
            {
                Microsoft.ServiceFabric.Data.IAsyncEnumerable<KeyValuePair<string, int>> list = await votesDictionary.CreateEnumerableAsync(tx);

                Microsoft.ServiceFabric.Data.IAsyncEnumerator<KeyValuePair<string, int>> enumerator = list.GetAsyncEnumerator();

                List<KeyValuePair<string, int>> result = new List<KeyValuePair<string, int>>();

                while (await enumerator.MoveNextAsync(ct))
                {
                    result.Add(enumerator.Current);
                }

                return this.Json(result);
            }
        }

        // PUT api/VoteData/name
        [HttpPut("{name}")]
        public async Task<IActionResult> Put(string name)
        {
            IReliableDictionary<string, int> votesDictionary = await this.stateManager.GetOrAddAsync<IReliableDictionary<string, int>>("counts");

            using (ITransaction tx = this.stateManager.CreateTransaction())
            {
                await votesDictionary.AddOrUpdateAsync(tx, name, 1, (key, oldvalue) => oldvalue + 1);
                await tx.CommitAsync();
            }

            return new OkResult();
        }

        // DELETE api/VoteData/name
        [HttpDelete("{name}")]
        public async Task<IActionResult> Delete(string name)
        {
            IReliableDictionary<string, int> votesDictionary = await this.stateManager.GetOrAddAsync<IReliableDictionary<string, int>>("counts");

            using (ITransaction tx = this.stateManager.CreateTransaction())
            {
                if (await votesDictionary.ContainsKeyAsync(tx, name))
                {
                    await votesDictionary.TryRemoveAsync(tx, name);
                    await tx.CommitAsync();
                    return new OkResult();
                }
                else
                {
                    return new NotFoundResult();
                }
            }
        }
    }
}
서비스 연결
이 섹션에서는 두 서비스를 연결합니다. 프런트 엔드 웹 애플리케이션이 백 엔드 서비스에서 투표 정보를 가져오도록 한 다음 앱에서 정보를 설정합니다.
Service Fabric은 신뢰할 수 있는 서비스와 통신하는 방식에 완전한 유연성을 제공합니다. 단일 애플리케이션 내에서 TCP/IP를 통하거나, HTTP REST API를 통하거나, WebSocket 프로토콜을 통해 액세스할 수 있는 서비스가 있을 수 있습니다. 사용 가능한 옵션 및 관련 장단점에 대한 배경 정보는 서비스와의 통신을 참조하세요.
VotingWeb 프런트 엔드 웹 서비스가 VotingData 백 엔드 데이터 서비스와 통신할 수 있도록 이 자습서에서는 ASP.NET Core Web API 및 Service Fabric 역방향 프록시를 사용합니다. 역방향 프록시는 기본적으로 포트 19081을 사용하도록 구성됩니다. 역방향 프록시 포트는 클러스터를 설정하는 Azure Resource Manager 템플릿에서 설정됩니다. 어떤 포트가 사용되는지 찾아보려면 Microsoft.ServiceFabric/clusters 리소스에서 클러스터 템플릿을 살펴보세요.
"nodeTypes": [
          {
            ...
            "httpGatewayEndpointPort": "[variables('nt0fabricHttpGatewayPort')]",
            "isPrimary": true,
            "vmInstanceCount": "[parameters('nt0InstanceCount')]",
            "reverseProxyEndpointPort": "[parameters('SFReverseProxyPort')]"
          }
        ],
로컬 개발 클러스터에서 사용되는 역방향 프록시 포트를 찾아보려면 로컬 Service Fabric 클러스터 매니페스트에서 HttpApplicationGatewayEndpoint 요소를 확인하세요.
- Service Fabric Explorer 도구를 열려면 브라우저를 열고
http://localhost:19080으로 이동합니다. - 클러스터>매니페스트를 선택합니다.
HttpApplicationGatewayEndpoint요소 포트를 기록해 둡니다. 기본적으로 포트는 19081입니다. 19081이 아닌 경우 다음 섹션에 설명된 대로 VotesController.cs 코드의GetProxyAddress메서드에서 포트를 변경합니다.
VotesController.cs 파일 업데이트
VotingWeb 프로젝트에서 Controllers/VotesController.cs 파일을 엽니다. VotesController 클래스 정의 내용을 다음 코드로 바꾼 다음 변경 내용을 저장합니다. 이전 단계에서 검색한 역방향 프록시 포트가 19081이 아닌 경우 GetProxyAddress 메서드의 포트를 19081에서 검색된 포트로 변경합니다.
public class VotesController : Controller
{
    private readonly HttpClient httpClient;
    private readonly FabricClient fabricClient;
    private readonly StatelessServiceContext serviceContext;

    public VotesController(HttpClient httpClient, StatelessServiceContext context, FabricClient fabricClient)
    {
        this.fabricClient = fabricClient;
        this.httpClient = httpClient;
        this.serviceContext = context;
    }

    // GET: api/Votes
    [HttpGet("")]
    public async Task<IActionResult> Get()
    {
        Uri serviceName = VotingWeb.GetVotingDataServiceName(this.serviceContext);
        Uri proxyAddress = this.GetProxyAddress(serviceName);

        ServicePartitionList partitions = await this.fabricClient.QueryManager.GetPartitionListAsync(serviceName);

        List<KeyValuePair<string, int>> result = new List<KeyValuePair<string, int>>();

        foreach (Partition partition in partitions)
        {
            string proxyUrl =
                $"{proxyAddress}/api/VoteData?PartitionKey={((Int64RangePartitionInformation) partition.PartitionInformation).LowKey}&PartitionKind=Int64Range";

            using (HttpResponseMessage response = await this.httpClient.GetAsync(proxyUrl))
            {
                if (response.StatusCode != System.Net.HttpStatusCode.OK)
                {
                    continue;
                }

                result.AddRange(JsonConvert.DeserializeObject<List<KeyValuePair<string, int>>>(await response.Content.ReadAsStringAsync()));
            }
        }

        return this.Json(result);
    }

    // PUT: api/Votes/name
    [HttpPut("{name}")]
    public async Task<IActionResult> Put(string name)
    {
        Uri serviceName = VotingWeb.GetVotingDataServiceName(this.serviceContext);
        Uri proxyAddress = this.GetProxyAddress(serviceName);
        long partitionKey = this.GetPartitionKey(name);
        string proxyUrl = $"{proxyAddress}/api/VoteData/{name}?PartitionKey={partitionKey}&PartitionKind=Int64Range";

        StringContent putContent = new StringContent($"{{ 'name' : '{name}' }}", Encoding.UTF8, "application/json");
        putContent.Headers.ContentType = new MediaTypeHeaderValue("application/json");

        using (HttpResponseMessage response = await this.httpClient.PutAsync(proxyUrl, putContent))
        {
            return new ContentResult()
            {
                StatusCode = (int) response.StatusCode,
                Content = await response.Content.ReadAsStringAsync()
            };
        }
    }

    // DELETE: api/Votes/name
    [HttpDelete("{name}")]
    public async Task<IActionResult> Delete(string name)
    {
        Uri serviceName = VotingWeb.GetVotingDataServiceName(this.serviceContext);
        Uri proxyAddress = this.GetProxyAddress(serviceName);
        long partitionKey = this.GetPartitionKey(name);
        string proxyUrl = $"{proxyAddress}/api/VoteData/{name}?PartitionKey={partitionKey}&PartitionKind=Int64Range";

        using (HttpResponseMessage response = await this.httpClient.DeleteAsync(proxyUrl))
        {
            if (response.StatusCode != System.Net.HttpStatusCode.OK)
            {
                return this.StatusCode((int) response.StatusCode);
            }
        }

        return new OkResult();
    }


    /// <summary>
    /// Constructs a reverse proxy URL for a given service.
    /// Example: http://localhost:19081/VotingApplication/VotingData/
    /// </summary>
    /// <param name="serviceName"></param>
    /// <returns></returns>
    private Uri GetProxyAddress(Uri serviceName)
    {
        return new Uri($"http://localhost:19081{serviceName.AbsolutePath}");
    }

    /// <summary>
    /// Creates a partition key from the given name.
    /// Uses the zero-based numeric position in the alphabet of the first letter of the name (0-25).
    /// </summary>
    /// <param name="name"></param>
    /// <returns></returns>
    private long GetPartitionKey(string name)
    {
        return Char.ToUpper(name.First()) - 'A';
    }
}
투표 애플리케이션 예제 연습
투표 애플리케이션은 두 가지 서비스로 구성됩니다.
- 웹 프런트 엔드 서비스(VotingWeb): 웹 페이지를 제공하고 백 엔드 서비스와 통신하기 위한 Web API를 노출하는 ASP.NET Core 웹 프런트 엔드 서비스입니다.
- 백 엔드 서비스(VotingData): API를 노출하여 투표 결과를 디스크에 보관된 신뢰할 수 있는 사전에 저장하는 ASP.NET Core 웹 서비스입니다.
애플리케이션에 투표하는 경우 다음 이벤트가 발생합니다.
JavaScript 파일은 투표 요청을 웹 프런트 엔드 서비스의 Web API에 HTTP PUT 요청으로 보냅니다.
웹 프런트 엔드 서비스는 프록시를 사용하여 HTTP PUT 요청을 찾아 백 엔드 서비스에 전달합니다.
백 엔드 서비스는 들어오는 요청을 받아 업데이트된 결과를 신뢰할 수 있는 사전에 저장합니다. 사전은 클러스터의 여러 노드에 복제되고 디스크에 유지됩니다. 애플리케이션의 모든 데이터가 클러스터에 저장되므로 데이터베이스가 필요하지 않습니다.
Visual Studio에서 디버그
Visual Studio에서 애플리케이션을 디버그할 때 로컬 Service Fabric 개발 클러스터를 사용합니다. 사용자 시나리오에 맞게 디버깅 환경을 조정할 수 있습니다.
이 애플리케이션에서는 신뢰할 수 있는 사전을 사용하여 데이터를 백 엔드 서비스에 저장합니다. Visual Studio는 디버거를 중지하는 경우 기본적으로 애플리케이션을 제거합니다. 애플리케이션을 제거하면 백 엔드 서비스의 데이터도 제거됩니다. 디버깅 세션 간에 데이터를 유지하려면 애플리케이션 디버그 모드를 Visual Studio에서 Voting 프로젝트의 속성으로 변경할 수 있습니다.
코드에서 발생하는 작업을 확인하려면 다음 단계를 완료합니다.
VotingWeb\VotesController.cs 파일을 열고 Web API의
Put메서드(72줄)에서 중단점을 설정합니다.VotingData\VoteDataController.cs 파일을 열고 Web API의
Put메서드(54줄)에서 중단점을 설정합니다.F5 키를 선택하여 디버그 모드에서 애플리케이션을 시작합니다.
브라우저로 돌아가서 투표 옵션을 선택하거나 새 투표 옵션을 추가합니다. 웹 프런트 엔드의 API 컨트롤러에서 첫 번째 중단점에 도달합니다.
브라우저의 JavaScript가 프런트 엔드 서비스의 Web API 컨트롤러에 요청을 보냅니다.
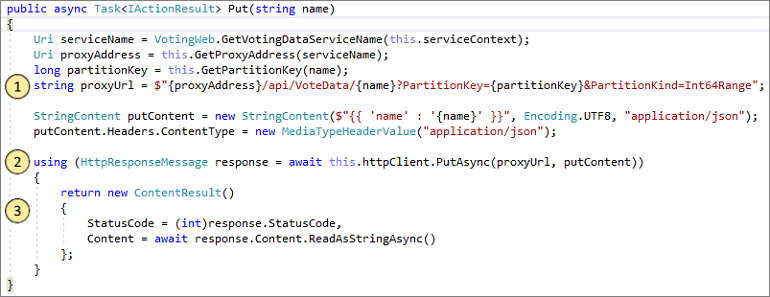
- 먼저 백 엔드 서비스의 역방향 프록시에 대한 URL을 생성합니다. (1)
- 그런 다음 HTTP PUT 요청을 역방향 프록시로 보냅니다. (2)
- 마지막으로 백 엔드 서비스에서 클라이언트로 응답을 반환합니다. (3)
F5 키를 선택하여 계속합니다.
이제 백 엔드 서비스의 중단점에 있습니다.
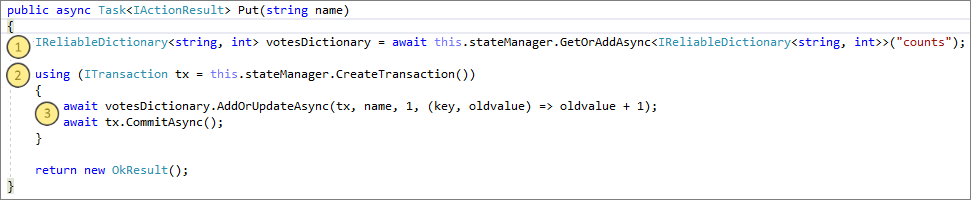
- 메서드의 첫 번째 줄에서
stateManager를 사용하여counts라는 신뢰할 수 있는 사전을 얻거나 추가합니다. (1) - 신뢰할 수 있는 사전에 값이 있는 모든 상호 작용에는 트랜잭션이 필요합니다. 이
using문은 해당 트랜잭션을 만듭니다. (2) - 트랜잭션에서는 투표 옵션에 대한 관련 키 값을 업데이트하고 작업을 커밋합니다.
commit메서드가 반환되면 사전에서 데이터가 업데이트됩니다. 그런 다음 클러스터의 다른 노드에 복제합니다. 이제 데이터는 클러스터에 안전하게 저장되며, 백 엔드 서비스는 다른 노드로 장애 조치(failover)하고 데이터를 계속 사용하도록 할 수 있습니다. (3)
- 메서드의 첫 번째 줄에서
F5 키를 선택하여 계속합니다.
디버깅 세션을 중지하려면 Shift+F5 키를 선택합니다.
다음 단계
다음 자습서를 진행합니다.