자습서: Yeoman을 사용하여 Service Fabric 애플리케이션으로 컨테이너 패키징 및 배포
이 자습서는 시리즈의 2부입니다. 이 자습서에서는 Service Fabric 애플리케이션 정의를 생성하는 데 템플릿 생성기 도구(Yeoman)를 사용합니다. 그런 다음 이 애플리케이션을 사용하여 Service Fabric에 컨테이너를 배포할 수 있습니다. 이 자습서에서는 다음을 하는 방법을 알아볼 수 있습니다.
- Yeoman 설치
- Yeoman을 사용하여 애플리케이션 패키지 만들기
- 애플리케이션 패키지에서 컨테이너에서 사용할 설정 구성
- 애플리케이션 빌드
- 애플리케이션 배포 및 실행
- 애플리케이션 정리
필수 조건
Yeoman 설치
Service Fabric은 Yeoman 템플릿 생성기를 사용하여 터미널에서 애플리케이션을 만들 수 있는 스캐폴딩 도구를 제공합니다. 아래 단계에 따라 Yeoman 템플릿 생성기가 설치되어 있는지 확인합니다.
머신에 nodejs 및 Node Package Manager를 설치합니다. macOS X를 사용하는 경우 패키지 관리자 Homebrew를 사용해야 합니다.
curl -o- https://raw.githubusercontent.com/creationix/nvm/v0.33.0/install.sh | bash
nvm install node
Node 패키지 관리자에서 Yeoman 템플릿 생성기를 설치합니다.
npm install -g yoService Fabric Yeoman 컨테이너 생성기 설치
npm install -g generator-azuresfcontainer
Yeoman에서 Docker 이미지 컨테이너 패키징
Service Fabric 컨테이너 애플리케이션을 만들려면 복제된 리포지토리의 'container-tutorial' 디렉터리에서 다음 명령을 실행합니다.
yo azuresfcontainer"TestContainer"를 입력하여 애플리케이션의 이름을 지정하세요.
"azurevotefront"를 입력하여 애플리케이션 서비스의 이름을 지정하세요.
예를 들어 '<acrName>.azurecr.io/azure-vote-front:v1'과 같이 프런트 엔드 리포지토리에 대해 ACR의 컨테이너 이미지 경로를 제공합니다. <acrName> 필드는 이전 자습서에서 사용된 값과 동일해야 합니다.
명령 섹션을 비어 두려면 Enter 키를 누릅니다.
1이라는 인스턴스 수를 지정합니다.
다음은 yo 명령을 실행하는 입력 및 출력을 보여줍니다.
? Name your application TestContainer
? Name of the application service: azurevotefront
? Input the Image Name: <acrName>.azurecr.io/azure-vote-front:v1
? Commands:
? Number of instances of guest container application: 1
   create TestContainer/TestContainer/ApplicationManifest.xml
   create TestContainer/TestContainer/azurevotefrontPkg/ServiceManifest.xml
   create TestContainer/TestContainer/azurevotefrontPkg/config/Settings.xml
   create TestContainer/TestContainer/azurevotefrontPkg/code/Dummy.txt
   create TestContainer/install.sh
   create TestContainer/uninstall.sh
Yeoman을 사용하여 다른 컨테이너 서비스를 이미 만든 애플리케이션에 추가하려면 다음 단계를 수행합니다.
- 디렉터리를 TestContainer 디렉터리로 한 수준 변경(예: ./TestContainer)
yo azuresfcontainer:AddService을 실행합니다.- 'azurevoteback' 서비스 이름 지정
- Redis - ‘redis:alpine’의 컨테이너 이미지 경로 제공
- 명령 섹션을 비워 두려면 Enter 키 누름
- "1"이라는 인스턴스 수를 지정합니다.
사용된 서비스를 추가하는 항목이 모두 표시됩니다.
? Name of the application service: azurevoteback
? Input the Image Name: redis:alpine
? Commands:
? Number of instances of guest container application: 1
   create TestContainer/azurevotebackPkg/ServiceManifest.xml
   create TestContainer/azurevotebackPkg/config/Settings.xml
   create TestContainer/azurevotebackPkg/code/Dummy.txt
이 자습서의 나머지 부분은 TestContainer 디렉터리에서 작업합니다. 예: ./TestContainer/TestContainer 이 디렉터리의 콘텐츠는 다음과 같아야 합니다.
$ ls
ApplicationManifest.xml azurevotefrontPkg azurevotebackPkg
Azure Container Registry의 자격 증명으로 애플리케이션 매니페스트 구성
Service Fabric이 Azure Container Registry에서 컨테이너 이미지를 끌어오려면 ApplicationManifest.xml에서 자격 증명을 제공해야 합니다.
ACR 인스턴스에 로그인합니다. az acr login 명령을 사용하여 작업을 완료합니다. 컨테이너 레지스트리가 생성될 때 지정된 고유한 이름을 입력합니다.
az acr login --name <acrName>
이 명령이 완료되면 로그인했습니다.라는 메시지를 반환합니다.
다음으로 컨테이너 레지스트리 암호를 가져오는 다음 명령을 실행합니다. 이 암호는 Service Fabric에서 컨테이너 이미지를 끌어오기 위해 ACR를 사용하여 인증하는 데 사용됩니다.
az acr credential show -n <acrName> --query passwords[0].value
ApplicationManifest.xml에서 프런트 엔드 서비스에 대한 ServiceManifestImport 요소 아래에 있는 코드 조각을 추가합니다. acrName을 AccountName 필드에 삽입하고 이전 명령에서 반환된 암호를 암호 필드에 사용합니다. 이 문서의 끝에서 전체 ApplicationManifest.xml을 제공합니다.
<Policies>
  <ContainerHostPolicies CodePackageRef="Code">
    <RepositoryCredentials AccountName="<acrName>" Password="<password>" PasswordEncrypted="false"/>
  </ContainerHostPolicies>
</Policies>
통신 및 컨테이너 포트와 호스트 포트 간 매핑 구성
통신 포트 구성
클라이언트가 서비스와 통신할 수 있도록 HTTP 엔드포인트를 구성합니다. ./TestContainer/azurevotefrontPkg/ServiceManifest.xml 파일을 열고 ServiceManifest 요소에서 엔드포인트 리소스를 선언합니다. 프로토콜, 포트 및 이름을 추가합니다. 이 자습서에서 서비스는 포트 80에서 수신 대기합니다. 다음 코드 조각은 리소스의 ServiceManifest 태그 아래에 배치됩니다.
<Resources>
  <Endpoints>
    <!-- This endpoint is used by the communication listener to obtain the port on which to
            listen. Please note that if your service is partitioned, this port is shared with
            replicas of different partitions that are placed in your code. -->
    <Endpoint Name="azurevotefrontTypeEndpoint" UriScheme="http" Port="80" Protocol="http"/>
  </Endpoints>
</Resources>
마찬가지로 백 엔드 서비스에 대한 서비스 매니페스트를 수정합니다. ./TestContainer/azurevotebackPkg/ServiceManifest.xml을 열고 ServiceManifest 요소에서 엔드포인트 리소스를 선언합니다. 이 자습서에서 6379라는 Redis 기본값이 유지 관리됩니다. 다음 코드 조각은 리소스의 ServiceManifest 태그 아래에 배치됩니다.
<Resources>
  <Endpoints>
    <!-- This endpoint is used by the communication listener to obtain the port on which to
            listen. Please note that if your service is partitioned, this port is shared with
            replicas of different partitions that are placed in your code. -->
    <Endpoint Name="azurevotebackTypeEndpoint" Port="6379" Protocol="tcp"/>
  </Endpoints>
</Resources>
UriScheme을 입력하면 컨테이너 엔드포인트가 검색될 수 있도록 Service Fabric Naming 서비스에 자동으로 등록됩니다. 백 엔드 서비스의 전체 ServiceManifest.xml 예제 파일을 이 문서의 끝에서 예제로 제공합니다.
서비스에 컨테이너 포트 매핑
또한 클러스터에서 컨테이너를 노출하려면 'ApplicationManifest.xml'에서 포트 바인딩을 만들어야 합니다. PortBinding 정책은 ServiceManifest.xml 파일에서 정의한 엔드포인트를 참조합니다. 이러한 엔드포인트에 들어오는 요청은 여기에서 열리고 바인딩된 컨테이너 포트에 매핑됩니다. ApplicationManifest.xml 파일에서 다음 코드를 추가하여 엔드포인트에 포트 80 및 6379를 바인딩합니다. 이 문서의 끝에서 전체 ApplicationManifest.xml을 사용할 수 있습니다.
<ContainerHostPolicies CodePackageRef="Code">
    <PortBinding ContainerPort="80" EndpointRef="azurevotefrontTypeEndpoint"/>
</ContainerHostPolicies>
<ContainerHostPolicies CodePackageRef="Code">
    <PortBinding ContainerPort="6379" EndpointRef="azurevotebackTypeEndpoint"/>
</ContainerHostPolicies>
백 엔드 서비스에 DNS 이름 추가
Service Fabric이 백 엔드 서비스에 이 DNS 이름을 할당하려면 ApplicationManifest.xml에서 이름을 지정해야 합니다. 표시된 대로 ServiceDnsName 특성을 서비스 요소에 추가합니다.
<Service Name="azurevoteback" ServiceDnsName="redisbackend.testapp">
  <StatelessService ServiceTypeName="azurevotebackType" InstanceCount="1">
    <SingletonPartition/>
  </StatelessService>
</Service>
프런트 엔드 서비스는 Redis 인스턴스의 DNS 이름을 가져오기 위해 환경 변수를 참고합니다. 이 환경 변수는 Docker 이미지를 생성하는 데 사용된 Dockerfile에서 이미 정의되었으며 아무 작업도 수행할 필요가 없습니다.
ENV REDIS redisbackend.testapp
다음 코드 조각은 프런트 엔드 Python 코드가 Dockerfile에 설명된 환경 변수를 선택하는 방법을 보여 줍니다. 여기에서 아무 작업도 수행할 필요가 없습니다.
# Get DNS Name
redis_server = os.environ['REDIS']

# Connect to the Redis store
r = redis.StrictRedis(host=redis_server, port=6379, db=0)
자습서의 이 시점에서 서비스 패키지 애플리케이션의 템플릿은 클러스터에 배포하는 데 사용할 수 있습니다. 이후 자습서에서 이 애플리케이션을 배포하고 Service Fabric 클러스터에서 실행합니다.
Service Fabric 클러스터 만들기
애플리케이션을 Azure에 배포하려면 애플리케이션을 실행하는 Service Fabric 클러스터가 필요합니다. 다음 명령은 Azure에서 5노드 클러스터를 만듭니다. 이 명령은 자체 서명된 인증서도 만들어, 키 자격 증명 모음에 추가하고, 해당 인증서를 PEM 파일로 로컬로 다운로드합니다. 새 인증서는 배포 시 클러스터를 보호하는 데 사용되며 클라이언트를 인증하는 데도 사용됩니다.
#!/bin/bash

# Variables
ResourceGroupName="containertestcluster"
ClusterName="containertestcluster"
Location="eastus"
Password="q6D7nN%6ck@6"
Subject="containertestcluster.eastus.cloudapp.azure.com"
VaultName="containertestvault"
VmPassword="Mypa$$word!321"
VmUserName="sfadminuser"

# Login to Azure and set the subscription
az login

az account set --subscription <mySubscriptionID>

# Create resource group
az group create --name $ResourceGroupName --location $Location

# Create secure five node Linux cluster. Creates a key vault in a resource group
# and creates a certficate in the key vault. The certificate's subject name must match
# the domain that you use to access the Service Fabric cluster.
# The certificate is downloaded locally as a PEM file.
az sf cluster create --resource-group $ResourceGroupName --location $Location \
--certificate-output-folder . --certificate-password $Password --certificate-subject-name $Subject \
--cluster-name $ClusterName --cluster-size 5 --os UbuntuServer1804 --vault-name $VaultName \
--vault-resource-group $ResourceGroupName --vm-password $VmPassword --vm-user-name $VmUserName
참고 항목
웹 프런트 엔드 서비스는 들어오는 트래픽에 대해 80 포트에서 수신 대기하도록 구성됩니다. 기본적으로 포트 80이 클러스터 VM 및 Azure Load Balancer에서 열려 있습니다.
사용자 고유의 클러스터를 만드는 방법은 Azure에서 Service Fabric 클러스터 만들기를 참조하세요.
애플리케이션 빌드 및 클러스터에 배포
Service Fabric CLI를 사용하여 Azure 클러스터에 애플리케이션을 배포할 수 있습니다. Service Fabric CLI가 컴퓨터에 설치되어 있지 않으면 여기의 지침에 따라 설치합니다.
Azure에서 Service Fabric 클러스터에 연결합니다. 샘플 엔드포인트를 고유한 값으로 대체합니다. 엔드포인트는 아래와 비슷한 전체 URL이어야 합니다. PEM 파일은 이전에 만든 자체 서명된 인증서입니다.
sfctl cluster select --endpoint https://containertestcluster.eastus.cloudapp.azure.com:19080 --pem containertestcluster22019013100.pem --no-verify
TestContainer 디렉터리에 제공된 설치 스크립트를 사용하여 클러스터의 이미지 저장소에 애플리케이션 패키지를 복사하고 애플리케이션 유형을 등록하며 애플리케이션의 인스턴스를 만듭니다.
./install.sh
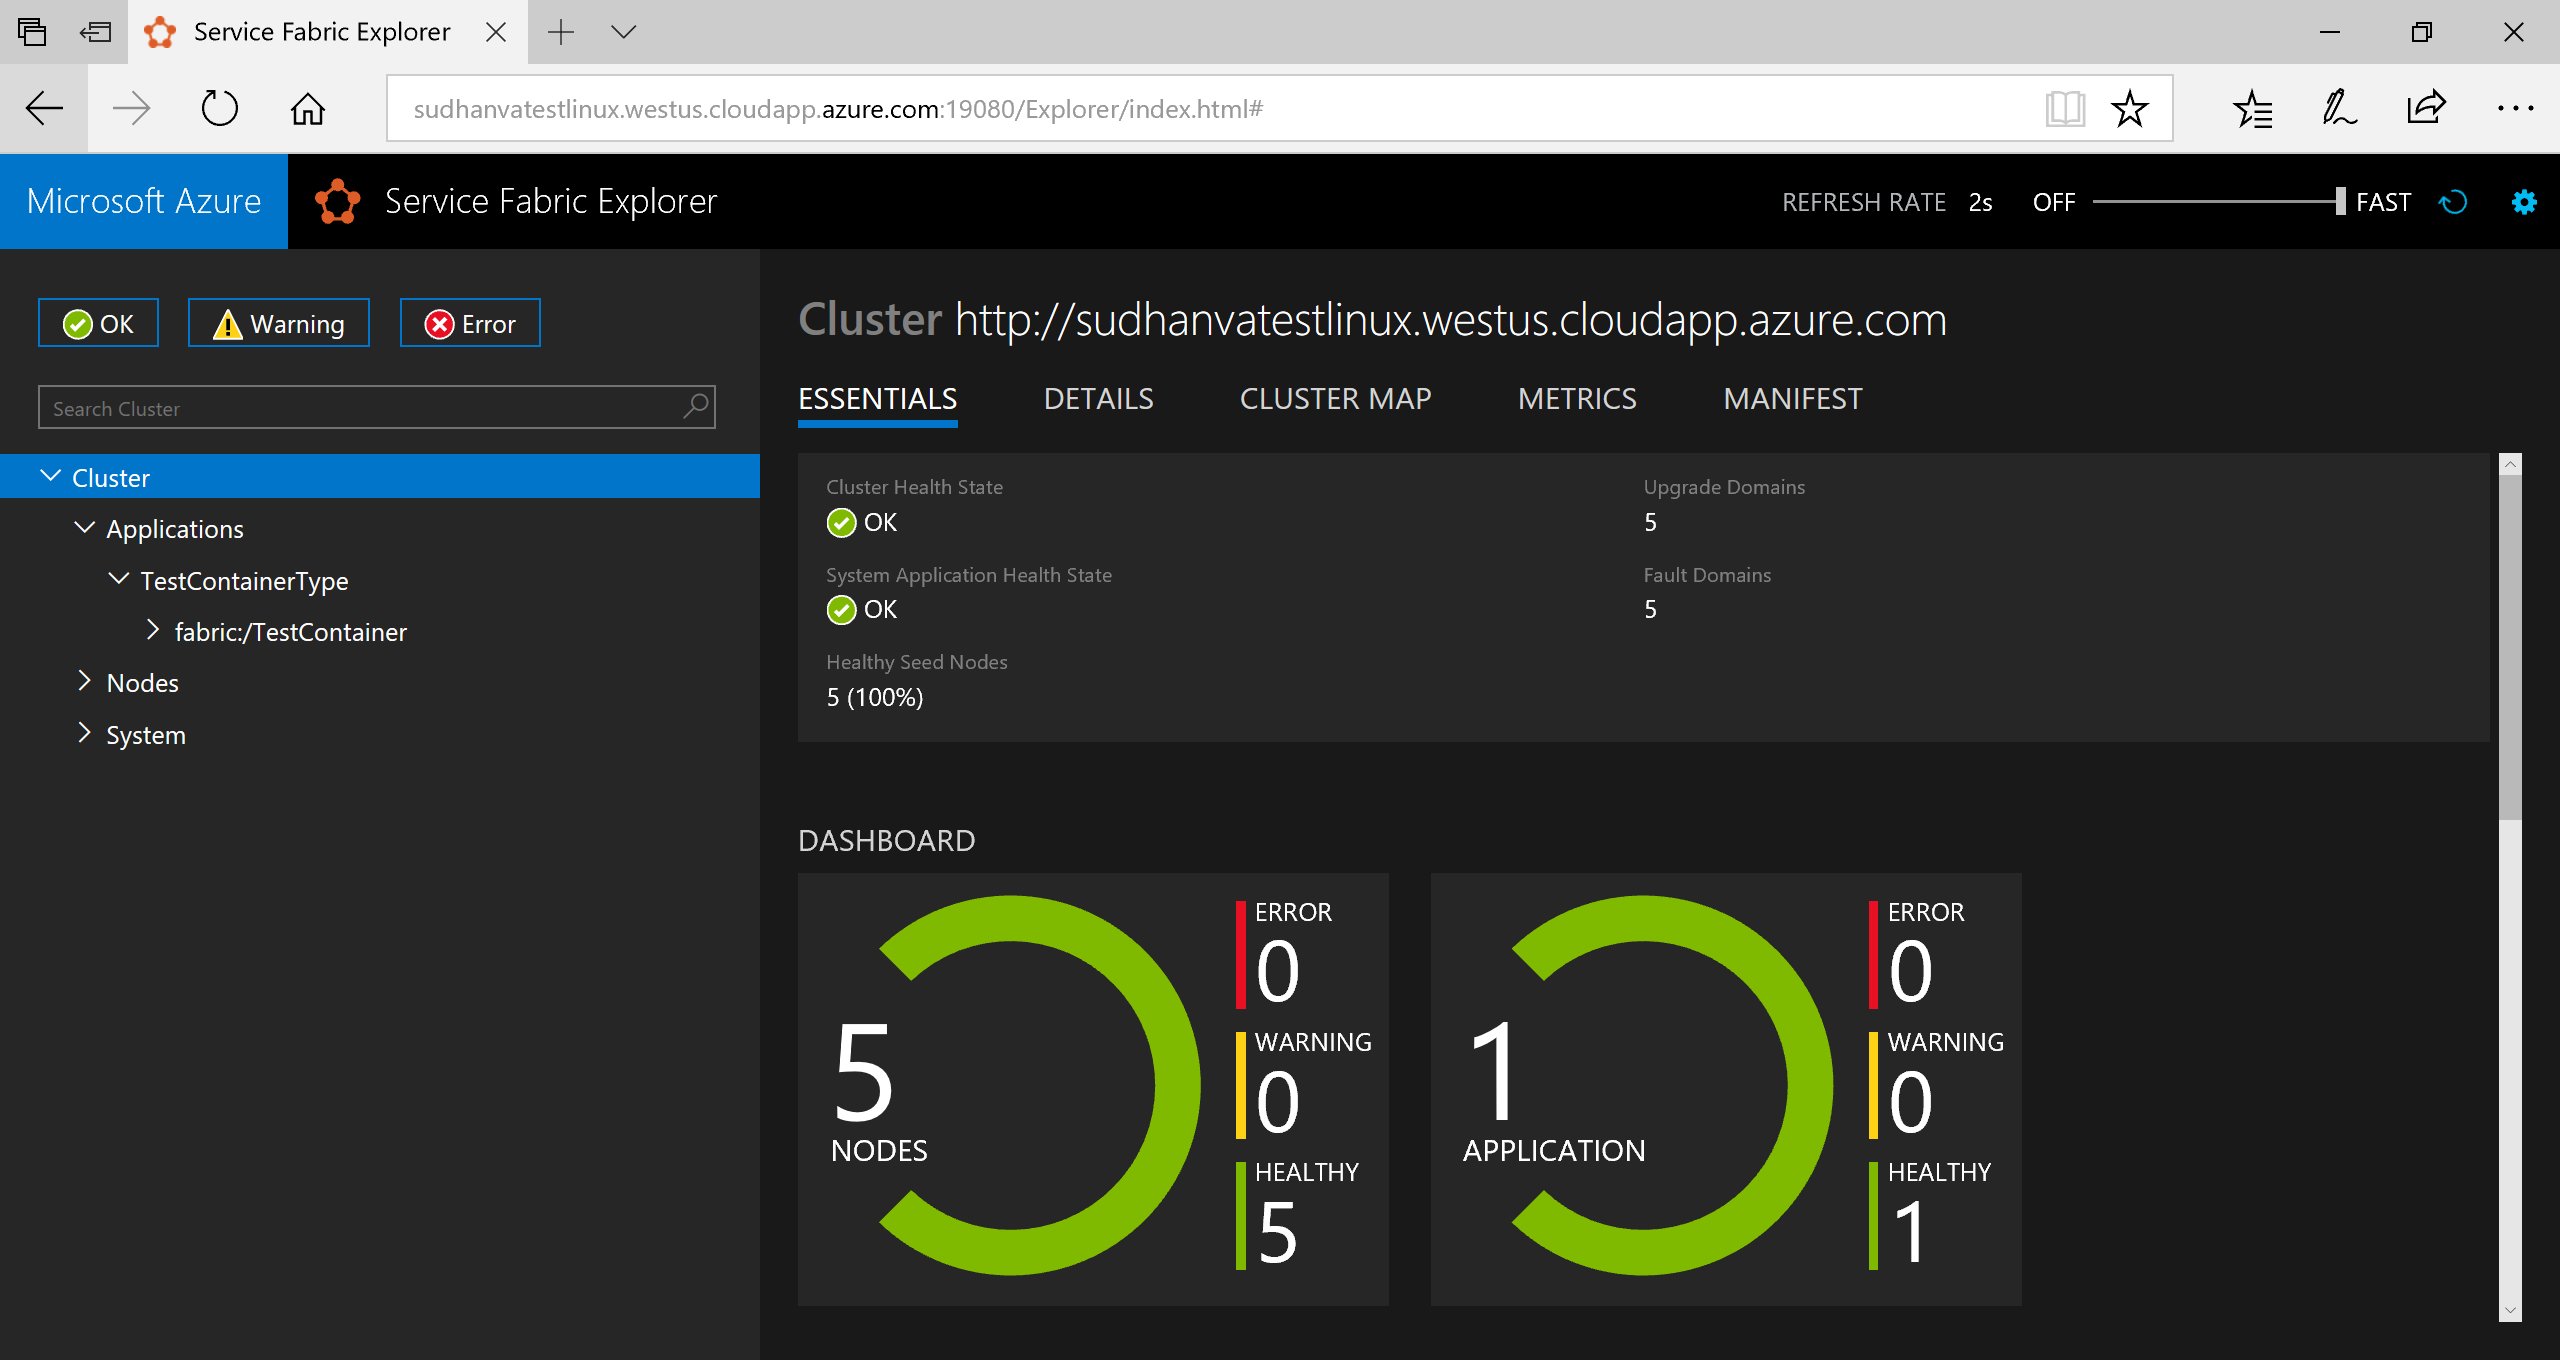
브라우저를 열고 https://containertestcluster.eastus.cloudapp.azure.com:19080/Explorer.에서 Service Fabric Explorer로 이동합니다. 애플리케이션 노드를 확장하면 애플리케이션 유형에 대한 항목 및 인스턴스에 대한 다른 항목이 만들어집니다.
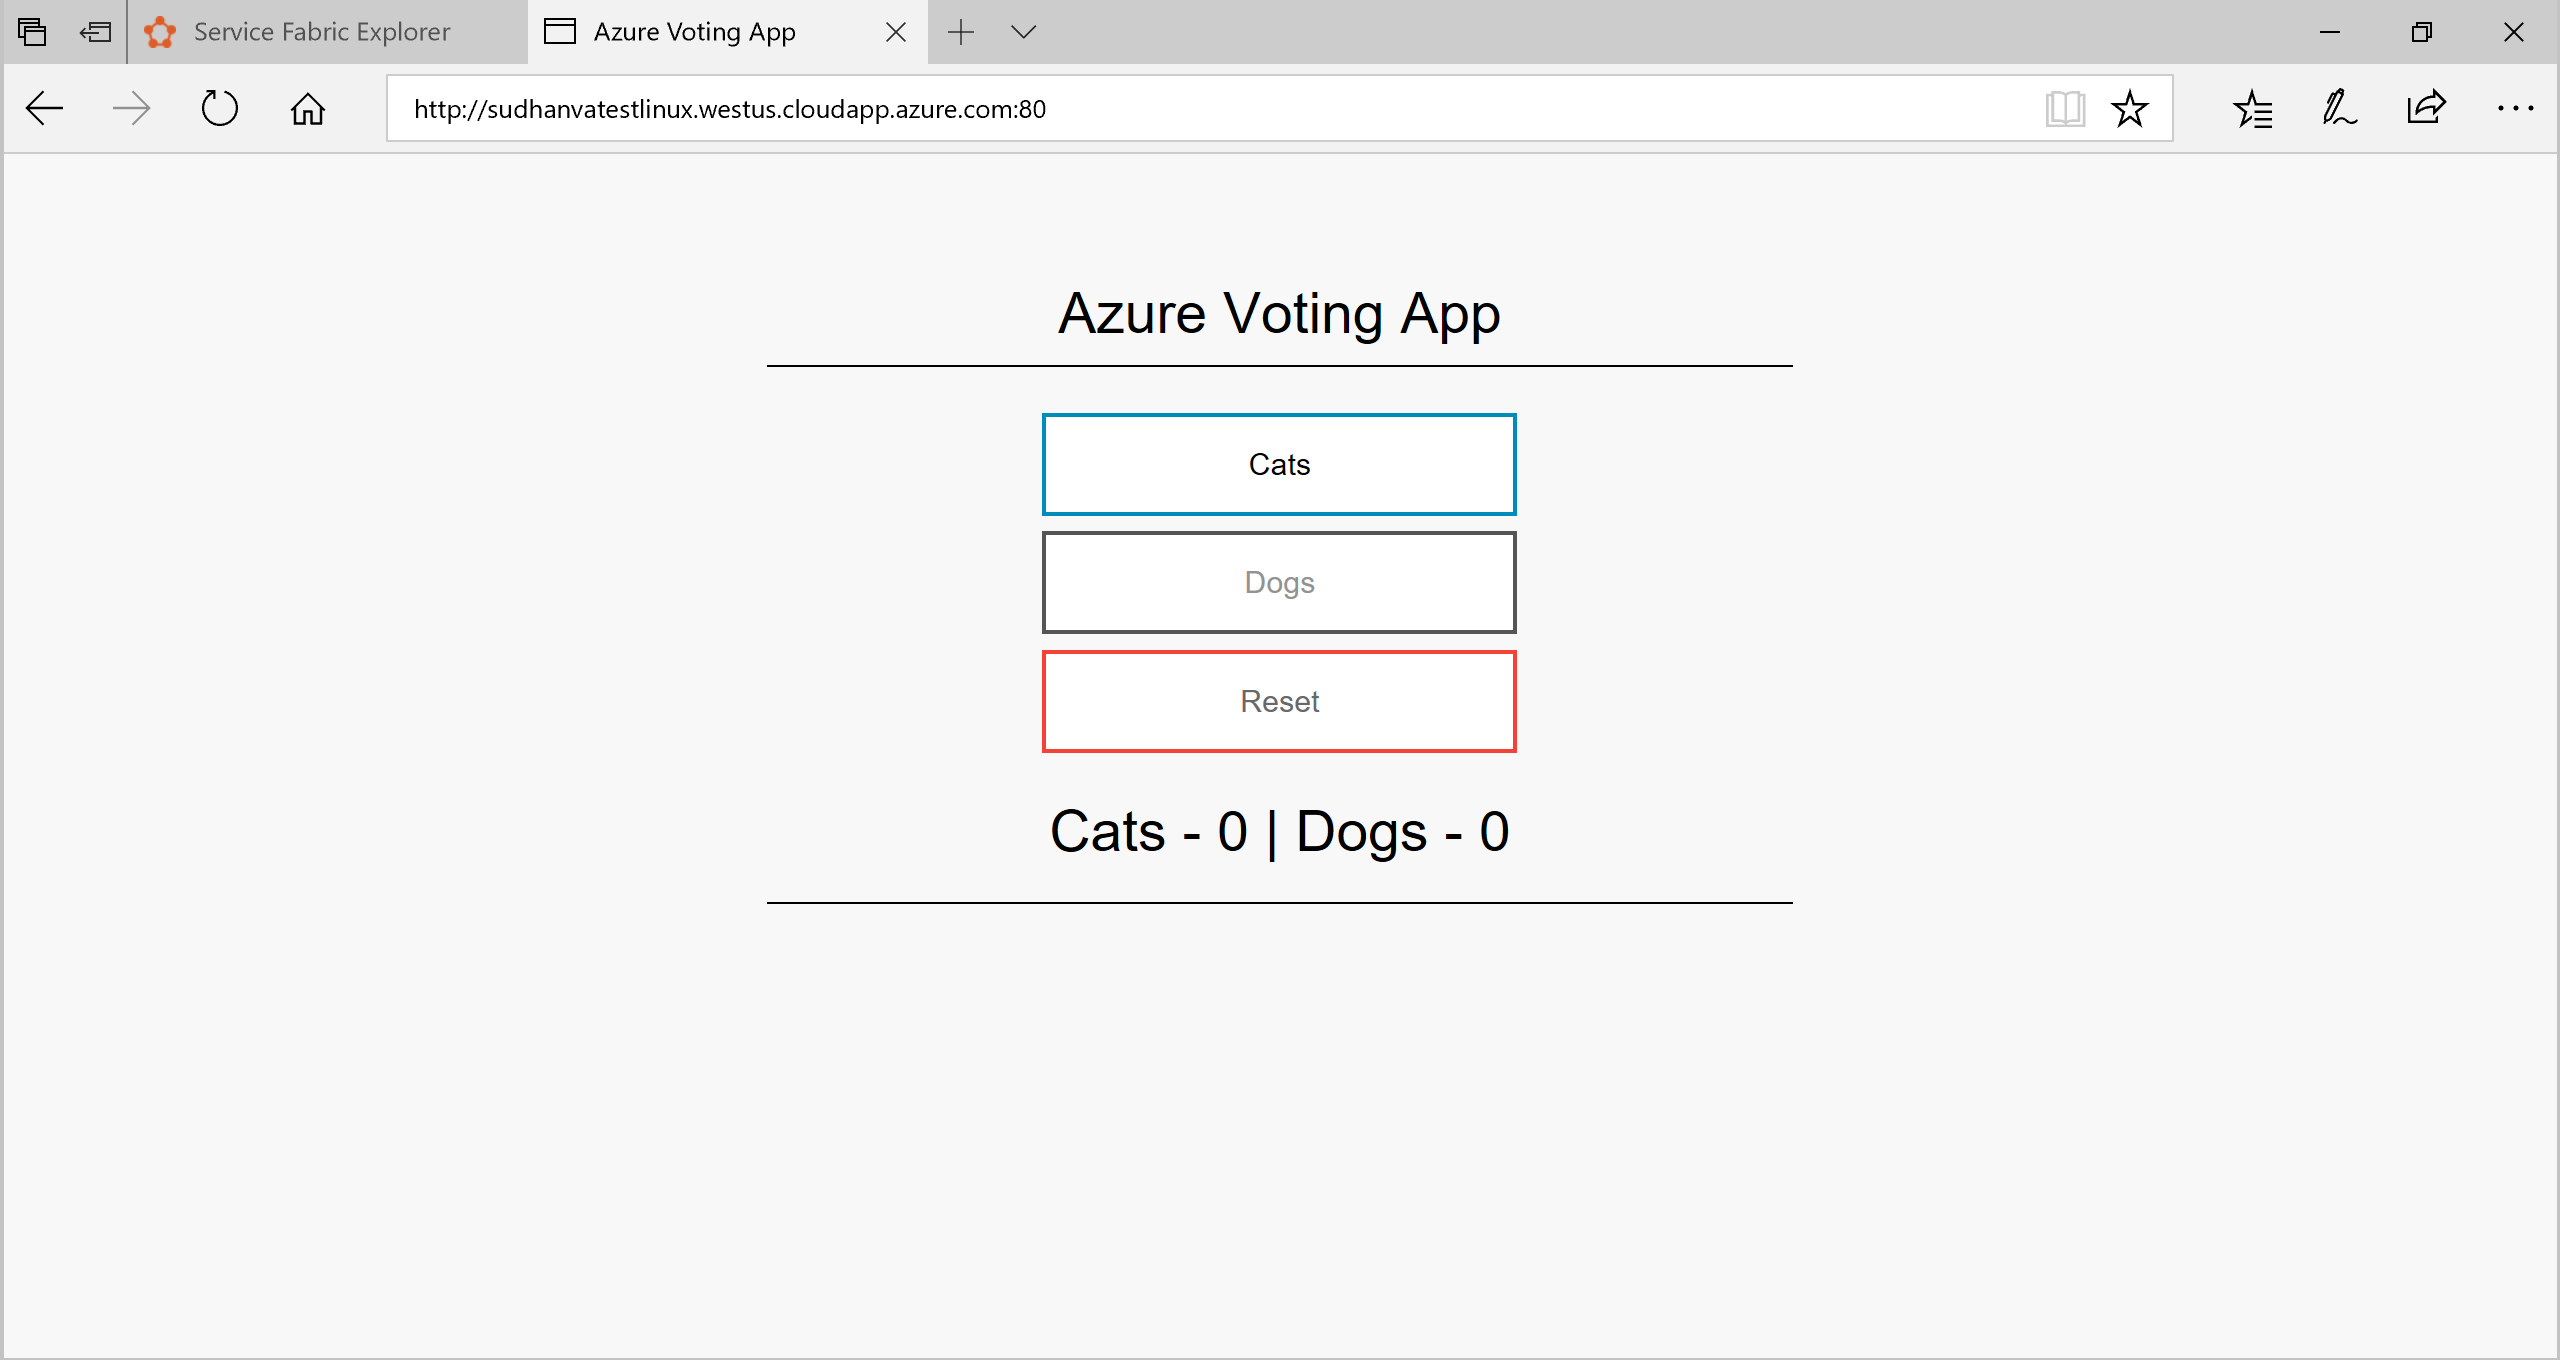
실행 중인 응용 프로그램에 연결하려면 웹 브라우저를 열고 클러스터 URL(예: http://containertestcluster.eastus.cloudapp.azure.com:80. )로 이동합니다. 웹 UI에서 선택 애플리케이션이 표시됩니다.
정리
템플릿에 제공된 제거 스크립트를 사용하여 클러스터에서 애플리케이션 인스턴스를 삭제하고 애플리케이션 유형을 등록 해제합니다. 이 명령은 인스턴스를 정리하는 데 시간이 걸리고 'install.sh' 명령은 이 스크립트 직후에 실행할 수 없습니다.
./uninstall.sh
완료된 매니페스트의 예제
ApplicationManifest.xml
<?xml version="1.0" encoding="UTF-8" standalone="yes"?>
<ApplicationManifest ApplicationTypeName="TestContainerType" ApplicationTypeVersion="1.0.0" xmlns="http://schemas.microsoft.com/2011/01/fabric" xmlns:xsd="https://www.w3.org/2001/XMLSchema" xmlns:xsi="https://www.w3.org/2001/XMLSchema-instance">
  <ServiceManifestImport>
    <ServiceManifestRef ServiceManifestName="azurevotefrontPkg" ServiceManifestVersion="1.0.0"/>
    <Policies>
    <ContainerHostPolicies CodePackageRef="Code">
        <RepositoryCredentials AccountName="myaccountname" Password="<password>" PasswordEncrypted="false"/>
        <PortBinding ContainerPort="80" EndpointRef="azurevotefrontTypeEndpoint"/>
    </ContainerHostPolicies>
        </Policies>
  </ServiceManifestImport>
  <ServiceManifestImport>
    <ServiceManifestRef ServiceManifestName="azurevotebackPkg" ServiceManifestVersion="1.0.0"/>
      <Policies>
        <ContainerHostPolicies CodePackageRef="Code">
          <PortBinding ContainerPort="6379" EndpointRef="azurevotebackTypeEndpoint"/>
        </ContainerHostPolicies>
      </Policies>
  </ServiceManifestImport>
  <DefaultServices>
    <Service Name="azurevotefront">
      <StatelessService ServiceTypeName="azurevotefrontType" InstanceCount="1">
        <SingletonPartition/>
      </StatelessService>
    </Service>
    <Service Name="azurevoteback" ServiceDnsName="redisbackend.testapp">
      <StatelessService ServiceTypeName="azurevotebackType" InstanceCount="1">
        <SingletonPartition/>
      </StatelessService>
    </Service>
  </DefaultServices>
</ApplicationManifest>
Front-end ServiceManifest.xml
<?xml version="1.0" encoding="utf-8"?>
<ServiceManifest Name="azurevotefrontPkg" Version="1.0.0"
                 xmlns="http://schemas.microsoft.com/2011/01/fabric" xmlns:xsd="https://www.w3.org/2001/XMLSchema" xmlns:xsi="https://www.w3.org/2001/XMLSchema-instance" >

   <ServiceTypes>
      <StatelessServiceType ServiceTypeName="azurevotefrontType" UseImplicitHost="true">
   </StatelessServiceType>
   </ServiceTypes>

   <CodePackage Name="code" Version="1.0.0">
      <EntryPoint>
         <ContainerHost>
            <ImageName>acrName.azurecr.io/azure-vote-front:v1</ImageName>
            <Commands></Commands>
         </ContainerHost>
      </EntryPoint>
      <EnvironmentVariables>
      </EnvironmentVariables>
   </CodePackage>

  <Resources>
    <Endpoints>
      <!-- This endpoint is used by the communication listener to obtain the port on which to
           listen. Please note that if your service is partitioned, this port is shared with
           replicas of different partitions that are placed in your code. -->
      <Endpoint Name="azurevotefrontTypeEndpoint" UriScheme="http" Port="80" Protocol="http"/>
    </Endpoints>
  </Resources>

 </ServiceManifest>
Redis ServiceManifest.xml
<?xml version="1.0" encoding="utf-8"?>
<ServiceManifest Name="azurevotebackPkg" Version="1.0.0"
                 xmlns="http://schemas.microsoft.com/2011/01/fabric" xmlns:xsd="https://www.w3.org/2001/XMLSchema" xmlns:xsi="https://www.w3.org/2001/XMLSchema-instance" >

   <ServiceTypes>
      <StatelessServiceType ServiceTypeName="azurevotebackType" UseImplicitHost="true">
   </StatelessServiceType>
   </ServiceTypes>

   <CodePackage Name="code" Version="1.0.0">
      <EntryPoint>
         <ContainerHost>
            <Commands></Commands>
         </ContainerHost>
      </EntryPoint>
      <EnvironmentVariables>
      </EnvironmentVariables>
   </CodePackage>
     <Resources>
    <Endpoints>
      <!-- This endpoint is used by the communication listener to obtain the port on which to
           listen. Please note that if your service is partitioned, this port is shared with
           replicas of different partitions that are placed in your code. -->
      <Endpoint Name="azurevotebackTypeEndpoint" Port="6379" Protocol="tcp"/>
    </Endpoints>
  </Resources>
 </ServiceManifest>
다음 단계
이 자습서에서는 Yeoman을 사용하여 Service Fabric 애플리케이션에 여러 컨테이너를 패키징했습니다. 그런 다음 이 애플리케이션을 배포하고 Service Fabric 클러스터에서 실행했습니다. 다음 단계가 완료되었습니다.
- Yeoman 설치
- Yeoman을 사용하여 애플리케이션 패키지 만들기
- 애플리케이션 패키지에서 컨테이너에서 사용할 설정 구성
- 애플리케이션 빌드
- 애플리케이션 배포 및 실행
- 애플리케이션 정리
Service Fabric에서 애플리케이션의 장애 조치 및 크기 조정에 대한 자세한 내용은 다음 자습서를 진행하세요.
피드백
출시 예정: 2024년 내내 콘텐츠에 대한 피드백 메커니즘으로 GitHub 문제를 단계적으로 폐지하고 이를 새로운 피드백 시스템으로 바꿀 예정입니다. 자세한 내용은 다음을 참조하세요. https://aka.ms/ContentUserFeedback
다음에 대한 사용자 의견 제출 및 보기