GitHub Actions에서 Azure Spring Apps CI/CD 사용
참고 항목
Azure Spring Apps는 Azure Spring Cloud 서비스의 새 이름입니다. 서비스에 새 이름이 지정되었지만, 자산을 업데이트하는 동안 스크린샷, 비디오, 다이어그램과 같은 일부 위치에서는 당분간 이전 이름이 표시됩니다.
이 문서의 적용 대상: ✔️ 기본/표준 ✔️ 엔터프라이즈
이 문서에서는 GitHub Actions에서 Azure Spring Apps용 CI/CD 워크플로를 빌드하는 방법을 보여줍니다.
GitHub Actions는 자동화된 소프트웨어 개발 수명 주기 워크플로를 지원합니다. Azure Spring Apps용 GitHub Actions를 사용하여 Azure에 빌드, 테스트하고 패키징, 릴리스 및 배포하기 위한 리포지토리에 워크플로를 만들 수 있습니다.
필수 조건
이 예제에는 Azure CLI가 필요합니다.
GitHub 리포지토리 설정 및 인증
Azure 로그인 작업에 권한을 부여하려면 Azure 서비스 사용자 자격 증명이 필요 합니다. Azure 자격 증명을 가져오려면 로컬 컴퓨터에서 다음 명령을 실행합니다.
az login
az ad sp create-for-rbac \
    --role contributor \
    --scopes /subscriptions/<SUBSCRIPTION_ID> \
    --json-auth
특정 리소스 그룹에 액세스하기 위해 범위를 줄일 수 있습니다.
az ad sp create-for-rbac \
    --role contributor \
    --scopes /subscriptions/<SUBSCRIPTION_ID>/resourceGroups/<RESOURCE_GROUP> \
    --json-auth
명령은 JSON 개체를 출력해야 합니다.
{
    "clientId": "<GUID>",
    "clientSecret": "<GUID>",
    "subscriptionId": "<GUID>",
    "tenantId": "<GUID>",
    ...
}
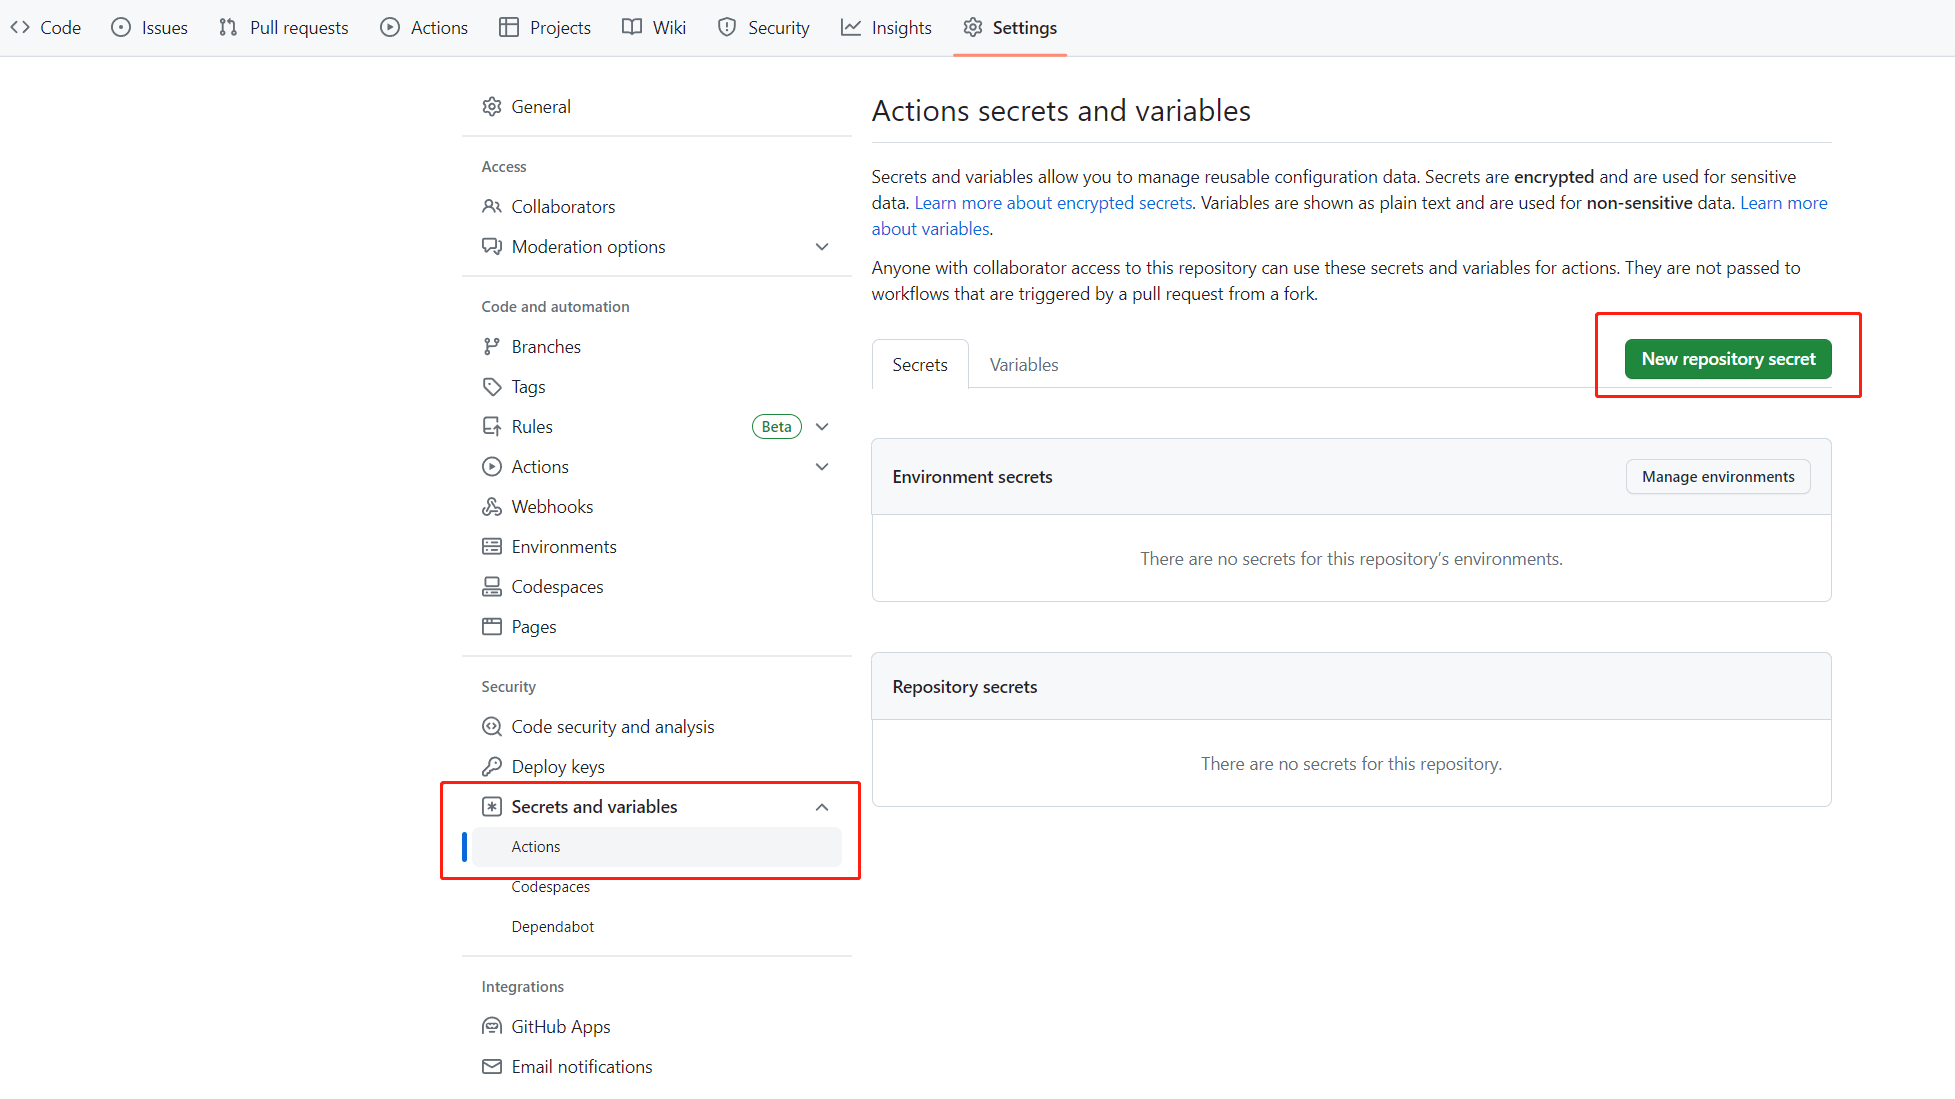
이 예제에서는 GitHub의 steeltoe 샘플을 사용합니다. 리포지토리를 포크하고, 포크에 대한 GitHub 리포지토리 페이지를 연 다음 설정 탭을 선택합니다. 비밀 메뉴를 열고 새 비밀을 선택합니다.
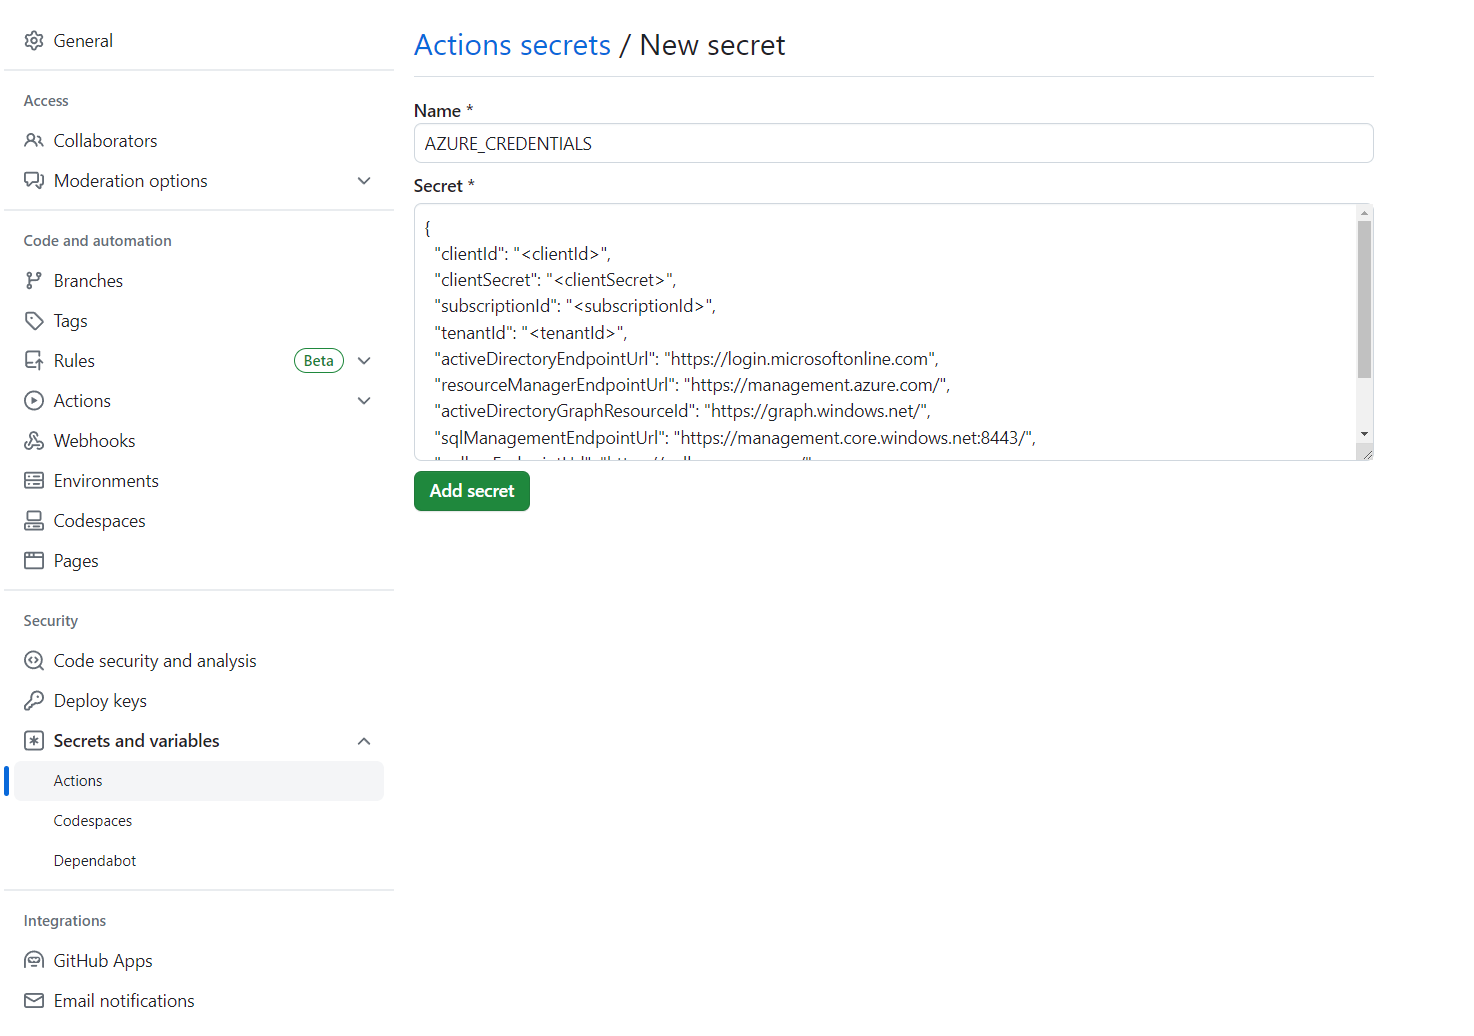
비밀 이름을 AZURE_CREDENTIALS(으)로 설정하고 해당 값을 GitHub 리포지토리 설정 및 인증이라는 제목 아래에서 찾을 수 있는 JSON 문자열로 설정합니다.
GitHub Actions에서 Key Vault를 사용하여 Azure Spring 인증에 설명된 대로 GitHub Actions의 Key Vault에서 Azure 로그인 자격 증명도 가져올 수 있습니다.
서비스 인스턴스 프로비저닝
Azure Spring Apps 서비스 인스턴스를 프로비전하려면 Azure CLI를 사용하여 다음 명령을 실행합니다.
az extension add --name spring
az group create \
    --name <resource-group-name> \
    --location eastus
az spring create \
    --resource-group <resource-group-name> \
    --name <service-instance-name>
az spring config-server git set \
    --name <service-instance-name> \
    --uri https://github.com/Azure-Samples/azure-spring-apps-samples \
    --label main \
    --search-paths steeltoe-sample/config
워크플로 빌드
워크플로는 다음 옵션을 사용하여 정의됩니다.
Azure CLI를 사용하여 배포 준비
az spring app create 명령이 현재 idempotent가 아닙니다. 한 번 실행한 후 동일한 명령을 다시 실행하면 오류가 발생합니다. 기존 Azure Spring Apps 앱 및 인스턴스에서 이 워크플로를 권장합니다.
준비 시 다음 Azure CLI 명령을 사용합니다.
az config set defaults.group=<service-group-name>
az config set defaults.spring=<service-instance-name>
az spring app create --name planet-weather-provider
az spring app create --name solar-system-weather
Azure CLI를 사용하여 직접 배포
다음 콘텐츠를 사용하여 리포지토리에 .github/workflows/main.yml 파일을 만듭니다. <리소스 그룹 이름> 및 <서비스 이름>을 올바른 값으로 바꿉니다.
name: Steeltoe-CD

# Controls when the action runs. Triggers the workflow on push or pull request
# events but only for the main branch
on:
  push:
    branches: [ main]

# A workflow run is made up of one or more jobs that can run sequentially or in parallel
jobs:
  # This workflow contains a single job called "build"
  build:
    # The type of runner that the job runs on
    runs-on: ubuntu-latest
    env:
      working-directory: ./steeltoe-sample
      resource-group-name: <your resource group name>
      service-name: <your service name>

    # Supported .NET Core version matrix.
    strategy:
      matrix:
        dotnet: [ '3.1.x' ]

    # Steps represent a sequence of tasks that is executed as part of the job
    steps:
      # Checks-out your repository under $GITHUB_WORKSPACE, so your job can access it
      - uses: actions/checkout@v2

      # Set up .NET Core 3.1 SDK
      - uses: actions/setup-dotnet@v1
        with:
          dotnet-version: ${{ matrix.dotnet }}

      # Set credential for az login
      - uses: azure/login@v1.1
        with:
          creds: ${{ secrets.AZURE_CREDENTIALS }}

      - name: install Azure CLI extension
        run: |
          az extension add --name spring --yes

      - name: Build and package planet-weather-provider app
        working-directory: ${{env.working-directory}}/src/planet-weather-provider
        run: |
          dotnet publish
          az spring app deploy -n planet-weather-provider --runtime-version NetCore_31 --main-entry Microsoft.Azure.SpringCloud.Sample.PlanetWeatherProvider.dll --artifact-path ./publish-deploy-planet.zip -s ${{ env.service-name }} -g ${{ env.resource-group-name }}
      - name: Build solar-system-weather app
        working-directory: ${{env.working-directory}}/src/solar-system-weather
        run: |
          dotnet publish
          az spring app deploy -n solar-system-weather --runtime-version NetCore_31 --main-entry Microsoft.Azure.SpringCloud.Sample.SolarSystemWeather.dll --artifact-path ./publish-deploy-solar.zip -s ${{ env.service-name }} -g ${{ env.resource-group-name }}
GitHub 리포지토리 설정 및 인증
Azure 로그인 작업에 권한을 부여하려면 Azure 서비스 사용자 자격 증명이 필요 합니다. Azure 자격 증명을 가져오려면 로컬 컴퓨터에서 다음 명령을 실행합니다.
az login
az ad sp create-for-rbac \
    --role contributor \
    --scopes /subscriptions/<SUBSCRIPTION_ID> \
    --json-auth
특정 리소스 그룹에 액세스하기 위해 범위를 줄일 수 있습니다.
az ad sp create-for-rbac \
    --role contributor \
    --scopes /subscriptions/<SUBSCRIPTION_ID>/resourceGroups/<RESOURCE_GROUP> \
    --json-auth
명령은 JSON 개체를 출력해야 합니다.
{
    "clientId": "<GUID>",
    "clientSecret": "<GUID>",
    "subscriptionId": "<GUID>",
    "tenantId": "<GUID>",
    ...
}
이 예제에서는 GitHub의 PiggyMetrics 샘플을 사용합니다. 샘플을 포크하고 Azure 분기만 복사를 선택 취소하고 GitHub 리포지토리 페이지를 열고 설정 탭을 선택합니다. 비밀 메뉴를 열고 새 비밀 추가를 선택합니다.
비밀 이름을 AZURE_CREDENTIALS(으)로 설정하고 해당 값을 GitHub 리포지토리 설정 및 인증이라는 제목 아래에서 찾을 수 있는 JSON 문자열로 설정합니다.
GitHub Actions에서 Key Vault를 사용하여 Azure Spring 인증에 설명된 대로 GitHub Actions의 Key Vault에서 Azure 로그인 자격 증명도 가져올 수 있습니다.
서비스 인스턴스 프로비저닝
Azure Spring Apps 서비스 인스턴스를 프로비전하려면 Azure CLI를 사용하여 다음 명령을 실행합니다.
az extension add --name spring
az group create --location eastus --name <resource group name>
az spring create -n <service instance name> -g <resource group name>
az spring config-server git set -n <service instance name> --uri https://github.com/xxx/piggymetrics --label config
엔드투엔드 샘플 워크플로
다음 예제는 일반적인 사용 시나리오를 보여줍니다.
배포
다음 섹션에서는 앱을 배포하기 위한 다양한 옵션을 보여 줍니다.
프로덕션으로
Azure Spring Apps는 빌드된 아티팩트(예: JAR 또는 .NET Core ZIP) 또는 소스 코드 아카이브가 포함된 배포에 대한 배포를 지원합니다.
다음 예제는 Maven으로 빌드된 JAR 파일을 사용하여 Azure Spring Apps에서 기본 프로덕션 배포에 배포됩니다. 이 예제는 기본 SKU를 사용할 때 가능한 유일한 배포 시나리오입니다.
참고 항목
패키지 검색 패턴은 정확히 하나의 패키지만 반환해야 합니다. 빌드 작업에서 sources.jar 및 javadoc.jar 같은 여러 JAR 패키지가 생성되는 경우에는 애플리케이션 이진 아티팩트와만 일치하도록 검색 패턴을 구체화해야 합니다.
name: AzureSpringApps
on: push
env:
  ASC_PACKAGE_PATH: ${{ github.workspace }}
  AZURE_SUBSCRIPTION: <azure subscription name>

jobs:
  deploy_to_production:
    runs-on: ubuntu-latest
    name: deploy to production with artifact
    steps:
      - name: Checkout GitHub Action
        uses: actions/checkout@v2

      - name: Set up Java 11
        uses: actions/setup-java@v3
        with:
          distribution: 'temurin'
          java-version: '11'

      - name: maven build, clean
        run: |
          mvn clean package

      - name: Login via Azure CLI
        uses: azure/login@v1
        with:
          creds: ${{ secrets.AZURE_CREDENTIALS }}

      - name: deploy to production with artifact
        uses: azure/spring-apps-deploy@v1
        with:
          azure-subscription: ${{ env.AZURE_SUBSCRIPTION }}
          action: Deploy
          service-name: <service instance name>
          app-name: <app name>
          use-staging-deployment: false
          package: ${{ env.ASC_PACKAGE_PATH }}/**/*.jar
다음 예제는 Azure Spring Apps에서 소스 코드를 사용하여 기본 프로덕션 배포에 배포됩니다.
name: AzureSpringApps
on: push
env:
  ASC_PACKAGE_PATH: ${{ github.workspace }}
  AZURE_SUBSCRIPTION: <azure subscription name>

jobs:
  deploy_to_production:
    runs-on: ubuntu-latest
    name: deploy to production with source code
    steps:
      - name: Checkout GitHub Action
        uses: actions/checkout@v2

      - name: Login via Azure CLI
        uses: azure/login@v1
        with:
          creds: ${{ secrets.AZURE_CREDENTIALS }}

      - name: deploy to production step with source code
        uses: azure/spring-apps-deploy@v1
        with:
          azure-subscription: ${{ env.AZURE_SUBSCRIPTION }}
          action: deploy
          service-name: <service instance name>
          app-name: <app name>
          use-staging-deployment: false
          package: ${{ env.ASC_PACKAGE_PATH }}
다음 예제에서는 엔터프라이즈 계획의 소스 코드를 사용하여 Azure Spring Apps의 기본 프로덕션 배포에 배포합니다. builder 옵션을 사용하여 작업 배포에 사용할 작성기를 지정할 수 있습니다.
name: AzureSpringApps
on: push
env:
  ASC_PACKAGE_PATH: ${{ github.workspace }}
  AZURE_SUBSCRIPTION: <azure subscription name>

jobs:
  deploy_to_production:
    runs-on: ubuntu-latest
    name: deploy to production with source code
    steps:
      - name: Checkout GitHub Action
        uses: actions/checkout@v2

      - name: Login via Azure CLI
        uses: azure/login@v1
        with:
          creds: ${{ secrets.AZURE_CREDENTIALS }}

      - name: deploy to production step with source code in the Enterprise plan
        uses: azure/spring-apps-deploy@v1
        with:
          azure-subscription: ${{ env.AZURE_SUBSCRIPTION }}
          action: deploy
          service-name: <service instance name>
          app-name: <app name>
          use-staging-deployment: false
          package: ${{ env.ASC_PACKAGE_PATH }}
          builder: <builder>
다음 예제는 기존 컨테이너 이미지로 Azure Spring Apps에서 기본 프로덕션 배포에 배포됩니다.
name: AzureSpringApps
on: push
env:
  ASC_PACKAGE_PATH: ${{ github.workspace }}
  AZURE_SUBSCRIPTION: <azure subscription name>

jobs:
  deploy_to_production:
    runs-on: ubuntu-latest
    name: deploy to production with source code
    steps:
      - name: Checkout GitHub Action
        uses: actions/checkout@v2

      - name: Login via Azure CLI
        uses: azure/login@v1
        with:
          creds: ${{ secrets.AZURE_CREDENTIALS }}

      - name: Deploy Custom Image
        uses: Azure/spring-apps-deploy@v1
        with:
          azure-subscription: ${{ env.AZURE_SUBSCRIPTION }}
          action: deploy
          service-name: <service instance name>
          app-name: <app name>
          deployment-name: <deployment name>
          container-registry: <your container image registry>
          registry-username: ${{ env.REGISTRY_USERNAME }}
          registry-password: ${{ secrets.REGISTRY_PASSWORD }}
          container-image: <your image tag>
배포하는 동안 더 많은 인수를 사용하여 더 많은 기능을 구현할 수 있습니다. 자세한 내용은 Azure Spring Apps에 배포하기 위한 GitHub Action의 인수 섹션을 참조하세요.
파란색-녹색
다음 예제는 기존 스테이징 배포에 배포됩니다. 이 배포는 프로덕션 배포로 설정될 때까지 프로덕션 트래픽을 수신하지 않습니다. use-staging-deployment를 true로 설정하여 스테이징 배포를 자동으로 찾거나 특정 deployment-name만 할당할 수 있습니다. spring-apps-deploy 작업에만 집중하고 이 문서의 나머지에서는 준비 작업을 제외합니다.
# environment preparation configurations omitted
    steps:
      - name: blue green deploy step use-staging-deployment
        uses: azure/spring-apps-deploy@v1
        with:
          azure-subscription: ${{ env.AZURE_SUBSCRIPTION }}
          action: deploy
          service-name: <service instance name>
          app-name: <app name>
          use-staging-deployment: true
          package: ${{ env.ASC_PACKAGE_PATH }}/**/*.jar
# environment preparation configurations omitted
    steps:
      - name: blue green deploy step with deployment-name
        uses: azure/spring-apps-deploy@v1
        with:
          azure-subscription: ${{ env.AZURE_SUBSCRIPTION }}
          action: deploy
          service-name: <service instance name>
          app-name: <app name>
          deployment-name: staging
          package: ${{ env.ASC_PACKAGE_PATH }}/**/*.jar
대체 접근 방법을 포함하여 파란색-녹색 배포에 대한 자세한 내용은 파란색-녹색 배포 전략을 참조하세요.
프로덕션 배포 설정
다음 예제에서는 현재 준비 배포를 프로덕션으로 설정하여 프로덕션 트래픽을 수신할 배포를 효과적으로 스왑합니다.
# environment preparation configurations omitted
    steps:
      - name: set production deployment step
        uses: azure/spring-apps-deploy@v1
        with:
          azure-subscription: ${{ env.AZURE_SUBSCRIPTION }}
          action: set-production
          service-name: <service instance name>
          app-name: <app name>
          use-staging-deployment: true
스테이징 배포 삭제
Delete Staging Deployment 작업을 사용하면 프로덕션 트래픽을 수신하지 않는 배포를 삭제할 수 있습니다. 이 삭제는 배포에 사용된 리소스를 비우고 새 준비 배포를 위한 공간을 확보할 수 있습니다.
# environment preparation configurations omitted
    steps:
      - name: Delete staging deployment step
        uses: azure/spring-apps-deploy@v1
        with:
          azure-subscription: ${{ env.AZURE_SUBSCRIPTION }}
          action: delete-staging-deployment
          service-name: <service instance name>
          app-name: <app name>
빌드 만들기 또는 업데이트(엔터프라이즈 계획만 해당)
다음 예제에서는 엔터프라이즈 계획에서 빌드 리소스를 만들거나 업데이트합니다.
# environment preparation configurations omitted
    steps:
      - name: Create or update build
        uses: azure/spring-apps-deploy@v1
        with:
          azure-subscription: ${{ env.AZURE_SUBSCRIPTION }}
          action: build
          service-name: <service instance name>
          build-name: <build name>
          package: ${{ env.ASC_PACKAGE_PATH }}
          builder: <builder>
빌드 삭제(엔터프라이즈 계획만 해당)
다음 예제에서는 엔터프라이즈 계획에서 빌드 리소스를 삭제합니다.
# environment preparation configurations omitted
    steps:
      - name: Delete build
        uses: azure/spring-apps-deploy@v1
        with:
          azure-subscription: ${{ env.AZURE_SUBSCRIPTION }}
          action: delete-build
          service-name: <service instance name>
          build-name: <build name>
Maven 플러그인을 사용하여 배포
또 다른 옵션은 Maven 플러그인을 사용하여 Jar를 배포하고 앱 설정을 업데이트하는 것입니다. mvn azure-spring-apps:deploy 명령은 idempotent이며 필요한 경우 앱을 자동으로 만듭니다. 해당 앱을 미리 만들 필요는 없습니다.
name: AzureSpringApps
on: push

jobs:
  build-and-deploy:
    runs-on: ubuntu-latest
    steps:

    - uses: actions/checkout@main

    - name: Set up Java 11
      uses: actions/setup-java@v3
      with:
        distribution: 'temurin'
        java-version: '11'

    - name: maven build, clean
      run: |
        mvn clean package -DskipTests

    # Maven plugin can cosume this authentication method automatically
    - name: Azure Login
      uses: azure/login@v1
      with:
        creds: ${{ secrets.AZURE_CREDENTIALS }}

    # Maven deploy, make sure you have correct configurations in your pom.xml
    - name: deploy to Azure Spring Apps using Maven
      run: |
        mvn azure-spring-apps:deploy
워크플로 실행
GitHub 작업은 .github/workflow/main.yml을 GitHub에 푸시한 후 자동으로 사용하도록 설정해야 합니다. 이 작업은 새 커밋을 푸시할 때 트리거됩니다. 브라우저에서 이 파일을 만드는 경우 작업이 이미 실행되어 있어야 합니다.
작업이 사용하도록 설정되었는지 확인하려면 GitHub 리포지토리 페이지에서 작업 탭을 선택합니다.
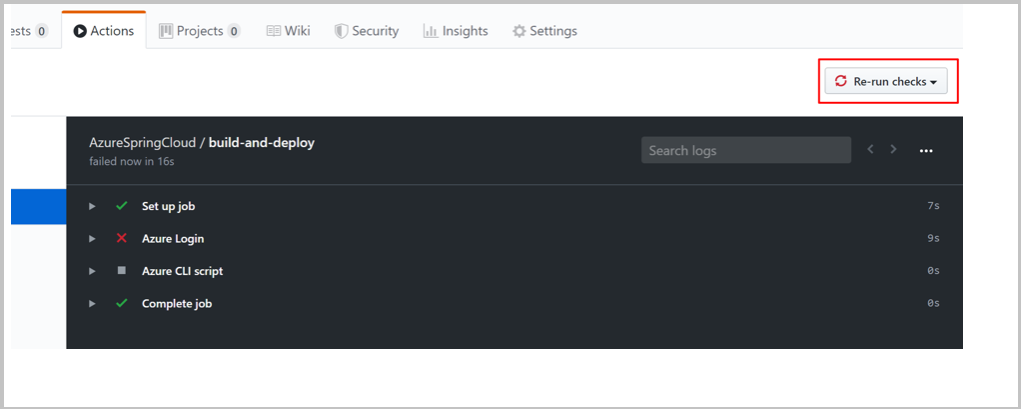
작업에서 오류가 발생한 경우(예: Azure 자격 증명을 설정하지 않은 경우) 오류를 수정하면 검사를 다시 시작할 수 있습니다. GitHub 리포지토리 페이지에서 작업을 선택하고 특정 워크플로 작업을 선택한 다음, 검사 다시 실행 단추를 선택하여 검사를 다시 실행합니다.


