방법: TileBrush의 가로 및 세로 맞춤 설정
이 예제에서는 타일에서 콘텐츠의 가로 및 세로 맞춤을 제어하는 방법을 보여 줍니다. TileBrush의 가로 및 세로 맞춤을 제어하려면 AlignmentX 및 AlignmentY 속성을 사용하세요.
다음 조건 중 하나가 true인 경우 TileBrush의 AlignmentX 및 AlignmentY 속성이 사용됩니다.
Stretch 속성이 Uniform 또는 UniformToFill이고, Viewbox와 Viewport의 가로 세로 비율이 다릅니다.
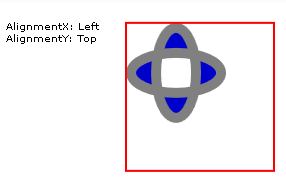
TileBrush를 왼쪽 위 모서리에 맞춥니다.
다음 예제는 TileBrush의 형식인 DrawingBrush의 콘텐츠를 타일의 왼쪽 위 모서리에 맞춥니다. 콘텐츠를 맞추기 위해 예제는 DrawingBrush의 AlignmentX 속성을 Left로, AlignmentY 속성을 Top으로 설정합니다. 이 예제의 결과는 다음과 같습니다.

콘텐츠가 왼쪽 위 구석에 정렬된 TileBrush
//
// Create a TileBrush and align its
// content to the top-left of its tile.
//
DrawingBrush topLeftAlignedTileBrush = new DrawingBrush();
topLeftAlignedTileBrush.AlignmentX = AlignmentX.Left;
topLeftAlignedTileBrush.AlignmentY = AlignmentY.Top;

// Set Stretch to None so that the brush's
// content doesn't automatically expand to
// fill the entire tile.
topLeftAlignedTileBrush.Stretch = Stretch.None;

// Define the brush's content.
GeometryGroup ellipses = new GeometryGroup();
ellipses.Children.Add(new EllipseGeometry(new Point(50, 50), 20, 45));
ellipses.Children.Add(new EllipseGeometry(new Point(50, 50), 45, 20));
Pen drawingPen = new Pen(Brushes.Gray, 10);
GeometryDrawing ellipseDrawing = new GeometryDrawing(Brushes.Blue, drawingPen, ellipses);
topLeftAlignedTileBrush.Drawing = ellipseDrawing;

// Use the brush to paint a rectangle.
Rectangle rectangle1 = new Rectangle();
rectangle1.Width = 150;
rectangle1.Height = 150;
rectangle1.Stroke = Brushes.Red;
rectangle1.StrokeThickness = 2;
rectangle1.Margin = new Thickness(20);
rectangle1.Fill = topLeftAlignedTileBrush;
'
' Create a TileBrush and align its
' content to the top-left of its tile.
'
Dim topLeftAlignedTileBrush As New DrawingBrush()
topLeftAlignedTileBrush.AlignmentX = AlignmentX.Left
topLeftAlignedTileBrush.AlignmentY = AlignmentY.Top

' Set Stretch to None so that the brush's
' content doesn't automatically expand to
' fill the entire tile.
topLeftAlignedTileBrush.Stretch = Stretch.None

' Define the brush's content.
Dim ellipses As New GeometryGroup()
ellipses.Children.Add(New EllipseGeometry(New Point(50, 50), 20, 45))
ellipses.Children.Add(New EllipseGeometry(New Point(50, 50), 45, 20))
Dim drawingPen As New Pen(Brushes.Gray, 10)
Dim ellipseDrawing As New GeometryDrawing(Brushes.Blue, drawingPen, ellipses)
topLeftAlignedTileBrush.Drawing = ellipseDrawing

' Use the brush to paint a rectangle.
Dim rectangle1 As New Rectangle()
With rectangle1
    .Width = 150
    .Height = 150
    .Stroke = Brushes.Red
    .StrokeThickness = 2
    .Margin = New Thickness(20)
    .Fill = topLeftAlignedTileBrush
End With
<Rectangle
  Width="150" Height="150"
  Stroke="Red" StrokeThickness="2"
  Margin="20">
  <Rectangle.Fill>

    <!-- This brush's content is aligned to the top-left
         of its tile. -->
    <DrawingBrush
      Stretch="None"
      AlignmentX="Left"
      AlignmentY="Top">
      <DrawingBrush.Drawing>
        <GeometryDrawing Brush="MediumBlue">
          <GeometryDrawing.Geometry>
            <GeometryGroup>
              <EllipseGeometry RadiusX="20" RadiusY="45" Center="50,50" />
              <EllipseGeometry RadiusX="45" RadiusY="20" Center="50,50" />
            </GeometryGroup>
          </GeometryDrawing.Geometry>
          <GeometryDrawing.Pen>
            <Pen Brush="Gray" Thickness="10" />
          </GeometryDrawing.Pen>
        </GeometryDrawing>
      </DrawingBrush.Drawing>
    </DrawingBrush>
  </Rectangle.Fill>
</Rectangle>
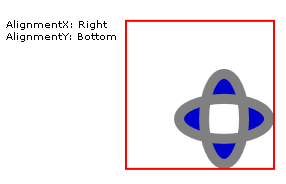
DrawingBrush를 오른쪽 아래 모서리에 맞춥니다.
다음 예제는 AlignmentX 속성을 Right로, AlignmentY 속성을 Bottom으로 설정하여 DrawingBrush의 콘텐츠를 타일의 오른쪽 아래 모서리에 맞춥니다. 예제의 결과는 다음과 같습니다.

콘텐츠가 오른쪽 아래 구석에 정렬된 TileBrush
//
// Create a TileBrush and align its
// content to the bottom-right of its tile.
//
DrawingBrush bottomRightAlignedTileBrush = new DrawingBrush();
bottomRightAlignedTileBrush.AlignmentX = AlignmentX.Right;
bottomRightAlignedTileBrush.AlignmentY = AlignmentY.Bottom;
bottomRightAlignedTileBrush.Stretch = Stretch.None;

// Define the brush's content.
bottomRightAlignedTileBrush.Drawing = ellipseDrawing;

// Use the brush to paint a rectangle.
Rectangle rectangle2 = new Rectangle();
rectangle2.Width = 150;
rectangle2.Height = 150;
rectangle2.Stroke = Brushes.Red;
rectangle2.StrokeThickness = 2;
rectangle2.Margin = new Thickness(20);
rectangle2.Fill = bottomRightAlignedTileBrush;
'
' Create a TileBrush and align its
' content to the bottom-right of its tile.
'
Dim bottomRightAlignedTileBrush As New DrawingBrush()
With bottomRightAlignedTileBrush
    .AlignmentX = AlignmentX.Right
    .AlignmentY = AlignmentY.Bottom
    .Stretch = Stretch.None

    ' Define the brush's content.
    .Drawing = ellipseDrawing
End With

' Use the brush to paint a rectangle.
Dim rectangle2 As New Rectangle()
With rectangle2
    .Width = 150
    .Height = 150
    .Stroke = Brushes.Red
    .StrokeThickness = 2
    .Margin = New Thickness(20)
    .Fill = bottomRightAlignedTileBrush
End With
<Rectangle
  Width="150" Height="150"
  Stroke="Red" StrokeThickness="2"
  Margin="20">
  <Rectangle.Fill>

    <!-- This brush's content is aligned to the bottom right
         of its tile. -->
    <DrawingBrush
      Stretch="None"
      AlignmentX="Right"
      AlignmentY="Bottom">
      <DrawingBrush.Drawing>
        <GeometryDrawing Brush="MediumBlue">
          <GeometryDrawing.Geometry>
            <GeometryGroup>
              <EllipseGeometry RadiusX="20" RadiusY="45" Center="50,50" />
              <EllipseGeometry RadiusX="45" RadiusY="20" Center="50,50" />
            </GeometryGroup>
          </GeometryDrawing.Geometry>
          <GeometryDrawing.Pen>
            <Pen Brush="Gray" Thickness="10" />
          </GeometryDrawing.Pen>
        </GeometryDrawing>
      </DrawingBrush.Drawing>
    </DrawingBrush>
  </Rectangle.Fill>
</Rectangle>
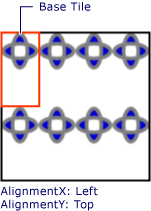
DrawingBrush를 왼쪽 위 모서리에 맞춥니다.
다음 예제는 AlignmentX 속성을 Left로, AlignmentY 속성을 Top으로 설정하여 DrawingBrush의 콘텐츠를 타일의 왼쪽 위 모서리에 맞춥니다. 또한 DrawingBrush의 Viewport와 TileMode를 설정하여 타일 패턴을 생성합니다. 예제의 결과는 다음과 같습니다.

콘텐츠가 기본 타일에서 왼쪽 위에 정렬된 타일 패턴
이 그림에서는 기본 타일을 강조해서 보여 주므로 해당 콘텐츠가 정렬되는 방식을 확인할 수 있습니다. DrawingBrush의 콘텐츠가 기본 타일을 가로로 완전히 채우기 때문에 AlignmentX 설정은 아무 효과가 없습니다.
//
// Create a TileBrush that generates a
// tiled pattern and align its
// content to the top-left of its tile.
//
DrawingBrush tiledTopLeftAlignedTileBrush = new DrawingBrush();
tiledTopLeftAlignedTileBrush.AlignmentX = AlignmentX.Left;
tiledTopLeftAlignedTileBrush.AlignmentY = AlignmentY.Top;
tiledTopLeftAlignedTileBrush.Stretch = Stretch.Uniform;

// Set the brush's Viewport and TileMode to produce a
// tiled pattern.
tiledTopLeftAlignedTileBrush.Viewport = new Rect(0, 0, 0.25, 0.5);
tiledTopLeftAlignedTileBrush.TileMode = TileMode.Tile;

// Define the brush's content.
tiledTopLeftAlignedTileBrush.Drawing = ellipseDrawing;

// Use the brush to paint a rectangle.
Rectangle rectangle3 = new Rectangle();
rectangle3.Width = 150;
rectangle3.Height = 150;
rectangle3.Stroke = Brushes.Black;
rectangle3.StrokeThickness = 2;
rectangle3.Margin = new Thickness(20);
rectangle3.Fill = tiledTopLeftAlignedTileBrush;
'
' Create a TileBrush that generates a
' tiled pattern and align its
' content to the top-left of its tile.
'
Dim tiledTopLeftAlignedTileBrush As New DrawingBrush()
With tiledTopLeftAlignedTileBrush
    .AlignmentX = AlignmentX.Left
    .AlignmentY = AlignmentY.Top
    .Stretch = Stretch.Uniform

    ' Set the brush's Viewport and TileMode to produce a
    ' tiled pattern.
    .Viewport = New Rect(0, 0, 0.25, 0.5)
    .TileMode = TileMode.Tile

    ' Define the brush's content.
    .Drawing = ellipseDrawing
End With

' Use the brush to paint a rectangle.
Dim rectangle3 As New Rectangle()
With rectangle3
    .Width = 150
    .Height = 150
    .Stroke = Brushes.Black
    .StrokeThickness = 2
    .Margin = New Thickness(20)
    .Fill = tiledTopLeftAlignedTileBrush
End With
<Rectangle
 Width="150" Height="150"
 Stroke="Black" StrokeThickness="2"
 Margin="20">
  <Rectangle.Fill>

    <!-- This brush's content is aligned to the top left
         of its tile.  -->
    <DrawingBrush
      Stretch="Uniform"
      Viewport="0,0,0.25,0.5"
      TileMode="Tile"
      AlignmentX="Left"
      AlignmentY="Top">
      <DrawingBrush.Drawing>
        <GeometryDrawing Brush="MediumBlue">
          <GeometryDrawing.Geometry>
            <GeometryGroup>
              <EllipseGeometry RadiusX="20" RadiusY="45" Center="50,50" />
              <EllipseGeometry RadiusX="45" RadiusY="20" Center="50,50" />
            </GeometryGroup>
          </GeometryDrawing.Geometry>
          <GeometryDrawing.Pen>
            <Pen Brush="Gray" Thickness="10" />
          </GeometryDrawing.Pen>
        </GeometryDrawing>
      </DrawingBrush.Drawing>
    </DrawingBrush>
  </Rectangle.Fill>
</Rectangle>
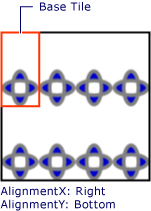
타일식 DrawingBrush를 오른쪽 아래 모서리에 맞춥니다.
마지막 예제는 AlignmentX 속성을 Right로, AlignmentY 속성을 Bottom으로 설정하여 타일식 DrawingBrush의 콘텐츠를 기본 타일의 오른쪽 아래에 맞춥니다. 예제의 결과는 다음과 같습니다.

콘텐츠가 기본 타일에서 오른쪽 아래에 정렬된 타일 패턴
이 경우에도 DrawingBrush의 콘텐츠가 기본 타일을 가로로 완전히 채우기 때문에 AlignmentX 설정은 아무 효과가 없습니다.
//
// Create a TileBrush and align its
// content to the bottom-right of its tile.
//
DrawingBrush bottomRightAlignedTileBrush = new DrawingBrush();
bottomRightAlignedTileBrush.AlignmentX = AlignmentX.Right;
bottomRightAlignedTileBrush.AlignmentY = AlignmentY.Bottom;
bottomRightAlignedTileBrush.Stretch = Stretch.None;

// Define the brush's content.
bottomRightAlignedTileBrush.Drawing = ellipseDrawing;

// Use the brush to paint a rectangle.
Rectangle rectangle2 = new Rectangle();
rectangle2.Width = 150;
rectangle2.Height = 150;
rectangle2.Stroke = Brushes.Red;
rectangle2.StrokeThickness = 2;
rectangle2.Margin = new Thickness(20);
rectangle2.Fill = bottomRightAlignedTileBrush;
'
' Create a TileBrush and align its
' content to the bottom-right of its tile.
'
Dim bottomRightAlignedTileBrush As New DrawingBrush()
With bottomRightAlignedTileBrush
    .AlignmentX = AlignmentX.Right
    .AlignmentY = AlignmentY.Bottom
    .Stretch = Stretch.None

    ' Define the brush's content.
    .Drawing = ellipseDrawing
End With

' Use the brush to paint a rectangle.
Dim rectangle2 As New Rectangle()
With rectangle2
    .Width = 150
    .Height = 150
    .Stroke = Brushes.Red
    .StrokeThickness = 2
    .Margin = New Thickness(20)
    .Fill = bottomRightAlignedTileBrush
End With
<Rectangle
  Width="150" Height="150"
  Stroke="Red" StrokeThickness="2"
  Margin="20">
  <Rectangle.Fill>

    <!-- This brush's content is aligned to the bottom right
         of its tile. -->
    <DrawingBrush
      Stretch="None"
      AlignmentX="Right"
      AlignmentY="Bottom">
      <DrawingBrush.Drawing>
        <GeometryDrawing Brush="MediumBlue">
          <GeometryDrawing.Geometry>
            <GeometryGroup>
              <EllipseGeometry RadiusX="20" RadiusY="45" Center="50,50" />
              <EllipseGeometry RadiusX="45" RadiusY="20" Center="50,50" />
            </GeometryGroup>
          </GeometryDrawing.Geometry>
          <GeometryDrawing.Pen>
            <Pen Brush="Gray" Thickness="10" />
          </GeometryDrawing.Pen>
        </GeometryDrawing>
      </DrawingBrush.Drawing>
    </DrawingBrush>
  </Rectangle.Fill>
</Rectangle>
이 예제들은 DrawingBrush 개체를 사용하여 AlignmentX 및 AlignmentY 속성이 사용되는 방법을 보여 줍니다. 이러한 속성은 모든 타일 브러시(DrawingBrush, ImageBrush, VisualBrush)에서 동일하게 동작합니다. 타일 브러시에 대한 자세한 내용은 이미지, 그림 및 시각적 표시로 그리기를 참조하세요.
참고 항목
.NET Desktop feedback
