방법: Windows Forms ListView 컨트롤에서 항목 그룹화
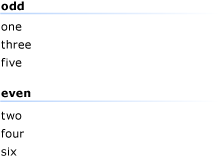
ListView 컨트롤의 그룹화 기능을 사용하면 관련 항목 집합을 그룹에 표시할 수 있습니다. 이러한 그룹은 화면에서 그룹 제목이 포함된 가로 그룹 헤더로 구분됩니다. ListView 그룹을 사용하면 항목을 사전순, 날짜순 또는 다른 논리 그룹화순으로 그룹화하여 큰 목록을 더 쉽게 탐색할 수 있습니다. 다음 이미지는 그룹화된 일부 항목을 보여줍니다.
그룹화를 활성화하려면 먼저 디자이너에서 또는 프로그래밍 방식으로 하나 이상의 그룹을 만들어야 합니다. 그룹이 정의되면 ListView 항목을 그룹에 할당할 수 있습니다. 항목을 한 그룹에서 다른 그룹으로 프로그래밍 방식으로 이동할 수 있습니다.
그룹을 추가하려면
-
// Adds a new group that has a left-aligned header
listView1.Groups.Add(new ListViewGroup("List item text",
    HorizontalAlignment.Left));
' Adds a new group that has a left-aligned header ListView1.Groups.Add(New ListViewGroup("Group 1", _ HorizontalAlignment.Left))
그룹을 제거하려면
Groups 컬렉션의 RemoveAt 또는 Clear 메서드를 사용합니다.
RemoveAt 메서드는 단일 그룹을 제거합니다. Clear 메서드는 목록에서 모든 그룹을 제거합니다.
참고
그룹을 제거해도 해당 그룹 내의 항목은 제거되지 않습니다.
// Removes the first group in the collection.
listView1.Groups.RemoveAt(0);
// Clears all groups.
listView1.Groups.Clear();
' Removes the first group in the collection. ListView1.Groups.RemoveAt(0) ' Clears all groups: ListView1.Groups.Clear()
그룹에 항목을 할당하거나 그룹 간에 항목을 이동하려면
개별 항목의 ListViewItem.Group 속성을 설정합니다.
// Adds the first item to the first group
listView1.Items[0].Group = listView1.Groups[0];
' Adds the first item to the first group ListView1.Items.Item(0).Group = ListView1.Groups(0)
참고 항목
GitHub에서 Microsoft와 공동 작업
이 콘텐츠의 원본은 GitHub에서 찾을 수 있으며, 여기서 문제와 끌어오기 요청을 만들고 검토할 수도 있습니다. 자세한 내용은 참여자 가이드를 참조하세요.
.NET Desktop feedback
피드백
출시 예정: 2024년 내내 콘텐츠에 대한 피드백 메커니즘으로 GitHub 문제를 단계적으로 폐지하고 이를 새로운 피드백 시스템으로 바꿀 예정입니다. 자세한 내용은 다음을 참조하세요. https://aka.ms/ContentUserFeedback
다음에 대한 사용자 의견 제출 및 보기