개요
Microsoft Entra 확인된 ID에는 요청 서비스 REST API가 포함됩니다. 이 API를 사용하면 자격 증명을 발급하고 확인할 수 있습니다. 이 문서에서는 요청 서비스 REST API 사용을 시작하는 방법을 보여 줍니다.
API 액세스 토큰
애플리케이션이 요청 서비스 REST API에 액세스할 수 있도록 필요한 권한이 있는 유효한 액세스 토큰을 포함해야 합니다. Microsoft ID 플랫폼에서 발급한 액세스 토큰에는 요청 서비스 REST API가 호출자의 유효성을 검사하는 데 사용하는 정보(범위)가 포함됩니다. 액세스 토큰은 호출자가 요청하는 작업을 수행할 수 있는 적절한 권한을 갖도록 합니다.
액세스 토큰을 가져오려면 앱이 Microsoft ID 플랫폼에 등록되고 관리자가 요청 서비스 REST API에 대한 액세스 권한을 부여받아야 합니다.
verifiable-credentials-app 애플리케이션을 등록하지 않은 경우, 앱을 등록하는 방법을 참조하고 애플리케이션 비밀을 생성하십시오.
액세스 토큰 가져오기
OAuth 2.0 클라이언트 자격 증명 부여 흐름 사용하여 Microsoft ID 플랫폼을 사용하여 액세스 토큰을 획득합니다. 이 목적을 위해 신뢰할 수 있는 라이브러리를 사용합니다. 이 자습서에서는 MSAL(Microsoft 인증 라이브러리)을 사용합니다. MSAL은 보안 웹 API를 호출할 수 있는 앱에 인증 및 권한 부여 추가를 간소화합니다.
POST /{tenant}/oauth2/v2.0/token HTTP/1.1           //Line breaks for clarity
Host: login.microsoftonline.com
Content-Type: application/x-www-form-urlencoded

client_id=00001111-aaaa-2222-bbbb-3333cccc4444
&scope=3db474b9-6a0c-4840-96ac-1fceb342124f/.default
&client_secret=sampleCredentia1s
&grant_type=client_credentials
// Initialize MSAL library by using the following code
ConfidentialClientApplicationBuilder.Create(AppSettings.ClientId)
    .WithClientSecret(AppSettings.ClientSecret)
    .WithAuthority(new Uri(AppSettings.Authority))
    .Build();

// Acquire an access token
result = await app.AcquireTokenForClient(AppSettings.Scopes)
                .ExecuteAsync();
// Initialize MSAL library by using the following code
const msalConfig = {
  auth: {
      clientId: config.azClientId,
      authority: `https://login.microsoftonline.com/${config.azTenantId}`,
      clientSecret: config.azClientSecret,
  },
  system: {
      loggerOptions: {
          loggerCallback(loglevel, message, containsPii) {
              console.log(message);
          },
          piiLoggingEnabled: false,
          logLevel: msal.LogLevel.Verbose,
      }
  }
};
const cca = new msal.ConfidentialClientApplication(msalConfig);
const msalClientCredentialRequest = {
  scopes: ["3db474b9-6a0c-4840-96ac-1fceb342124f/.default"],
  skipCache: false,
};
module.exports.msalCca = cca;
module.exports.msalClientCredentialRequest = msalClientCredentialRequest;

// Acquire an access token
const result = await mainApp.msalCca.acquireTokenByClientCredential(mainApp.msalClientCredentialRequest);
    if ( result ) {
      accessToken = result.accessToken;
    }
# Initialize MSAL library by using the following code
msalCca = msal.ConfidentialClientApplication( config["azClientId"],
    authority="https://login.microsoftonline.com/" + config["azTenantId"],
    client_credential=config["azClientSecret"],
    )

# Acquire an access token
accessToken = ""
result = msalCca.acquire_token_for_client( scopes="3db474b9-6a0c-4840-96ac-1fceb342124f/.default" )
if "access_token" in result:
    accessToken = result['access_token']
// Initialize MSAL library by using the following code
ConfidentialClientApplication app = ConfidentialClientApplication.builder(
                clientId,
                ClientCredentialFactory.createFromSecret(clientSecret))
                .authority(authority)
                .build();

// Acquire an access token
ClientCredentialParameters clientCredentialParam = ClientCredentialParameters.builder(
                Collections.singleton(scope))
                .build();
CompletableFuture<IAuthenticationResult> future = app.acquireToken(clientCredentialParam);
IAuthenticationResult result = future.get();
return result.accessToken();
앞의 코드에서 다음 매개 변수를 제공합니다.
| 매개 변수 |
조건 |
묘사 |
| 권위 |
필수 |
애플리케이션이 작동할 예정인 디렉터리 테넌트입니다. 예: https://login.microsoftonline.com/{your-tenant}. (your-tenant을(를) 테넌트 ID 또는 이름로 대체하십시오.) |
| 클라이언트 ID |
필수 |
앱에 할당된 애플리케이션 ID입니다. 이 정보는 앱을 등록한 Azure Portal에서 찾을 수 있습니다. |
| 클라이언트 암호 |
필수 |
앱에 대해 생성한 클라이언트 암호입니다. |
| 범위 |
필수 |
3db474b9-6a0c-4840-96ac-1fceb342124f/.default으로 설정해야 합니다. 이 설정은 역할의 클레임을 가진 VerifiableCredential.Create.All액세스 토큰을 생성합니다. |
콘솔 앱의 ID를 사용하여 액세스 토큰을 가져오는 방법에 대한 자세한 내용은 다음 문서 중 하나를 참조하세요.
클라이언트 암호 대신 인증서를 사용하여 토큰을 요청할 수도 있습니다.
POST /{tenant}/oauth2/v2.0/token HTTP/1.1   //Line breaks for clarity
Host: login.microsoftonline.com
Content-Type: application/x-www-form-urlencoded

client_id=00001111-aaaa-2222-bbbb-3333cccc4444
&scope=3db474b9-6a0c-4840-96ac-1fceb342124f/.default
&client_assertion_type=urn%3Aietf%3Aparams%3Aoauth%3Aclient-assertion-type%3Ajwt-bearer
&client_assertion=eyJhbGciOiJSUzI1NiIsIng1dCI6Imd4OHRHeXN5amNScUtqRlBuZDdSRnd2d1pJMCJ9.eyJ{a lot of characters here}M8U3bSUKKJDEg
&grant_type=client_credentials
// Initialize MSAL library by using the following code
X509Certificate2 certificate = AppSettings.ReadCertificate(AppSettings.CertificateName);
    app = ConfidentialClientApplicationBuilder.Create(AppSettings.ClientId)
        .WithCertificate(certificate)
        .WithAuthority(new Uri(AppSettings.Authority))
        .Build();

// Acquire an access token
result = await app.AcquireTokenForClient(AppSettings.Scopes)
                .ExecuteAsync();
// Initialize MSAL library by using the following code
const msalConfig = {
  auth: {
      clientId: config.azClientId,
      authority: `https://login.microsoftonline.com/${config.azTenantId}`,
      clientCertificate: {
            thumbprint: "CERT_THUMBPRINT", // a 40-digit hexadecimal string
            privateKey: "CERT_PRIVATE_KEY"
        }
  },
  system: {
      loggerOptions: {
          loggerCallback(loglevel, message, containsPii) {
              console.log(message);
          },
          piiLoggingEnabled: false,
          logLevel: msal.LogLevel.Verbose,
      }
  }
};
const cca = new msal.ConfidentialClientApplication(msalConfig);
const msalClientCredentialRequest = {
  scopes: ["3db474b9-6a0c-4840-96ac-1fceb342124f/.default"],
  skipCache: false,
};
module.exports.msalCca = cca;
module.exports.msalClientCredentialRequest = msalClientCredentialRequest;

// Acquire an access token
const result = await mainApp.msalCca.acquireTokenByClientCredential(mainApp.msalClientCredentialRequest);
    if ( result ) {
      accessToken = result.accessToken;
    }
# Initialize MSAL library by using the following code
with open(config["azCertificatePrivateKeyLocation"], "rb") as file:
    private_key = file.read()
with open(config["azCertificateLocation"]) as file:
    public_certificate = file.read()
cert = load_pem_x509_certificate(data=bytes(public_certificate, 'UTF-8'), backend=default_backend())
thumbprint = (cert.fingerprint(hashes.SHA1()).hex())
msalCca = msal.ConfidentialClientApplication( config["azClientId"],
    authority="https://login.microsoftonline.com/" + config["azTenantId"],
    client_credential={
        "private_key": private_key,
        "thumbprint": thumbprint,
        "public_certificate": public_certificate
    }
)
# Acquire an access token
accessToken = ""
result = msalCca.acquire_token_for_client( scopes="3db474b9-6a0c-4840-96ac-1fceb342124f/.default" )
if "access_token" in result:
    accessToken = result['access_token']
// Initialize MSAL library by using the following code
PKCS8EncodedKeySpec spec = new PKCS8EncodedKeySpec(Files.readAllBytes(Paths.get(certKeyLocation)));
PrivateKey key = KeyFactory.getInstance("RSA").generatePrivate(spec);
java.io.InputStream certStream = (java.io.InputStream)new ByteArrayInputStream(Files.readAllBytes(Paths.get(certLocation)));
X509Certificate cert = (X509Certificate) CertificateFactory.getInstance("X.509").generateCertificate(certStream);
ConfidentialClientApplication app = ConfidentialClientApplication.builder(
                clientId,
                ClientCredentialFactory.createFromCertificate(key, cert))
                .authority(authority)
                .build();
// Acquire an access token
ClientCredentialParameters clientCredentialParam = ClientCredentialParameters.builder(
                Collections.singleton(scope))
                .build();
CompletableFuture<IAuthenticationResult> future = app.acquireToken(clientCredentialParam);
IAuthenticationResult result = future.get();
return result.accessToken();
API 호출
확인 가능한 자격 증명을 발급하거나 확인하려면 다음을 수행합니다.
요청 서비스 REST API에 대한 HTTP POST 요청을 생성합니다. 테넌트 ID는 액세스 토큰에 클레임으로 존재하기 때문에 URL에 더 이상 필요하지 않습니다.
문제
POST https://verifiedid.did.msidentity.com/v1.0/verifiableCredentials/createIssuanceRequest
을 확인하십시오
POST https://verifiedid.did.msidentity.com/v1.0/verifiableCredentials/createPresentationRequest
HTTP 요청의 권한 부여 헤더에 액세스 토큰을 전달자 토큰으로 연결합니다.
Authorization: Bearer <token>
Content-Type 헤더를 application/json로 설정합니다.
요청 본문에 발급 또는 프레젠테이션 요청 페이로드를 준비하고 연결합니다.
요청 서비스 REST API에 요청을 제출합니다.
Request Service API는 성공적인 호출에 대한 HTTP 상태 코드 201 Created 반환합니다. API 호출에서 오류가 반환되면, 오류 참조 설명서를참조하여 확인합니다.
발급 요청 예제
다음 예제에서는 확인 가능한 자격 증명 발급 요청을 보여 줍니다. 페이로드에 대한 자세한 내용은 Request Service REST API 발급 사양참조하세요.
POST https://verifiedid.did.msidentity.com/v1.0/verifiableCredentials/createIssuanceRequest
Content-Type: application/json
Authorization: Bearer  <token>

{...JSON payload...}
idTokenHint 증명 흐름을 사용하는 발급 요청:
{
    "authority": "did:web:verifiedid.contoso.com",
    "callback": {
        "url": "https://contoso.com/api/issuer/issuanceCallback",
        "state": "de19cb6b-36c1-45fe-9409-909a51292a9c",
        "headers": {
            "api-key": "OPTIONAL API-KEY for CALLBACK EVENTS"
        }
    },
    "registration": {
        "clientName": "Verifiable Credential Expert Sample"
    },
    "type": "VerifiedCredentialExpert",
    "manifestUrl": "https://verifiedid.did.msidentity.com/v1.0/00001111-aaaa-2222-bbbb-3333cccc4444/verifiableCredentials/contracts/VerifiedCredentialExpert1",
    "pin": {
        "value": "3539",
        "length": 4
    },
    "claims": {
        "given_name": "Megan",
        "family_name": "Bowen"
    }
}
idTokenHint로 설정하는 증명 흐름을 사용하는 발급 요청:
{
    "authority": "did:web:verifiedid.contoso.com",
    "callback": {
        "url": "https://contoso.com/api/issuer/issuanceCallback",
        "state": "de19cb6b-36c1-45fe-9409-909a51292a9c",
        "headers": {
            "api-key": "OPTIONAL API-KEY for CALLBACK EVENTS"
        }
    },
    "registration": {
        "clientName": "Verifiable Credential Expert Sample"
    },
    "type": "VerifiedCredentialExpert",
    "manifestUrl": "https://verifiedid.did.msidentity.com/v1.0/00001111-aaaa-2222-bbbb-3333cccc4444/verifiableCredentials/contracts/VerifiedCredentialExpert1",
    "pin": {
        "value": "3539",
        "length": 4
    },
    "claims": {
        "given_name": "Megan",
        "family_name": "Bowen"
    },
    "expirationDate": "2024-12-31T23:59:59.000Z"
}
전체 코드는 다음 코드 샘플 중 하나를 참조하세요.
프레젠테이션 요청 예제
다음 예제에서는 확인 가능한 자격 증명 프레젠테이션 요청을 보여 줍니다. 페이로드에 대한 자세한 내용은 Request Service REST API 프레젠테이션 사양참조하세요.
POST https://verifiedid.did.msidentity.com/v1.0/verifiableCredentials/createPresentationRequest
Content-Type: application/json
Authorization: Bearer  <token>

{...JSON payload...}
특정 형식 및 발급자를 사용하는 자격 증명에 대한 프레젠테이션 요청:
{
  "authority": "did:web:verifiedid.contoso.com",
  "callback": {
    "url": "https://contoso.com/api/verifier/presentationCallback",
    "state": "92d076dd-450a-4247-aa5b-d2e75a1a5d58",
    "headers": {
      "api-key": "OPTIONAL API-KEY for CALLBACK EVENTS"
    }
  },
  "registration": {
    "clientName": "Veritable Credential Expert Verifier"
  },
  "includeReceipt": true,
  "requestedCredentials": [
    {
      "type": "VerifiedCredentialExpert",
      "purpose": "So we can see that you are a veritable credentials expert",
      "acceptedIssuers": [
        "did:web:verifiedid.contoso.com"
      ],
      "configuration": {
        "validation": {
          "allowRevoked": true,
          "validateLinkedDomain": true
        }
      }
    }
  ]
}
제약 조건을 가진 클레임의 프레젠테이션 요청:
{
  "authority": "did:web:verifiedid.contoso.com",
  "includeReceipt": false,
  "registration": {
    "clientName": "Contoso Job Application Center",
    "purpose": "Provide proof of attended courses"
  },
  "callback": {
    "url": "https://contoso.com/api/verifier/presentationCallback",
    "state": "92d076dd-450a-4247-aa5b-d2e75a1a5d58",
    "headers": {
      "api-key": "OPTIONAL API-KEY for CALLBACK EVENTS"
    }
  },
  "requestedCredentials": [
    {
      "type": "FabrikamCourseCertification",
      "acceptedIssuers": [ "did:web:learn.fabrikam.com" ],
      "constraints": [
        {
          "claimName": "courseCode",
          "values": ["FC100", "FC110", "FC150"],
        },
        {
          "claimName": "courseTitle",
          "contains": "network",
        }
      ],
      "configuration": {
        "validation": {
          "allowRevoked": false,
          "validateLinkedDomain": true
        }
      }
    }
  ]
}
FaceCheck를 사용한 프레젠테이션 요청입니다. FaceCheck를 사용할 때, 영수증이 FaceCheck에서 지원되지 않으므로 includeReceipt는 false여야 합니다.
{
  "authority": "did:web:verifiedid.contoso.com",
  "includeReceipt": false,
  "registration": {
    "clientName": "Contoso Job Application Center",
    "purpose": "Provide proof of attended courses"
  },
  "callback": {
    "url": "https://contoso.com/api/verifier/presentationCallback",
    "state": "92d076dd-450a-4247-aa5b-d2e75a1a5d58",
    "headers": {
      "api-key": "OPTIONAL API-KEY for CALLBACK EVENTS"
    }
  },
  "requestedCredentials": [
    {
      "type": "VerifiedEmployee",
      "acceptedIssuers": [ "did:web:learn.contoso.com" ],
      "configuration": {
        "validation": {
          "allowRevoked": false,
          "validateLinkedDomain": true,
          "faceCheck": {
            "sourcePhotoClaimName": "photo",
            "matchConfidenceThreshold": 70
          }
        }
      }
    }
  ]
}
전체 코드는 다음 코드 샘플 중 하나를 참조하세요.
콜백 이벤트
요청 페이로드에는 발급 및 프레젠테이션 콜백 엔드포인트가 포함됩니다. 엔드포인트는 웹 애플리케이션의 일부이며 HTTPS 프로토콜을 통해 공개적으로 사용할 수 있어야 합니다. 요청 서비스 API는 엔드포인트를 호출하여 특정 이벤트에 대해 앱에 알릴 수 있습니다. 예를 들어 사용자가 QR 코드를 스캔하거나, 인증자 앱에 대한 딥 링크를 사용하거나, 프레젠테이션 프로세스를 완료할 때 이러한 이벤트가 발생할 수 있습니다.
다음 도표는 앱이 Request Service REST API에 호출하는 과정과 애플리케이션으로의 콜백을 설명합니다.
API 및 콜백 이벤트에 대한 호출을 보여 주는 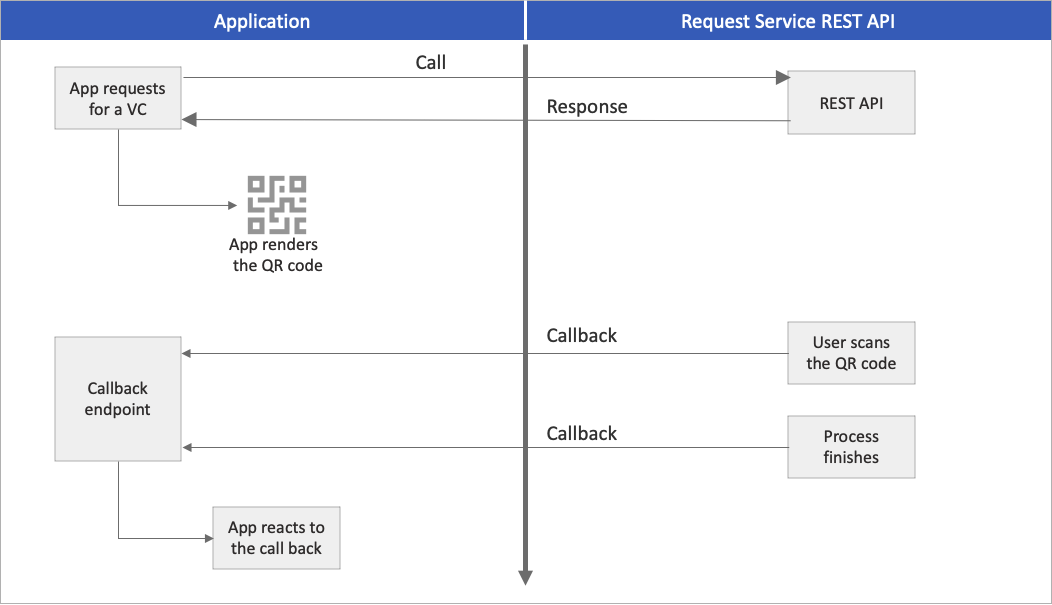
들어오는 HTTP POST 요청을 수신 대기하도록 엔드포인트를 구성합니다. 다음 코드 조각은 발급 콜백 HTTP 요청을 처리하는 방법과 그에 따라 UI를 업데이트하는 방법을 보여 줍니다.
적용할 수 없습니다. 다른 프로그래밍 언어 중 하나를 선택합니다.
[HttpPost]
public async Task<ActionResult> IssuanceCallback()
{
try
{
    string content = new System.IO.StreamReader(this.Request.Body).ReadToEndAsync().Result;
    _log.LogTrace("callback!: " + content);
    JObject issuanceResponse = JObject.Parse(content);

    // More code here
    if (issuanceResponse["code"].ToString() == "request_retrieved")
    {
        var cacheData = new
        {
            status = "request_retrieved",
            message = "QR Code is scanned. Waiting for issuance...",
        };
        _cache.Set(state, JsonConvert.SerializeObject(cacheData));

        // More code here
    }
}
전체 코드는 GitHub 리포지토리의 발급 및 프레젠테이션 코드를 참조하세요.
mainApp.app.post('/api/issuer/issuance-request-callback', parser, async (req, res) => {
  var body = '';
  req.on('data', function (data) {
    body += data;
  });
  req.on('end', function () {
    requestTrace( req );
    console.log( body );
    var issuanceResponse = JSON.parse(body.toString());
    var message = null;

    if ( issuanceResponse.code == "request_retrieved" ) {
      message = "QR Code is scanned. Waiting for issuance to complete...";
    }
    if ( issuanceResponse.code == "issuance_successful" ) {
      message = "Credential successfully issued";
    }
    if ( issuanceResponse.code == "issuance_error" ) {
      message = issuanceResponse.error.message;
    }

    // More code here
    res.send()
  });
  res.send()
})
@app.route("/api/issuer/issuance-request-callback", methods = ['POST'])
def issuanceRequestApiCallback():
    if request.headers['api-key'] != apiKey:
        return Response( jsonify({'error':'api-key wrong or missing'}), status=401, mimetype='application/json')

    issuanceResponse = request.json
    if issuanceResponse["code"] == "request_retrieved":
        cacheData = {
            "status": issuanceResponse["code"],
            "message": "QR Code is scanned. Waiting for issuance to complete..."
        }
        cache.set( issuanceResponse["state"], json.dumps(cacheData) )
        return ""

    if issuanceResponse["code"] == "issuance_successful":
        cacheData = {
            "status": issuanceResponse["code"],
            "message": "Credential successfully issued"
        }
        cache.set( issuanceResponse["state"], json.dumps(cacheData) )
        return ""

    if issuanceResponse["code"] == "issuance_error":
        cacheData = {
            "status": issuanceResponse["code"],
            "message": issuanceResponse["error"]["message"]
        }
        cache.set( issuanceResponse["state"], json.dumps(cacheData) )
        return ""

    return ""
@RequestMapping(value = "/api/issuer/issue-request-callback", method = RequestMethod.POST, produces = "application/json", consumes = "application/json")
    public ResponseEntity<String> issueRequestCallback( HttpServletRequest request
                                                      , @RequestHeader HttpHeaders headers
                                                      , @RequestBody String body ) {
        ObjectMapper objectMapper = new ObjectMapper();
        try {
            if ( !request.getHeader("api-key").equals(apiKey) ) {
                lgr.info( "api-key wrong or missing" );
                return ResponseEntity.status(HttpStatus.UNAUTHORIZED).body( "api-key wrong or missing" );
            }
            JsonNode presentationResponse = objectMapper.readTree( body );
            String code = presentationResponse.path("code").asText();
            ObjectNode data = null;
            if ( code.equals( "request_retrieved" )  ) {
                data = objectMapper.createObjectNode();
                data.put("message", "QR Code is scanned. Waiting for issuance to complete..." );
            }
            if ( code.equals("issuance_successful") ) {
                data = objectMapper.createObjectNode();
                data.put("message", "Credential successfully issued" );
            }
            if ( code.equals( "issuance_error" ) ) {
                data = objectMapper.createObjectNode();
                data.put("message", presentationResponse.path("error").path("message").asText() );
            }
            if ( data != null ) {
                data.put("status", code );
                cache.put( presentationResponse.path("state").asText(), objectMapper.writerWithDefaultPrettyPrinter().writeValueAsString(data) );
            }
        } catch (java.io.IOException ex) {
            ex.printStackTrace();
            return ResponseEntity.status(HttpStatus.BAD_REQUEST).body( "Technical error" );
        }
        return ResponseEntity.ok().body( "{}" );
    }
전체 코드는 GitHub 리포지토리의 발급 및 프레젠테이션 코드를 참조하세요.
다음 단계
이러한 사양에 대해 자세히 알아보세요.