빠른 시작: C#용 PlayFab 클라이언트 라이브러리
C#용 PlayFab 클라이언트 라이브러리를 시작합니다. 단계에 따라 패키지를 설치하고 기본 작업에 대한 예제 코드를 사용해 봅니다.
이 빠른 시작은 C#용 클라이언트 라이브러리를 사용하여 첫 번째 PlayFab API 호출을 수행하는 데 도움을 드립니다.
요구 사항
CSharp 프로젝트 설정
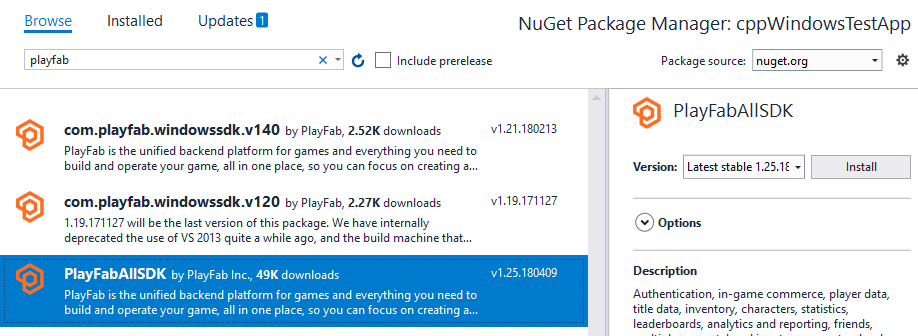
설치
- Visual Studio를 열고 새 프로젝트 만들기를 선택합니다.
- C#용 콘솔 앱(.Net Core)을 선택합니다.
- PlayFabAllSDK용 NuGet 패키지를 설치합니다.
이제 프로젝트를 성공적으로 컴파일할 수 있습니다. 출력 창에는 다음 예제와 같은 항목이 포함되어야 합니다.
1>------ Build started: Project: CSharpGettingStarted, Configuration: Debug Any CPU ------
1>  CSharpGettingStarted -> c:\dev\CSharpGettingStarted\CSharpGettingStarted\bin\Debug\CSharpGettingStarted.exe
========== Build: 1 succeeded, 0 failed, 0 up-to-date, 0 skipped ==========
첫 번째 API 호출 설정
이 가이드에서는 첫 번째 PlayFab API 호출을 수행하는 데 필요한 최소 단계를 제공합니다. 확인은 콘솔 출력을 통해 수행합니다.
새 프로젝트에는 Visual Studio에서 자동으로 생성된 Program.cs라는 파일이 포함되어 있어야 합니다. 해당 파일을 열고 내용을 아래 예제에 있는 코드로 대체합니다(코드를 붙여넣은 후 파일을 표시하기 위해 새로 고쳐야 할 수도 있음). API 호출에 대한 확인은 콘솔 출력에 표시된 메시지를 사용하여 수행됩니다.
using System;
using System.Threading;
using System.Threading.Tasks;
using PlayFab;
using PlayFab.ClientModels;

public static class Program
{
    private static bool _running = true;
    static void Main(string[] args)
    {
        PlayFabSettings.staticSettings.TitleId = "144"; // Please change this value to your own titleId from PlayFab Game Manager

        var request = new LoginWithCustomIDRequest { CustomId = "GettingStartedGuide", CreateAccount = true };
        var loginTask = PlayFabClientAPI.LoginWithCustomIDAsync(request);
        // If you want a synchronous result, you can call loginTask.Wait() - Note, this will halt the program until the function returns

        while (_running)
        {
            if (loginTask.IsCompleted) // You would probably want a more sophisticated way of tracking pending async API calls in a real game
            {
                OnLoginComplete(loginTask);
            }

            // Presumably this would be your main game loop, doing other things
            Thread.Sleep(1);
        }

        Console.WriteLine("Done! Press any key to close");
        Console.ReadKey(); // This halts the program and waits for the user
    }

    private static void OnLoginComplete(Task<PlayFabResult<LoginResult>> taskResult)
    {
        var apiError = taskResult.Result.Error;
        var apiResult = taskResult.Result.Result;

        if (apiError != null)
        {
            Console.ForegroundColor = ConsoleColor.Red; // Make the error more visible
            Console.WriteLine("Something went wrong with your first API call.  :(");
            Console.WriteLine("Here's some debug information:");
            Console.WriteLine(PlayFabUtil.GenerateErrorReport(apiError));
            Console.ForegroundColor = ConsoleColor.Gray; // Reset to normal
        }
        else if (apiResult != null)
        {
            Console.WriteLine("Congratulations, you made your first successful API call!");
        }

        _running = false; // Because this is just an example, successful login triggers the end of the program
    }
}
완료 및 실행
이 프로그램을 실행하면 다음과 같은 출력이 콘솔에 표시됩니다.
“축하합니다. 첫 번째 API 호출을 성공적으로 만들었습니다! 완료! 아무 키나 눌러 종료합니다.”
이제 다른 API 호출을 만들고 게임 빌드를 시작할 수 있습니다.
관리자 유틸리티를 빌드하려면
{CSharpSdk}/PlayFabClientSDK/sources에 있는 PlayFab CSharpSdk zip 파일에서 다른 소스 파일을 확인합니다.
사용 가능한 모든 클라이언트 API 호출 목록이나 기타 여러 문서를 보려면 PlayFab API 참조를 확인하세요.