이 샘플은 매니페스트를 사용하여 웹 템플릿을 확장하고 카드 형식으로 웹 페이지의 제품 리뷰를 표시하는 방법을 보여줍니다.
제품 리뷰를 표시하는 웹 템플릿 구성 요소를 만드는 방법
1단계: 준비
- 일치하는 열(이름, 콘텐츠 및 평가)로 환경에 테이블을 만듭니다
- 테이블의 논리적 이름을 복사합니다.
- 새 테이블에 몇 가지 샘플 레코드를 만듭니다.
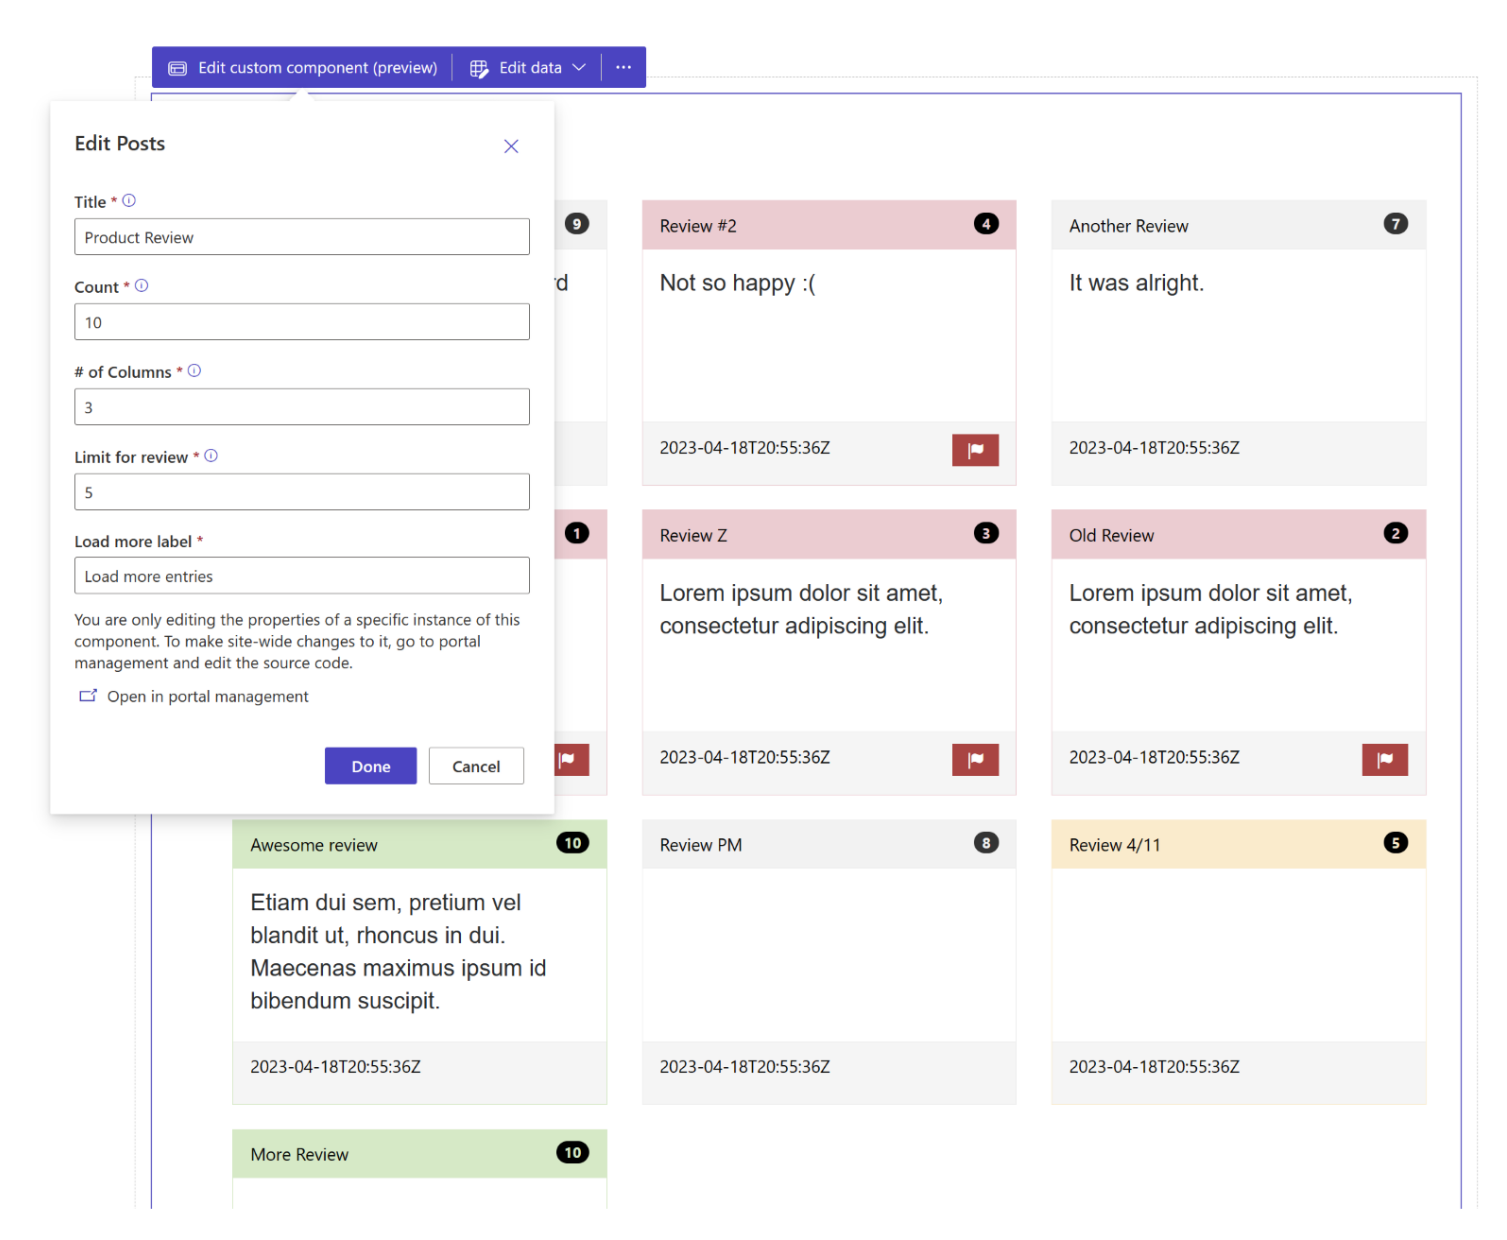
2단계: 웹 템플릿 설정
사용자 환경의 새 웹 템플릿에 소스 코드를 복사합니다. 자세한 내용은 웹 템플릿 구성 요소를 만드는 방법을 참조하세요.
{% fetchxml postsQuery %} <fetch mapping='logical'> <entity name='cr50f_review'> <attribute name='cr50f_name' /> <attribute name='cr50f_content' /> <attribute name='cr50f_rating' /> <attribute name='createdon' /> <order attribute='createdon' descending='false' /> </entity> </fetch> {% endfetchxml %} {% assign posts_count = count | integer %} {% assign column_count = columns | integer %} {% assign cutoff = cutoff | integer %} <h2>{{ name | default: "Feedback entries (default)" }} </h2> <span>Showing {{ posts_count }} out of {{ postsQuery.results.entities.size }}</span> {% if postsQuery.results.entities.size > 0 %} <div class="col-sm-12"> <ul style="list-style:none" class="grid"> {% for post in postsQuery.results.entities limit: posts_count %} <li class="col-md-{{ 12 | divided_by: column_count }}"> <div class="panel panel-{% if post.cr50f_rating < cutoff %}danger{%elsif post.cr50f_rating == cutoff%}warning{%elsif post.cr50f_rating == 10%}success{% else %}default{% endif %}"> <div class="panel-heading">{{ post.cr50f_name }} <span class="badge" style="float:right">{{ post.cr50f_rating }}</span> </div> <div class="panel-body" style="height:150px"> <p>{{ post.cr50f_content }}</p> </div> <div class="panel-footer" style="height:55px"> <span>{{ post.createdon }}</span> {% if post.cr50f_rating < cutoff %} <button type="button" class="btn btn-danger" style="float:right" onclick="alert('Flagging this review!')"> <span class="glyphicon glyphicon-flag" aria-hidden="true"></span> </button> {% endif %} </div> </div> </li> {% endfor %} </ul> </div> {% if postsQuery.results.entities.size > count %} <hr/> <button onclick="alert('Not yet implemented :)')" class="button1" style="margin: 0 auto; display:block">{{ load_more_label | default: "Load More" }}</button> {% endif %} {% endif %} {% manifest %} { "type": "Functional", "displayName": "Posts", "description": "Shows all posts", "tables": ["cr50f_review"], "params": [ { "id": "name", "displayName": "Title", "description": "Let's give it a title" }, { "id": "count", "displayName": "Count", "description": "No. of items" }, { "id": "columns", "displayName": "# of Columns", "description": "less than 12" }, { "id": "cutoff", "displayName": "Limit for review", "description": "Number between 1 and 10" }, { "id": "load_more_label", "displayName": "Load more label", "description": "" } ] } {% endmanifest %}cr50f의 모든 인스턴스를 새 테이블의 스키마 이름으로 바꿉니다. 이것은 fetchXML 속성과 HTML 및
{% manifest %}전체를 처리해야 합니다.
3단계: 웹 템플릿 사용
- 새 웹 템플릿을 페이지의 페이지 복사본에 추가합니다. 예를 들어 Web용 Visual Studio Code를 사용하여
{% include 'product-reviews' name:'Product Review' count:'15' columns:'3' cutoff:'5' load_more_label:'Load more entries' %}or{% include 'product-reviews' name:'Product Review' count:'3' columns:'3' cutoff:'5' load_more_label:'Load more entries' %}를 추가합니다. - 디자인 스튜디오에서 웹 템플릿의 속성을 편집하고 구성합니다.
- 필요에 따라 여러 웹 페이지에서 구성 요소를 재사용하고 이전 단계를 반복하여 요구 사항에 따라 디스플레이를 구성합니다.
- 새로 만든 테이블의 레코드를 업데이트하려면 데이터 편집을 선택하십시오.