Azure PowerShell 시작
Warning
AzureRM PowerShell 모듈은 2024년 2월 29일부터 공식적으로 사용되지 않습니다. 사용자는 지속적인 지원 및 업데이트를 보장하기 위해 AzureRM에서 Az PowerShell 모듈로 마이그레이션하는 것이 좋습니다.
AzureRM 모듈은 여전히 작동할 수 있지만 더 이상 기본 또는 지원되지 않으므로 사용자의 재량에 따라 계속 사용할 수 있습니다. Az 모듈로 전환하는 방법에 대한 지침은 마이그레이션 리소스를 참조하세요.
Azure PowerShell은 명령줄에서 Azure 리소스를 관리하고 관리하며 Azure Resource Manager에 대해 작동하는 자동화 스크립트를 빌드하기 위해 설계되었습니다. Azure Cloud Shell을 사용하여 브라우저에서 사용하거나 로컬 컴퓨터에 설치할 수 있습니다. 이 문서는 Azure PowerShell을 시작하는 데 도움이 되며 그 뒤에 있는 핵심 개념을 설명합니다.
Azure PowerShell 설치
첫 번째 단계는 최신 버전의 Azure PowerShell이 설치되어 있는지 확인하는 것입니다. 최신 릴리스에 대한 자세한 내용은 릴리스 정보를 참조하세요.
설치가 완료되었는지 확인하려면 PowerShell에서
Get-InstalledModule -Name AzureRM -AllVersions를 실행합니다.
Azure Cloud Shell
가장 간단하게 시작하는 방법은 Cloud Shell을 실행하는 것입니다.
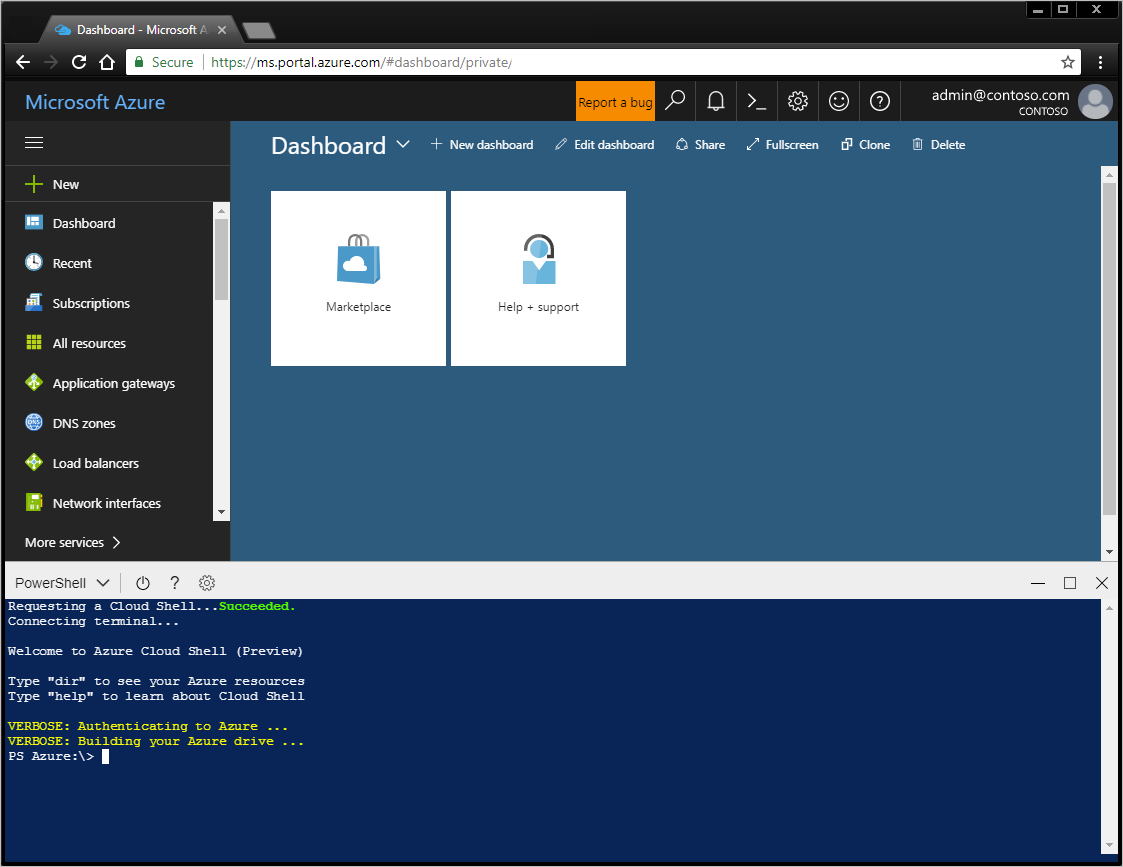
Azure Portal의 위쪽 탐색 모음에서 Cloud Shell을 시작합니다.

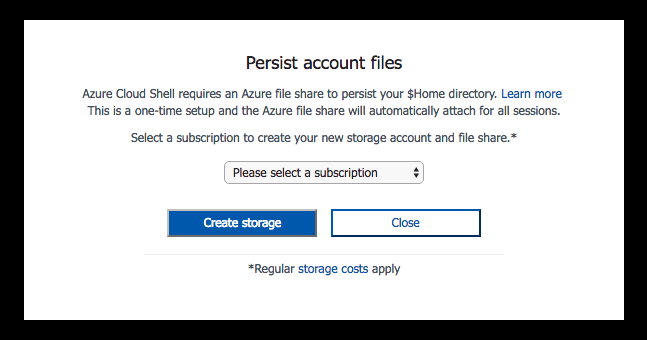
사용하려는 구독을 선택하고 스토리지 계정을 만듭니다.
스토리지가 만들어지면 Cloud Shell이 브라우저에서 PowerShell 세션을 엽니다.
Azure PowerShell을 설치하고 PowerShell 세션에서 로컬로 사용할 수도 있습니다.
Azure에 로그인
대화형으로 로그온:
Connect-AzureRmAccount. Azure 자격 증명을 요청하는 대화 상자가 표시됩니다. 옵션 '-Environment'를 사용하면 Azure 중국 또는 Azure 독일에 대해 인증할 수 있습니다.예를 들어 커넥트-AzureRmAccount -Environment AzureChinaCloud
계정과 연결된 전자 메일 주소 및 암호를 입력합니다. Azure는 자격 증명 정보를 인증하고 저장한 다음 창을 닫습니다.
Azure 계정에 로그인한 후에는 Azure PowerShell cmdlet을 사용하여 구독의 리소스에 액세스하고 관리할 수 있습니다.
간단한 기본값을 사용하여 Windows 가상 머신 만들기
이 cmdlet은 New-AzureRmVM 간소화된 구문을 제공하여 새 가상 머신을 쉽게 만들 수 있습니다. 제공해야 하는 매개 변수 값은 VM의 이름과 VM의 로컬 관리자 계정에 대한 자격 증명 집합입니다.
먼저 자격 증명 개체를 만듭니다.
$cred = Get-Credential -Message 'Enter a username and password for the virtual machine.'
Windows PowerShell credential request.
Enter a username and password for the virtual machine.
User: localAdmin
Password for user localAdmin: *********
다음으로 VM을 만듭니다.
New-AzureRmVM -Name SampleVM -Credential $cred
ResourceGroupName        : SampleVM
Id                       : /subscriptions/XXXXXXXX-XXXX-XXXX-XXXX-XXXXXXXXXXXX/resourceGroups/SampleVM/providers/Microsoft.Compute/virtualMachines/SampleVM
VmId                     : 43f6275d-ce50-49c8-a831-5d5974006e63
Name                     : SampleVM
Type                     : Microsoft.Compute/virtualMachines
Location                 : eastus
Tags                     : {}
HardwareProfile          : {VmSize}
NetworkProfile           : {NetworkInterfaces}
OSProfile                : {ComputerName, AdminUsername, WindowsConfiguration, Secrets}
ProvisioningState        : Succeeded
StorageProfile           : {ImageReference, OsDisk, DataDisks}
FullyQualifiedDomainName : samplevm-2c0867.eastus.cloudapp.azure.com
생성되는 다른 항목과 VM이 어떻게 구성되어 있는지 궁금할 수 있습니다. 먼저 리소스 그룹을 살펴보겠습니다.
Get-AzureRmResourceGroup |
  Select-Object -Property ResourceGroupName, Location
ResourceGroupName          Location
-----------------          --------
cloud-shell-storage-westus westus
SampleVM                   eastus
cloud-shell-storage-westus 리소스 그룹은 Cloud Shell을 처음 사용할 때 만들어집니다. SampleVM 리소스 그룹은 cmdlet에 New-AzureRmVM 의해 만들어졌습니다.
이제 이 새 리소스 그룹에 어떤 다른 리소스가 만들어졌나요?
Get-AzureRmResource |
  Where ResourceGroupName -eq SampleVM |
    Select-Object -Property ResourceGroupName, Location, ResourceType, Name
ResourceGroupName          Location ResourceType                            Name
-----------------          -------- ------------                            ----
SAMPLEVM                   eastus   Microsoft.Compute/disks                 SampleVM_OsDisk_1_9b286c54b168457fa1f8c47...
SampleVM                   eastus   Microsoft.Compute/virtualMachines       SampleVM
SampleVM                   eastus   Microsoft.Network/networkInterfaces     SampleVM
SampleVM                   eastus   Microsoft.Network/networkSecurityGroups SampleVM
SampleVM                   eastus   Microsoft.Network/publicIPAddresses     SampleVM
SampleVM                   eastus   Microsoft.Network/virtualNetworks       SampleVM
VM에 대한 자세한 내용을 살펴보겠습니다. 이 예제에서는 VM을 만드는 데 사용되는 OS 이미지에 대한 정보를 검색하는 방법을 보여줍니다.
Get-AzureRmVM -Name SampleVM -ResourceGroupName SampleVM |
  Select-Object -ExpandProperty StorageProfile |
    Select-Object -ExpandProperty ImageReference
Publisher : MicrosoftWindowsServer
Offer     : WindowsServer
Sku       : 2016-Datacenter
Version   : latest
Id        :
완벽히 구성된 Linux Virtual Machine 만들기
이전에 사용된 예제에서는 간소화된 구문 및 기본 매개 변수 값을 사용하여 Windows 가상 머신을 만듭니다. 이 예제에서는 가상 머신의 모든 옵션에 대한 값을 제공합니다.
리소스 그룹 만들기
이 예제에서는 리소스 그룹을 만들려고 합니다. Azure의 리소스 그룹은 논리적으로 그룹화하려는 여러 리소스를 관리하는 방법을 제공합니다. 예를 들어 애플리케이션 또는 프로젝트에 대한 리소스 그룹을 만들고 그 안에 가상 머신, 데이터베이스 및 CDN 서비스를 추가할 수 있습니다.
Azure의 westeurope 지역에 "MyResourceGroup"이라는 이름의 리소스 그룹을 만듭니다. 이렇게 하려면 다음 명령을 입력합니다.
New-AzureRmResourceGroup -Name 'myResourceGroup' -Location 'westeurope'
ResourceGroupName : myResourceGroup
Location          : westeurope
ProvisioningState : Succeeded
Tags              :
ResourceId        : /subscriptions/XXXXXXXX-XXXX-XXXX-XXXX-XXXXXXXXXXXX/resourceGroups/myResourceGroup
이 새 리소스 그룹을 사용하여 새 VM에 필요한 리소스를 모두 포함합니다. 새 Linux VM을 만들려면 먼저 필요한 다른 리소스를 만들고 구성에 할당해야 합니다. 그런 다음 해당 구성을 사용하여 VM을 만들 수 있습니다. 또한 사용자 프로필의 .ssh 디렉터리에 이름이 지정된 id_rsa.pub SSH 공개 키가 있어야 합니다.
필요한 네트워크 리소스 만들기
먼저 가상 네트워크 만들기 프로세스와 함께 사용할 서브넷 구성을 만들어야 합니다. 또한 이 VM에 연결할 수 있도록 공용 IP 주소를 만듭니다. 네트워크 보안 그룹을 만들어서 공용 주소에 대한 액세스를 보호합니다. 마지막으로 이전 리소스를 모두 사용하여 가상 NIC를 만듭니다.
# Variables for common values
$resourceGroup = 'myResourceGroup'
$location = 'westeurope'
$vmName = 'myLinuxVM'

# Definer user name and blank password
$securePassword = ConvertTo-SecureString 'azurepassword' -AsPlainText -Force
$cred = New-Object -TypeName System.Management.Automation.PSCredential ('azureuser', $securePassword)

# Create a subnet configuration
$subnetConfig = New-AzureRmVirtualNetworkSubnetConfig -Name mySubnet2 -AddressPrefix 192.168.2.0/24

# Create a virtual network
$vnet = New-AzureRmVirtualNetwork -ResourceGroupName $resourceGroup -Location $location `
  -Name MYvNET2 -AddressPrefix 192.168.0.0/16 -Subnet $subnetConfig

# Create a public IP address and specify a DNS name
$publicIp = New-AzureRmPublicIpAddress -ResourceGroupName $resourceGroup -Location $location `
  -Name "mypublicdns$(Get-Random)" -AllocationMethod Static -IdleTimeoutInMinutes 4
$publicIp | Select-Object Name,IpAddress

# Create an inbound network security group rule for port 22
$nsgRuleSSH = New-AzureRmNetworkSecurityRuleConfig -Name myNetworkSecurityGroupRuleSSH  -Protocol Tcp `
  -Direction Inbound -Priority 1000 -SourceAddressPrefix * -SourcePortRange * -DestinationAddressPrefix * `
  -DestinationPortRange 22 -Access Allow

# Create a network security group
$nsg = New-AzureRmNetworkSecurityGroup -ResourceGroupName $resourceGroup -Location $location `
  -Name myNetworkSecurityGroup2 -SecurityRules $nsgRuleSSH

# Create a virtual network card and associate with public IP address and NSG
$nic = New-AzureRmNetworkInterface -Name myNic2 -ResourceGroupName $resourceGroup -Location $location `
  -SubnetId $vnet.Subnets[0].Id -PublicIpAddressId $publicIp.Id -NetworkSecurityGroupId $nsg.Id
VM 구성 만들기
이제 필요한 리소스가 있으므로 VM 구성 개체를 만들 수 있습니다.
# Create a virtual machine configuration
$vmConfig = New-AzureRmVMConfig -VMName $vmName -VMSize Standard_D1 |
  Set-AzureRmVMOperatingSystem -Linux -ComputerName $vmName -Credential $cred -DisablePasswordAuthentication |
  Set-AzureRmVMSourceImage -PublisherName Canonical -Offer UbuntuServer -Skus 14.04.2-LTS -Version latest |
  Add-AzureRmVMNetworkInterface -Id $nic.Id

# Configure SSH Keys
$sshPublicKey = Get-Content -Raw "$env:USERPROFILE\.ssh\id_rsa.pub"
Add-AzureRmVMSshPublicKey -VM $vmConfig -KeyData $sshPublicKey -Path '/home/azureuser/.ssh/authorized_keys'
가상 머신 만들기
이제 VM 구성 개체를 사용하여 VM을 만들 수 있습니다.
New-AzureRmVM -ResourceGroupName $resourceGroup -Location $location -VM $vmConfig
VM을 만들었으니, SSH를 사용하여 앞에서 만든 VM의 공용 IP 주소로 새 Linux VM에 로그온할 수 있습니다.
ssh xx.xxx.xxx.xxx
Welcome to Ubuntu 14.04.4 LTS (GNU/Linux 3.19.0-65-generic x86_64)

 * Documentation:  https://help.ubuntu.com/

  System information as of Sun Feb 19 00:32:28 UTC 2017

  System load: 0.31              Memory usage: 3%   Processes:       89
  Usage of /:  39.6% of 1.94GB   Swap usage:   0%   Users logged in: 0

  Graph this data and manage this system at:
    https://landscape.canonical.com/

  Get cloud support with Ubuntu Advantage Cloud Guest:
    http://www.ubuntu.com/business/services/cloud

0 packages can be updated.
0 updates are security updates.


The programs included with the Ubuntu system are free software;
the exact distribution terms for each program are described in the
individual files in /usr/share/doc/*/copyright.

Ubuntu comes with ABSOLUTELY NO WARRANTY, to the extent permitted by
applicable law.

my-login@MyLinuxVM:../../..$
Azure에서 다른 리소스 만들기
이제 리소스 그룹, Linux VM 및 Windows Server VM을 만드는 방법을 살펴보았습니다. 여러 다른 유형의 Azure 리소스도 만들 수 있습니다.
예를 들어 새로 만든 VM과 연결할 수 있는 Azure 네트워크 부하 분산 장치를 만들려면 다음 create 명령을 사용할 수 있습니다.
New-AzureRmLoadBalancer -Name MyLoadBalancer -ResourceGroupName myResourceGroup -Location westeurope
다음 명령을 사용하여 인프라에 대한 새 프라이빗 Virtual Network(일반적으로 Azure 내의 "VNet"이라고 함)를 만들 수도 있습니다.
$subnetConfig = New-AzureRmVirtualNetworkSubnetConfig -Name mySubnet2 -AddressPrefix 10.0.0.0/16
$vnet = New-AzureRmVirtualNetwork -ResourceGroupName myResourceGroup -Location westeurope `
  -Name MYvNET3 -AddressPrefix 10.0.0.0/16 -Subnet $subnetConfig
Azure와 Azure PowerShell을 강력하게 만드는 이유는 클라우드 기반 인프라를 가져오는 것뿐만 아니라 관리형 플랫폼 서비스를 만드는 데 사용할 수 있다는 것입니다. 또한 관리되는 플랫폼 서비스를 인프라와 결합하여 훨씬 더 강력한 솔루션을 빌드할 수 있습니다.
예를 들어 Azure PowerShell을 사용하여 Azure AppService를 만들 수 있습니다. Azure AppService는 인프라에 대한 걱정 없이 웹앱을 호스트하는 훌륭한 방법을 제공하는 관리형 플랫폼 서비스입니다. Azure 앱Service를 만든 후 다음 명령을 사용하여 AppService 내에 두 개의 새 Azure Web Apps를 만들 수 있습니다.
# Create an Azure AppService that we can host any number of web apps within
New-AzureRmAppServicePlan -Name MyAppServicePlan -Tier Basic -NumberofWorkers 2 -WorkerSize Small -ResourceGroupName myResourceGroup -Location westeurope

# Create Two Web Apps within the AppService (note: name param must be a unique DNS entry)
New-AzureRmWebApp -Name MyWebApp43432 -AppServicePlan MyAppServicePlan -ResourceGroupName myResourceGroup -Location westeurope
New-AzureRmWebApp -Name MyWebApp43433 -AppServicePlan MyAppServicePlan -ResourceGroupName myResourceGroup -Location westeurope
배포된 리소스 나열
cmdlet을 Get-AzureRmResource 사용하여 Azure에서 실행되는 리소스를 나열할 수 있습니다. 다음 예제에서는 새 리소스 그룹에서 생성된 리소스를 표시합니다.
Get-AzureRmResource |
  Where-Object ResourceGroupName -eq myResourceGroup |
    Select-Object Name,Location,ResourceType
Name                                                  Location   ResourceType
----                                                  --------   ------------
myLinuxVM_OsDisk_1_36ca038791f642ba91270879088c249a   westeurope Microsoft.Compute/disks
myWindowsVM_OsDisk_1_f627e6e2bb454c72897d72e9632adf9a westeurope Microsoft.Compute/disks
myLinuxVM                                             westeurope Microsoft.Compute/virtualMachines
myWindowsVM                                           westeurope Microsoft.Compute/virtualMachines
myWindowsVM/BGInfo                                    westeurope Microsoft.Compute/virtualMachines/extensions
myNic1                                                westeurope Microsoft.Network/networkInterfaces
myNic2                                                westeurope Microsoft.Network/networkInterfaces
myNetworkSecurityGroup1                               westeurope Microsoft.Network/networkSecurityGroups
myNetworkSecurityGroup2                               westeurope Microsoft.Network/networkSecurityGroups
mypublicdns245369171                                  westeurope Microsoft.Network/publicIPAddresses
mypublicdns779537141                                  westeurope Microsoft.Network/publicIPAddresses
MYvNET1                                               westeurope Microsoft.Network/virtualNetworks
MYvNET2                                               westeurope Microsoft.Network/virtualNetworks
micromyresomywi032907510                              westeurope Microsoft.Storage/storageAccounts
리소스 삭제
Azure 계정을 클린 이 예제에서 만든 리소스를 제거하려고 합니다. Remove-AzureRm* cmdlet을 사용하여 더 이상 필요 없는 리소스를 삭제할 수 있습니다. 만든 Windows VM을 제거하려면 다음 명령을 사용합니다.
Remove-AzureRmVM -Name myWindowsVM -ResourceGroupName myResourceGroup
리소스를 제거할지 확인하라는 메시지가 표시됩니다.
Confirm
Are you sure you want to remove resource group 'myResourceGroup'
[Y] Yes  [N] No  [S] Suspend  [?] Help (default is "Y"): Y
여러 리소스를 한 번에 삭제할 수도 있습니다. 예를 들어 다음 명령은 지금까지 모든 샘플에 사용한 리소스 그룹 "MyResourceGroup"을 삭제합니다. 그룹의 모든 리소스도 삭제됩니다.
Remove-AzureRmResourceGroup -Name myResourceGroup
Confirm
Are you sure you want to remove resource group 'myResourceGroup'
[Y] Yes  [N] No  [S] Suspend  [?] Help (default is "Y"): Y
자원의 수와 유형에 따라 작업을 완료하는 데 몇 분 정도 걸릴 수 있습니다.
샘플 받기
Azure PowerShell을 사용하는 방법에 대해 자세히 알아보려면 Linux VM, Windows VM, Web Apps 및 SQL Database에 대한 가장 일반적인 스크립트를 검사.