애플리케이션 배포
중요
2020년 3월 이전에 릴리스된 Microsoft Rights Management Service SDK 버전은 더 이상 사용되지 않습니다. 이전 버전을 사용하는 애플리케이션은 2020년 3월 릴리스를 사용하도록 업데이트해야 합니다. 자세한 내용은 사용 중단 알림을 참조하세요.
Microsoft Rights Management Service SDK에 대한 추가 개선 사항은 계획되어 있지 않습니다. 분류, 레이블 지정 및 보호 서비스에 Microsoft Information Protection SDK를 채택하는 것이 좋습니다.
이 예에서는 AIP(Azure Information Protection) 서비스와 상호 작용하는 간단한 콘솔 애플리케이션을 빌드합니다. 이 응용 프로그램은 보호할 문서의 경로를 입력으로 사용하며, 애드혹 정책 또는 Azure 템플릿을 통해 문서를 보호합니다. 그리고 입력에 따라 올바른 정책을 적용하여 정보가 보호되는 문서를 생성합니다. 여기서 사용할 샘플 코드는 Github에서 제공되는 Azure IP 테스트 애플리케이션입니다.
샘플 앱 필수 구성 요소
- 운영 체제: Windows 10, Windows 8, Windows 7, Windows Server 2008, Windows Server 2008 R2 또는 Windows Server 2012
- 프로그래밍 언어: C#(.NET Framework 3.0 이상)
- 개발 환경: Visual Studio 2015 이상
Azure 구성 설정
이 앱용으로 Azure를 설정하려면 테넌트 ID, 대칭 키 및 애플리케이션 계정 ID를 만들어야 합니다.
Azure AD 테넌트 구성
Azure Information Protection 대한 Azure AD 환경을 구성하려면 Azure Information Protection 보호 서비스 활성화의 지침을 따릅니다.
서비스가 활성화되면 다음 단계를 수행하기 위한 PowerShell 구성 요소를 준비해야 합니다. PowerShell을 사용하여 Azure Information Protection 보호 관리를 수행합니다.
테넌트 ID 가져오기
- 관리자로 PowerShell을 실행합니다.
Import-Module AIPService을 실행하여 RMS 모듈을 가져옵니다.Connect-AipService –Verbose를 실행하여 할당된 사용자 자격 증명으로 서비스에 연결합니다.enable-aipservice을 실행하여 RMS가 사용하도록 설정되어 있는지 확인합니다.Get-AipServiceConfiguration을 실행하여 테넌트 ID를 가져옵니다.
BPOSId(테넌트 ID) 값을 기록합니다. 이는 이후 단계에서 필요합니다.
예제 출력
Disconnect-AipServiceService를 실행하여 서비스 연결을 끊습니다.
서비스 주체 만들기
서비스 주체를 만들려면 다음 단계를 수행합니다.
서비스 주체는 서비스가 Microsoft Azure AD에 인증하고 Microsoft Azure AD Rights Management를 사용하여 정보를 보호할 수 있도록 하는 전역적으로 구성된 액세스 제어용 자격 증명입니다.
- 관리자 권한으로 PowerShell을 실행합니다.
Import-Module MSOnline을 사용하여 Microsoft Azure AD 모듈을 가져옵니다.Connect-MsolService를 실행하여 할당된 사용자 자격 증명으로 온라인 서비스에 연결합니다.New-MsolServicePrincipal을 실행하여 새 서비스 주체를 만듭니다.- 서비스 주체의 이름을 입력하고
나중에 사용할 수 있도록 대칭 키와 애플리케이션 계정 ID를 기록합니다.
예제 출력
- 애플리케이션 계정 ID, 대칭 키 및 테넌트 ID를 애플리케이션 App.config 파일에 추가합니다.
예제 App.config 파일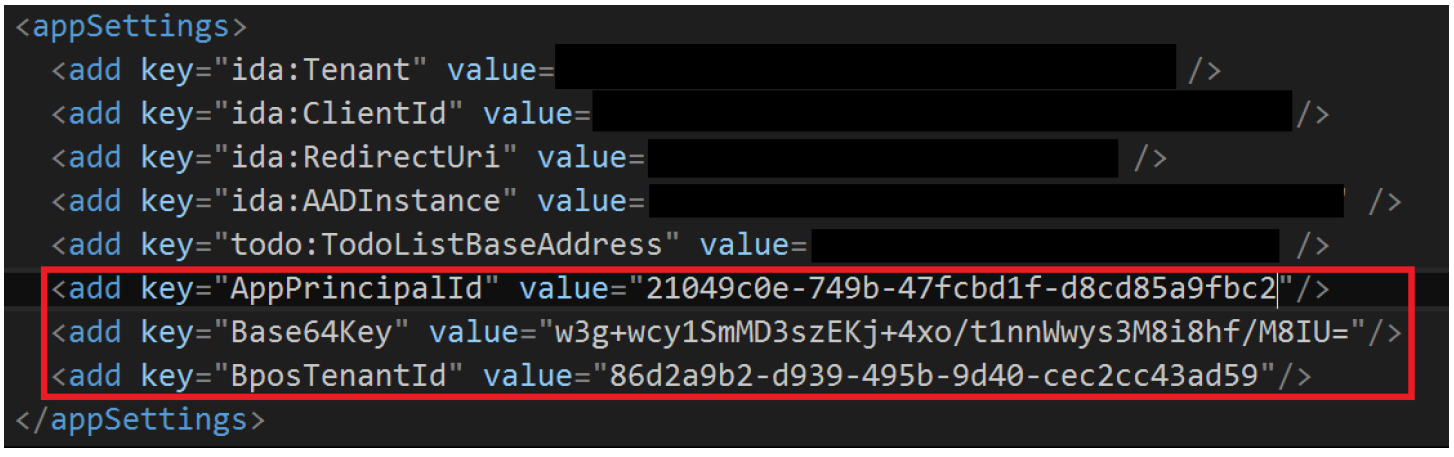
- Azure에서 애플리케이션을 등록할 때부터 ClientID 및 RedirectUri 를 사용할 수 있습니다. Azure에서 애플리케이션을 등록하고 ClientID 및 RedirectUri를 받는 방법에 대한 자세한 내용은 ADAL 인증을 위해 Azure RMS 구성을 참조하세요.
디자인 요약
다음 다이어그램은 여기서 만드는 앱의 아키텍처 및 프로세스 흐름을 보여 줍니다. 이 흐름에 해당하는 단계는 다이어그램 아래에 나와 있습니다.
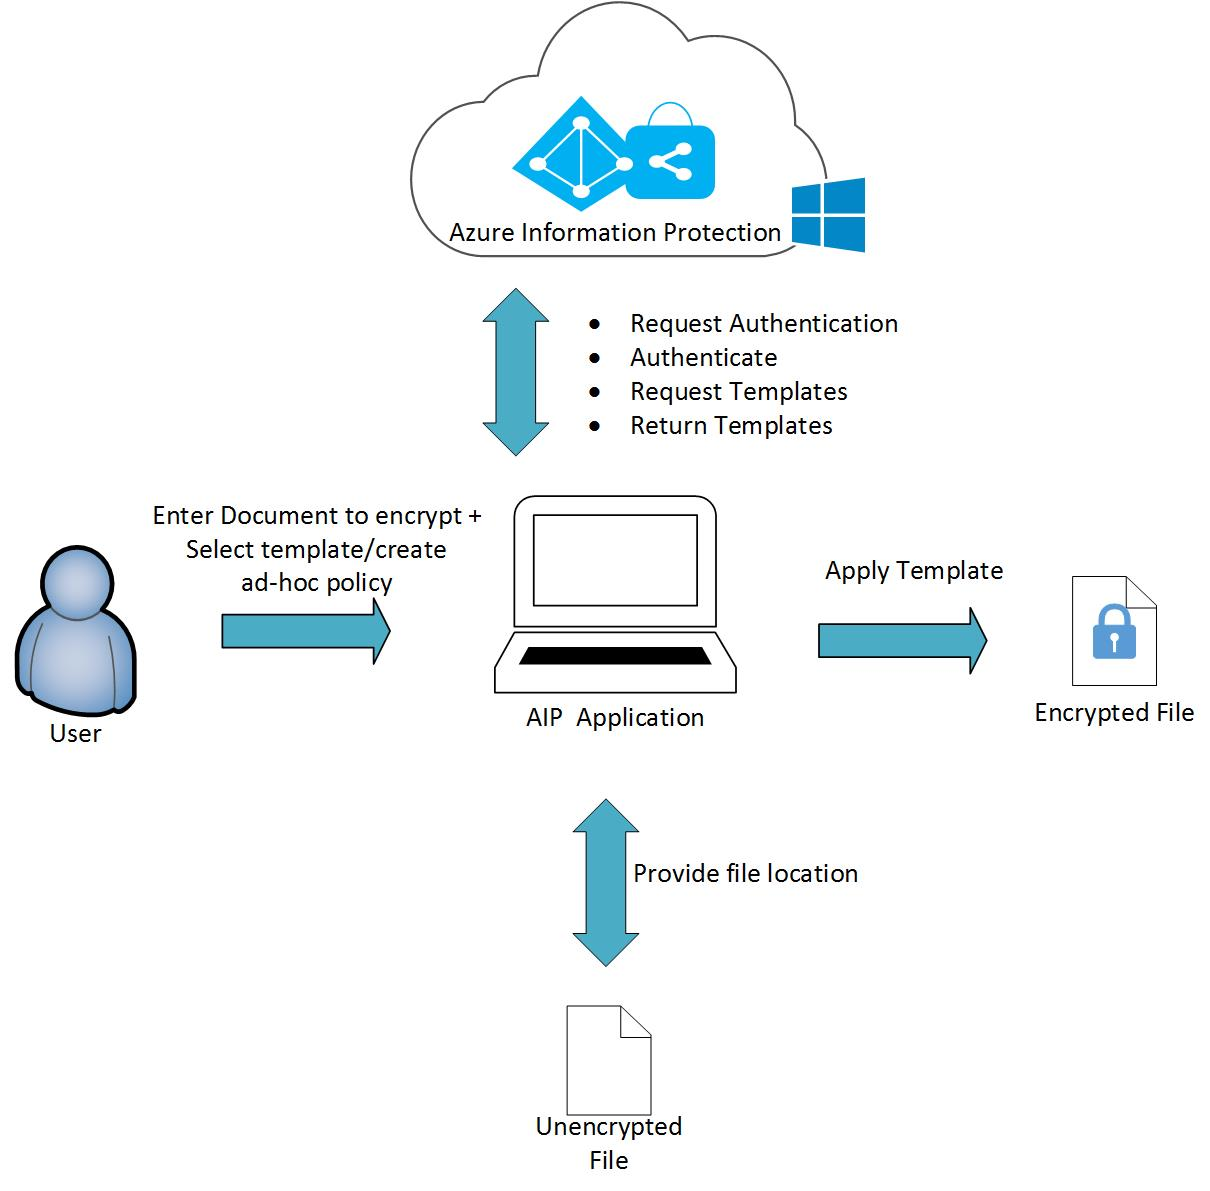
- 사용자가 다음을 수행합니다.
- 보호할 파일의 경로를 입력합니다.
- 템플릿을 선택하거나 애드혹 정책을 만듭니다.
- 애플리케이션이 AIP에 인증을 요청합니다.
- AIP가 인증을 확인합니다.
- 애플리케이션이 AIP에서 템플릿을 요청합니다.
- AIP가 미리 정의된 템플릿을 반환합니다.
- 애플리케이션이 지정된 위치를 사용하여 지정한 파일을 찾습니다.
- 애플리케이션이 AIP 보호 정책을 파일에 적용합니다.
코드의 작동 방식
Azure IP 테스트 샘플에서는 Iprotect.cs 파일을 사용하여 솔루션이 시작됩니다. 이 파일은 C# 콘솔 애플리케이션이며, 다른 AIP 지원 애플리케이션과 마찬가지로 main() 메서드에 나와 있는 MSIPC.dll을 먼저 로드합니다.
//Loads MSIPC.dll
SafeNativeMethods.IpcInitialize();
SafeNativeMethods.IpcSetAPIMode(APIMode.Server);
Azure에 연결하는 데 필요한 매개 변수를 로드합니다.
//Loads credentials for the service principal from App.Config
SymmetricKeyCredential symmetricKeyCred = new SymmetricKeyCredential();
symmetricKeyCred.AppPrincipalId = ConfigurationManager.AppSettings["AppPrincipalId"];
symmetricKeyCred.Base64Key = ConfigurationManager.AppSettings["Base64Key"];
symmetricKeyCred.BposTenantId = ConfigurationManager.AppSettings["BposTenantId"];
콘솔 애플리케이션에서 파일 경로를 입력하면 애플리케이션은 문서가 이미 암호화되어 있는지를 확인합니다. 이때 SafeFileApiNativeMethods 클래스의 메서드가 사용됩니다.
var checkEncryptionStatus = SafeFileApiNativeMethods.IpcfIsFileEncrypted(filePath);
문서가 암호화되어 있지 않으면 응용 프로그램이 프롬프트에서 제공된 선택 항목을 사용하여 문서 암호화를 진행합니다.
if (!checkEncryptionStatus.ToString().ToLower().Contains(alreadyEncrypted))
{
  if (method == EncryptionMethod1)
  {
    //Encrypt a file via AIP template
    ProtectWithTemplate(symmetricKeyCred, filePath);

  }
  else if (method == EncryptionMethod2)
  {
    //Encrypt a file using ad-hoc policy
    ProtectWithAdHocPolicy(symmetricKeyCred, filePath);
  }
}
계속해서 템플릿으로 보호 옵션이 서버에서 템플릿 목록을 가져온 다음 사용자에게 선택 옵션을 제공합니다.
템플릿을 수정하지 않은 경우에는 AIP의 기본 템플릿이 제공됩니다.
public static void ProtectWithTemplate(SymmetricKeyCredential symmetricKeyCredential, string filePath)
{
  // Gets the available templates for this tenant
  Collection<TemplateInfo> templates = SafeNativeMethods.IpcGetTemplateList(null, false, true,
      false, true, null, null, symmetricKeyCredential);

  //Requests tenant template to use for encryption
  Console.WriteLine("Please select the template you would like to use to encrypt the file.");

  //Outputs templates available for selection
  int counter = 0;
  for (int i = 0; i < templates.Count; i++)
  {
    counter++;
    Console.WriteLine(counter + ". " + templates.ElementAt(i).Name + "\n" +
        templates.ElementAt(i).Description);
  }

  //Parses template selection
  string input = Console.ReadLine();
  int templateSelection;
  bool parseResult = Int32.TryParse(input, out templateSelection);

  //Returns error if no template selection is entered
  if (parseResult)
  {
    //Ensures template value entered is valid
    if (0 < templateSelection && templateSelection <= counter)
    {
      templateSelection -= templateSelection;

      // Encrypts the file using the selected template
      TemplateInfo selectedTemplateInfo = templates.ElementAt(templateSelection);

      string encryptedFilePath = SafeFileApiNativeMethods.IpcfEncryptFile(filePath,
          selectedTemplateInfo.TemplateId,
          SafeFileApiNativeMethods.EncryptFlags.IPCF_EF_FLAG_KEY_NO_PERSIST, true, false, true, null,
          symmetricKeyCredential);
    }
  }
}
애드혹 정책을 선택하는 경우 애플리케이션 사용자가 권한을 제공할 사용자의 전자 메일을 입력해야 합니다. 이 섹션에서는 IpcCreateLicenseFromScratch() 메서드를 사용하고 템플릿에 새 정책을 적용하여 라이선스를 만듭니다.
if (issuerDisplayName.Trim() != "")
{
  // Gets the available issuers of rights policy templates.
  // The available issuers is a list of RMS servers that this user has already contacted.
  try
  {
    Collection<TemplateIssuer> templateIssuers = SafeNativeMethods.IpcGetTemplateIssuerList(
                                                    null,
                                                    true,
                                                    false,
                                                    false, true, null, symmetricKeyCredential);

    // Creates the policy and associates the chosen user rights with it
    SafeInformationProtectionLicenseHandle handle = SafeNativeMethods.IpcCreateLicenseFromScratch(
                                                        templateIssuers.ElementAt(0));
    SafeNativeMethods.IpcSetLicenseOwner(handle, owner);
    SafeNativeMethods.IpcSetLicenseUserRightsList(handle, userRights);
    SafeNativeMethods.IpcSetLicenseDescriptor(handle, new TemplateInfo(null, CultureInfo.CurrentCulture,
                                                            policyName,
                                                            policyDescription,
                                                            issuerDisplayName,
                                                            false));

    //Encrypts the file using the ad hoc policy
    string encryptedFilePath = SafeFileApiNativeMethods.IpcfEncryptFile(
                                    filePath,
                                    handle,
                                    SafeFileApiNativeMethods.EncryptFlags.IPCF_EF_FLAG_KEY_NO_PERSIST,
                                    true,
                                    false,
                                    true,
                                    null,
                                    symmetricKeyCredential);
    }
}
사용자 상호 작용 예제
모든 항목을 빌드하여 실행하면 다음과 같은 애플리케이션 출력이 표시됩니다.
암호화 방법을 선택하라는 메시지가 표시됩니다.

보호할 파일의 경로를 입력하라는 메시지가 표시됩니다.

라이선스 소유자의 전자 메일을 입력하라는 메시지가 표시됩니다. 이 소유자에게는 Azure AD 테넌트에 대한 전역 관리자 권한이 있어야 합니다.

파일 액세스 권한을 제공할 사용자의 전자 메일 주소를 공백으로 구분하여 입력합니다.

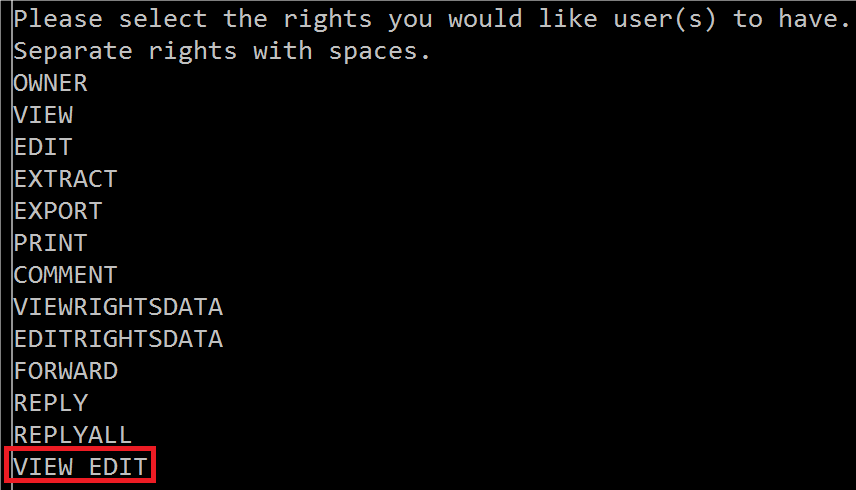
권한 있는 사용자에게 제공할 권한을 권한 목록에서 선택합니다.
마지막으로 정책 이름, 설명 및 발급자(Azure AD 테넌트) 표시 이름 앱 출력과 같은 몇 가지 정책 메타데이터를 입력합니다
