이 자습서에서는 Azure Cognitive Search 및 Visual Studio를 사용하여 검색 인덱스의 결과를 쿼리하고 반환하는 웹앱을 만드는 방법을 보여 줍니다.
이 자습서에서는 다음 방법을 알아봅니다.
- 개발 환경 설정
- 모델 데이터 구조
- 쿼리 입력을 수집하고 결과를 표시하는 웹 페이지 만들기
- 검색 방법 정의
- 앱 테스트
또한 검색 호출이 얼마나 간단한지 알아봅니다. 코드의 핵심 문장은 다음 몇 줄에 포함됩니다.
var options = new SearchOptions()
{
    // The Select option specifies fields for the result set
    options.Select.Add("HotelName");
    options.Select.Add("Description");
};

var searchResult = await _searchClient.SearchAsync<Hotel>(model.searchText, options).ConfigureAwait(false);
model.resultList = searchResult.Value.GetResults().ToList();
한 번의 호출만으로 검색 인덱스를 쿼리하고 결과를 반환합니다.
개요
이 자습서에서는 데이터 가져오기 빠른 시작을 단계별로 실행하여 자체 검색 서비스에서 빠르게 만들 수 있는 hotels-sample-index를 사용합니다. 인덱스에는 모든 검색 서비스에서 기본 제공 데이터 원본으로 사용할 수 있는 가상의 호텔 데이터가 포함되어 있습니다.
이 자습서의 첫 번째 단원에서는 기본 쿼리 구조 및 검색 페이지를 만듭니다. 이 페이지는 페이징, 패싯 및 미리 입력 환경을 포함하도록 후속 단원에서 향상됩니다.
완성된 코드 버전은 다음 프로젝트에서 찾을 수 있습니다.
필수 조건
검색 서비스에서 호스트되는 샘플 인덱스(hotels-sample-index)입니다.
GitHub에서 프로젝트 설치 및 실행
작업 앱으로 이동하려면 아래 단계에 따라 완료된 코드를 다운로드하고 실행합니다.
GitHub에서 샘플을 찾습니다. 첫 번째 앱을 만듭니다.
루트 폴더에서 코드를 선택한 다음, 복제 또는 ZIP 다운로드를 선택하여 프로젝트의 프라이빗 로컬 복사본을 만듭니다.
Visual Studio를 사용하여 기본 검색 페이지("1-basic-search-page")로 이동하여 솔루션을 열고 디버깅하지 않고 시작을 선택하거나 F5 키를 눌러 프로그램을 빌드하고 실행합니다.
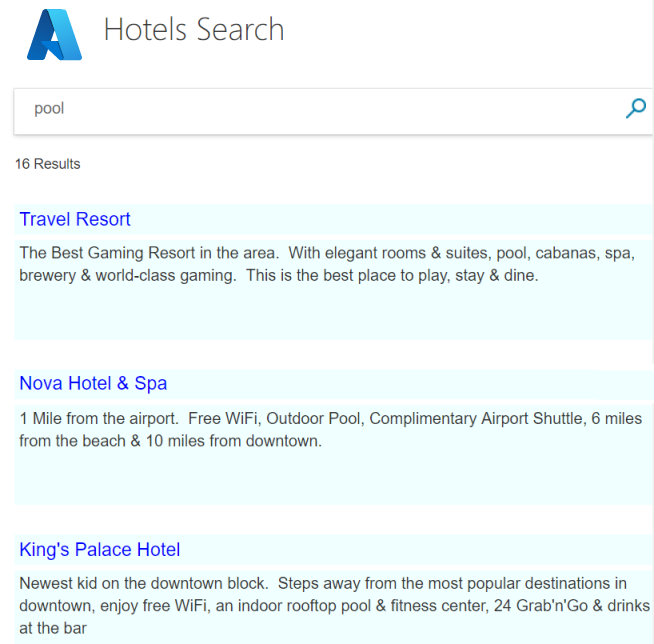
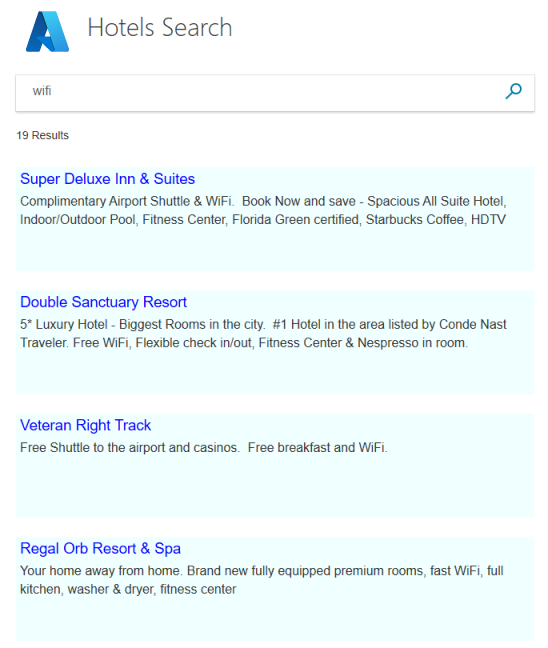
호텔 인덱스이므로 호텔을 검색하는 데 사용할 수 있는 단어(예: "wifi", "view", "bar", "parking")를 입력합니다. 결과를 검사합니다.
보다 정교한 검색을 위한 필수 구성 요소는 이 하나의 앱에 포함되어 있습니다. 검색 개발을 새로 사용하는 경우 이 앱을 단계별로 다시 만들어 워크플로를 알아볼 수 있습니다. 다음 섹션에서는 방법을 보여줍니다.
개발 환경 설정
이 프로젝트를 처음부터 만들고 Azure Cognitive Search의 개념을 강화하려면 Visual Studio 프로젝트로 시작합니다.
Visual Studio에서 새>프로젝트를 선택한 다음, Core Web App(모델View-Controller)을 ASP.NET.
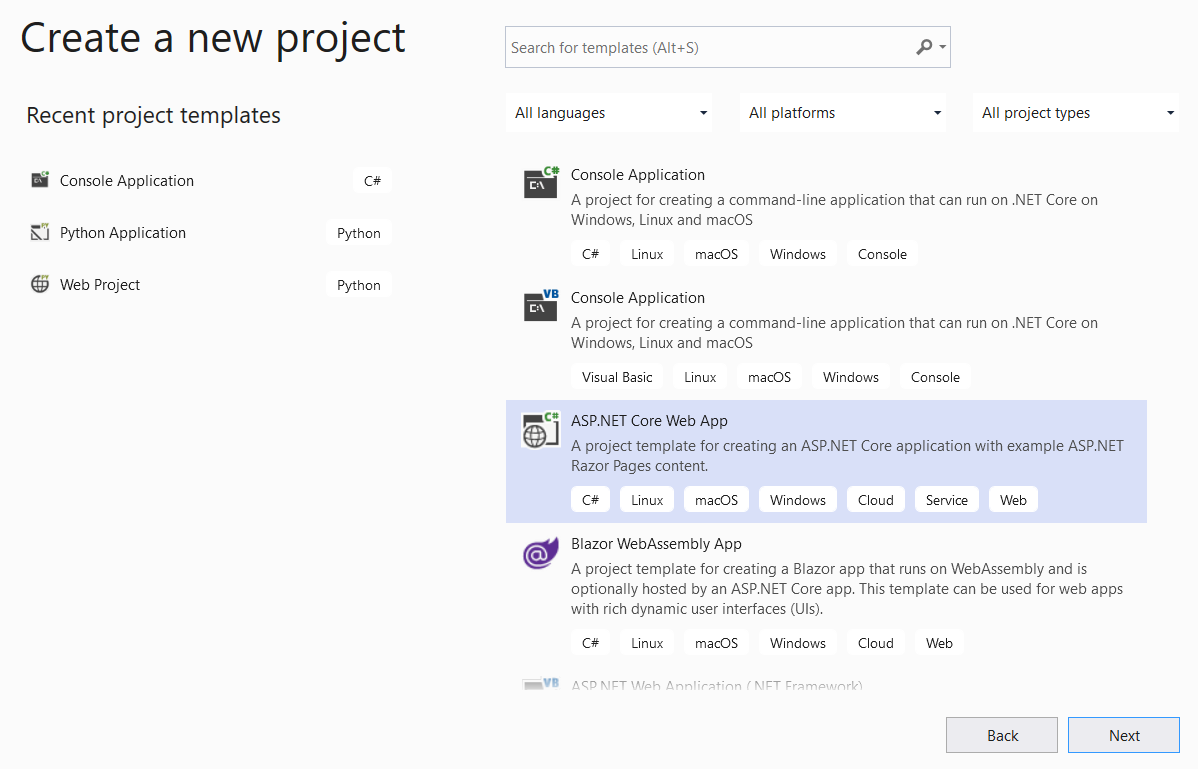
프로젝트에 "FirstSearchApp"과 같은 이름을 지정하고 위치를 설정합니다. 다음을 선택합니다.
대상 프레임워크, 인증 유형 및 HTTPS에 대한 기본값을 적용합니다. 선택하고생성합니다.
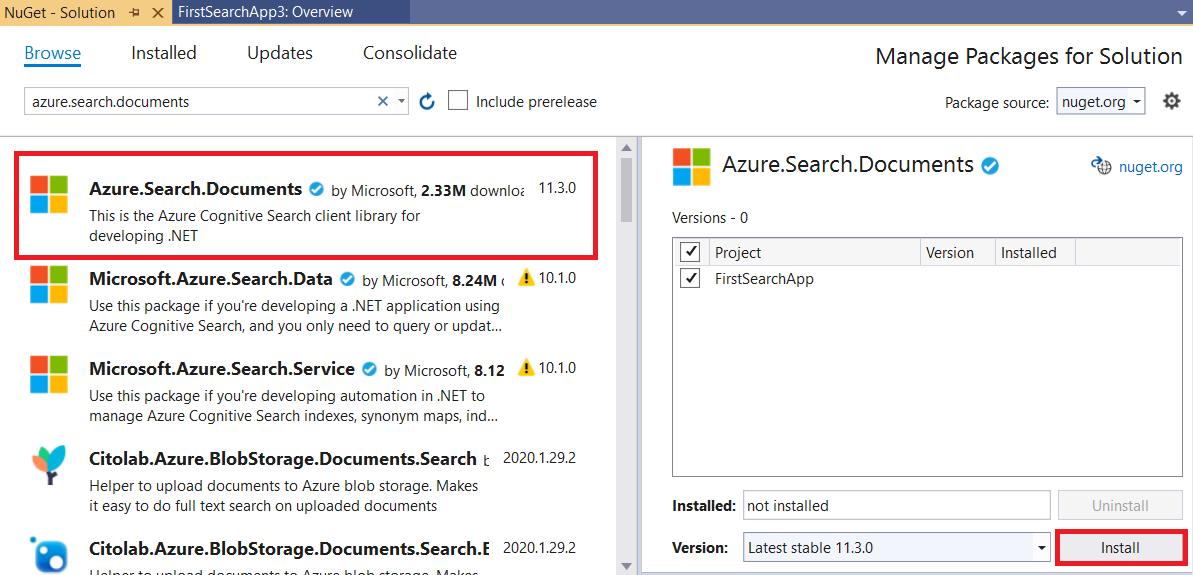
클라이언트 라이브러리를 설치합니다. 도구>NuGet 패키지 관리자>솔루션용 NuGet 패키지 관리...에서 찾아보기를 선택하고 "azure.search.documents"를 검색합니다. 사용권 계약 및 종속성을 수락하여 Azure.Search.Documents (버전 11 이상)를 설치합니다.
Azure Cognitive Search 초기화
이 단계에서는 호텔 샘플 인덱스 제공 검색 서비스에 연결하기 위한 엔드포인트 및 액세스 키를 설정합니다.
appsettings.json 열고 기본 줄을 검색 서비스 URL(형식
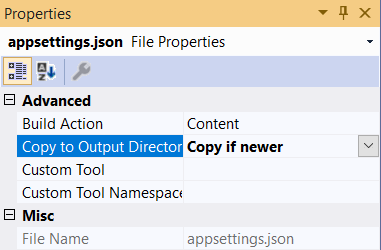
https://<service-name>.search.windows.net) 및 검색 서비스의 관리자 또는 쿼리 API 키로 바꿉니다. 인덱을 만들거나 업데이트할 필요가 없으므로 이 자습서에 쿼리 키를 사용할 수 있습니다.{ "SearchServiceUri": "<YOUR-SEARCH-SERVICE-URI>", "SearchServiceQueryApiKey": "<YOUR-SEARCH-SERVICE-API-KEY>" }솔루션 탐색기에서 파일을 선택하고 속성에서 출력 디렉터리로 복사 설정을 최신 인 경우 복사로 변경합니다.
모델 데이터 구조
모델(C# 클래스)은 MVC(모델, 뷰, 컨트롤러) 아키텍처를 사용하여 클라이언트(뷰), 서버(컨트롤러) 및 Azure 클라우드 간에 데이터를 통신하는 데 사용됩니다. 일반적으로 이러한 모델은 액세스되는 데이터의 구조를 반영합니다.
이 단계에서는 검색 인덱스의 데이터 구조와 뷰/컨트롤러 통신에 사용되는 검색 문자열을 모델링합니다. 호텔 인덱스 내 각 호텔에는 많은 객실이 있으며, 각 호텔에는 여러 부분으로 구성된 주소가 있습니다. 호텔의 전체 표현은 계층적이고 중첩된 데이터 구조입니다. 각 구성 요소를 만들려면 세 가지 클래스가 필요합니다.
Hotel, Address 및 Room 클래스 집합을 Azure Cognitive Search의 중요한 기능인 복합 형식이라고 합니다. 복합 형식은 많은 수준의 클래스 및 서브클래스일 수 있으며 단순 형식 (기본 멤버만 포함하는 클래스)을 사용하는 것보다 훨씬 더 복잡한 데이터 구조를 나타낼 수 있습니다.
솔루션 탐색기에서 모델> 새항목 추가를 마우스 오른쪽 단추로> 클릭합니다.
클래스를 선택하고 항목 이름을 Hotel.cs. Hotel.cs 모든 내용을 다음 코드로 바꿉니다. 클래스의 주소 및 회의실 멤버를 확인합니다. 이러한 필드는 클래스 자체이므로 모델도 필요합니다.
using Azure.Search.Documents.Indexes;
using Azure.Search.Documents.Indexes.Models;
using Microsoft.Spatial;
using System;
using System.Text.Json.Serialization;

namespace FirstAzureSearchApp.Models
{
    public partial class Hotel
    {
        [SimpleField(IsFilterable = true, IsKey = true)]
        public string HotelId { get; set; }

        [SearchableField(IsSortable = true)]
        public string HotelName { get; set; }

        [SearchableField(AnalyzerName = LexicalAnalyzerName.Values.EnLucene)]
        public string Description { get; set; }

        [SearchableField(AnalyzerName = LexicalAnalyzerName.Values.FrLucene)]
        [JsonPropertyName("Description_fr")]
        public string DescriptionFr { get; set; }

        [SearchableField(IsFilterable = true, IsSortable = true, IsFacetable = true)]
        public string Category { get; set; }

        [SearchableField(IsFilterable = true, IsFacetable = true)]
        public string[] Tags { get; set; }

        [SimpleField(IsFilterable = true, IsSortable = true, IsFacetable = true)]
        public bool? ParkingIncluded { get; set; }

        [SimpleField(IsFilterable = true, IsSortable = true, IsFacetable = true)]
        public DateTimeOffset? LastRenovationDate { get; set; }

        [SimpleField(IsFilterable = true, IsSortable = true, IsFacetable = true)]
        public double? Rating { get; set; }

        public Address Address { get; set; }

        [SimpleField(IsFilterable = true, IsSortable = true)]
        public GeographyPoint Location { get; set; }

        public Room[] Rooms { get; set; }
    }
}
Address 클래스에 대한 모델을 만들고 파일 이름을 Address.cs 동일한 프로세스를 반복합니다. 내용을 다음으로 바꿉니다.
using Azure.Search.Documents.Indexes;

namespace FirstAzureSearchApp.Models
{
    public partial class Address
    {
        [SearchableField]
        public string StreetAddress { get; set; }

        [SearchableField(IsFilterable = true, IsSortable = true, IsFacetable = true)]
        public string City { get; set; }

        [SearchableField(IsFilterable = true, IsSortable = true, IsFacetable = true)]
        public string StateProvince { get; set; }

        [SearchableField(IsFilterable = true, IsSortable = true, IsFacetable = true)]
        public string PostalCode { get; set; }

        [SearchableField(IsFilterable = true, IsSortable = true, IsFacetable = true)]
        public string Country { get; set; }
    }
}
또한 동일한 프로세스에 따라 Room 클래스를 만들고 파일 이름을 Room.cs.
using Azure.Search.Documents.Indexes;
using Azure.Search.Documents.Indexes.Models;
using System.Text.Json.Serialization;

namespace FirstAzureSearchApp.Models
{
    public partial class Room
    {
        [SearchableField(AnalyzerName = LexicalAnalyzerName.Values.EnMicrosoft)]
        public string Description { get; set; }

        [SearchableField(AnalyzerName = LexicalAnalyzerName.Values.FrMicrosoft)]
        [JsonPropertyName("Description_fr")]
        public string DescriptionFr { get; set; }

        [SearchableField(IsFilterable = true, IsFacetable = true)]
        public string Type { get; set; }

        [SimpleField(IsFilterable = true, IsFacetable = true)]
        public double? BaseRate { get; set; }

        [SearchableField(IsFilterable = true, IsFacetable = true)]
        public string BedOptions { get; set; }

        [SimpleField(IsFilterable = true, IsFacetable = true)]
        public int SleepsCount { get; set; }

        [SimpleField(IsFilterable = true, IsFacetable = true)]
        public bool? SmokingAllowed { get; set; }

        [SearchableField(IsFilterable = true, IsFacetable = true)]
        public string[] Tags { get; set; }
    }
}
이 자습서에서 만들 마지막 모델은 SearchData 라는 클래스이며 사용자의 입력(searchText) 및 검색 출력(resultList)을 나타냅니다. 출력 형식은 검색 결과와 정확히 일치하므로 SearchResults<Hotel> 형식이 중요하며, 이 참조를 보기로 전달해야 합니다. 기본 템플릿을 다음 코드로 바꿉다.
using Azure.Search.Documents.Models;

namespace FirstAzureSearchApp.Models
{
    public class SearchData
    {
        // The text to search for.
        public string searchText { get; set; }

        // The list of results.
        public SearchResults<Hotel> resultList;
    }
}
웹 페이지 만들기
프로젝트 템플릿은 Views 폴더에 있는 여러 클라이언트 보기와 함께 제공됩니다. 정확한 보기는 사용 중인 Core .NET 버전에 따라 달라집니다(이 샘플에서는 3.1이 사용됨). 이 자습서에서는 검색 페이지의 요소를 포함하도록 Index.cshtml 을 수정합니다.
Index.cshtml의 콘텐츠를 전체적으로 삭제하고 다음 단계에서 파일을 다시 빌드합니다.
이 자습서에서는 보기에서 Azure 로고와 검색 돋보기 아이콘(azure-logo.png 및 search.png)의 두 개의 작은 이미지를 사용합니다. GitHub 프로젝트의 이미지를 프로젝트의 wwwroot/images 폴더로 복사합니다.
Index.cshtml의 첫 번째 줄은 이전에 만든 SearchData 모델인 클라이언트(뷰)와 서버(컨트롤러) 간에 데이터를 전달하는 데 사용되는 모델을 참조해야 합니다. Index.cshtml 파일에 이 줄을 추가합니다.
@model FirstAzureSearchApp.Models.SearchData보기의 제목을 입력하는 것이 표준 연습이므로 다음 줄은 다음과 여야 합니다.
@{
    ViewData["Title"] = "Home Page";
}
제목에 따라 곧 만들 HTML 스타일시트에 대한 참조를 입력합니다.
<head>
    <link rel="stylesheet" href="~/css/hotels.css" />
</head>
보기 본문은 두 가지 사용 사례를 처리합니다. 먼저 검색 텍스트를 입력하기 전에 처음 사용할 때 빈 페이지를 제공해야 합니다. 둘째, 반복 쿼리에 대한 검색 텍스트 상자 외에 결과를 처리해야 합니다.
두 경우 모두 처리하려면 뷰에 제공된 모델이 null인지 확인해야 합니다. null 모델은 첫 번째 사용 사례(앱의 초기 실행)를 나타냅니다. Index.cshtml 파일에 다음을 추가하고 주석을 읽습니다.
<body>
<h1 class="sampleTitle">
    <img src="~/images/azure-logo.png" width="80" />
    Hotels Search
</h1>

@using (Html.BeginForm("Index", "Home", FormMethod.Post))
{
    // Display the search text box, with the search icon to the right of it.
    <div class="searchBoxForm">
        @Html.TextBoxFor(m => m.searchText, new { @class = "searchBox" }) <input class="searchBoxSubmit" type="submit" value="">
    </div>

    @if (Model != null)
    {
        // Show the result count.
        <p class="sampleText">
            @Model.resultList.TotalCount Results
        </p>

        var results = Model.resultList.GetResults().ToList();

        @for (var i = 0; i < results.Count; i++)
        {
            // Display the hotel name and description.
            @Html.TextAreaFor(m => results[i].Document.HotelName, new { @class = "box1" })
            @Html.TextArea($"desc{i}", results[i].Document.Description, new { @class = "box2" })
        }
    }
}
</body>
스타일시트를 추가합니다. Visual Studio에서 파일>새로 만들기>파일에서 일반이 강조 표시된 상태로 스타일 시트를 선택합니다.
기본 코드를 다음으로 바꿉다. 이 파일은 더 이상 자세히 다루지 않으며 스타일은 표준 HTML입니다.
textarea.box1 {
    width: 648px;
    height: 30px;
    border: none;
    background-color: azure;
    font-size: 14pt;
    color: blue;
    padding-left: 5px;
}

textarea.box2 {
    width: 648px;
    height: 100px;
    border: none;
    background-color: azure;
    font-size: 12pt;
    padding-left: 5px;
    margin-bottom: 24px;
}

.sampleTitle {
    font: 32px/normal 'Segoe UI Light',Arial,Helvetica,Sans-Serif;
    margin: 20px 0;
    font-size: 32px;
    text-align: left;
}

.sampleText {
    font: 16px/bold 'Segoe UI Light',Arial,Helvetica,Sans-Serif;
    margin: 20px 0;
    font-size: 14px;
    text-align: left;
    height: 30px;
}

.searchBoxForm {
    width: 648px;
    box-shadow: 0 0 0 1px rgba(0,0,0,.1), 0 2px 4px 0 rgba(0,0,0,.16);
    background-color: #fff;
    display: inline-block;
    border-collapse: collapse;
    border-spacing: 0;
    list-style: none;
    color: #666;
}

.searchBox {
    width: 568px;
    font-size: 16px;
    margin: 5px 0 1px 20px;
    padding: 0 10px 0 0;
    border: 0;
    max-height: 30px;
    outline: none;
    box-sizing: content-box;
    height: 35px;
    vertical-align: top;
}

.searchBoxSubmit {
    background-color: #fff;
    border-color: #fff;
    background-image: url(/images/search.png);
    background-repeat: no-repeat;
    height: 20px;
    width: 20px;
    text-indent: -99em;
    border-width: 0;
    border-style: solid;
    margin: 10px;
    outline: 0;
}
스타일시트 파일을 기본 site.css 파일과 함께 wwwroot/css 폴더에 hotels.css 저장합니다.
그것은 우리의 보기를 완료합니다. 이 시점에서 모델과 뷰가 모두 완료됩니다. 컨트롤러만 모든 것을 함께 묶을 수 있습니다.
메서드 정의
이 단계에서는 홈 컨트롤러의 내용으로 수정합니다.
HomeController.cs 파일을 열고 using 문을 다음으로 바꿉니다.
using Azure;
using Azure.Search.Documents;
using Azure.Search.Documents.Indexes;
using FirstAzureSearchApp.Models;
using Microsoft.AspNetCore.Mvc;
using Microsoft.Extensions.Configuration;
using System;
using System.Diagnostics;
using System.Linq;
using System.Threading.Tasks;
인덱스 메서드 추가
MVC 앱에서 Index() 메서드는 모든 컨트롤러에 대한 기본 작업 메서드입니다. 인덱스 HTML 페이지가 열립니다. 매개 변수를 사용하지 않는 기본 메서드는 이 자습서에서 애플리케이션 시작 사용 사례인 빈 검색 페이지 렌더링에 사용됩니다.
이 섹션에서는 사용자가 검색 텍스트를 입력했을 때 페이지를 렌더링하는 두 번째 사용 사례를 지원하도록 메서드를 확장합니다. 이 경우를 지원하기 위해 인덱스 메서드는 모델을 매개 변수로 사용하도록 확장됩니다.
기본 Index() 메서드 다음에 다음 메서드를 추가합니다.
    [HttpPost]
    public async Task<ActionResult> Index(SearchData model)
    {
        try
        {
            // Ensure the search string is valid.
            if (model.searchText == null)
            {
                model.searchText = "";
            }

            // Make the Azure Cognitive Search call.
            await RunQueryAsync(model);
        }

        catch
        {
            return View("Error", new ErrorViewModel { RequestId = "1" });
        }
        return View(model);
    }
메서드의 비동기 선언과 RunQueryAsync에 대한 await 호출에 유의하십시오. 이러한 키워드는 비동기 호출을 처리하므로 서버에서 스레드를 차단하지 않습니다.
catch 블록은 생성된 기본 오류 모델을 사용합니다.
오류 처리 및 기타 기본 보기 및 메서드를 확인합니다.
사용 중인 .NET Core 버전에 따라 약간 다른 기본 보기 집합이 만들어집니다. .NET Core 3.1의 경우 기본 보기는 인덱스, 개인 정보 및 오류입니다. 앱을 실행할 때 이러한 기본 페이지를 보고 컨트롤러에서 어떻게 처리되는지 검사할 수 있습니다.
이 자습서의 뒷부분에서 오류 보기를 테스트합니다.
GitHub 샘플에서는 사용되지 않는 뷰와 관련 작업이 삭제됩니다.
RunQueryAsync 메서드 추가
Azure Cognitive Search 호출은 RunQueryAsync 메서드에 캡슐화됩니다.
먼저 일부 정적 변수를 추가하여 Azure 서비스를 설정하고 호출하여 시작합니다.
    private static SearchClient _searchClient;
    private static SearchIndexClient _indexClient;
    private static IConfigurationBuilder _builder;
    private static IConfigurationRoot _configuration;

    private void InitSearch()
    {
        // Create a configuration using appsettings.json
        _builder = new ConfigurationBuilder().AddJsonFile("appsettings.json");
        _configuration = _builder.Build();

        // Read the values from appsettings.json
        string searchServiceUri = _configuration["SearchServiceUri"];
        string queryApiKey = _configuration["SearchServiceQueryApiKey"];

        // Create a service and index client.
        _indexClient = new SearchIndexClient(new Uri(searchServiceUri), new AzureKeyCredential(queryApiKey));
        _searchClient = _indexClient.GetSearchClient("hotels");
    }
이제 RunQueryAsync 메서드 자체를 추가합니다.
private async Task<ActionResult> RunQueryAsync(SearchData model)
{
    InitSearch();

    var options = new SearchOptions()
    {
        IncludeTotalCount = true
    };

    // Enter Hotel property names into this list so only these values will be returned.
    // If Select is empty, all values will be returned, which can be inefficient.
    options.Select.Add("HotelName");
    options.Select.Add("Description");

    // For efficiency, the search call should be asynchronous, so use SearchAsync rather than Search.
    model.resultList = await _searchClient.SearchAsync<Hotel>(model.searchText, options).ConfigureAwait(false);

    // Display the results.
    return View("Index", model);
}
이 메서드에서 먼저 Azure 구성이 시작되었는지 확인하고 몇 가지 검색 옵션을 설정합니다. 선택 옵션은 결과를 반환할 필드를 지정하므로 호텔 클래스의 속성 이름과 일치합니다. 선택을 생략하면 모든 unhidden 필드가 반환되므로 가능한 모든 필드의 하위 집합에만 관심이 있는 경우 비효율적일 수 있습니다.
검색에 대한 비동기 호출은 요청( searchText로 모델링됨) 및 응답( searchResult로 모델링됨)을 공식화합니다. 이 코드를 디버깅하는 경우 Model.resultList의 내용을 검사해야 하는 경우 SearchResult 클래스가 중단점을 설정하는 데 적합합니다. 요청한 데이터만 제공하는 직관적이며 그 외에는 그다지 많지 않다는 것을 알게 될 것입니다.
앱 테스트
이제 앱이 올바르게 실행되는지 확인해 보겠습니다.
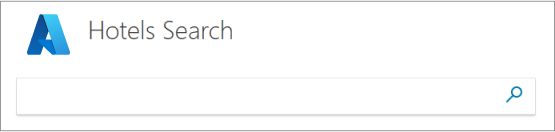
디버깅하지 않고디버그> 시작을 선택하거나 F5 키를 누릅니다. 앱이 예상대로 실행되는 경우 초기 인덱스 보기를 가져와야 합니다.
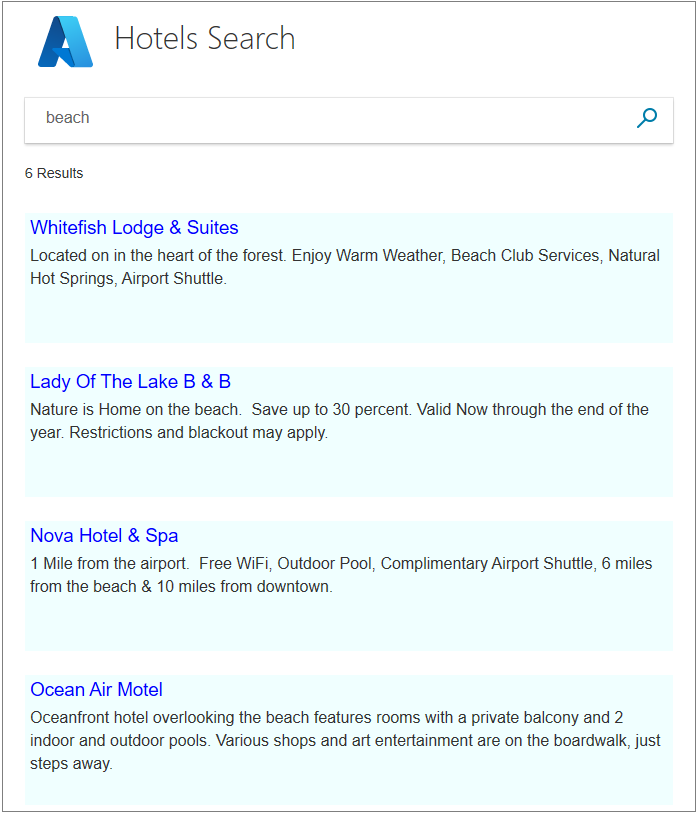
"beach"(또는 마음에 오는 텍스트)와 같은 쿼리 문자열을 입력하고 검색 아이콘을 클릭하여 요청을 보냅니다.
"5성급"을 입력해 보세요. 이 쿼리는 결과를 반환하지 않습니다. 더 정교한 검색은 "5 성급"을 "럭셔리"의 동의어로 취급하고 그 결과를 반환합니다. 동의어에 대한 지원은 Azure Cognitive Search에서 사용할 수 있지만 이 자습서 시리즈에서는 다루지 않습니다.
검색 텍스트로 "핫"을 입력해 보세요. "hotel"이라는 단어가 포함된 항목은 반환하지 않습니다. 몇 가지 결과가 반환되지만 검색은 전체 단어만 찾습니다.
"pool", "sunshine", "view" 등 다른 단어를 써보세요. Azure Cognitive Search가 가장 간단하지만 여전히 설득력 있는 수준에서 작동하는 것을 볼 수 있습니다.
에지 조건 및 오류 테스트
오류 처리 기능이 완벽하게 작동하는 경우에도 정상적으로 작동하는지 확인하는 것이 중요합니다.
Index 메서드에서 try { 호출 후 새 예외()를 throw하는 줄을 입력합니다. 이 예외는 텍스트를 검색할 때 오류를 일으킵니다.
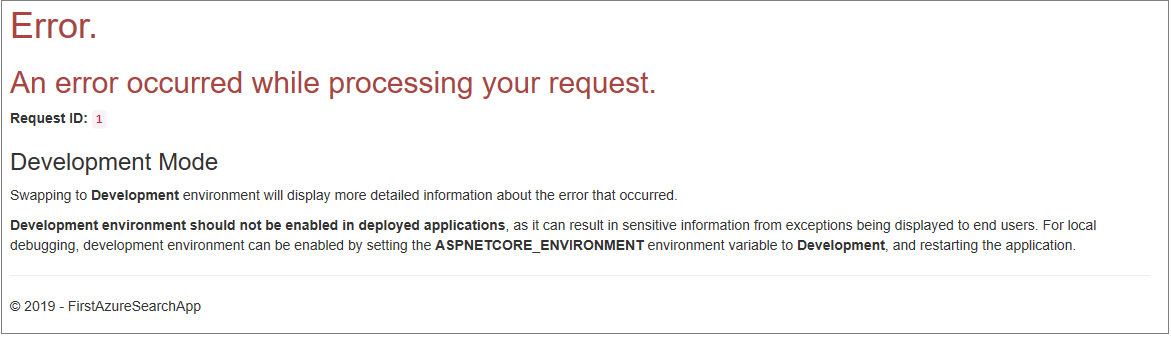
앱을 실행하고 검색 텍스트로 "바"를 입력한 다음 검색 아이콘을 클릭합니다. 예외로 인해 오류 화면이 나타납니다.
중요합니다
오류 페이지에서 내부 오류 번호를 반환하는 것은 보안 위험으로 간주됩니다. 앱이 일반적인 용도인 경우 오류가 발생할 때 반환할 항목에 대한 보안 모범 사례를 따르세요.
오류 처리가 정상적으로 작동하면 새 예외 throw() 를 제거합니다.
주요 사항
이 프로젝트에서 다음 사항을 고려합니다.
- Azure Cognitive Search 호출은 간결하며 결과를 쉽게 해석할 수 있습니다.
- 비동기 호출은 컨트롤러에 약간의 복잡성을 추가하지만 성능을 향상시키는 모범 사례입니다.
- 이 앱은 searchOptions에 설정된 내용으로 정의된 간단한 텍스트 검색을 수행했습니다. 그러나 이 하나의 클래스는 검색에 정교함을 추가하는 많은 멤버로 채워질 수 있습니다. 좀 더 많은 작업을 통해 이 앱을 훨씬 더 강력하게 만들 수 있습니다.
다음 단계
사용자 환경을 개선하려면 더 많은 기능, 특히 페이징(페이지 번호 사용 또는 무한 스크롤 사용) 및 자동 완성/제안을 추가합니다. 다른 검색 옵션(예: 지정된 지점의 지정된 반경 내에 있는 호텔의 지리적 검색) 및 검색 결과 순서를 고려할 수도 있습니다.
다음 단계는 나머지 자습서에서 해결됩니다. 페이징부터 시작해 보겠습니다.