이 자습서 시리즈 전체에서 결과가 반환되고 기본 순서로 표시됩니다. 이 자습서에서는 기본 및 보조 정렬 조건을 추가합니다. 숫자 값을 기준으로 정렬하는 대신, 마지막 예제에서는 사용자 지정 점수 매기기 프로필을 기반으로 결과의 순위를 지정하는 방법을 보여 있습니다. 또한 복잡한 형식의 표시에 대해 좀 더 자세히 살펴보겠습니다.
이 튜토리얼에서는 다음을 배우게 됩니다:
- 하나의 속성에 따라 결과 정렬
- 여러 속성에 따라 결과 정렬
- 점수 매기기 프로필에 따라 결과 정렬
개요
이 자습서에서는 검색 결과에 페이징 추가 자습서에서 만든 무한 스크롤 프로젝트를 확장합니다.
이 자습서의 완성된 최종 코드 버전은 다음 프로젝트에서 찾을 수 있습니다.
필수 조건
- 2b-add-infinite-scroll (GitHub) 해법. 이 프로젝트는 이전 자습서에서 빌드된 사용자 고유의 버전이거나 GitHub의 복사본일 수 있습니다.
하나의 속성에 따라 결과 정렬
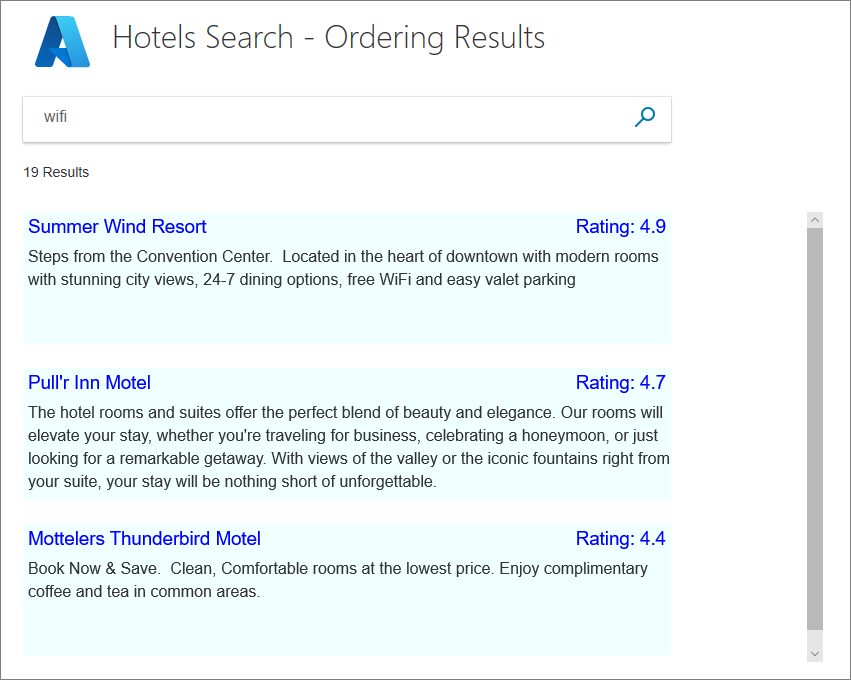
호텔 등급과 같은 하나의 속성에 따라 결과를 주문할 때 주문 결과를 원할 뿐만 아니라 주문이 올바른지 확인하려고 합니다. 결과에 등급 필드를 추가하면 결과가 올바르게 정렬되었는지 확인할 수 있습니다.
이 연습에서는 각 호텔에 대해 가장 저렴한 객실 요금과 가장 비싼 객실 요금 등 결과의 표시에 조금 더 추가합니다.
순서 지정을 사용하도록 모델을 수정할 필요가 없습니다. 보기와 컨트롤러만 업데이트가 필요합니다. 홈 컨트롤러를 열어 시작합니다.
검색 매개 변수에 OrderBy 속성 추가
HomeController.cs OrderBy 옵션을 추가하고 내림차순 정렬 순서로 Rating 속성을 포함합니다. Index(SearchData 모델) 메서드에서 검색 매개 변수에 다음 줄을 추가합니다.
options.OrderBy.Add("Rating desc");비고
기본 순서는 오름차순이지만 속성에 추가하여
asc명확하게 지정할 수 있습니다. 내림차순은 .를 추가하여desc지정됩니다.이제 앱을 실행하고 일반적인 검색어를 입력합니다. 사용자가 아닌 개발자가 결과를 확인하는 쉬운 방법이 없기 때문에 결과가 올바른 순서로 표시될 수도 있고 그렇지 않을 수도 있습니다.
결과가 등급에 따라 정렬됨을 분명히 하겠습니다. 먼저 hotels.css 파일의 box1 및 box2 클래스를 다음 클래스로 바꿉니다(이 클래스는 이 자습서에 필요한 새로운 클래스입니다).
textarea.box1A {
    width: 324px;
    height: 32px;
    border: none;
    background-color: azure;
    font-size: 14pt;
    color: blue;
    padding-left: 5px;
    text-align: left;
}

textarea.box1B {
    width: 324px;
    height: 32px;
    border: none;
    background-color: azure;
    font-size: 14pt;
    color: blue;
    text-align: right;
    padding-right: 5px;
}

textarea.box2A {
    width: 324px;
    height: 32px;
    border: none;
    background-color: azure;
    font-size: 12pt;
    color: blue;
    padding-left: 5px;
    text-align: left;
}

textarea.box2B {
    width: 324px;
    height: 32px;
    border: none;
    background-color: azure;
    font-size: 12pt;
    color: blue;
    text-align: right;
    padding-right: 5px;
}

textarea.box3 {
    width: 648px;
    height: 100px;
    border: none;
    background-color: azure;
    font-size: 12pt;
    padding-left: 5px;
    margin-bottom: 24px;
}
팁 (조언)
브라우저는 일반적으로 css 파일을 캐시하므로 이전 css 파일이 사용되고 편집 내용이 무시될 수 있습니다. 이를 반올림하는 좋은 방법은 버전 매개 변수가 있는 쿼리 문자열을 링크에 추가하는 것입니다. 다음은 그 예입니다.
<link rel="stylesheet" href="~/css/hotels.css?v1.1" />이전 css 파일이 브라우저에서 사용되고 있다고 생각되면 버전 번호를 업데이트합니다.
결과에 다음 세 개의 필드가 포함되도록 Index(SearchData 모델) 메서드의 Select 매개 변수에 Rating 속성을 추가합니다.
options.Select.Add("HotelName");
options.Select.Add("Description");
options.Select.Add("Rating");
뷰(index.cshtml)를 열고 렌더링 루프(<-- 호텔 데이터 표시)>를 다음 코드로 바꿉니다.
<!-- Show the hotel data. -->
@for (var i = 0; i < result.Count; i++)
{
    var ratingText = $"Rating: {result[i].Document.Rating}";

    // Display the hotel details.
    @Html.TextArea($"name{i}", result[i].Document.HotelName, new { @class = "box1A" })
    @Html.TextArea($"rating{i}", ratingText, new { @class = "box1B" })
    @Html.TextArea($"desc{i}", fullDescription, new { @class = "box3" })
}
등급은 첫 번째 표시된 페이지와 무한 스크롤을 통해 호출되는 후속 페이지에서 모두 사용할 수 있어야 합니다. 이러한 두 상황의 후자의 경우 컨트롤러의 다음 작업과 뷰의 스크롤된 함수를 모두 업데이트해야 합니다. 컨트롤러부터 Next 메서드를 다음 코드로 변경합니다. 이 코드는 등급 텍스트를 만들고 전달합니다.
public async Task<ActionResult> Next(SearchData model)
{
    // Set the next page setting, and call the Index(model) action.
    model.paging = "next";
    await Index(model);

    // Create an empty list.
    var nextHotels = new List<string>();

    // Add a hotel details to the list.
    await foreach (var result in model.resultList.GetResultsAsync())
    {
        var ratingText = $"Rating: {result.Document.Rating}";
        var rateText = $"Rates from ${result.Document.cheapest} to ${result.Document.expensive}";

        string fullDescription = result.Document.Description;

        // Add strings to the list.
        nextHotels.Add(result.Document.HotelName);
        nextHotels.Add(ratingText);
        nextHotels.Add(fullDescription);
    }

    // Rather than return a view, return the list of data.
    return new JsonResult(nextHotels);
}
이제 보기에서 스크롤된 함수를 업데이트하여 등급 텍스트를 표시합니다.
<script>
    function scrolled() {
        if (myDiv.offsetHeight + myDiv.scrollTop >= myDiv.scrollHeight) {
            $.getJSON("/Home/Next", function (data) {
                var div = document.getElementById('myDiv');

                // Append the returned data to the current list of hotels.
                for (var i = 0; i < data.length; i += 3) {
                    div.innerHTML += '\n<textarea class="box1A">' + data[i] + '</textarea>';
                    div.innerHTML += '\n<textarea class="box1B">' + data[i + 1] + '</textarea>';
                    div.innerHTML += '\n<textarea class="box3">' + data[i + 2] + '</textarea>';
                }
            });
        }
    }
</script>
이제 앱을 다시 실행합니다. "wifi"와 같은 일반적인 용어를 검색하고 호텔 등급의 내림차순으로 결과가 정렬되는지 확인합니다.
여러 호텔이 동일한 등급을 가지므로 디스플레이의 모양은 데이터가 검색되는 순서이며 임의로 표시됩니다.
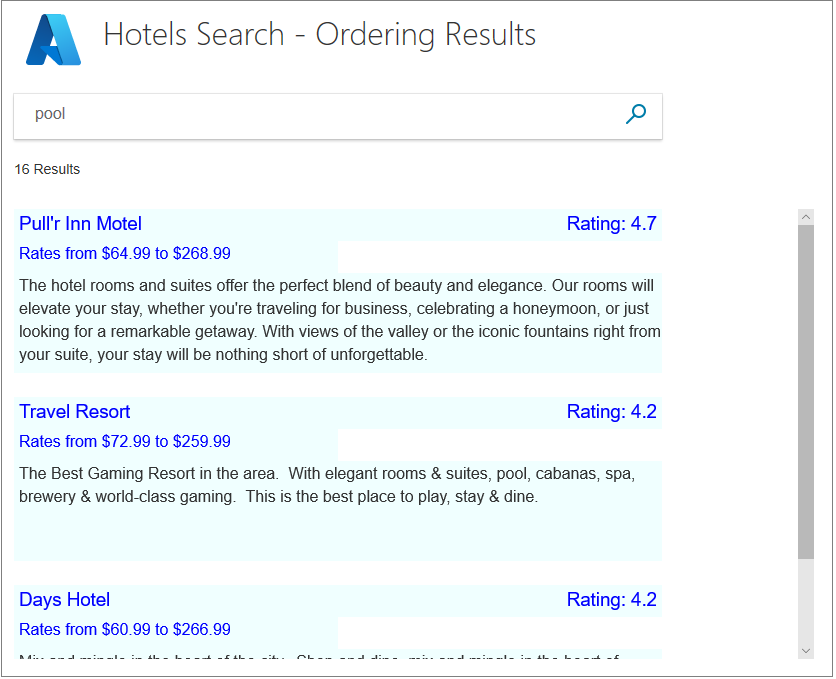
두 번째 수준의 주문 추가를 살펴보기 전에 몇 가지 코드를 추가하여 객실 요금 범위를 표시해 보겠습니다. 이 코드를 추가하여 복잡한 형식에서 데이터를 추출하는 방법을 보여 줍니다. 또한 가격을 기준으로 정렬 결과를 논의할 수 있습니다(가장 저렴할 수도 있습니다).
보기에 객실 요금 범위 추가
Hotel.cs 모델에 가장 저렴하고 가장 비싼 객실 요금이 포함된 속성을 추가합니다.
// Room rate range
public double cheapest { get; set; }
public double expensive { get; set; }
홈 컨트롤러의 Index(SearchData 모델) 작업의 끝에서 객실 요금을 계산합니다. 임시 데이터를 저장한 후 계산을 추가합니다.
// Ensure TempData is stored for the next call.
TempData["page"] = page;
TempData["searchfor"] = model.searchText;

// Calculate the room rate ranges.
await foreach (var result in model.resultList.GetResultsAsync())
{
    var cheapest = 0d;
    var expensive = 0d;

    foreach (var room in result.Document.Rooms)
    {
        var rate = room.BaseRate;
        if (rate < cheapest || cheapest == 0)
        {
            cheapest = (double)rate;
        }
        if (rate > expensive)
        {
            expensive = (double)rate;
        }
    }
    model.resultList.Results[n].Document.cheapest = cheapest;
    model.resultList.Results[n].Document.expensive = expensive;
}
컨트롤러의 Index(SearchData 모델) 작업 메서드에서 Select 매개 변수에 Rooms 속성을 추가합니다.
options.Select.Add("Rooms");보기에서 렌더링 루프를 변경하여 결과의 첫 번째 페이지에 대한 속도 범위를 표시합니다.
<!-- Show the hotel data. -->
@for (var i = 0; i < result.Count; i++)
{
    var rateText = $"Rates from ${result[i].Document.cheapest} to ${result[i].Document.expensive}";
    var ratingText = $"Rating: {result[i].Document.Rating}";

    string fullDescription = result[i].Document.Description;

    // Display the hotel details.
    @Html.TextArea($"name{i}", result[i].Document.HotelName, new { @class = "box1A" })
    @Html.TextArea($"rating{i}", ratingText, new { @class = "box1B" })
    @Html.TextArea($"rates{i}", rateText, new { @class = "box2A" })
    @Html.TextArea($"desc{i}", fullDescription, new { @class = "box3" })
}
홈 컨트롤러의 Next 메서드를 변경하여 결과의 후속 페이지에 대한 속도 범위를 전달합니다.
public async Task<ActionResult> Next(SearchData model)
{
    // Set the next page setting, and call the Index(model) action.
    model.paging = "next";
    await Index(model);

    // Create an empty list.
    var nextHotels = new List<string>();

    // Add a hotel details to the list.
    await foreach (var result in model.resultList.GetResultsAsync())
    {
        var ratingText = $"Rating: {result.Document.Rating}";
        var rateText = $"Rates from ${result.Document.cheapest} to ${result.Document.expensive}";

        string fullDescription = result.Document.Description;

        // Add strings to the list.
        nextHotels.Add(result.Document.HotelName);
        nextHotels.Add(ratingText);
        nextHotels.Add(rateText);
        nextHotels.Add(fullDescription);
    }

    // Rather than return a view, return the list of data.
    return new JsonResult(nextHotels);
}
객실 요금 텍스트를 처리하도록 보기에서 스크롤된 함수를 업데이트합니다.
<script>
    function scrolled() {
        if (myDiv.offsetHeight + myDiv.scrollTop >= myDiv.scrollHeight) {
            $.getJSON("/Home/Next", function (data) {
                var div = document.getElementById('myDiv');

                // Append the returned data to the current list of hotels.
                for (var i = 0; i < data.length; i += 4) {
                    div.innerHTML += '\n<textarea class="box1A">' + data[i] + '</textarea>';
                    div.innerHTML += '\n<textarea class="box1B">' + data[i + 1] + '</textarea>';
                    div.innerHTML += '\n<textarea class="box2A">' + data[i + 2] + '</textarea>';
                    div.innerHTML += '\n<textarea class="box3">' + data[i + 4] + '</textarea>';
                }
            });
        }
    }
</script>
앱을 실행하고 방 요금 범위가 표시되는지 확인합니다.
검색 매개 변수의 OrderBy 속성은 룸이 이미 요금에 따라 정렬된 경우에도 가장 저렴한 객실 요금을 제공하기 위해 Rooms.BaseRate 와 같은 항목을 허용하지 않습니다. 이 경우 객실은 가격에 따라 정렬되지 않습니다. 객실 요금에 따라 정렬된 샘플 데이터 집합에 호텔을 표시하려면 홈 컨트롤러에서 결과를 정렬하고 이러한 결과를 원하는 순서로 보기로 보내야 합니다.
여러 값을 기준으로 결과 정렬
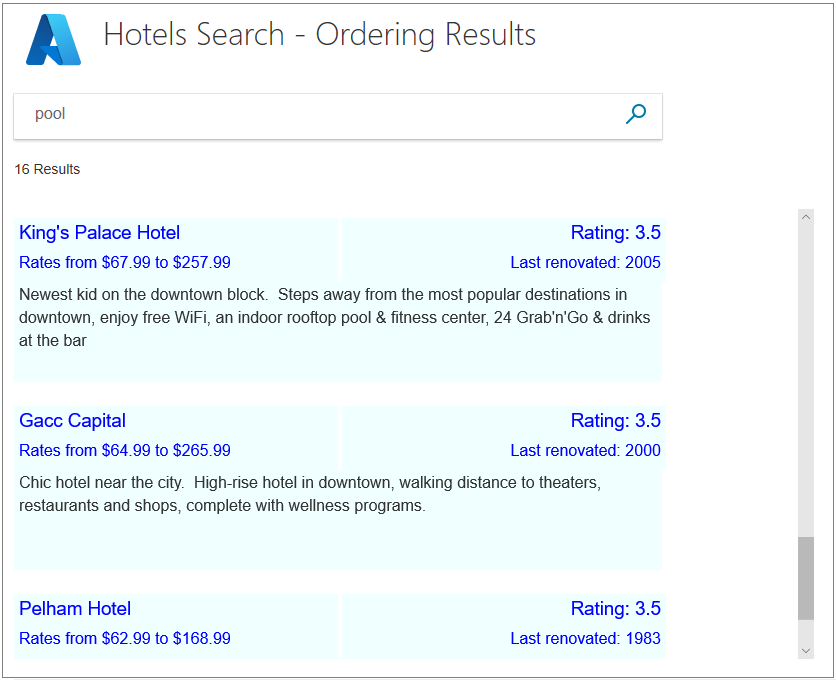
이제 문제는 동일한 등급을 가진 호텔을 어떻게 구별할 것인가하는 것입니다. 한 가지 방법은 최근에 개조된 호텔이 결과에서 더 높게 표시되도록 호텔을 마지막으로 개조한 시간을 기반으로 하는 보조 주문일 수 있습니다.
두 번째 순서 수준을 추가하려면 검색 결과에 LastRenovationDate를 추가하고 Index(SearchData 모델) 메서드의 OrderBy에 추가합니다.
options.Select.Add("LastRenovationDate");

options.OrderBy.Add("LastRenovationDate desc");
팁 (조언)
OrderBy 목록에는 모든 수의 속성을 입력할 수 있습니다. 호텔이 등급과 리노베이션 날짜가 같으면 세 번째 숙소를 입력하여 호텔을 구분할 수 있습니다.
다시 말하지만, 우리는 주문이 올바른지 확인하기 위해 보기에서 리노베이션 날짜를 볼 필요가 있습니다. 리노베이션과 같은 일을 위해, 아마 올해만으로도 충분합니다. 보기의 렌더링 루프를 다음 코드로 변경합니다.
<!-- Show the hotel data. -->
@for (var i = 0; i < result.Count; i++)
{
    var rateText = $"Rates from ${result[i].Document.cheapest} to ${result[i].Document.expensive}";
    var lastRenovatedText = $"Last renovated: { result[i].Document.LastRenovationDate.Value.Year}";
    var ratingText = $"Rating: {result[i].Document.Rating}";

    string fullDescription = result[i].Document.Description;

    // Display the hotel details.
    @Html.TextArea($"name{i}", result[i].Document.HotelName, new { @class = "box1A" })
    @Html.TextArea($"rating{i}", ratingText, new { @class = "box1B" })
    @Html.TextArea($"rates{i}", rateText, new { @class = "box2A" })
    @Html.TextArea($"renovation{i}", lastRenovatedText, new { @class = "box2B" })
    @Html.TextArea($"desc{i}", fullDescription, new { @class = "box3" })
}
홈 컨트롤러에서 Next 메서드를 변경하여 마지막 리노베이션 날짜의 연도 구성 요소를 전달합니다.
    public async Task<ActionResult> Next(SearchData model)
    {
        // Set the next page setting, and call the Index(model) action.
        model.paging = "next";
        await Index(model);

        // Create an empty list.
        var nextHotels = new List<string>();

        // Add a hotel details to the list.
        await foreach (var result in model.resultList.GetResultsAsync())
        {
            var ratingText = $"Rating: {result.Document.Rating}";
            var rateText = $"Rates from ${result.Document.cheapest} to ${result.Document.expensive}";
            var lastRenovatedText = $"Last renovated: {result.Document.LastRenovationDate.Value.Year}";

            string fullDescription = result.Document.Description;

            // Add strings to the list.
            nextHotels.Add(result.Document.HotelName);
            nextHotels.Add(ratingText);
            nextHotels.Add(rateText);
            nextHotels.Add(lastRenovatedText);
            nextHotels.Add(fullDescription);
        }

        // Rather than return a view, return the list of data.
        return new JsonResult(nextHotels);
    }
뷰에서 스크롤된 함수를 변경하여 리노베이션 텍스트를 표시합니다.
<script>
    function scrolled() {
        if (myDiv.offsetHeight + myDiv.scrollTop >= myDiv.scrollHeight) {
            $.getJSON("/Home/Next", function (data) {
                var div = document.getElementById('myDiv');

                // Append the returned data to the current list of hotels.
                for (var i = 0; i < data.length; i += 5) {
                    div.innerHTML += '\n<textarea class="box1A">' + data[i] + '</textarea>';
                    div.innerHTML += '\n<textarea class="box1B">' + data[i + 1] + '</textarea>';
                    div.innerHTML += '\n<textarea class="box2A">' + data[i + 2] + '</textarea>';
                    div.innerHTML += '\n<textarea class="box2B">' + data[i + 3] + '</textarea>';
                    div.innerHTML += '\n<textarea class="box3">' + data[i + 4] + '</textarea>';
                }
            });
        }
    }
</script>
앱을 실행하세요. "풀" 또는 "보기"와 같은 일반적인 용어를 검색하고 동일한 등급을 가진 호텔이 이제 리노베이션 날짜의 내림차순으로 표시되는지 확인합니다.
점수 매기기 프로필에 따라 결과 정렬
지금까지 자습서에 제공된 예제에서는 정확한 순서 순서를 제공하여 숫자 값(등급 및 리노베이션 날짜)을 정렬하는 방법을 보여 줍니다. 그러나 일부 검색과 일부 데이터는 두 데이터 요소를 쉽게 비교할 수 없습니다. 전체 텍스트 검색 쿼리의 경우 Cognitive Search에는 순위 개념이 포함됩니다. 점수 매기기 프로필을 지정하여 결과의 순위를 지정하여 더 복잡하고 질적인 비교를 제공할 수 있습니다.
점수 매기기 프로필은 인덱스 스키마에 정의됩니다. 호텔 데이터에 몇 가지 점수 매기기 프로필이 설정되었습니다. 점수 매기기 프로필이 정의되는 방법을 살펴본 다음 코드를 작성하여 검색해 보겠습니다.
점수 매기기 프로필 정의 방법
점수 매기기 프로필은 설계 단계에서 검색 인덱스에 정의됩니다. Microsoft에서 호스팅하는 읽기 전용 호텔 인덱스에는 세 개의 점수 매기기 프로필이 있습니다. 이 섹션에서는 점수 매기기 프로필을 탐구하고, 이를 코드에서 어떻게 사용하는지 보여줍니다.
다음은 OrderBy 또는 ScoringProfile 매개 변수를 지정하지 않을 때 사용되는 호텔 데이터 집합의 기본 점수 매기기 프로필입니다. 이 프로필은 검색 텍스트가 호텔 이름, 설명 또는 태그 목록(편의 시설)에 있는 경우 호텔 점수를 높입니다. 점수 매기기의 가중치가 특정 필드를 어떻게 선호하는지 확인합니다. 검색 텍스트가 아래에 나열되지 않은 다른 필드에 표시되면 가중치가 1입니다. 점수가 높을수록 결과가 더 높은 위치에 나타납니다.
{
   "name": "boostByField",
   "text": {
       "weights": {
           "Tags": 3,
           "HotelName": 2,
           "Description": 1.5,
           "Description_fr": 1.5,
       }
   }
}
다음 대체 점수 매기기 프로필은 제공된 매개 변수에 태그 목록("편의 시설"이라고 함)이 하나 이상 포함된 경우 점수를 크게 높입니다. 이 프로필의 핵심은 텍스트를 포함하는 매개 변수를 제공해야 한다는 것입니다. 매개 변수가 비어 있거나 제공되지 않으면 오류가 발생합니다.
{
    "name":"boostAmenities",
    "functions":[
        {
        "fieldName":"Tags",
        "freshness":null,
        "interpolation":"linear",
        "magnitude":null,
        "distance":null,
        "tag":{
            "tagsParameter":"amenities"
        },
        "type":"tag",
        "boost":5
        }
    ],
    "functionAggregation":0
},
이 세 번째 프로필에서 호텔 등급은 점수에 상당한 부스트를 제공합니다. 마지막으로 개조된 날짜도 점수를 높일 수 있지만, 해당 데이터가 현재 날짜의 730일(2년) 이내인 경우에만 점수가 높아집니다.
{
    "name":"renovatedAndHighlyRated",
    "functions":[
        {
        "fieldName":"Rating",
        "freshness":null,
        "interpolation":"linear",
        "magnitude":{
            "boostingRangeStart":0,
            "boostingRangeEnd":5,
            "constantBoostBeyondRange":false
        },
        "distance":null,
        "tag":null,
        "type":"magnitude",
        "boost":20
        },
        {
        "fieldName":"LastRenovationDate",
        "freshness":{
            "boostingDuration":"P730D"
        },
        "interpolation":"quadratic",
        "magnitude":null,
        "distance":null,
        "tag":null,
        "type":"freshness",
        "boost":10
        }
    ],
    "functionAggregation":0
}
이제 이러한 프로필이 예상대로 작동하는지 살펴보겠습니다.
뷰에 코드를 추가하여 프로필 비교
index.cshtml 파일을 열고 본문> 섹션을 <다음 코드로 바꿉니다.
<body> @using (Html.BeginForm("Index", "Home", FormMethod.Post)) { <table> <tr> <td></td> <td> <h1 class="sampleTitle"> <img src="~/images/azure-logo.png" width="80" /> Hotels Search - Order Results </h1> </td> </tr> <tr> <td></td> <td> <!-- Display the search text box, with the search icon to the right of it. --> <div class="searchBoxForm"> @Html.TextBoxFor(m => m.searchText, new { @class = "searchBox" }) <input class="searchBoxSubmit" type="submit" value=""> </div> <div class="searchBoxForm"> <b> Order: </b> @Html.RadioButtonFor(m => m.scoring, "Default") Default @Html.RadioButtonFor(m => m.scoring, "RatingRenovation") By numerical Rating @Html.RadioButtonFor(m => m.scoring, "boostAmenities") By Amenities @Html.RadioButtonFor(m => m.scoring, "renovatedAndHighlyRated") By Renovated date/Rating profile </div> </td> </tr> <tr> <td valign="top"> <div id="facetplace" class="facetchecks"> @if (Model != null && Model.facetText != null) { <h5 class="facetheader">Amenities:</h5> <ul class="facetlist"> @for (var c = 0; c < Model.facetText.Length; c++) { <li> @Html.CheckBoxFor(m => m.facetOn[c], new { @id = "check" + c.ToString() }) @Model.facetText[c] </li> } </ul> } </div> </td> <td> @if (Model != null && Model.resultList != null) { // Show the total result count. <p class="sampleText"> @Html.DisplayFor(m => m.resultList.Count) Results <br /> </p> <div id="myDiv" style="width: 800px; height: 450px; overflow-y: scroll;" onscroll="scrolled()"> <!-- Show the hotel data. --> @for (var i = 0; i < Model.resultList.Results.Count; i++) { var rateText = $"Rates from ${Model.resultList.Results[i].Document.cheapest} to ${Model.resultList.Results[i].Document.expensive}"; var lastRenovatedText = $"Last renovated: { Model.resultList.Results[i].Document.LastRenovationDate.Value.Year}"; var ratingText = $"Rating: {Model.resultList.Results[i].Document.Rating}"; string amenities = string.Join(", ", Model.resultList.Results[i].Document.Tags); string fullDescription = Model.resultList.Results[i].Document.Description; fullDescription += $"\nAmenities: {amenities}"; // Display the hotel details. @Html.TextArea($"name{i}", Model.resultList.Results[i].Document.HotelName, new { @class = "box1A" }) @Html.TextArea($"rating{i}", ratingText, new { @class = "box1B" }) @Html.TextArea($"rates{i}", rateText, new { @class = "box2A" }) @Html.TextArea($"renovation{i}", lastRenovatedText, new { @class = "box2B" }) @Html.TextArea($"desc{i}", fullDescription, new { @class = "box3" }) } </div> <script> function scrolled() { if (myDiv.offsetHeight + myDiv.scrollTop >= myDiv.scrollHeight) { $.getJSON("/Home/Next", function (data) { var div = document.getElementById('myDiv'); // Append the returned data to the current list of hotels. for (var i = 0; i < data.length; i += 5) { div.innerHTML += '\n<textarea class="box1A">' + data[i] + '</textarea>'; div.innerHTML += '<textarea class="box1B">' + data[i + 1] + '</textarea>'; div.innerHTML += '\n<textarea class="box2A">' + data[i + 2] + '</textarea>'; div.innerHTML += '<textarea class="box2B">' + data[i + 3] + '</textarea>'; div.innerHTML += '\n<textarea class="box3">' + data[i + 4] + '</textarea>'; } }); } } </script> } </td> </tr> </table> } </body>SearchData.cs 파일을 열고 SearchData 클래스를 다음 코드로 바꿉다.
public class SearchData
{
    public SearchData()
    {
    }

    // Constructor to initialize the list of facets sent from the controller.
    public SearchData(List<string> facets)
    {
        facetText = new string[facets.Count];

        for (int i = 0; i < facets.Count; i++)
        {
            facetText[i] = facets[i];
        }
    }

    // Array to hold the text for each amenity.
    public string[] facetText { get; set; }

    // Array to hold the setting for each amenitity.
    public bool[] facetOn { get; set; }

    // The text to search for.
    public string searchText { get; set; }

    // Record if the next page is requested.
    public string paging { get; set; }

    // The list of results.
    public DocumentSearchResult<Hotel> resultList;

    public string scoring { get; set; }
}
hotels.css 파일을 열고 다음 HTML 클래스를 추가합니다.
.facetlist {
    list-style: none;
}

.facetchecks {
    width: 250px;
    display: normal;
    color: #666;
    margin: 10px;
    padding: 5px;
}

.facetheader {
    font-size: 10pt;
    font-weight: bold;
    color: darkgreen;
}
점수 매기기 프로필을 지정하는 코드를 컨트롤러에 추가합니다.
홈 컨트롤러 파일을 엽니다. 목록을 만드는 데 도움이 되도록 다음 using 문을 추가합니다.
using System.Linq;이 예제에서는 초기 뷰를 반환하는 것 이상의 작업을 수행하려면 인덱 스 초기 호출이 필요합니다. 이 방법은 이제 보기에 표시할 최대 20개 편의 시설을 검색합니다.
    public async Task<ActionResult> Index()
    {
        InitSearch();

        // Set up the facets call in the search parameters.
        SearchOptions options = new SearchOptions();
        // Search for up to 20 amenities.
        options.Facets.Add("Tags,count:20");

        SearchResults<Hotel> searchResult = await _searchClient.SearchAsync<Hotel>("*", options);

        // Convert the results to a list that can be displayed in the client.
        List<string> facets = searchResult.Facets["Tags"].Select(x => x.Value.ToString()).ToList();

        // Initiate a model with a list of facets for the first view.
        SearchData model = new SearchData(facets);

        // Save the facet text for the next view.
        SaveFacets(model, false);

        // Render the view including the facets.
        return View(model);
    }
패싯을 임시 스토리지에 저장하고 임시 스토리지에서 복구하고 모델을 채웁니다.
    // Save the facet text to temporary storage, optionally saving the state of the check boxes.
    private void SaveFacets(SearchData model, bool saveChecks = false)
    {
        for (int i = 0; i < model.facetText.Length; i++)
        {
            TempData["facet" + i.ToString()] = model.facetText[i];
            if (saveChecks)
            {
                TempData["faceton" + i.ToString()] = model.facetOn[i];
            }
        }
        TempData["facetcount"] = model.facetText.Length;
    }

    // Recover the facet text to a model, optionally recoving the state of the check boxes.
    private void RecoverFacets(SearchData model, bool recoverChecks = false)
    {
        // Create arrays of the appropriate length.
        model.facetText = new string[(int)TempData["facetcount"]];
        if (recoverChecks)
        {
            model.facetOn = new bool[(int)TempData["facetcount"]];
        }

        for (int i = 0; i < (int)TempData["facetcount"]; i++)
        {
            model.facetText[i] = TempData["facet" + i.ToString()].ToString();
            if (recoverChecks)
            {
                model.facetOn[i] = (bool)TempData["faceton" + i.ToString()];
            }
        }
    }
필요에 따라 OrderBy 및 ScoringProfile 매개 변수를 설정해야 합니다. 기존 Index(SearchData 모델) 메서드를 다음으로 바꿉니다.
public async Task<ActionResult> Index(SearchData model)
{
    try
    {
        InitSearch();

        int page;

        if (model.paging != null && model.paging == "next")
        {
            // Recover the facet text, and the facet check box settings.
            RecoverFacets(model, true);

            // Increment the page.
            page = (int)TempData["page"] + 1;

            // Recover the search text.
            model.searchText = TempData["searchfor"].ToString();
        }
        else
        {
            // First search with text.
            // Recover the facet text, but ignore the check box settings, and use the current model settings.
            RecoverFacets(model, false);

            // First call. Check for valid text input, and valid scoring profile.
            if (model.searchText == null)
            {
                model.searchText = "";
            }
            if (model.scoring == null)
            {
                model.scoring = "Default";
            }
            page = 0;
        }

        // Setup the search parameters.
        var options = new SearchOptions
        {
            SearchMode = SearchMode.All,

            // Skip past results that have already been returned.
            Skip = page * GlobalVariables.ResultsPerPage,

            // Take only the next page worth of results.
            Size = GlobalVariables.ResultsPerPage,

            // Include the total number of results.
            IncludeTotalCount = true,
        };
        // Select the data properties to be returned.
        options.Select.Add("HotelName");
        options.Select.Add("Description");
        options.Select.Add("Tags");
        options.Select.Add("Rooms");
        options.Select.Add("Rating");
        options.Select.Add("LastRenovationDate");

        List<string> parameters = new List<string>();
        // Set the ordering based on the user's radio button selection.
        switch (model.scoring)
        {
            case "RatingRenovation":
                // Set the ordering/scoring parameters.
                options.OrderBy.Add("Rating desc");
                options.OrderBy.Add("LastRenovationDate desc");
                break;

            case "boostAmenities":
                {
                    options.ScoringProfile = model.scoring;

                    // Create a string list of amenities that have been clicked.
                    for (int a = 0; a < model.facetOn.Length; a++)
                    {
                        if (model.facetOn[a])
                        {
                            parameters.Add(model.facetText[a]);
                        }
                    }

                    if (parameters.Count > 0)
                    {
                        options.ScoringParameters.Add($"amenities-{ string.Join(',', parameters)}");
                    }
                    else
                    {
                        // No amenities selected, so set profile back to default.
                        options.ScoringProfile = "";
                    }
                }
                break;

            case "renovatedAndHighlyRated":
                options.ScoringProfile = model.scoring;
                break;

            default:
                break;
        }

        // For efficiency, the search call should be asynchronous, so use SearchAsync rather than Search.
        model.resultList = await _searchClient.SearchAsync<Hotel>(model.searchText, options);

        // Ensure TempData is stored for the next call.
        TempData["page"] = page;
        TempData["searchfor"] = model.searchText;
        TempData["scoring"] = model.scoring;
        SaveFacets(model, true);

        // Calculate the room rate ranges.
        await foreach (var result in model.resultList.GetResultsAsync())
        {
            var cheapest = 0d;
            var expensive = 0d;

            foreach (var room in result.Document.Rooms)
            {
                var rate = room.BaseRate;
                if (rate < cheapest || cheapest == 0)
                {
                    cheapest = (double)rate;
                }
                if (rate > expensive)
                {
                    expensive = (double)rate;
                }
            }

            result.Document.cheapest = cheapest;
            result.Document.expensive = expensive;
        }
    }
    catch
    {
        return View("Error", new ErrorViewModel { RequestId = "1" });
    }

    return View("Index", model);
}
각 스위치 선택에 대한 주석을 읽습니다.
여러 속성에 따라 순서 지정에 대한 이전 섹션의 추가 코드를 완료한 경우 다음 작업을 변경할 필요가 없습니다.
앱 실행 및 테스트
앱을 실행하세요. 당신은 모든 편의시설이 표시되는 것을 보게 될 것입니다.
주문의 경우 "숫자 등급별"을 선택하면 이 자습서에서 이미 구현한 숫자 순서를 제공하며, 리노베이션 날짜는 동등한 등급의 호텔 중에서 결정됩니다.
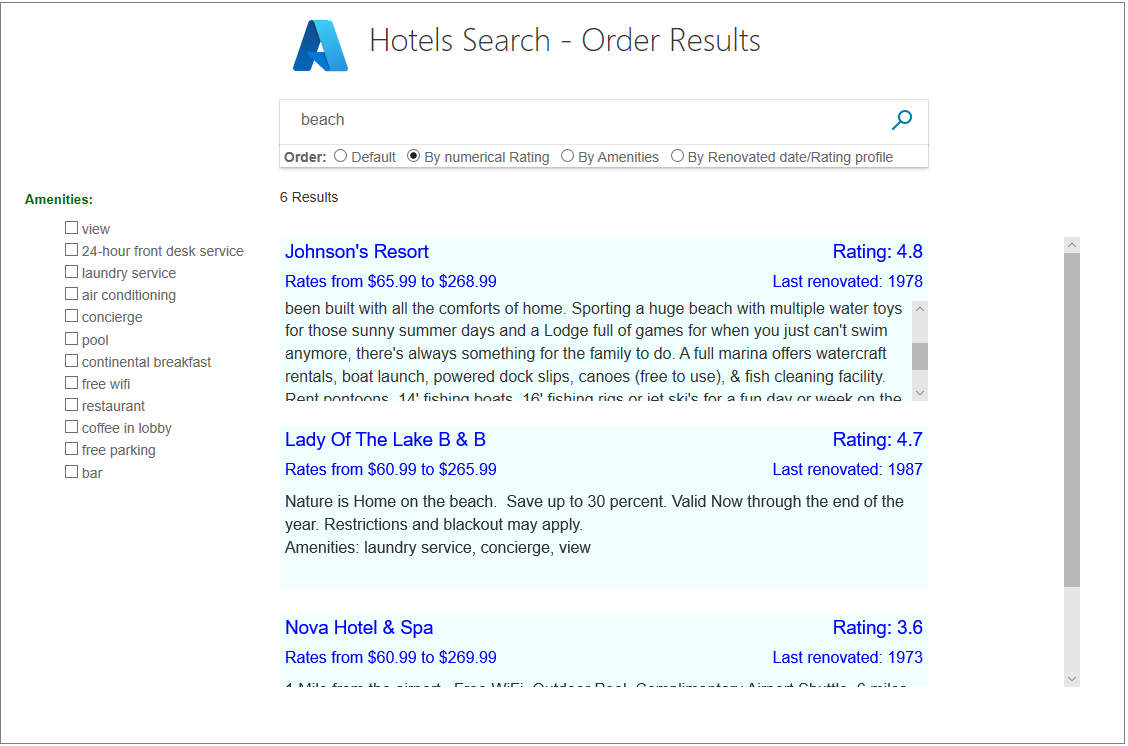
이제 "편의 시설별" 프로필을 사용해 보세요. 다양한 편의 시설을 제공하고 해당 편의 시설을 갖춘 호텔이 결과 목록으로 승격되었는지 확인합니다.
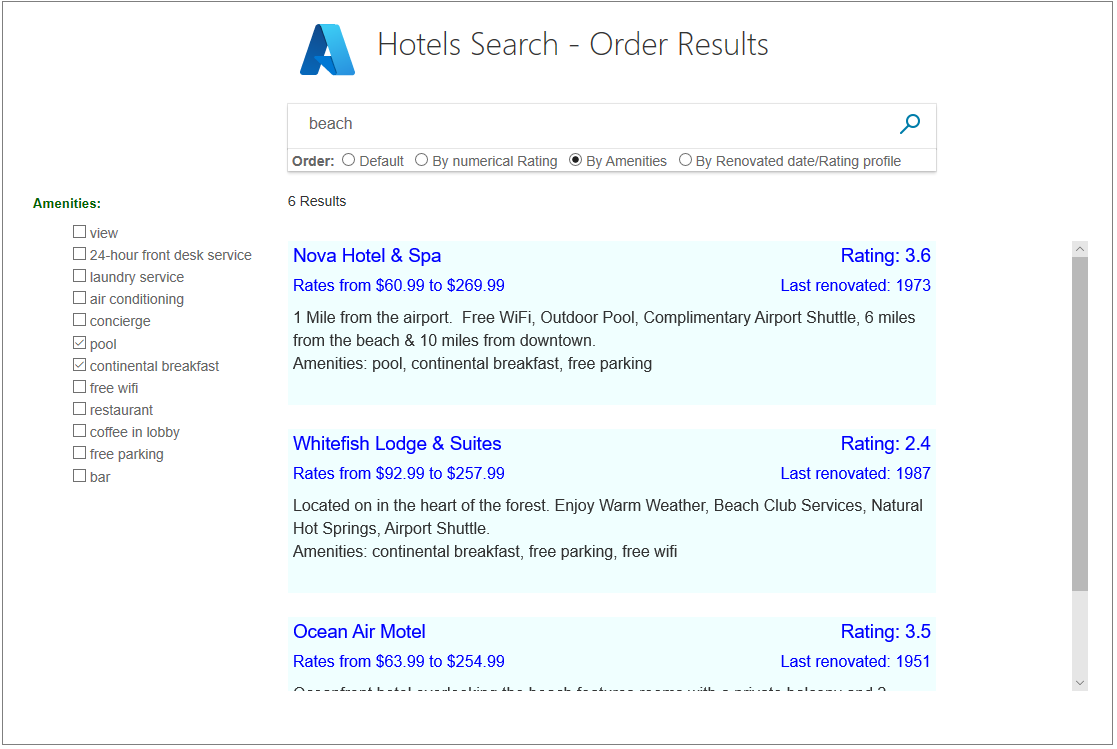
"By Renovated date/Rating profile"을 사용해 예상했던 결과를 얻을 수 있는지를 확인해 보세요. 최근에 개조 된 호텔만이 신선함을 높여야합니다.
리소스
자세한 내용은 Azure Cognitive Search 인덱스에 다음 점수 매기기 프로필 추가를 참조하세요.
주요 사항
이 프로젝트에서 다음 사항을 고려합니다.
- 사용자는 검색 결과가 순서대로 정렬될 것으로 예상하며, 가장 관련성이 가장 좋습니다.
- 정렬이 쉽도록 데이터를 구조화해야 합니다. 추가 코드 없이 정렬할 수 있도록 데이터가 구조화되지 않았기 때문에 "가장 저렴한"을 먼저 쉽게 정렬할 수 없었습니다.
- 더 높은 순서 수준에서 동일한 값을 가진 결과를 구분하기 위해 정렬에 많은 수준이 있을 수 있습니다.
- 일부 결과는 오름차순(예: 지점에서 멀리 떨어져 있음)으로 정렬되고 일부는 내림차순(예: 게스트 등급)으로 정렬되는 것이 당연합니다.
- 데이터 집합에 대해 숫자 비교를 사용할 수 없거나 충분히 스마트하지 않은 경우 점수 매기기 프로필을 정의할 수 있습니다. 각 결과를 채점하면 결과를 지능적으로 정렬하고 표시하는 데 도움이 됩니다.
다음 단계
이 일련의 C# 자습서를 완료했습니다. Azure Cognitive Search API에 대한 귀중한 지식을 얻었어야 합니다.
추가 참조 및 자습서를 보려면 Microsoft Learn 학습 카탈로그 또는 Azure Cognitive Search 설명서의 다른 자습서를 찾아보는 것이 좋습니다.